小工具的代码
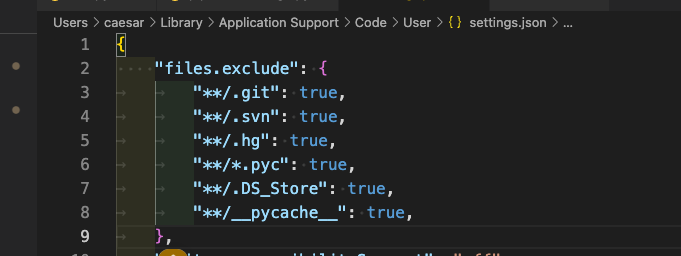
在vscode中隐藏部分文件
import sys
print(sys.path)
sys.path.insert(0,'/data/zhangxy/dev_fastgpt/GoMate')
查看系统版本号
# 1. 停止和启动 docker compose
docker-compose down
docker-compose up -d

# 2. 拉取镜像
docker pull registry.cn-hangzhou.aliyuncs.com/fastgpt_docker/m3e-large-api:latest

# 3. 查看docker镜像
docker ps

# 4. 修改docker内部文件后,使用restart
docker restart m3e-large-api

docker stop m3e-large-api

docker rm m3e-large-api

docker run -d -p 6008:6008 -e SK_KEY='sk-aaabbbcccdddeeefffggghhhiiijjjkkk' --name m3e-large-api registry.cn-hangzhou.aliyuncs.com/fastgpt_docker/m3e-large-api:latest

docker run -d -p 6008:6008  --gpus "device=4" --name m3e registry.cn-hangzhou.aliyuncs.com/fastgpt_docker/m3e-large-api:latest

# 5.进入docker
docker exec -it m3e-large-api sh

# 6.传输文件到docker
docker cp localembedding.py m3e-large-zh:/app/

# 7. 可以展示出docker run执行的是哪个代码
docker inspect cd9
# TODO 如何修改docker中执行的是哪个程序?
查看ubuntu任务信息
ps -fp 1972824
在linux服务器上使用命令行下载百度网盘中的文件 - 拎壶冲AR - 博客园 (cnblogs.com)
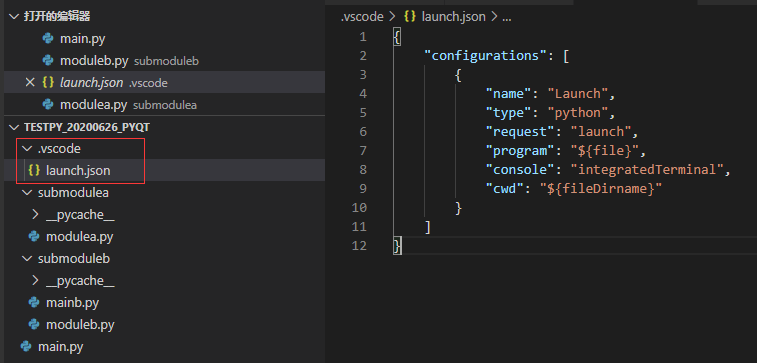
在vscode中debug模式的代码,.vscode文件夹launch.json
{
    "version": "0.2.0",
    "configurations": [
        {
            "name": "Python Debugger: Django",
            "type": "debugpy",
            "request": "launch",
            "args": [
                "runserver",
                "0.0.0.0:8765",
                "--noreload"
            ],
            "django": true,
            "autoStartBrowser": false,
            "program": "${workspaceFolder}/aiflow/manage.py",
            "justMyCode": false,
        },
        {
            "name": "Python: Celery",
            "type": "debugpy",
            "request": "launch",
            "module": "celery",
            "console": "integratedTerminal",
            "args": [
              "-A",
              "aiflow",
              "worker",
              "-l",
              "info",
              "--pool=solo"
            ],
            "env": {
                "DJANGO_SETTINGS_MODULE": "aiflow.settings"
            },
            "cwd": "${workspaceFolder}/aiflow",
        },
        {
            "name": "Python Debugger: Current File",
            "type": "debugpy",
            "request": "launch",
            "program": "${file}",
            "console": "integratedTerminal",
            "justMyCode": false,
            "env": {
                "PYTHONPATH": "${workspaceFolder}"
            }
        },
        {
            "name":"Python Debugger: Startup with Arg",
            "type":"debugpy",
            "request": "launch",
            "program": "${workspaceFolder}/startup.py",
            "args": ["-a"],
            "console": "integratedTerminal",
            "justMyCode": false
        }
    ],
    "compounds": [
        {
            "name": "Compound",
            "configurations": []
        }
    ],
}
在 CentOS 系统中,你可以按照以下步骤安装 cuDNN:
首先,从 NVIDIA 官方网站下载 cuDNN 的 RPM 包。我看到你已经有了下载链接,所以你可以直接使用 `wget` 命令下载:
```bash
wget https://developer.nvidia.com/downloads/compute/cudnn/secure/8.9.2/local_installers/11.x/cudnn-local-repo-rhel7-8.9.2.26-1.0-1.x86_64.rpm
```
然后,使用 `rpm` 命令安装下载的 RPM 包:
```bash
sudo rpm -i cudnn-local-repo-rhel7-8.9.2.26-1.0-1.x86_64.rpm
```
这会在 `/etc/yum.repos.d/` 目录下添加一个 cuDNN 的 yum 仓库。
然后,使用 `yum` 命令从添加的仓库中安装 cuDNN:

安装cudnn
```bash
sudo yum clean all
sudo yum install libcudnn8 libcudnn8-devel
```
注意:以上步骤可能会将 cuDNN 安装到默认的 CUDA 目录(例如 `/usr/local/cuda`)而不是你指定的 `/opt/cuda-11.8`。在这种情况下,你可能需要在环境变量中添加正确的路径,或者在需要的地方使用正确的路径。
验证 cuDNN 是否已经安装成功:
```bash
cat /usr/include/cudnn_version.h | grep CUDNN_MAJOR -A 2
```
以上步骤应该可以在 CentOS 7.9 中安装 cuDNN。不过,如果在执行过程中遇到任何问题,欢迎继续提问,我会尽力帮助你。
# 添加同级目录
或者
sys.path.append('./')
# 添加往上一级目录
sys.path.append('../')
# 添加往上两级目录
sys.path.append('../../')
# 添加往上三级目录
sys.path.append('../../../')
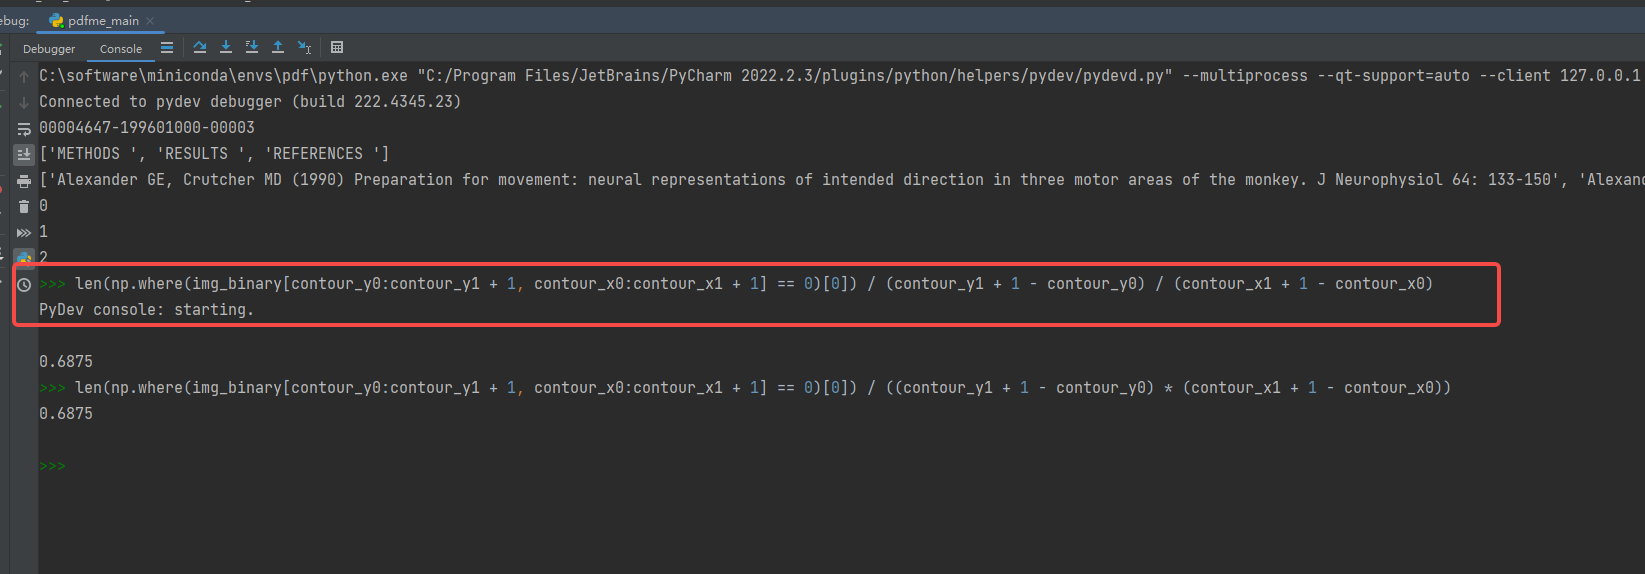
连接服务器,但是代码运行在类似虚拟机的东西,使用以下方法进行debug。和pdb的方式区别开来
从hugging face上只下载pytorch模型
git lfs install
GIT_LFS_SKIP_SMUDGE=1 git clone https://huggingface.co/facebook/opt-66b
cd opt-66b
git lfs pull --include="pytorch_model*.bin"
git lfs ls-files#查看哪些文件已经下载
如何快速下载huggingface模型——全方法总结 - 知乎 (zhihu.com)
pip install modelscope
modelscope download --model deepseek-ai/DeepSeek-R1-Distill-Llama-70B --local_dir /root/models/ds_70_bf16
export HF_ENDPOINT=https://hf-mirror.com; export HUGGINGFACE_HUB_TIMEOUT=300
huggingface-cli download --resume-download --local-dir-use-symlinks False THUDM/chatglm3-6b-32k --local-dir /root/autodl-tmp/chatglm3-6b-32k --exclude "*.msgpack" "*.onnx" "*.bin" "*.ot" "*.h5" --token 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
# 下载指定文件
huggingface-cli download unsloth/r1-1776-GGUF \
--include "Q2_K/*" \
--exclude "*.msgpack" "*.onnx" "*.bin" "*.ot" "*.h5" \
--local-dir "/Volumes/Elements SE/r1-1776-GGUF-Q2-K" \
--token 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
# 下载仓库
huggingface-cli download Qwen/QwQ-32B \
--local-dir /usr/share/ollama/qwq \
--exclude "*.msgpack" "*.onnx" "*.bin" "*.ot" "*.h5" \
--token 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
huggingface-cli download --repo-type dataset --resume-download lsb/enwiki20230101 --local-dir-use-symlinks False --local-dir /home/ma-user/work/ModelLink/dataset/enwiki
或者用modelscope
# 仓库中下载某个文件
modelscope download \
--model unsloth/DeepSeek-R1-Distill-Llama-70B-GGUF \
DeepSeek-R1-Distill-Llama-70B-Q8_0/DeepSeek-R1-Distill-Llama-70B-Q8_0-00001-of-00002.gguf \
--local_dir /usr/share/ollama/DeepSeek-R1-Distill-Llama-70B-GGUF/
#在仓库中下载多个文件
modelscope download \
--model unsloth/DeepSeek-R1-Distill-Llama-70B-GGUF \
--include "DeepSeek-R1-Distill-Llama-70B-Q8_0/*.gguf" \
--local_dir /usr/share/ollama/DeepSeek-R1-Distill-Llama-70B-GGUF
from modelscope.hub.snapshot_download import snapshot_download
model_dir = snapshot_download('qwen/Qwen1.5-7B-Chat', cache_dir='/data/share/Qwen1.5_7B_Chat')
ps -u -p 20139# 查看pid对应的用户
lsof -i :19980 查看端口接听
要在运行 shell 脚本时使用断点进行调试,你可以在 Python 脚本中插入以下代码来启动调试器:

python
Copy code
import pdb
pdb.set_trace()
当程序执行到这一行时,它将在命令行中启动 Python 调试器,允许你单步执行代码、检查变量等。然后,你可以使用以下命令操作调试器:

n:执行下一行代码
c:继续执行,直到遇到另一个断点或程序结束
q:退出调试器
p variable:打印变量的值
l:显示当前执行的代码周围的行
在centos上安装不同版本cuda
-
在nvidia官网上寻找cuda11.1的下载链接
-
将其安装在一个新的文件夹中,不安装驱动
-
在bashrc文件中添加以下内容
-
export CUDA_HOME_11_1=/opt/cuda-11.1
-
export PATH=$CUDA_HOME_11_1/bin:$PATH
-
export LD_LIBRARY_PATH=$CUDA_HOME_11_1/lib64:$LD_LIBRARY_PATH
-
寻找cuda11.2的安装位置,完成cuda不同版本的切换
spark集群基础命令
sinfo -p p-A100 # 查看能用的gpu
squeue -o "%.10i %.9P %.15j %.8u %.2t %.10M %.6D %R %b %C" -p p-A100 # 查看当前任务占用的GPU
squeue -u wangbenyou
scancel 65280
srun --job-name=ANON_DEBUG_CODE --gres=gpu:1 --reservation=root_78 -w pgpu19 -p p-A100 -c 6 --pty bash
srun --job-name=ANON_DEBUG_CODE --gres=gpu:1 -w pgpu11 -p p-A100 -c 6 --pty bash
srun --job-name=testone --gres=gpu:1 --reservation=root_47 -w pgpu17 -p p-A100 -c 6 --pty bash
source bash_scripts/init_env.sh
bash bash_scripts/train/huatuo_muti_machine_node19_singleNode.sh
bash bash_scripts/train/zxy_test.sh # megatron框架效率对比
nohup bash bash_scripts/train/zxy_test.sh > 1.logs 2>&1&
使用分桶时,需要在fp16下方,加 --collate-dynami-max-len\
pip list --format=freeze > requirements.txt导出不带路径包
conda env export > environment.yml
conda env create -f environment.yml


服务器端口占用检测   lsof -i :5000
1. 在python代码中有这个目录,但就是引用不到,就是环境中有重名的包,删除掉重名包或者修改代码引用名称即可
2. 图解vscode远程开发+免密登录 - 知乎 (zhihu.com)
chmod 700 ~/.ssh
chmod 600 ~/.ssh/authorized_keys
sudo vim /etc/ssh/sshd_config
PubkeyAuthentication yes
AuthorizedKeysFile .ssh/authorized_keys关闭selinxu,编辑 /etc/selinux/config 文件,修改 SELINUX 参数设置为 enforcing、permissive 或 disabled。
3. 关于centos上的gcc软连接的代码 https://blog.csdn.net/abrahamss/article/details/124147679
「效率」使用VScode连接远程服务器进行开发 - 知乎 (zhihu.com)
# 爬虫框架
def main(word):
    # 1.指定url
    post_url = 'https://fanyi.baidu.com/v2transapi?from=zh&to=en'
    # post_url = 'https://fanyi.baidu.com/sug'
    # 2.进行UA伪装
    headers = {'User - Agent': 'Mozilla / 5.0(Windows NT 10.0;Win64;x64) AppleWebKit / 537.36(KHTML, likeGecko) Chrome / 110.0.0.0 Safari / 537.36'}
    # 3.post请求参数处理,同get请求
    # data = {'kw': 'dog'}
    data = {'from': 'zh',
            'to': 'en',
            'query': word,
            # 'transtype': 'realtime',
            'simple_means_flag': '3',
            # 'sign': '590553.909800',
            'token': 'cfca06d9fc63eb6dfc95ec9a9ea249f0',
            'domain': 'common'}
    # 4.请求发送
    response = requests.post(url=post_url, data=data, headers=headers)
    # 5.处理响应数据(需要观察Content-Type)
    dic_obj = response.json()
    logging.info(dic_obj)
    fp = open(f'./{word}.json', 'w', encoding='utf-8')
    json.dump(dic_obj, fp=fp, ensure_ascii=False)
conda环境打包迁移
可以从官网下载压缩包,解压后运行如下命令安装python setup.py install
将本地代码推到已有的仓库中
Push an existing folder
cd existing_folder# 对应修改
git init
git remote add origin https://git.cnpiec.com.cn/research/recommendation-system/keyword-based_gat_for_content_recommendation_cpu.git # 对应修改
git add .
git commit -m "Initial commit"
git push -u origin master
git教程
https://www.cnblogs.com/chaoxiZ/p/9714085.html

# 只改最后的tianyangjie为分支名字即可
# 双重字典,ast转列表,import ast
# 遍历文件夹
def get_all_filenames(files_path):
    list = []
    for root, ds, fs in os.walk(files_path):
        for f in fs:
            fullname = os.path.join(root, f)
            list.append(fullname)
   return list
pip install Cython==0.27.3 -i https://pypi.tuna.tsinghua.edu.cn/simple --trusted-host pypi.tuna.tsinghua.edu.cn --default-timeout=1800

TEMPDIR=/data2/sunjiaze/tmp pip install XXXX -i https://pypi.tuna.tsinghua.edu.cn/simple --default-timeout=1800
pip config set global.index-url https://pypi.tuna.tsinghua.edu.cn/simple

vim ~/.condarc
git提交代码
方式一:
    i,进入编辑状态,写一下本次提交修改的内容
    写完后,按esc,退出编辑状态
    然后输入:x,回车,保存完毕
方式二:
    git commit -m abc,abc即为注释
# 正则匹配子标签,关注点-产品
re_lt = re.findall(r'[\.a-zA-Z0-9\u2E80-\u9FFF,_\-]+', text)
re_lt = re.findall(r'[\.a-zA-Z0-9\u2E80-\u9FFF,_\-]+', text)
a = '*iman permana,maksum'
b = '*iman permana,maksum(department of chemistry'
pattern = f'[{a}\(]'
if re.findall(pattern, b):  # 这句能执行
    c = re.split(pattern, b, 1)
    d = b.split(pattern, 1)# 这句执行不了
# 上下拼接
output_all = pd.concat([output_all, output_part], axis=0, ignore_index=True)
output_part.drop(output_part.index, inplace=True)
# 去重有二者之一,有空值的行
df.dropna(axis=0, how='any', thresh=None, subset=["orgs_w", "orgs_o"], inplace=True)
# 去重
两个字段都为空值的字段
out.drop_duplicates(subset=["single_w_name", "single_ds_name"], inplace=True)
output_all.drop_duplicates('content', inplace=True)
output_all.reset_index(drop=True)

#删除布尔索引的元素
data_all.drop(data_all[(data_all["type"] == "")].index, inplace=True)
# eval字典 temp_dic = eval(context_series.iloc[i], {"true": True, "false": False, "null": None})
# 布尔索引 data.drop(data[(data.sentence == "0")].index, inplace=True)
# 左右拼接parent_data = pd.merge(parent_data, subtag_data_process, on="id", how="left")father_classes = father_classes.iloc[1:4, -1].values.tolist()
# 统计列数value_counts = view_pred_df['实际标签'].value_counts()
for name, each in value_counts.items():
#通过iloc进行行的截取,列的截取
# 备份一份gold数据,通过这种方式取出数据
model_data = df_n[['标签', 'sentence_format']]
gold_data = df_n[['id', '标签_simple', 'sentence_format']]
train_data = model_data.head(train_num)
test_data = model_data.tail(toatl_num - train_num)
gold_data = gold_data.iloc[test_data.index]
将两列转换为字典
d = df.set_index('A')['B'].to_dict()
rule_tmp_s=df.rule_path.map(lambda x:eval(x))
df["rule_path"]=rule_tmp_s
type_s=df.rule_path.map(lambda x:x[-2])
df["type"]=type_s
nihao
大规模集群管理GPU的代码
sinfo -p p-A100 # 查看能用的gpu
squeue -o "%.10i %.9P %.15j %.8u %.2t %.10M %.6D %R %b %C" -p p-A100 # 查看当前任务占用的GPU squeue -u wangbenyou
scancel 65280
srun --job-name=ANON_DEBUG_CODE --gres=gpu:1 --reservation=root_78 -w pgpu19 -p p-A100 -c 6 --pty bash
srun --job-name=testone --gres=gpu:1 --reservation=root_47 -w pgpu17 -p p-A100 -c 6 --pty bash
srun --job-name=ANON_DEBUG_CODE --gres=gpu:1 -w pgpu11 -p p-A100 -c 6 --pty bash
source bash_scripts/init_env.sh bash bash_scripts/train/huatuo_muti_machine_node19_singleNode.sh
bash bash_scripts/train/zxy_test.sh # megatron框架效率对比
nohup bash run_gemini.sh > 1.logs 2>&1&
slide_label = data_part["label"].tolist()[start:end]
# 将列表展开成''0','1','0'
slide_label = [list(w) for w in slide_label]
# 转换成numpy,其中每个元素转换成int类型
slide_label = np.array(slide_label).astype(int)
if len(slide_label.shape) > 1:
   slide_label = np.sum(slide_label, axis=0)
# 取出字典中最小的key,然后取出字典中该key对应的value按照len进行排序,然后pop出这个内容。
cus_one_distance = defaultdict(list)
min_key = min(cus_one_distance.keys())
match_sentence = sorted(cus_one_distance[min_key], key=len).pop()

- gitlab在分支上修改完毕,必须先merge到main分支,然后再提交到远程的main分支
- linux服务器激活环境 source activate base
- 传输文件到服务器 scp -P 37889 cc.en.300.bin.gz root@region-3.autodl.com:/root/HFT-CNN/Word_embedding/
-
下载服务器文件到本地 scp -P 37889 root@region-3.autodl.com:/root/HFT-CNN/Word_embedding/cc.en.50.bin /home/zxy/deeplearning/cc.en.50.bin
- crontab设置linux的定时任务
- ~是用户主目录,也叫根路径, /是源路径,比~更远
-
*/1 * * * * /home/megaview/anaconda3/envs/first/bin/python /home/megaview/ZXY/test.py >> /home/megaview/ZXY/a.log 每隔1分钟,调用第一路径上的python,执行第二路径的test.py,生成文件在第三路径的a.log
def find_dir(dir_name):
    file_list = []
    for path_name, dir, files_name in os.walk(dir_name):
        for file in files_name:
            file_list.append(os.path.join(path_name, file))
    return file_list

if __name__ == "__main__":
    file_list = find_dir("./专题数据")
    print(file_list)
# 获取双层文件夹
- 主规则:(到(周六|周五)|晚|一会.{0,1}再|((过.{0,5}分钟))).{0,15}(联系|沟通|电话|打给(你|您)|给(你|您)打)
- 主规则:(晚|过会|下班|一会|周末|待会|明天).{0,10}(打给你|给你打|聊|沟通|打给我)
- 主规则:(周末|下周一|时间|方便|下午|((一|二|两|三|四|五|六|七|八|九|十)点)).{0,7}再.{0,5}(联系|电话|沟通|打|问)
- 公用下文规则:下文:^.{0,2}(好|行|可|嗯)
画图
plt.figure(figsize=(16.5, 10.5))
plt.plot(np.arange(1, 31, 1), train_loss_np)
plt.xlabel('epoch')
plt.ylabel('train_loss')
plt.show()
    if torch.cuda.is_available():
        device = torch.device("cuda")
    else:
        device = torch.device("cpu")
    model=model.to(device)
    mask = mask.to(device)
    input_id = input_id.to(device)
import ast
    testa = ast.literal_eval(testa)# 使用ast模块解析字符串为本来的格式
用这个方法,获取mysql数据库中,一行的每列的内容
temp_dt = {
                "authors_d": line["authors_d"],
                "authors_raw_affiliation": line["authors_raw_affiliation"],
                "c1": line["c1"],
                "authors_with_affiliations": line["authors_with_affiliations"],
                "affiliations": line["affiliations"]
            }
import time
import uuid
import pymysql
# 在python中调用mysql的代码

dbinfo = {
    "host": '192.168.',
    "port": 1,
    "user": 'wh',
    "password": 'Cf+',
    "database": 'scientific',
}


class DB:

    def __init__(self, dbinfo):
        self.db = pymysql.connect(cursorclass=pymysql.cursors.DictCursor, **dbinfo)
        self.cursor = self.db.cursor()

    def select(self, sql):
        self.cursor.execute(sql)
        result = self.cursor.fetchall()
        return result

    def execute(self, sql, data=""):
        try:
            if data == "":
                self.cursor.execute(sql)
                self.db.commit()
            self.cursor.execute(sql, data)
            return self.cursor.lastrowid
            print("insert successful!")
        except Exception as e:
            print(e)
            self.db.rollback()

    def commit(self):
        self.db.commit()

    def close(self):
        self.cursor.close()
        self.db.close()


class Publication_Grant_Strandard:
    def __init__(self, batchId, datasource, df):
        self.batchId = batchId  # 请求批次号
        self.data_source = datasource  # 数据来源 0 -> 论文数据
        self.df = df
        self.mysql = DB(dbinfo)

    def reg_fund_data_circulation(self):
        '''
            # todo 匹配和写入sql
            处理reg_fund_data_circulation字段
        '''
        # 读取线上的规范文档
        Normative_data = self.mysql.select(f"Select * from reg_fund_data ")
        # todo 查询指定batch_id数据,将其整理为df,此处直接写df
        process_data = self.mysql.select(f"Select * from reg_src_fund_data WHERE batch_id={self.batchId}")
        # todo 将df数据与规范文档匹配,筛选出匹配的数据
        pass
        # 写入表中
        name_ens = self.df["基金英文规范名"].tolist()
        name_zhs = self.df['基金中文规范名'].tolist()
        fund_types = self.df['基金类别'].tolist()
        batch_id = self.batchId
        pub_ids = self.df['文献唯一id'].tolist()
        # todo 接入景芳的包含基金名字的基金信息,先伪造一个
        fund_datas = 'e.贫困儿童救助专项基金(Special fund for poor children)'
        for i in range(len(self.df)):
            create_time = time.strftime('%Y-%m-%d %H:%M:%S', time.localtime(time.time()))
            temp_id = uuid.uuid1()
            fund_id = self.create_fund_id(temp_id)
            # 插入数据库命令
            insert_cmd_std = "insert into reg_fund_data_circulation" \
                             "(data_id, name_en, name_zh, " \
                             "fund_type, batch_id, pub_id, " \
                             "create_time,fund_data) " \
                             "values (%s,%s,%s,%s,%s,%s,%s,%s)"
            # 要插入数据库数据
            insert_data_std = (
                {fund_id}, {name_ens[i]}, {name_zhs[i]},
                {fund_types[i]}, {batch_id},
                {pub_ids[i]}, {create_time}, {fund_datas},
            )
            # 获取存入流转表时返回的主键id
            alias_id = self.mysql.execute(insert_cmd_std, insert_data_std)
            self.mysql.commit()
            return alias_id


if __name__ == '__main__':
    standard = Publication_Grant_Strandard(2022110800323, 2, df)  # 0是论文,1是专利,2是基金
    standard.process()

 浙公网安备 33010602011771号