NIO
Java NIO(New IO 或 Non Blocking IO)是从 Java 1.4 版本开始引入的一个新的 IO API,可以替代标准的 Java IO API。NIO 支持面向缓冲区的、基于通道的 IO 操 作。NIO 将以更加高效的方式进行文件的读写操作。

基本概念
- BIO(阻塞IO)
在进行同步 I/O 操作时,如果读取数据,代码会阻塞直至有可供读取的数据。同样,写入调用将会阻塞直至数据能够写入。
在Web项目中,传统的 Server/Client 模式会基于 ”TPR (Thread per Request)“,服务器会为每个客户端请求建立一个线程,由该线程单独负责处理一个客户请求。这种模式带来的一个问题就是线程数量的剧增,大量的线程会 增大服务器的开销。大多数的实现为了避免这个问题,都采用了线程池模型,并设置线程池线程的最大数量。
这并不是完美的,如果线程池中有 10 个线程,而有 10 个用户都在进行大文件下载,会导致第 11 个用户的请求无法及时处理,即便第 11 个用户只想请求一个几 KB 大小的页面。
- NIO(非阻塞IO)
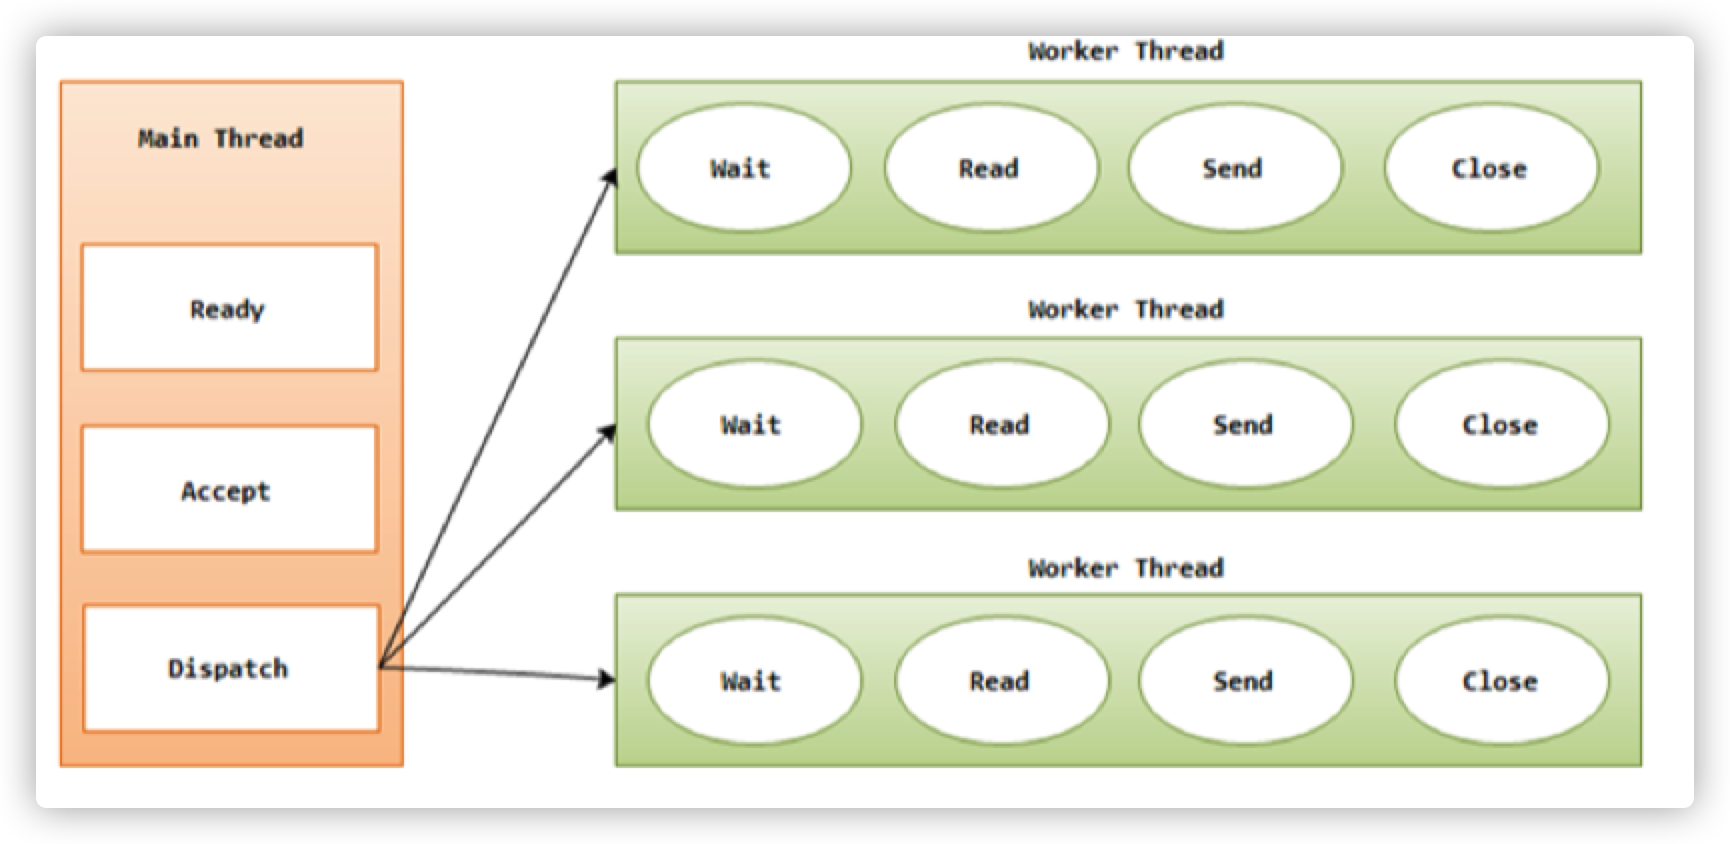
NIO 中采用了基于 「Reactor 模式」的工作方式,I/O 调用会去注册特定的 I/O 事件,比如可读数据到达,新的套接字连接等等;在发生特定 事件时,系统再通知我们。
NIO 中实现非阻塞 I/O 的核心对象就是 Selector, Selector 就是注册各种 I/O 事件地方,而且当我们感兴趣的事件发生时,就是这个对象告诉我们所发生的事件。
当有读或写等任何注册的事件发生时,可以从 Selector 中获得相应 的 SelectionKey,同时从 SelectionKey 中可以找到发生的事件和该事件所发生的具 体的 SelectableChannel,以获得客户端发送过来的数据。
如下图所示:
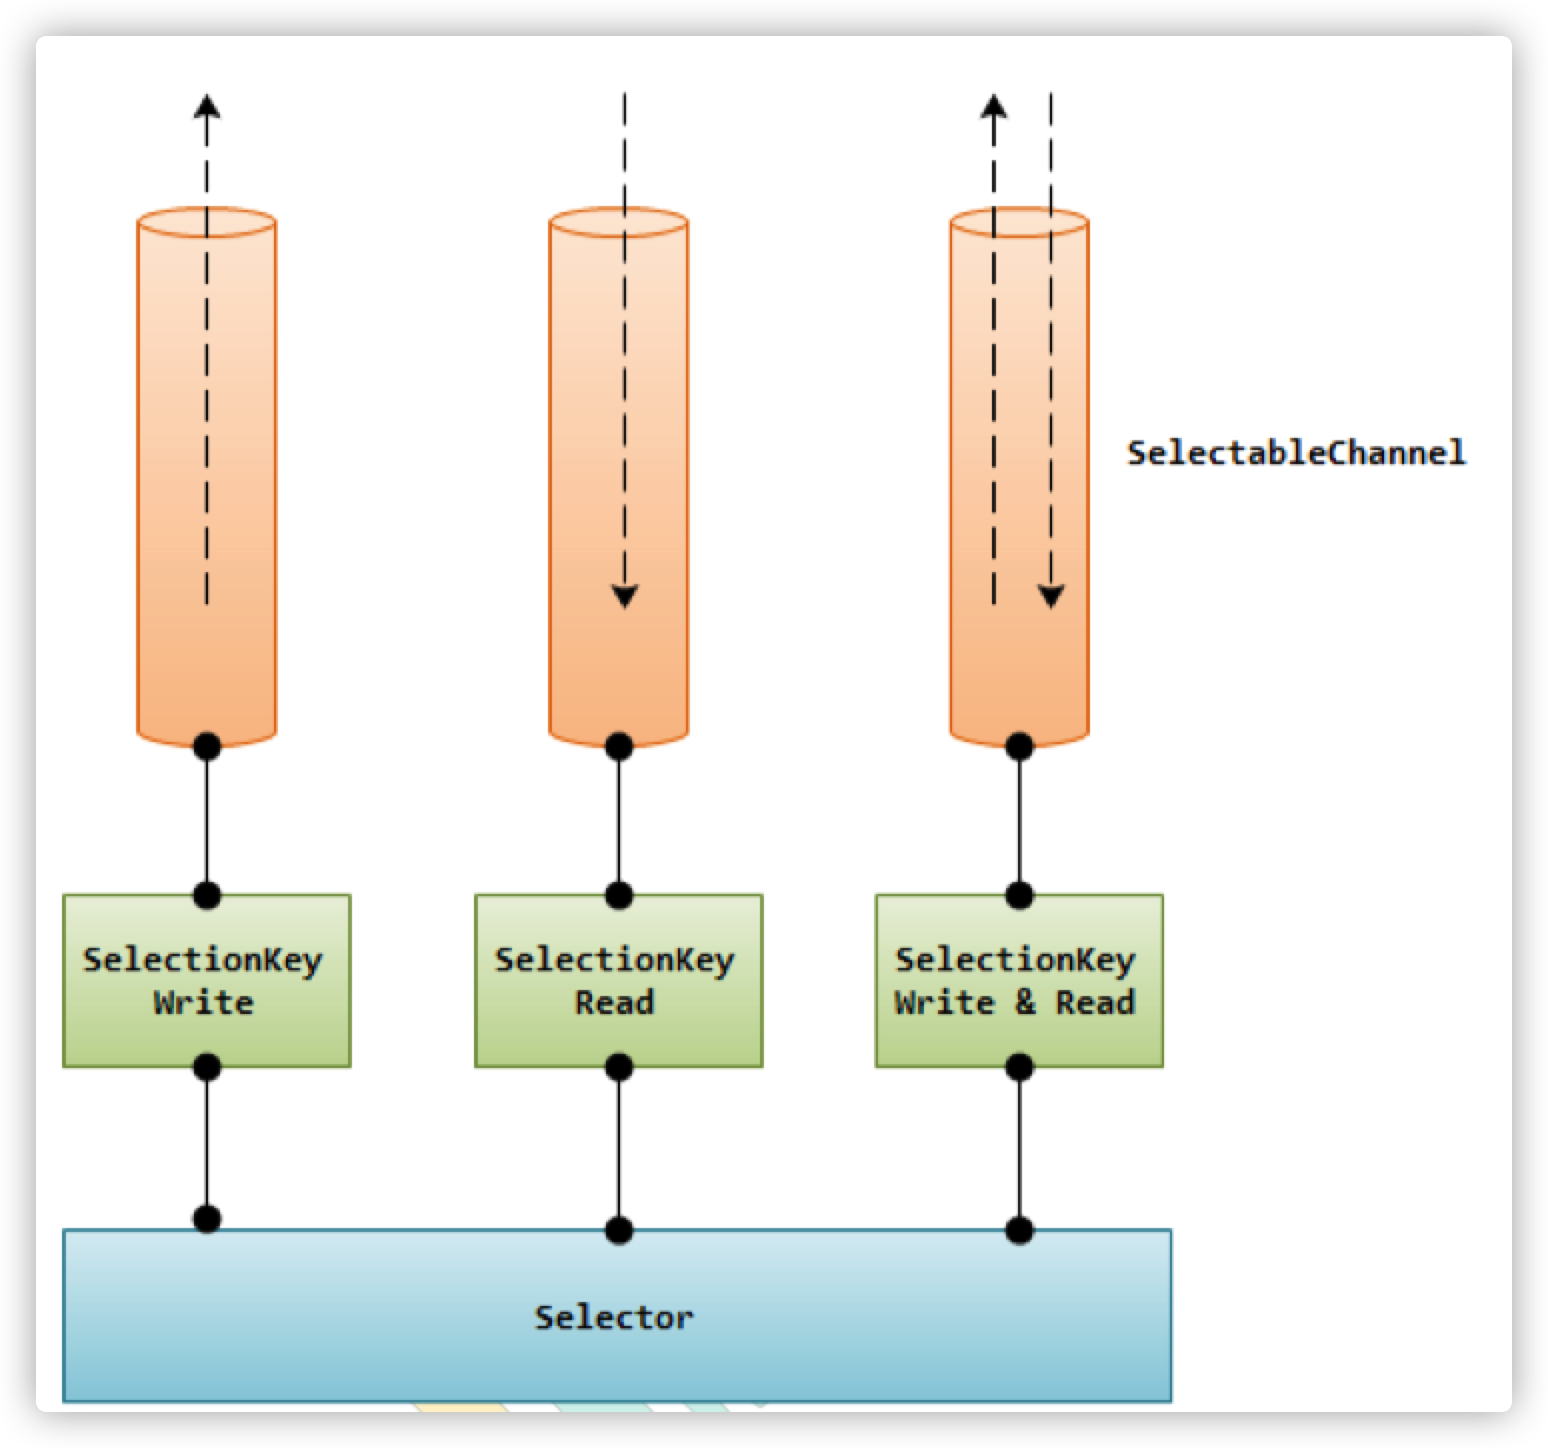
非阻塞指的是 IO 事件本身不阻塞,但是获取 IO 事件的 select()方法是需要阻塞监听等待的。区别是阻塞的 IO 会阻塞在 IO 操作上, NIO 阻塞在事件获取上,没有事件就没有 IO。
NIO 的本质是延迟 IO 操作到真正发生 IO 的时候,而不是只要 IO 流打开了就一直等待 IO 操作。
Channel
Channel 是一个通道,可以通过它读取和写入数据,它就像水管一样用于在字节缓冲区和位于通道另一侧的实体(通常是一个文件或套接字)之间有效地传输数据。
通道与流的不同之处在于通道是双向的,一个流必须是 InputStream 或者 OutputStream 的子类,而通道可以用于读、写或者同时用于读写。因为 Channel 是全双工的,所以它可以比流更好地映射底层操作系统的 API。
NIO 中通过 channel 封装了对数据源的操作,通过 channel 我们可以操作数据源,但 又不必关心数据源的具体物理结构。这个数据源可能是多种的。比如,可以是文件, 也可以是网络 socket。在大多数应用中,channel 与文件描述符或者 socket 是一一 对应的。
// 源码
public interface Channel extends Closeable {

    public boolean isOpen();

    public void close() throws IOException;

}
不同的操作系统上通道实现(Channel Implementation)会有根本性的差异,所以Channel API 仅仅描述了可以做什么。通道实现经常使用操作系统的本地代码,以一种受控且可移 植的方式来访问底层的 I/O 服务。
所有数据都通过 Buffer 对象来处理。永远不会将字节直接写入通道中,而是将数据写入包含一个或者多个字节的缓冲区。同样,您不会直接 从通道中读取字节,而是将数据从通道读入缓冲区,再从缓冲区获取这个字节。
Java NIO 的通道类似流,但又有些不同 : 既可以从通道中读取数据,又可以写数据到通道。但流的读写通常是单向的。
- 通道可以异步地读写。
- 通道中的数据总是要先读到一个 Buffer,或者总是要从一个 Buffer 中写入。
NIO中重要的Channel,涵盖了 UDP 和 TCP 网络 IO,以及文件 IO
(1)FileChannel 从文件中读写数据。
(2)DatagramChannel 能通过 UDP 读写网络中的数据。
(3)SocketChannel 能通过 TCP 读写网络中的数据。
(4)ServerSocketChannel 可以监听新进来的 TCP 连接,像 Web 服务器那样。对 每一个新进来的连接都会创建一个 SocketChannel。
FileChannel
在使用 FileChannel 之前,必须先打开它。但是,我们无法直接打开一个 FileChannel,需要通过使用一个 InputStream、OutputStream 或 RandomAccessFile 来获取一个 FileChannel 实例。
使用allocate创建buffer默认处于写模式(data->buffer)
内部的position位于开始处,在Buffer部分详细讲解
-> Demo: 使用FileChannel读取数据
// 创建FileChanel
RandomAccessFile file = new RandomAccessFile("./1.txt", "rw");
FileChannel channel = file.getChannel();
// 创建Buffer
ByteBuffer buffer = ByteBuffer.allocate(1024);
//读取数据到buffer
int read = channel.read(buffer);
// 检查是否到达文件结尾
while (read != -1){
    System.out.println("读取了"+ read);
  // 反转读写模式
    buffer.flip();
    while (buffer.hasRemaining()){
        System.out.println((char)buffer.get());
    }
    buffer.clear(); // 调用 buffer.clear() 或 buffer.compact() 清除缓冲区内容
    read = channel.read(buffer);
}
// 记得关
file.close();
-> Demo: 使用FileChannel写数据
// 同上
RandomAccessFile file = new RandomAccessFile("./1.txt","rw");
FileChannel channel = file.getChannel();
ByteBuffer buffer = ByteBuffer.allocate(1024);
// 写入准备,清缓存
String data = "data";
buffer.clear();
// 写入数据
buffer.put(data.getBytes());
buffer.flip();
while (buffer.hasRemaining()){
    channel.write(buffer);
}
// 记得关
channel.close();
position
有时可能需要在 FileChannel 的某个特定位置进行数据的读/写操作,可以通过调用 position()方法获取 FileChannel 的当前位置。也可以通过调用 position(long pos)方 法设置 FileChannel 的当前位置。
long pos = channel.position();

channel.position(pos +123);
-
如果将位置设置在文件结束符之后,然后试图从文件通道中读取数据,读方法将返回-1 (文件结束标志)。
-
如果将位置设置在文件结束符之后,然后向通道中写数据,文件将撑大到当前位置并 写入数据。这可能导致“文件空洞”,磁盘上物理文件中写入的数据间有空隙。
size
FileChannel 实例的 size()方法将返回该实例所关联文件的大小。
long fileSize = channel.size();
truncate
可以使用 FileChannel.truncate()方法截取一个文件。
截取文件时,文件将中指定长度 后面的部分将被删除。
// 截取文件的前 1024 个字节。
channel.truncate(1024);
force
FileChannel.force()方法将通道里尚未写入磁盘的数据强制写到磁盘上。
出于性能方面的考虑,操作系统会将数据缓存在内存中,所以无法保证写入到 FileChannel 里的 数据一定会即时写到磁盘上。要保证这一点,需要调用 force()方法。
force()方法有一个 boolean 类型的参数,指明是否同时将文件元数据(权限信息等) 写到磁盘上。
transferTo 和 transferFrom
如果两个通道中有一个是 FileChannel,可以直接将数据从一个 channel 传输到 另外一个 channel。
->Demo: 通道间数据传输
RandomAccessFile file1= new RandomAccessFile("./1.txt", "rw");
FileChannel channel1 = file1.getChannel();

RandomAccessFile file2 = new RandomAccessFile("./2.txt", "rw");
FileChannel channel2 = file2.getChannel();

// 1->2
long position = 0;
long size = channel1.size();
// 两种方法
channel1.transferTo(position,size,channel2);
channel2.transferFrom(channel1, position, size);

file1.close();
file2.close();
Socket(NIO)
socket通道类可以运行非阻塞模式并且是可选择的,没有为每个 socket 连接使用一个线程的必要了,也避免了管理大量线程所需的上下文交换 开销。借助新的 NIO 类,一个或几个线程就可以管理成百上千的活动 socket 连接了 并且只有很少甚至可能没有性能损失。
所有的 socket 通道类(DatagramChannel、 SocketChannel 和 ServerSocketChannel)都继承了位于 java.nio.channels.spi 包中 的 AbstractSelectableChannel。我们可以用一个 Selector 对象来执行 socket 通道的就绪选择(readiness selection)。
请注意 DatagramChannel 和 SocketChannel 实现定义读和写功能的接口而 ServerSocketChannel 不实现。ServerSocketChannel 负责监听传入的连接和创建新 的 SocketChannel 对象,它本身从不传输数据。
- socket不会再次实现与之对应的 socket 通道类中的 socket 协议 API
全部 socket 通道类(DatagramChannel、SocketChannel 和 ServerSocketChannel)在被实例化时都会创建一个对等 socket 对象。
要把一个 socket 通道置于非阻塞模式,我们要依靠所有 socket 通道类的公有 超级类:SelectableChannel。
就绪选择(readiness selection)是一种可以用来查询通道的机制,该查询可以判断通道是否准备好执行一个目标操作,如读或写。非阻 塞 I/O 和可选择性是紧密相连的,那也正是管理阻塞模式的 API 代码要在 SelectableChannel 超级类中定义的原因。
设置或重新设置一个通道的阻塞模式是很简单的,只要调用 configureBlocking( )方 法即可,传递参数值为 true 则设为阻塞模式,参数值为 false 值设为非阻塞模式。可 以通过调用 isBlocking( )方法来判断某个 socket 通道当前处于哪种模式。
非阻塞 socket 通常被认为是服务端使用的,因为它们使同时管理很多 socket 通道变 得更容易。但是,在客户端使用一个或几个非阻塞模式的 socket 通道也是有益处的, 例如,借助非阻塞 socket 通道,GUI 程序可以专注于用户请求并且同时维护与一个或 多个服务器的会话。在很多程序上,非阻塞模式都是有用的。
偶尔地,我们也会需要防止 socket 通道的阻塞模式被更改。API 中有一个 blockingLock( )方法,该方法会返回一个非透明的对象引用。返回的对象是通道实现 修改阻塞模式时内部使用的。只有拥有此对象的锁的线程才能更改通道的阻塞模式。
ServerSocketChannel
ServerSocketChannel 是一个基于通道的 socket 监听器。它同我们所熟悉的 java.net.ServerSocket 执行相同的任务,不过它增加了通道语义,因此能够在非阻塞模式下运行。
-
由于 ServerSocketChannel 没有 bind()方法,因此有必要取出对等的 socket 并使用 它来绑定到一个端口以开始监听连接。我们也是使用对等 ServerSocket 的 API 来根据需要设置其他的 socket 选项。
-
ServerSocketChannel 的 accept()方法会返回 SocketChannel 类型对象, SocketChannel 可以在非阻塞模式下运行。
-
其它 Socket 的 accept()方法会阻塞返回一个 Socket 对象。如果 ServerSocketChannel 以非阻塞模式被调用,当没有传入连接在等待时, ServerSocketChannel.accept( )会立即返回 null。
->Demo: ServerSocketChannel
// 端口
int port = 8888;
// buffer
ByteBuffer buffer = ByteBuffer.wrap("data".getBytes());
ServerSocketChannel ssc = ServerSocketChannel.open();
// bind
ssc.socket().bind(new InetSocketAddress(port));
// 非阻塞模式
ssc.configureBlocking(false);

while (true){
    SocketChannel socketChannel = ssc.accept();
    if (socketChannel == null) {
        System.out.println("等待连接");
        Thread.sleep(2000);
    }else {
        System.out.println(socketChannel.socket().getRemoteSocketAddress());
        // 指针归0
        buffer.rewind();
        socketChannel.write(buffer);
        socketChannel.close();
    }

}
SocketChannel
客户端socketChannel
SocketChannel 是基于 TCP 连接传输,实现了可选择通道,可以被多路复用的
-
对于已经存在的 socket 不能创建 SocketChannel
-
SocketChannel 中提供的 open 接口创建的 Channel 并没有进行网络级联,需要使 用 connect 接口连接到指定地址
-
未进行连接的 SocketChannle 执行 I/O 操作时,会抛出NotYetConnectedException
-
SocketChannel 支持两种 I/O 模式:阻塞式和非阻塞式
SocketChannel 支持异步关闭。如果 SocketChannel 在一个线程上 read 阻塞,另一个线程对该 SocketChannel 调用 shutdownInput,则读阻塞的线程将返回-1 表示没有读取任何数据;
如果 SocketChannel 在一个线程上 write 阻塞,另一个线程对该 SocketChannel 调用 shutdownWrite,则写阻塞的线程将抛出AsynchronousCloseException
SocketChannel 支持设定参数
SO_SNDBUF 套接字发送缓冲区大小

SO_RCVBUF 套接字接收缓冲区大小

SO_KEEPALIVE 保活连接

O_REUSEADDR 复用地址

SO_LINGER 有数据传输时延缓关闭 Channel (只有在非阻塞模式下有用)

TCP_NODELAY 禁用 Nagle 算法
->Demo: SocketChannel读取
 			SocketChannel socketChannel = SocketChannel.open(new InetSocketAddress("www.baidu.com", 80));
// 				两种方式创建
//        SocketChannel channel = SocketChannel.open();
//        channel.connect(new InetSocketAddress("http://www.bilibili.com", 80));

        socketChannel.isOpen(); // 测试 SocketChannel 是否为 open 状态 socketChannel.isConnected();
        // 测试 SocketChannel
        // 是否已经被连接 socketChannel.isConnectionPending();
        // 测试 SocketChannel 是否正在进行 连接 socketChannel.finishConnect();
        // 校验正在进行套接字连接的 SocketChannel 是否已经完成连接

        // 设置阻塞非阻塞
        socketChannel.configureBlocking(false);

        ByteBuffer byteBuffer = ByteBuffer.allocate(16);
        socketChannel.read(byteBuffer);
        socketChannel.close();
        System.out.println("read over");
DatagramChannel
DatagramChannel 对象关联DatagramSocket 对象。
DatagramChannel 是无连接的,每个数据报 (datagram)都是一个自包含的实体,拥有它自己的目的地址及不依赖其他数据报的 数据负载。
与面向流的的 socket 不同,DatagramChannel 可以发送单独的数据报给 不同的目的地址。同样,DatagramChannel 对象也可以接收来自任意地址的数据 包。每个到达的数据报都含有关于它来自何处的信息(源地址)
->Demo: 发送接受数据报
@Test
public void send() throws IOException, InterruptedException {
    DatagramChannel sendChannel = DatagramChannel.open();
    InetSocketAddress sendAddress = new InetSocketAddress("127.0.0.1", 8888);
    // 发送
    while (true) {
        ByteBuffer buffer = ByteBuffer.wrap("data".getBytes("UTF-8"));
        sendChannel.send(buffer, sendAddress);
        System.out.println("发送完成");
        Thread.sleep(1000);
    }
}

@Test
public void receiveDatagram() throws IOException {
    DatagramChannel receiveChannel = DatagramChannel.open();
    InetSocketAddress receiveAddress = new InetSocketAddress(8888);
    // 绑定
    receiveChannel.bind(receiveAddress);
    ByteBuffer buffer = ByteBuffer.allocate(1024);
    while (true) {
        SocketAddress socketAddress = receiveChannel.receive(buffer);
        buffer.flip();
        System.out.println(socketAddress.toString());
        System.out.println(Charset.forName("UTF-8").decode(buffer));
    }
}
->Demo: 连接
 @Test
    void testConnect() throws IOException {
        DatagramChannel connChannel = DatagramChannel.open();
        connChannel.bind(new InetSocketAddress(9998));
        connChannel.connect(new InetSocketAddress("127.0.0.1", 9999));
        connChannel.write(ByteBuffer.wrap("发包".getBytes("UTF-8")));
        ByteBuffer readBuffer = ByteBuffer.allocate(512);
        while (true) {
            try {
                readBuffer.clear();
                connChannel.read(readBuffer);
                readBuffer.flip();
                System.out.println(Charset.forName("UTF-8").decode(readBuffer));
            } catch (Exception e) {

            }
        }
    }
UDP 不存在真正意义上的连接,这里的连接是向特定服务地址用 read 和 write 接收 发送数据包。
read()和 write()只有在 connect()后才能使用,不然会抛 NotYetConnectedException 异常。用 read()接收时,如果没有接收到包,会抛 PortUnreachableException 异常。
Scatter/Gather
Java NIO 开始支持 scatter/gather,scatter/gather 用于描述从 Channel 中读取或 者写入到 Channel 的操作。
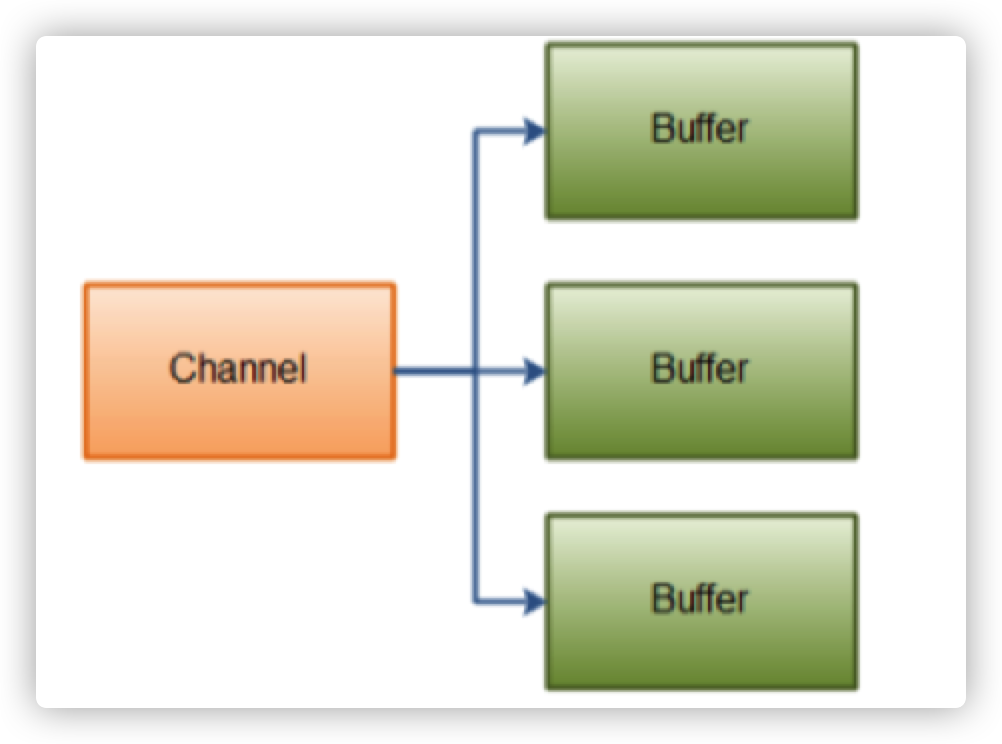
「分散」(scatter)从 Channel 中读取是指在读操作时将读取的数据写入多个 buffer 中。因此,Channel 将从 Channel 中读取的数据『分散(scatter)』到多个 Buffer 中。
「聚集」(gather)写入 Channel 是指在写操作时将多个 buffer 的数据写入同一个 Channel,因此,Channel 将多个 Buffer 中的数据「聚集(gather)」后发送到 Channel。
scatter / gather 经常用于需要将传输的数据分开处理的场合,例如: 传输一个由消息头 和消息体组成的消息,你可能会将消息体和消息头分散到不同的 buffer 中,这样你可以方便的处理消息头和消息体。
有点多路复用分解的意思奥
Scattering Reads
Scattering Reads 是指数据从一个 channel 读取到多个 buffer 中。如下图描述:
ByteBuffer header = ByteBuffer.allocate(128); ByteBuffer body = ByteBuffer.allocate(1024);

ByteBuffer[] bufferArray = { header, body };

channel.read(bufferArray);
-
read()方法按照 buffer 在数组中的顺序将从 channel 中读取的数据写入到 buffer,当 一个 buffer 被写满后,channel 紧接着向另一个 buffer 中写。
-
Scattering Reads 在移动下一个 buffer 前,必须填满当前的 buffer,这也意味着它 不适用于动态(大小不定)的消息。
Gathering Writes
ByteBuffer header = ByteBuffer.allocate(128); ByteBuffer body = ByteBuffer.allocate(1024);

//write data into buffers

ByteBuffer[] bufferArray = { header, body };
channel.write(bufferArray);
- write()方法会按照 buffer 在数组中的顺序,将数 据写入到 channel,注意只有 position 和 limit 之间的数据才会被写入。
- 如果 一个 buffer 的容量为 128byte,但是仅仅包含 58byte 的数据,那么这 58byte 的数 据将被写入到 channel 中,因此Gathering Writes 能较 好的处理动态消息。
Buffer
Java NIO 中的 Buffer 用于和 NIO 通道进行交互。数据是从通道读入缓冲区,从缓冲区写入到通道中的。
缓冲区本质上是一块可以写入数据,然后可以从中读取数据的内存。这块内存被包装 成 NIO Buffer 对象,并提供了一组方法,用来方便的访问该块内存。缓冲区实际上就是一个数组,在 NIO 库中,所有数据都是用缓冲区处理的。
在读取数据时,直接读到缓冲区中的; 在写入数据时,也是写入到缓冲区中的;任何时候访问 NIO 中的数据,都是将它放到缓冲区中。而在面向流 I/O 系统中,所有数据都是直接写入或者直接将数据读取到 Stream 对象中。
在 NIO 中,所有的缓冲区类型都继承于抽象类 Buffer,最常用的就是 ByteBuffer, 对于 Java 中的基本类型,基本都有一个具体 Buffer 类型与之相对应,它们之间的继 承关系如下图所示:

-
ByteBuffer
-
MappedByteBuffer
-
CharBuffer
-
DoubleBuffer
-
FloatBuffer
-
IntBuffer
-
LongBuffer
-
ShortBuffer
当向 buffer 写入数据时,buffer 会记录下写了多少数据。一旦要读取数据,需要通过 flip()方法将 Buffer 从写模式切换到读模式。在读模式下,可以读取之前写入到 buffer 的所有数据。一旦读完了所有的数据,就需要清空缓冲区,让它可以再次被写入。
buffer中的flip方法涉及到bufer中的Capacity,Position和Limit三个概念。(后面有详细讲解)
有两种方式能清空缓冲区:调用 clear()或 compact()方法。clear()方法会清空整个缓冲 区。compact()方法只会清除已经读过的数据。任何未读的数据都被移到缓冲区的起 始处,新写入的数据将放到缓冲区未读数据的后面。clear方法隐含了position置零的操作,所以不需要再次调用flip()。
->Demo: ByteBuffer&IntBuffer读写
@Test
    public void byteBuffer() throws IOException {
        RandomAccessFile file = new RandomAccessFile("./1.txt", "rw");
        FileChannel channel = file.getChannel();
        ByteBuffer buffer = ByteBuffer.allocate(1024);
        int bytesRead = channel.read(buffer);
        while (bytesRead != -1) {
            buffer.flip();
            while (buffer.hasRemaining()) {
                System.out.println((char) buffer.get());
            }
            buffer.clear();
            bytesRead = channel.read(buffer);
        }
        file.close();
    }

    @Test
    public void intBuffer(){
        IntBuffer buffer = IntBuffer.allocate(10);
        for (int i = 0; i < buffer.capacity(); i++) {
            buffer.put(i);
        }
        buffer.flip();
        while (buffer.hasRemaining()){
            System.out.println(buffer.get());
        }
    }
Buffer 的 capacity、position 和 limit
为了理解 Buffer 的工作原理,需要熟悉它的三个属性:
-
Capacity
-
Position
-
limit
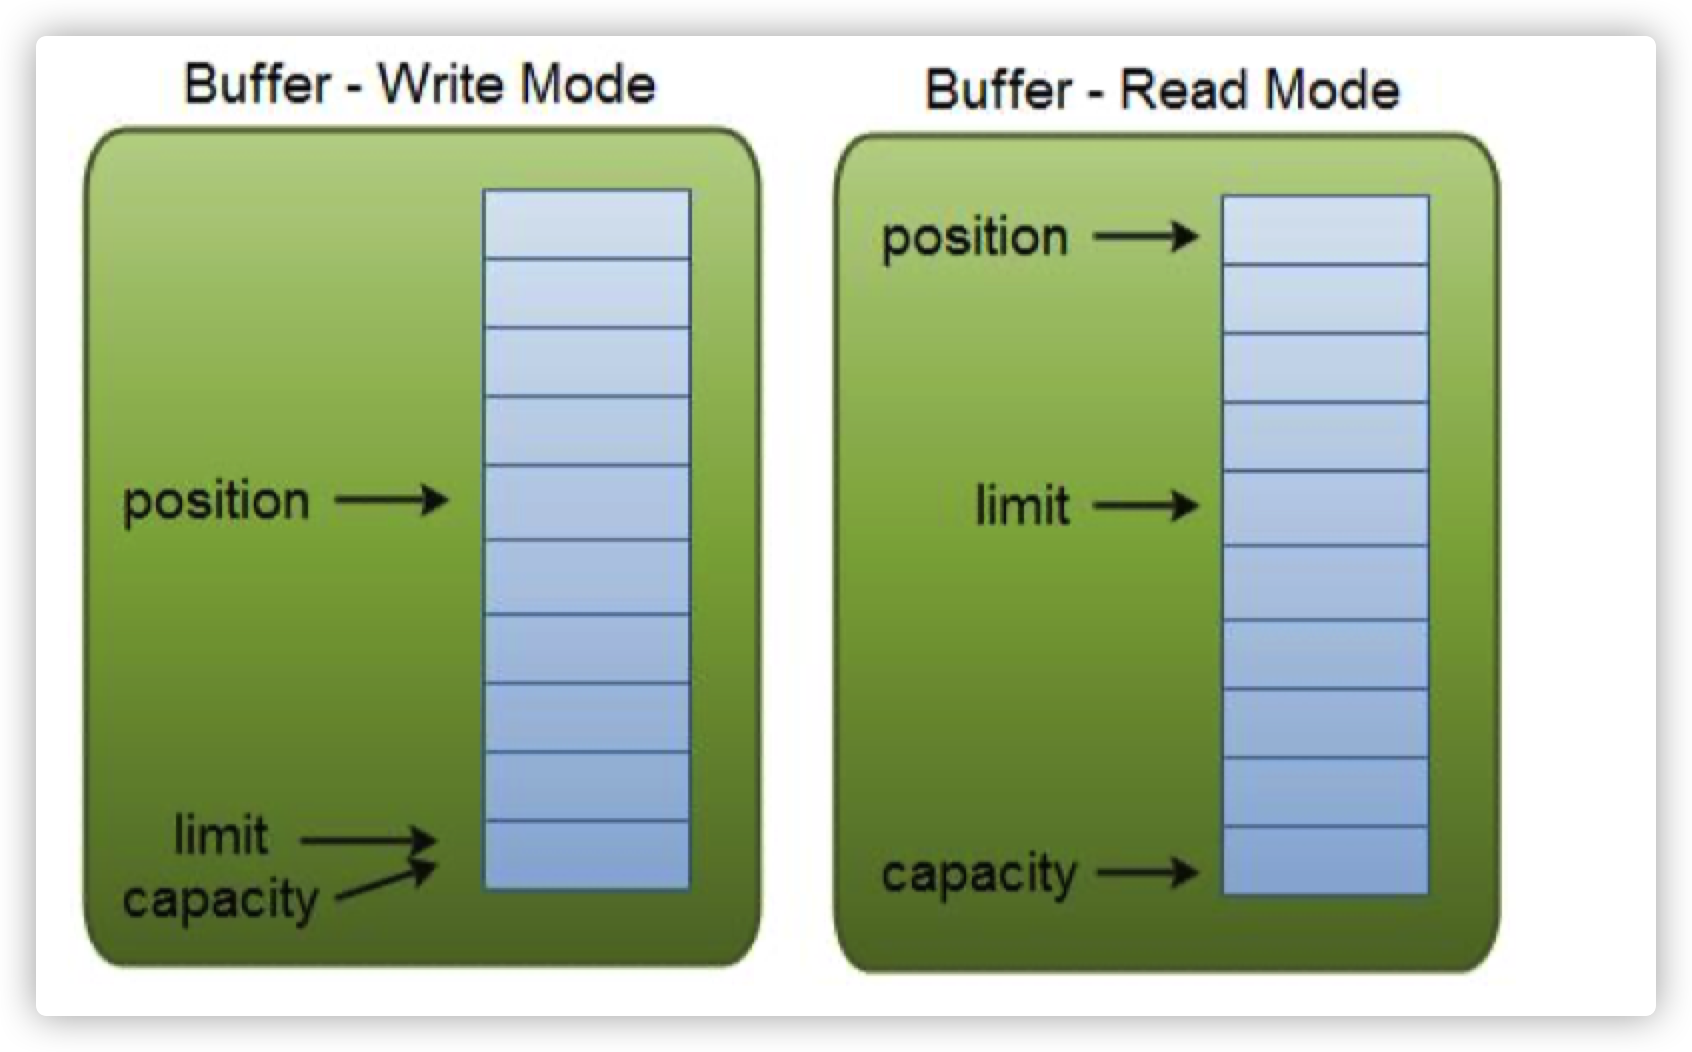
position 和 limit 的含义取决于 Buffer 处在读模式还是写模式。不管 Buffer 处在什么 模式,capacity 的含义总是一样的。
ps: 我这里将写入缓冲区称为『写模式』,从缓冲区读取称为「读模式」
capacity
作为一个内存块,Buffer 有一个固定的大小值,也叫“capacity”.你只能往里写 capacity 个 byte、long,char 等类型。一旦 Buffer 满了,需要将其清空(通过读数 据或者清除数据)才能继续写数据往里写数据(clear&compact)。
position
-
写数据到 Buffer 中时,position 表示写入数据的当前位置,position 的初始值为 0。当一个 byte、long 等数据写到 Buffer 后, position 会向下移动到下一个可插入 数据的 Buffer 单元。position 最大可为 capacity – 1(因为 position 的初始值为 0).
-
从Buffer读数据时,position 表示读入数据的当前位置,如 position=2 时表 示已开始读入了 3 个 byte,或从第 3 个 byte 开始读取。通过 ByteBuffer.flip()切换 到读模式时 position 会被重置为 0,当 Buffer 从 position 读入数据后,position 会 下移到下一个可读入的数据 Buffer 单元。
limit
-
写数据时,limit 表示可对 Buffer 最多写入多少个数据。写模式下,limit 等于 Buffer 的 capacity。
-
读数据时,limit 表示 Buffer 里有多少可读数据(not null 的数据),因此能读到之前写入的所有数据(limit 被设置成已写数据的数量,这个值在写模式下就是 position)。
flip()方法
flip 方法将 Buffer 从写模式切换到读模式。调用 flip()方法会将 position 设回 0,并 将 limit 设置成之前 position 的值。换句话说,position 现在用于标记读的位置, limit 表示之前写进了多少个 byte、char 等 (现在能读取多少个 byte、char 等)。
Buffer分配和写数据
前面已经写过很多次了,这里再简单复习一遍:
Buffer 分配
要想获得一个 Buffer 对象首先要进行分配。 每一个 Buffer 类都有一个 allocate 方 法。
下面是一个分配 48 字节 capacity 的 ByteBuffer 的例子。
ByteBuffer buf = ByteBuffer.allocate(48);
这是分配一个可存储 1024 个字符的 CharBuffer:
CharBuffer buf = CharBuffer.allocate(1024);
向 Buffer 中写数据
写数据到 Buffer 有两种方式:
(1)从 Channel 写到 Buffer。
int bytesRead = inChannel.read(buf); //read into buffer.
(2)通过 Buffer 的 put()方法写到 Buffer 里。
buf.put(127);
put 方法有很多版本,允许你以不同的方式把数据写入到 Buffer 中。例如, 写到一个 指定的位置,或者把一个字节数组写入到 Buffer
从 Buffer 中读取数据
(1)从 Buffer 读取数据到 Channel。
int bytesWritten = inChannel.write(buf);
(2)使用 get()方法从 Buffer 中读取数据。
byte aByte = buf.get();
同样,get 方法有很多版本,允许你以不同的方式从 Buffer 中读取数据。例如,从指定 position 读取,或者从 Buffer 中读取数据到字节数组。
常用方法
- rewind()方法
Buffer.rewind()将 position 设回 0,所以你可以重读 Buffer 中的所有数据。limit 保 持不变,仍然表示能从 Buffer 中读取多少个元素(byte、char 等)。
- clear()与 compact()方法
一旦读完 Buffer 中的数据,需要让 Buffer 准备好再次被写入。可以通过 clear()或 compact()方法来完成。
如果调用的是 clear()方法,position 将被设回 0,limit 被设置成 capacity 的值。
换 句话说,Buffer 被清空了。Buffer 中的数据并未清除,只是这些标记告诉我们可以从 哪里开始往 Buffer 里写数据。
如果 Buffer 中仍有未读的数据,且后续还需要这些数据,那么使用 compact()方法。
compact()方法将所有未读的数据拷贝到 Buffer 起始处。然后将 position 设到最后一 个未读元素正后面。limit 属性依然像 clear()方法一样,设置成 capacity,不会覆盖未读的数据。
- mark()与 reset()方法
通过调用 Buffer.mark()方法,可以标记 Buffer 中的一个特定 position。之后可以通 过调用 Buffer.reset()方法恢复到这个 position。(前提是没有clear&compact)
 buffer.mark();

//call buffer.get() a couple of times, e.g. during parsing.

buffer.reset(); //set position back to mark.
缓冲区操作
缓冲区分片
在 NIO 中,除了可以分配或者包装一个缓冲区对象外,还可以根据现有的缓冲区对象 来创建一个子缓冲区,即在现有缓冲区上切出一片来作为一个新的缓冲区,但现有的 缓冲区与创建的子缓冲区在底层数组层面上是数据共享的,也就是说,子缓冲区相当 于是现有缓冲区的一个视图窗口。
调用 slice()方法可以创建一个子缓冲区。
->Demo: 缓冲区分片
ByteBuffer buffer = ByteBuffer.allocate(10);
// 缓冲区中的数据 0-9
for (int i = 0; i < buffer.capacity(); ++i) { buffer.put((byte) i); }
// 创建子缓冲区
buffer.position(3); // 实际上是index4
buffer.limit(7); // position<limit
ByteBuffer slice = buffer.slice(); // 分出来的是3-6这部分,容量是4
// 改变子缓冲区的内容
for (int i = 0; i < slice.capacity(); ++i) {
  byte b = slice.get(i);
  b *= 10;
  slice.put(i, b);
}
buffer.position(0);
buffer.limit(buffer.capacity());
// 打印0 1 2 30 40 50 60 7 8 9
while (buffer.remaining() > 0) { System.out.println(buffer.get()); }
只读缓冲区
只读缓冲区非常简单,可以读取它们,但是不能向它们写入数据。可以通过调用缓冲 区的 asReadOnlyBuffer()方法,将任何常规缓冲区转 换为只读缓冲区,这个方法返 回一个与原缓冲区完全相同的缓冲区,并与原缓冲区共享数据,只不过它是只读的。
如果原缓冲区的内容发生了变化,只读缓冲区的内容也随之发生变化:
				ByteBuffer buffer = ByteBuffer.allocate(10);
        for (int i = 0; i < buffer.capacity(); ++i) { buffer.put((byte) i); }
        // 创建只读缓冲区
        ByteBuffer readonly = buffer.asReadOnlyBuffer();
        // 改变原缓冲区的内容
        for (int i = 0; i < buffer.capacity(); ++i) {
            byte b = buffer.get(i);
            b *= 10;
            buffer.put(i, b);
        }

        readonly.position(0);
        readonly.limit(buffer.capacity());
        // 只读缓冲区的内容也随之改变
        while (readonly.remaining() > 0) { System.out.println(readonly.get()); }
如果尝试修改只读缓冲区的内容,则会报 ReadOnlyBufferException 异常。
只读缓冲 区对于保护数据很有用。在将缓冲区传递给某个 对象的方法时,无法知道这个方法是 否会修改缓冲区中的数据。创建一个只读的缓冲区可以保证该缓冲区不会被修改。只 可以把常规缓冲区转换为只读缓冲区,而不能将只读的缓冲区转换为可写的缓冲区。
直接缓冲区
直接缓冲区是为加快 I/O 速度,使用一种特殊方式为其分配内存的缓冲区,JDK 文档 中的描述为:给定一个直接字节缓冲区,Java 虚拟机将尽最大努力直接对它执行本机 I/O 操作。也就是说,它会在每一次调用底层操作系统的本机 I/O 操作之前(或之后), 尝试避免将缓冲区的内容拷贝到一个中间缓冲区中 或者从一个中间缓冲区中拷贝数 据。
要分配直接缓冲区,需要调用 allocateDirect()方法,而不是 allocate()方法,使用方式与普通缓冲区并无区别。
ByteBuffer buffer = ByteBuffer.allocateDirect(1024);
内存映射文件
内存映射文件 I/O 是一种读和写文件数据的方法,它可以比常规的基于流或者基于通 道的 I/O 快的多。
ps: 关于内存映射文件还需单独了解
static private final int start = 0;
static private final int size = 1024;

static public void main(String args[]) throws Exception {
  RandomAccessFile raf = new RandomAccessFile("./1.txt", "rw");

	FileChannel fc = raf.getChannel();
	MappedByteBuffer mbb = fc.map(FileChannel.MapMode.READ_WRITE, start, size);
	mbb.put(0, (byte) 97);
  mbb.put(1023, (byte) 122);
  raf.close();
}
Selector
Selector 一般称 为选择器 ,也可以翻译为 多路复用器 ,它用于检查一个或多个 NIO Channel(通道)的状态是否处于可读、可写。如此可以实现单线程管理多个 channels,也就是可以管理多个网络链接。
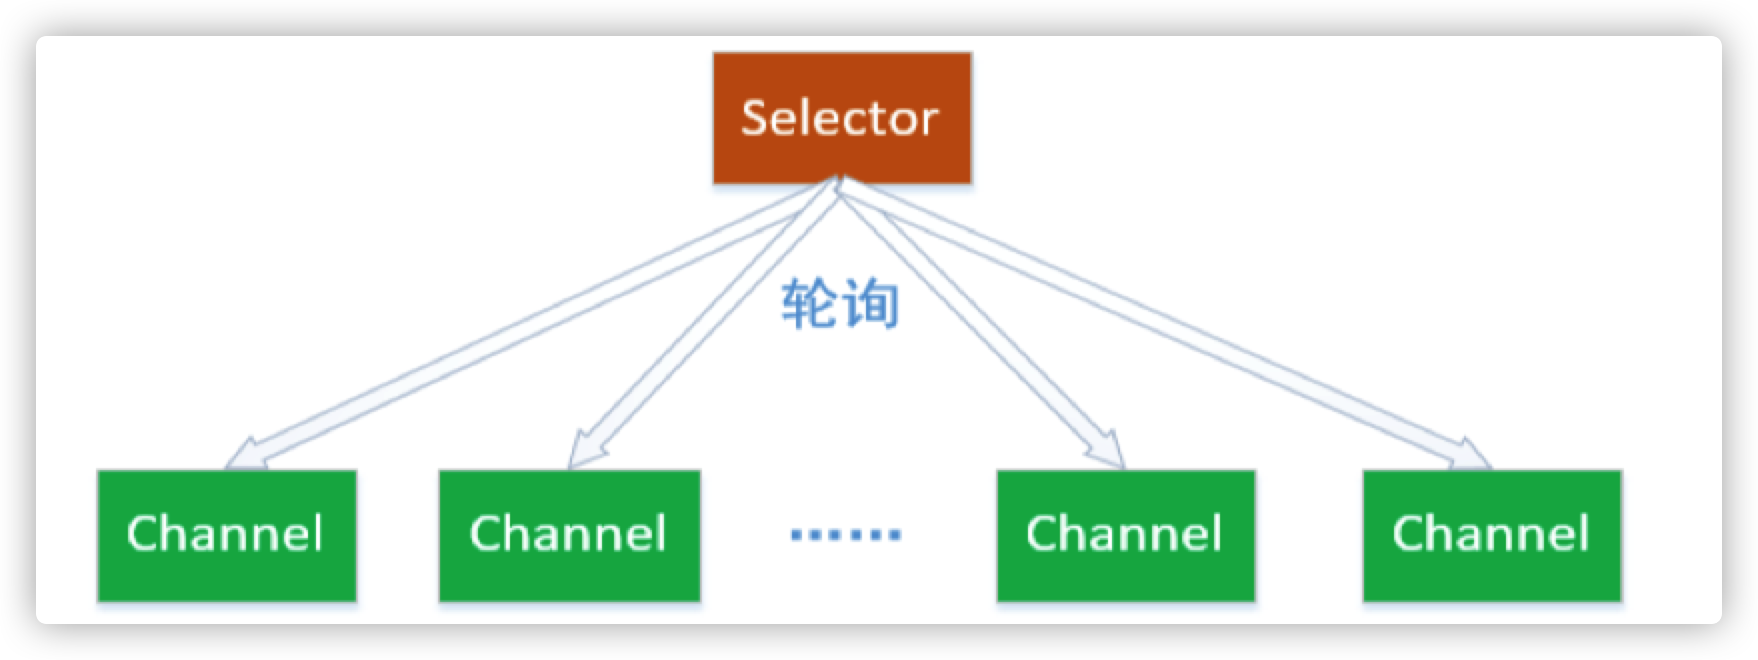
使用 Selector 的好处在于: 使用更少的线程来就可以来处理通道了, 相比使用多个线程,避免了线程上下文切换带来的开销。
可选择通道
-
不是所有的 Channel 都可以被 Selector 复用的。
比如,FileChannel 就不能 被选择器复用。继承了抽象类 SelectableChannel的Channel才可以复用。
SelectableChannel 类提供了实现通道的可选择性所需要的公共方法。它是所有 支持就绪检查的通道类的父类。所有 socket 通道,都继承了 SelectableChannel 类,包括从管道(Pipe)对象的中获得的通道。
-
一个通道可以被注册到多个选择器上,但对每个选择器而言只能被注册一次。
SelectableChannel 可以被注册到 Selector 对象上,在注册的时候,需要指定通道的哪些操作,是 Selector 感兴趣的。
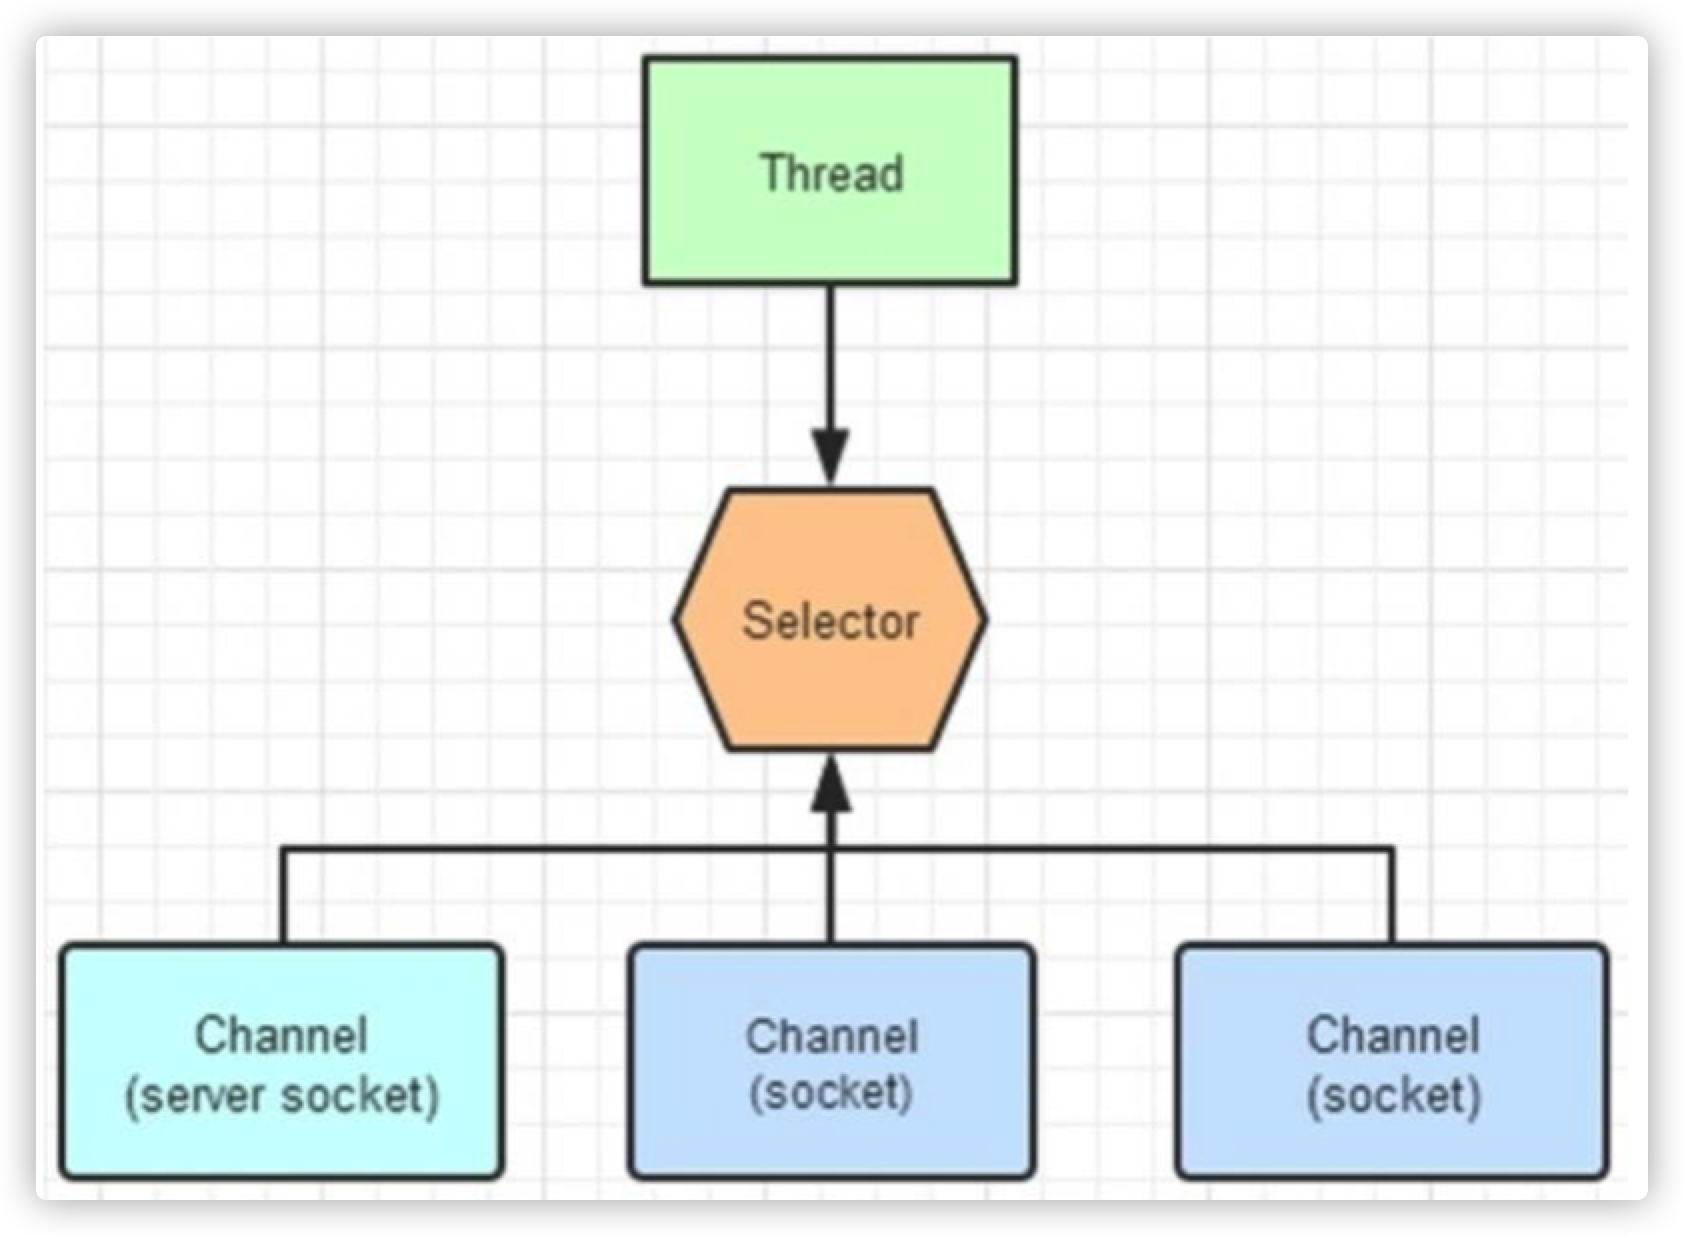
Channel注册到Selector
使用 Channel.register(Selector sel,int ops)方法,将一个通道注册到一个 选择器。
第一个参数,指定通道要注册的选择器。第二个参数指定选择器需要查询的通道操作。
可以供选择器查询的通道操作,从类型来分,包括以下四种:
-
可读 : SelectionKey.OP_READ
-
可写 : SelectionKey.OP_WRITE
-
连接 : SelectionKey.OP_CONNECT
-
接收 : SelectionKey.OP_ACCEPT
如果 Selector 对通道的多操作类型感兴趣,可以用“位或”操作符来实现:
int key = SelectionKey.OP_READ | SelectionKey.OP_WRITE ;
选择器查询的不是通道的操作,而是通道的某个操作的一种就绪状态。
什么是操作的就绪状态?
一旦通道具备完成某个操作的条件,表示该通道的某个操作已经就 绪,就可以被 Selector 查询到,程序可以对通道进行对应的操作。
比方说,某个 SocketChannel 通道可以连接到一个服务器,则处于“连接就绪” (OP_CONNECT)。
再比方说,一个 ServerSocketChannel 服务器通道准备好接收新 进入的连接,则处于“接收就绪”(OP_ACCEPT)状态。
还比方说,一个有数据可读的通道,可以说是“读就绪”(OP_READ)。一个等待写数据的通道可以说是“写就 绪”(OP_WRITE)。
选择键
选择键的概念,和事件的概念比较相似。一个选择键类似监听器模式里边的一个事件。由于 Selector 不是事件触发的模式,而是主动去查询的模式,所以不叫事件 Event,而是叫 SelectionKey 选择键。
一个选择键,首先是包含了注册在 Selector 的通道操作的类型,比方说 SelectionKey.OP_READ。也包含了特定的通道与特定的选择器之间的注册关系。
Channel 注册到后,并且一旦通道处于某种就绪的状态,就可以被选择器查询 到。这个工作,使用选择器 Selector 的 select()方法完成。select 方法的作用,对 感兴趣的通道操作,进行就绪状态的查询。
Selector 可以不断的查询 Channel 中发生的操作的就绪状态。并且挑选感兴趣 的操作就绪状态。一旦通道有操作的就绪状态达成,并且是 Selector 感兴趣的操作, 就会被 Selector 选中,放入选择键集合中。
NIO 的编程,就是根据对应的选择键,进行 不同的业务逻辑处理。
->Demo: 注册Channel到Selector
// 1、获取 Selector 选择器
Selector selector = Selector.open();

// 2、获取通道
ServerSocketChannel serverSocketChannel = ServerSocketChannel.open();

// 3.设置为非阻塞
serverSocketChannel.configureBlocking(false);

// 4、绑定连接
serverSocketChannel.bind(new InetSocketAddress(9999));

// 5、将通道注册到选择器上,并制定监听事件为:“接收”事件
serverSocketChannel.register(selector,SelectionKey.OP_ACCEPT);
-
与 Selector 一起使用时,Channel 必须处于非阻塞模式下,否则将抛出异常 IllegalBlockingModeException。
-
一个通道并不一定支持所有的四种操作。
比如服务器通道 ServerSocketChannel 支持 Accept 接受操作,而 SocketChannel 客户端通道则不支持。可以通过通道上的 validOps()方法,来获取特定通道下所有支持的操作集合。
轮询查询就绪操作
通过 Selector 的 select()方法,可以查询出已经就绪的通道操作,这些就绪的 状态集合,包存在一个元素是 SelectionKey 对象的 Set 集合中。
-
select(): 阻塞到至少有一个通道在你注册的事件上就绪了。
-
select(long timeout):和 select()一样,但最长阻塞时间为 timeout 毫秒。
-
selectNow(): 非阻塞,只要有通道就绪就立刻返回。
select()方法返回的 int 值,表示有多少通道已经就绪,更准确的说,是自前一次 select 方法以来到这一次 select 方法之间的时间段上,有多少通道变成就绪状态。
例如:首次调用 select()方法,如果有一个通道变成就绪状态,返回了 1,若再次调用 select()方法,如果另一个通道就绪了,它会再次返回 1。如果对第一个就绪的 channel 没有做任何操作,现在就有两个就绪的通道,但在每次 select()方法调用之 间,只有一个通道就绪了。
一旦调用 select()方法,并且返回值不为 0 时,在 Selector 中有一个 selectedKeys()方 法,用来访问已选择键集合,迭代集合的每一个选择键元素,根据就绪操作的类型, 完成对应的操作:
Set selectedKeys = selector.selectedKeys(); Iterator keyIterator = selectedKeys.iterator();

while(keyIterator.hasNext()) {

SelectionKey key = keyIterator.next();

if(key.isAcceptable()) {

// a connection was accepted by a ServerSocketChannel.

} else if (key.isConnectable()) {

// a connection was established with a remote server.

} else if (key.isReadable()) {

// a channel is ready for reading

} else if (key.isWritable()) {

// a channel is ready for writing

}
keyIterator.remove();
}
停止选择
解除select的阻塞
wakeup()方法 :通过调用 Selector 对象的 wakeup()方法让处在阻塞状态的 select()方法立刻返回 该方法使得选择器上的第一个还没有返回的选择操作立即返回。如果当前没有进行中 的选择操作,那么下一次对 select()方法的一次调用将立即返回。
close()方法 :通过 close()方法关闭 Selector, 该方法使得任何一个在选择操作中阻塞的线程都被唤醒(类似 wakeup()),同时使得注册到该 Selector 的所有 Channel 被注销,所有的键将被取消,但是 Channel 本身并不会关闭。
->Demo: C/S
  @Test
    public void server() throws IOException {
        try {
            ServerSocketChannel ssc = ServerSocketChannel.open();
            ssc.socket().bind(new InetSocketAddress("127.0.0.1", 8000));
            ssc.configureBlocking(false);

            Selector selector = Selector.open();
            ssc.register(selector, SelectionKey.OP_ACCEPT);
            ByteBuffer readBuff = ByteBuffer.allocate(1024);
            ByteBuffer writeBuff = ByteBuffer.allocate(128);
            writeBuff.put("received".getBytes());
            writeBuff.flip();

            while (true) {
                // selector阻塞直到有至少一个channel就绪
                selector.select();

                Set<SelectionKey> keys = selector.selectedKeys();
                Iterator<SelectionKey> it = keys.iterator();

                // 遍历所有就绪的channel
                while (it.hasNext()) {

                    SelectionKey key = it.next();
                    it.remove();

                    if (key.isAcceptable()) {
                         // 创建新的连接,并且把连接注册到 selector上
                        // 因为是已经有channel就绪,所以不用判空
                        SocketChannel socketChannel = ssc.accept();
                        socketChannel.configureBlocking(false);
                        // 声明这个 channel 对读操作感兴趣。buffer->channel
                        socketChannel.register(selector, SelectionKey.OP_READ);
                    } else if (key.isReadable()) {

                        SocketChannel socketChannel = (SocketChannel) key.channel();
                        readBuff.clear();
                        socketChannel.read(readBuff);

                        readBuff.flip();
                        System.out.println("received : " + new String(readBuff.array()));

                        key.interestOps(SelectionKey.OP_WRITE);

                    } else if (key.isWritable()) {
                        writeBuff.rewind();
                        SocketChannel socketChannel = (SocketChannel) key.channel();
                        socketChannel.write(writeBuff);
                        key.interestOps(SelectionKey.OP_READ);
                    }

                }

            }
        } catch (IOException e) {

            e.printStackTrace();
        }
    }

    @Test
    void client() throws IOException, InterruptedException {
        SocketChannel channel = SocketChannel.open();
        channel.connect(new InetSocketAddress("127.0.0.1", 8000));
        channel.configureBlocking(false);
        ByteBuffer buffer = ByteBuffer.allocate(1024);
        buffer.put(new Date().toString().getBytes());
        while (true) {
            buffer.rewind();
            channel.write(buffer);
            Thread.sleep(1000);
        }
    }
Pipe&FileLock
Pipe
Java NIO 管道是 2 个线程之间的单向数据连接。Pipe 有一个 source 通道和一个 sink 通道。数据会被写到 sink 通道,从 source 通道读取。

->Demo: pipe读写
		    Pipe pipe = Pipe.open();
        Pipe.SinkChannel sinkChannel = pipe.sink();
        ByteBuffer byteBuffer = ByteBuffer.allocate(1024);
        byteBuffer.put("data".getBytes());
        byteBuffer.flip();
        sinkChannel.write(byteBuffer);

        Pipe.SourceChannel sourceChannel = pipe.source();
        ByteBuffer allocate = ByteBuffer.allocate(1024);
        int len = sourceChannel.read(allocate);
        System.out.println(new String(allocate.array(),0,len));

        sourceChannel.close();
        sinkChannel.close();
- 要向管道写数据,需要访问 sink 通道。
- 从读取管道的数据,需要访问 source 通道
FileLock
文件锁在 OS 中很常见,如果多个程序同时访问、修改同一个文件,很容易因为文件 数据不同步而出现问题。给文件加一个锁,同一时间,只能有一个程序修改此文件, 或者程序都只能读此文件,这就解决了同步问题。
文件锁是进程级别的,不是线程级别的。文件锁可以解决多个进程并发访问、修改同 一个文件的问题,但不能解决多线程并发访问、修改同一文件的问题。使用文件锁时,同一进程内的多个线程,可以同时访问、修改此文件。
文件锁是当前程序所属的 JVM 实例持有的,一旦获取到文件锁(对文件加锁),要调 用 release(),或者关闭对应的 FileChannel 对象,或者当前 JVM 退出,才会释放这 个锁。
一旦某个进程(比如说 JVM 实例)对某个文件加锁,则在释放这个锁之前,此进程不 能再对此文件加锁,就是说 JVM 实例在同一文件上的文件锁是不重叠的(进程级别不 能重复在同一文件上获取锁)。
和常见的锁一样,也分为两类
排它锁:又叫独占锁。对文件加排它锁后,该进程可以对此文件进行读写,该进程独 占此文件,其他进程不能读写此文件,直到该进程释放文件锁。
共享锁:某个进程对文件加共享锁,其他进程也可以访问此文件,但这些进程都只能读此文件(包括加锁的进程),不能写。线程是安全的。只要还有一个进程持有共享锁,此文件就只能 读,不能写。
//创建 FileChannel 对象,文件锁只能通过 FileChannel 对象来使用

FileChannel fileChannel=new FileOutputStream("./1.txt").getChannel();

//对文件加锁

FileLock lock=fileChannel.lock();

//对此文件进行一些读写操作。 //....... //释放锁

lock.release();
有 4 种获取文件锁的方法:
// 对整个文件加锁,默认为排它锁
lock()
// 自定义加锁方式。前 2 个参数 指定要加锁的部分(可以只对此文件的部分内容加锁),第三个参数值指定是否是共享锁。
lock(long position, long size, booean shared)
// 对整个文件加锁,默认为排它锁。
tryLock()
// 自定义加锁方式。 如果指定为共享锁,则其它进程可读此文件,所有进程均不能写此文件,如果某进程 试图对此文件进行写操作,会抛出异常。
tryLock(long position, long size, booean shared)
lock 是阻塞式的,如果未获取到文件锁,会一直阻塞当前线程,直到获取文件锁,tryLock 是非阻塞式的,tryLock 尝试获取文 件锁,获取成功就返回锁对象,否则返回 null,不会阻塞当前线程。
-
boolean isShared()
此文件锁是否是共享锁
-
boolean isValid()
此文件锁是否还有效
在某些 OS 上,对某个文件加锁后,不能对此文件使用通道映射。
String input = "data";

System.out.println("输入 :" + input);

ByteBuffer buf = ByteBuffer.wrap(input.getBytes());

String fp = "./1.txt";

Path pt = Paths.get(fp); FileChannel channel = FileChannel.open(pt, StandardOpenOption.WRITE,StandardOpenOption.APPEND); channel.position(channel.size() - 1);
// position of a cursor at the end of file
// 获得锁方法一:lock(),阻塞方法,当文件锁不可用时,当前进程会被挂起
//lock = channel.lock();
// 无参 lock()为独占锁
// lock = channel.lock(0L, Long.MAX_VALUE, true);
// 有参 lock()为共享 锁,有写操作会报异常
// 获得锁方法二:trylock(),非阻塞的方法,当文件锁不可用时,tryLock()会 得到 null 值
FileLock lock = channel.tryLock(0,Long.MAX_VALUE,false);
System.out.println("共享锁 shared: " + lock.isShared());
channel.write(buf);
channel.close();
// Releases the Lock System.out.println("写操作完成.");
//读取数据 readPrint(fp);
Other
Path
Java Path 接口是 Java NIO 更新的一部分,同 Java NIO 一起已经包括在 Java6 和 Java7 中。Java Path 接口是在 Java7 中添加到 Java NIO 的。Path 接口位于 java.nio.file 包中,所以 Path 接口的完全限定名称为 java.nio.file.Path。
Java Path 实例表示文件系统中的路径。一个路径可以指向一个文件或一个目录。路径 可以是绝对路径,也可以是相对路径。绝对路径包含从文件系统的根目录到它指向的 文件或目录的完整路径。相对路径包含相对于其他路径的文件或目录的路径。
在许多方面,java.nio.file.Path 接口类似于 java.io.File 类,但是有一些差别。不过, 在许多情况下,可以使用 Path 接口来替换 File 类的使用。
创建绝对路径,通过调用 Paths.get()方法,给定绝对路径文件作为参数来完 成。
Path path = Paths.get("/home/1.txt");
相对路径
Path projects = Paths.get("d:\\xxx", "projects");
如果在 Windows 机器上使用了从/开始的路径,那么路径将被解释为相对于当 前驱动器。
Path.normalize()
Path 接口的 normalize()方法可以使路径标准化。标准化意味着它将移除所有在路径 字符串的中间的.和..代码,并解析路径字符串所引用的路径。
Files
Java NIO Files 类(java.nio.file.Files)提供了几种操作文件系统中的文件的方法。
Files.createDirectory()
Files.createDirectory()方法,用于根据 Path 实例创建一个新目录
  Path path  = Paths.get("./lol");;
        try {
            Files.createDirectory(path);
        } catch (IOException e) {
            e.printStackTrace();
        }
Files.copy()
Files.copy()方法从一个路径拷贝一个文件到另外一个目录
Path sourcePath = Paths.get("./1.txt");
Path destinationPath = Paths.get("./02.txt");

try {

Files.copy(sourcePath, destinationPath);
} catch(FileAlreadyExistsException e) {

// 目录已经存在
} catch (IOException e) {

// 其他发生的异常
e.printStackTrace();

}
Files.copy()方法的第三个参数。如果目标文件已经存在,这个参数指示 copy()方法覆 盖现有的文件。
Files.copy(sourcePath, destinationPath, StandardCopyOption.REPLACE_EXISTING);
Files.move()
Files.move()用于将文件从一个路径移动到另一个路径。
移动文件与重命名相同,但是 移动文件既可以移动到不同的目录,也可以在相同的操作中更改它的名称。
示例:
Path sourcePath = Paths.get("./1.txt");
Path destinationPath = Paths.get("./01.txt");

try {
	Files.move(sourcePath, destinationPath, StandardCopyOption.REPLACE_EXISTING);
} catch (IOException e) {
//移动文件失败
	e.printStackTrace();
}
Files.move()的第三个参数。这个参数告诉 Files.move()方法来覆盖目标路径上的任何 现有文件。
Files.delete()
Files.delete()方法可以删除一个文件或者目录。
Path path = Paths.get("1.txt");
try {
	Files.delete(path);
} catch (IOException e) {
// 删除文件失败
	e.printStackTrace();
}
Files.walkFileTree()
Files.walkFileTree()方法包含递归遍历目录树功能,将 Path 实例和 FileVisitor 作为参数。Path 实例指向要遍历的目录,FileVisitor 在遍历期间被调用。
- FileVisitor 是一个接口,必须自己实现 FileVisitor 接口,并将实现的实例传递给 walkFileTree()方法。在目录遍历过程中,您的 FileVisitor 实现的每个方法都将被调 用。如果不需要实现所有这些方法,那么可以扩展 SimpleFileVisitor 类,它包含 FileVisitor 接口中所有方法的默认实现。
FileVisitor 接口的方法中,每个都返回一个 FileVisitResult 枚举实例。 FileVisitResult 枚举包含以下四个选项:
CONTINUE 继续
TERMINATE 终止
SKIP_SIBLING 跳过同级
SKIP_SUBTREE 跳过子级
Path rootPath = Paths.get("/usr/local");
String fileToFind = File.separator + "001.txt";

try {

Files.walkFileTree(rootPath, new SimpleFileVisitor<Path>() {

@Override
public FileVisitResult visitFile(Path file, BasicFileAttributes attrs) throws IOException {
String fileString = file.toAbsolutePath().toString();

 if(fileString.endsWith(fileToFind)){
     System.out.println("file found at path: " + file.toAbsolutePath());
     return FileVisitResult.TERMINATE;
    }
			return FileVisitResult.CONTINUE;
		}
	});
} catch(IOException e){

e.printStackTrace();
}
AsynchronousFileChannel
通过静态方法 open()创建
Path path = Paths.get("/01.txt");

try {
  AsynchronousFileChannel fileChannel = AsynchronousFileChannel.open(path, StandardOpenOption.READ);
} catch (IOException e) {
	e.printStackTrace();
}
- 第二个参数是一个或多个打开选项,它告诉 AsynchronousFileChannel 在文件上执 行什么操作。在本例中,我们使用了 StandardOpenOption.READ 选项,表示该文件 将被打开阅读。
通过 Future 读取数据
可以通过两种方式从 AsynchronousFileChannel 读取数据。第一种方式是调用返回 Future 的 read()方法
Path path = Paths.get("1.txt");
AsynchronousFileChannel fileChannel = null;
try {
	fileChannel = AsynchronousFileChannel.open(path, StandardOpenOption.READ);
} catch (IOException e) {
	e.printStackTrace();
}

ByteBuffer buffer = ByteBuffer.allocate(1024);
long position = 0;

Future<Integer> operation = fileChannel.read(buffer, position);
// 异步操作是否完成
while(!operation.isDone());

buffer.flip();
byte[] data = new byte[buffer.limit()];
buffer.get(data);
System.out.println(new String(data));
buffer.clear();
通过 CompletionHandler 读取数据
  Path path = Paths.get("./1.txt");
        AsynchronousFileChannel fileChannel = null;
        try {

            fileChannel = AsynchronousFileChannel.open(path, StandardOpenOption.READ);
        } catch (IOException e) {

            e.printStackTrace();
        }

        ByteBuffer buffer = ByteBuffer.allocate(1024);
        long position = 0;

        fileChannel.read(buffer, position, buffer, new CompletionHandler<Integer, ByteBuffer>() {

            @Override
            public void completed (Integer result, ByteBuffer attachment){
                System.out.println("result = " + result);

                attachment.flip();
                byte[] data = new byte[attachment.limit()];
                attachment.get(data);
                System.out.println(new String(data));
                attachment.clear();

            }

            @Override
            public void failed(Throwable exc, ByteBuffer attachment) {

            }
        });
读取操作完成,将调用 CompletionHandler 的 completed()方法。
对于 completed()方法的参数传递一个整数,它告诉我们读取了多少字节,以及 传递给 read()方法的“附件”。“附件”是 read()方法的第三个参数。在本代码中, 它是 ByteBuffer,数据也被读取。
如果读取操作失败,则将调用 CompletionHandler 的 failed()方法。
通过 Future 写数据
Path path = Paths.get("。、1.txt");
AsynchronousFileChannel fileChannel = null;
try {

    fileChannel = AsynchronousFileChannel.open(path, StandardOpenOption.WRITE);
} catch (IOException e) {

    e.printStackTrace();
}

ByteBuffer buffer = ByteBuffer.allocate(1024);
long position = 0;

buffer.put("data".getBytes());

buffer.flip();
Future<Integer> operation = fileChannel.write(buffer, position);
buffer.clear();

while (!operation.isDone()) ;

System.out.println("Write over");
注意,文件必须已经存在。如果该文件不存在,那么 write()方法将抛出一个 java.nio.file.NoSuchFileException。
通过 CompletionHandler 写数据
 Path path = Paths.get("./1.txt");
        if (!Files.exists(path)) {

            try { Files.createFile(path); } catch (IOException e) {

                e.printStackTrace();
            }

        }
        AsynchronousFileChannel fileChannel = null;
        try {

            fileChannel = AsynchronousFileChannel.open(path, StandardOpenOption.WRITE);
        } catch (IOException e) {

            e.printStackTrace();
        }

        ByteBuffer buffer = ByteBuffer.allocate(1024);
        long position = 0;

        buffer.put("data".getBytes());
        buffer.flip();

        fileChannel.write(buffer, position, buffer, new CompletionHandler<Integer, ByteBuffer>() {

            @Override
            public void completed(
                    Integer result, ByteBuffer attachment) { System.out.println("bytes written: " + result); }

            @Override
            public void failed(Throwable exc, ByteBuffer attachment) {

                System.out.println("Write failed");

                exc.printStackTrace();
            }

        });
字符集
java 中使用 Charset 来表示字符集编码对象
Charset 常用静态方法
public static Charset forName(String charsetName)//通过编码类型获得 Charset 对

象

public static SortedMap<String,Charset> availableCharsets()//获得系统支持的所有
编码方式

public static Charset defaultCharset()//获得虚拟机默认的编码方式

public static boolean isSupported(String charsetName)//判断是否支持该编码类型
Charset 常用普通方法
public final String name()//获得 Charset 对象的编码类型(String)

public abstract CharsetEncoder newEncoder()//获得编码器对象

public abstract CharsetDecoder newDecoder()//获得解码器对象
->Demo: 使用CharSet
  //1.获取编码器 CharsetEncoder charsetEncoder=charset.newEncoder();
        Charset charset = Charset.forName("UTF-8");
        // 2.获取解码器 CharsetDecoder charsetDecoder=charset.newDecoder();

        //3.获取需要解码编码的数据

        CharBuffer charBuffer = CharBuffer.allocate(1024);
        charBuffer.put("字符集编码解码");
        charBuffer.flip();

        //4.编码

        ByteBuffer byteBuffer = charset.encode(charBuffer);
        System.out.println("编码后:");
        for (int i = 0; i < byteBuffer.limit(); i++) { System.out.println(byteBuffer.get()); }

				//5.解码

        byteBuffer.flip();
        CharBuffer charBuffer1 = charset.decode(byteBuffer);
        System.out.println("解码后:");
        System.out.println(charBuffer1.toString());
        System.out.println("指定其他格式解码:");
        Charset charset1 = Charset.forName("GBK");
        byteBuffer.flip();
        CharBuffer charBuffer2 = charset1.decode(byteBuffer);
        System.out.println(charBuffer2.toString());

				//6.获取 Charset 所支持的字符编码

        Map<String, Charset> map = Charset.availableCharsets();
        Set<Map.Entry<String, Charset>> set = map.entrySet();
        for (Map.Entry<String, Charset> entry : set) {
            System.out.println(entry.getKey() + "=" + entry.getValue().toString());

        }
End
->Demo: 多人聊天
public class ChatServer {

    public void startServer() throws IOException {
        // 创建Selector
        Selector selector = Selector.open();
        // 创建ServerSocketChannel
        ServerSocketChannel channel = ServerSocketChannel.open();
        channel.configureBlocking(false);
        // bind
        channel.socket().bind(new InetSocketAddress(8000));
        // 监听新链接
        channel.register(selector, SelectionKey.OP_ACCEPT);
        System.out.println("open");
        // 实现业务
        for (; ; ) {
            int num = selector.select();
            if (num == 0) { continue; }
            Set<SelectionKey> selectionKeys = selector.selectedKeys();
            Iterator<SelectionKey> iterator = selectionKeys.iterator();
            while (iterator.hasNext()) {
                SelectionKey key = iterator.next();
                iterator.remove();

                if (key.isAcceptable()) {
                    acceptOperator(channel, selector);
                } else if (key.isReadable()) {
                    readOperator(selector, key);
                }
            }
        }

    }

    private void readOperator(Selector selector, SelectionKey key) throws IOException {
        SocketChannel channel = (SocketChannel) key.channel();
        ByteBuffer buffer = ByteBuffer.allocate(1024);
        int len = channel.read(buffer);
        StringBuilder message = new StringBuilder();
        if (len > 0) {
            buffer.flip();
            message.append(Charset.forName("UTF-8").decode(buffer));
        }
        System.out.println(message.toString());
        channel.register(selector, SelectionKey.OP_READ);
        // 广播
        if (message.length() > 0) {
            castOtherClient(message, selector, channel);
        }
    }

    private void castOtherClient(StringBuilder message, Selector selector, SocketChannel channel) throws IOException {
        Set<SelectionKey> keys = selector.keys();
        for (SelectionKey key : keys) {
            SelectableChannel target = key.channel();
            if (target instanceof SocketChannel && target != channel) {
                ((SocketChannel) target).write(Charset.forName("UTF-8").encode(message.toString()));
            }
        }
    }


    private void acceptOperator(ServerSocketChannel channel, Selector selector) throws IOException {
        SocketChannel socketChannel = channel.accept();
        socketChannel.configureBlocking(false);
        socketChannel.register(selector, SelectionKey.OP_READ);
        socketChannel.write(Charset.forName("UTF-8").encode("你好(*´▽`)ノノ"));
    }

    public static void main(String[] args) {
        try {
            new ChatServer().startServer();
        } catch (IOException e) {
            e.printStackTrace();
        }
    }
}
public class ChatClient {
    public void startClient(String name) throws IOException {
        SocketChannel channel = SocketChannel.open(new InetSocketAddress("127.0.0.1", 8000));

        Selector selector = Selector.open();
        channel.configureBlocking(false);
        channel.register(selector, SelectionKey.OP_READ);

        new Thread(new ClientThread(selector)).start();

        Scanner sc = new Scanner(System.in);
        while (sc.hasNextLine()) {
            String msg = sc.nextLine();
            if (msg.length() > 0) {
                channel.write(Charset.forName("UTF-8").encode(name+": " + msg));
            }
        }

    }


    public static void main(String[] args) {
        try {
            new ChatClient().startClient("B");
        } catch (IOException e) {
            e.printStackTrace();
        }
    }
}
public class ClientThread implements Runnable {
    private Selector selector;

    public ClientThread(Selector selector) {
        this.selector = selector;
    }

    @Override
    public void run() {
        try {
            for (; ; ) {
                int num = selector.select();
                if (num == 0) { continue; }
                Set<SelectionKey> selectionKeys = selector.selectedKeys();
                Iterator<SelectionKey> iterator = selectionKeys.iterator();
                while (iterator.hasNext()) {
                    SelectionKey key = iterator.next();
                    iterator.remove();

                    if (key.isReadable()) {
                        readOperator(selector, key);
                    }
                }
            }
        } catch (IOException e) {
            e.printStackTrace();
        }
    }

    private void readOperator(Selector selector, SelectionKey key) throws IOException {
        SocketChannel channel = (SocketChannel) key.channel();
        ByteBuffer buffer = ByteBuffer.allocate(1024);
        int len = channel.read(buffer);
        StringBuilder message = new StringBuilder();
        if (len > 0) {
            buffer.flip();
            message.append(Charset.forName("UTF-8").decode(buffer));
        }
        System.out.println(message.toString());
        channel.register(selector, SelectionKey.OP_READ);
    }
}


 浙公网安备 33010602011771号