opentsdb探索之路——部分设计与实现
基于opentsdb-2.4.0版本,本篇开启opentsdb探索之路(主要涉及读写特性以及一些其他细节),下一篇将开启opentsdb优化之路——性能优化思路与建议(总结当前痛点问题、优化思路和解决方案,同时也欢迎朋友提出更好的思路与方案)。
注意:阅读本篇文章应该要对HBase有最基本的认识,比如rowkey、region、store、 ColumnFamily、ColumnQualifier等概念以及HBase逻辑结构、物理存储结构有大致的认知。
opentsdb 概览(overview)
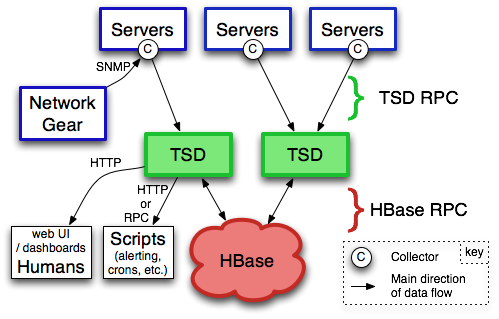
上图取自官方http://opentsdb.net/overview.html。其中的TSD(对应实际进程名是TSDMain)就是opentsdb组件。每个实例TSD都是独立的。没有master,没有共享状态(shared state),因此实际生产部署可能会通过nginx+Consul运行多个TSD实例以实现负载均衡。
Each TSD uses the open source database HBase or hosted Google Bigtable service to store and retrieve time-series data
我们大多应该还是用HBase作为数据存储。
安装部署一文中提到过在HBase中创建表结构,这里先简单介绍一下这4张表(table),随着探究的深入会对tsdb和tsdb-uid这两张表有更深刻的认识,至于tsdb-meta、tsdb-tree两张表不是这里讨论的重点,简单了解一下即可。相关文档:http://opentsdb.net/docs/build/html/user_guide/backends/index.html
- tsdb:
opentsdb全部的时序数据都存在这张表中,该表只有一个名为"t"的列族(ColumnFamily)。所以这张表的数据非常大,大多情况下读写性能瓶颈也就与这张表密切相关,进而优化也可能与它相关。
rowkey的设计为an optional salt, the metric UID, a base timestamp and the UID for tagk/v pairs,即[可选的salt位+metric的UID+小时级别的时间戳+依次有序的tagk、tagv组成的UID键值对],如下:
[salt]<metric_uid><timestamp><tagk1><tagv1>[...<tagkN><tagvN>]
暂不考虑salt位,关于加salt下面有章节单独拿出来看它的设计与实现。来看一个不加salt且含有两个tag的时序数据的rowkey组成:
00000150E22700000001000001000002000004
'----''------''----''----''----''----'
metric  time   tagk  tagv  tagk  tagv
至于rowkey为什么要这样设计以及具体实现,后面详细介绍,这里先有个基本认知。
- tsdb-uid: 为了减少
rowkey的长度,opentsdb会将metric、tagk、tagv都映射成UID,映射是双向的,比如说既可以根据tagk找到对应的UID,也可以根据UID直接找到相应的tagk。而这些映射关系就记录在tsdb-uid表中。该表有两个ColumnFamily,分别是name和id,另外这两个ColumnFamily下都有三列,分别是metric、tagk、tagv。如下图所示:
| RowKey | id:metric | id:tagk | id:tagv | name:metric | name:tagk | name:tagv |
|---|---|---|---|---|---|---|
| metric01 | 0x01 | |||||
| metric02 | 0x02 | |||||
| tagk01 | 0x01 | |||||
| tagv01 | 0x01 | |||||
| tagv02 | 0x02 | |||||
| 0x01 | metric01 | |||||
| 0x01 | tagk01 | |||||
| 0x01 | tagv01 | |||||
| 0x02 | metric02 | |||||
| 0x02 | tagv02 | |||||
从上面可以看出,metric、tagk、tagv三种类型的UID映射互不干扰,这也就使得0x01这个UID在不同类型中有着不同的含义。后面会从源码角度讲一下uid大致的分配。 |
- tsdb-meta: 在完成时序数据的写入之后,会根据当前
opentsdb实例的配置决定是否为相关时序记录元数据信息。看一下opentsdb.conf配置文件中tsd.core.meta.enable_tsuid_tracking配置项即可。
tsd.core.meta.enable_tsuid_tracking(默认false): 如果开启该选项,每次写入一个DataPoint(时序数据)的同时还会向tsdb-meta表中写入rowkey为该时序数据的tsuid(下面会讲到它,即完整的rowkey除去salt和timestamp后的数据),value为1的记录。这样,每个点就对应两次HBase的写入,一定程度上加大了HBase集群的压力。相关代码见TSDB#storeIntoDB()#WriteCB#call()
// if the meta cache plugin is instantiated then tracking goes through it
if (meta_cache != null) {
  meta_cache.increment(tsuid);
} else {
// tsd.core.meta.enable_tsuid_tracking
  if (config.enable_tsuid_tracking()) {
  // tsd.core.meta.enable_realtime_ts
    if (config.enable_realtime_ts()) {
    // tsd.core.meta.enable_tsuid_incrementing
      if (config.enable_tsuid_incrementing()) {
        TSMeta.incrementAndGetCounter(TSDB.this, tsuid);
      } else {
        TSMeta.storeIfNecessary(TSDB.this, tsuid);
      }
    } else {
    // 写入rowkey为tsuid,value为1的记录
      final PutRequest tracking = new PutRequest(meta_table, tsuid,
          TSMeta.FAMILY(), TSMeta.COUNTER_QUALIFIER(), Bytes.fromLong(1));
      client.put(tracking);
    }
  }
}
- tsdb-tree: 作用,可按照树形层次结构组织时序,就像浏览文件系统一样浏览时序。相关介绍
http://opentsdb.net/docs/build/html/user_guide/trees.html。这里就不细说了,有兴趣的话看下上面链接中官方介绍的Examples,就能秒懂是干嘛的。
opentsdb 存储细节(Writing)
相关文档:
http://opentsdb.net/docs/build/html/user_guide/writing/index.html
rowkey的设计
只有一个名为"t"的列族
- 时序数据的
metric、tagk、tagv三部分字符串都会被转成UID,这样再长的字符串在rowkey中也会由UID代替,大大缩短了rowkey的长度 rowkey中的时序数据的timestamp并非实际的时序数据时间,是格式化成以小时为单位的时间戳(所谓的base_time),也就是说该rowkey中的base_time表示的是该时序数据发生在哪个整点(小时)。每个数据写入的时候,会用该时序数据实际时间戳相对base_time的偏移量(offset)作为ColumnQualifier写入。
结合下面的图以及之后的代码,就一目了然。
| rowkey | t: +1 | t: +2 | t: +3 | t: ... | t: +3600 |
|---|---|---|---|---|---|
| salt+metric_uid+base_time+tagk1+tagv1+...+tagkN+tagvN | 10 | 9 | 12 | ... | 8 |
rowkey的具体实现
在没有启用salt的情况下,我整理出来生成rowkey的代码如下(注意一下:源码中并没有这段代码哦):
public byte[] generateRowKey(String metricName, long timestamp, Map<String, String> tags) {
        // 获取metricUid
        byte[] metricUid = tsdb.getUID(UniqueId.UniqueIdType.METRIC, metricName);

        // 将时间戳转为秒
        if ((timestamp & Const.SECOND_MASK) != 0L) {
            timestamp /= 1000L;
        }

        final long timestamp_offset = timestamp % Const.MAX_TIMESPAN;//3600
        // 提取出时间戳所在的整点(小时)时间
        final long basetime = timestamp - timestamp_offset;

        // 用TreeMap存储<tagkUid,tagvUid>, 排序用的是memcmp()方法,下面会有介绍
        Map<byte[], byte[]> tagsUidMap = new org.hbase.async.Bytes.ByteMap<>();

        tags.forEach((k, v) -> tagsUidMap.put(
                tsdb.getUID(UniqueId.UniqueIdType.TAGK, k),
                tsdb.getUID(UniqueId.UniqueIdType.TAGV, v)));

        // 不加salt的rowkey,metricUid+整点时间戳+所有的tagK、tagV
        byte[] rowkey = new byte[metricUid.length + Const.TIMESTAMP_BYTES +
                tags.size() * (TSDB.tagk_width() + TSDB.tagv_width())];

        // 下面拷贝相应的数据到rowkey字节数组中的相应位置
        System.arraycopy(metricUid, 0, rowkey, 0, metricUid.length);
        Bytes.setInt(rowkey, (int) basetime, metricUid.length);

        int startOffset = metricUid.length + Const.TIMESTAMP_BYTES;
        for (Map.Entry<byte[], byte[]> entry : tagsUidMap.entrySet()) {
            System.arraycopy(entry.getKey(), 0, rowkey, startOffset, TSDB.tagk_width());
            startOffset += TSDB.tagk_width();

            System.arraycopy(entry.getValue(), 0, rowkey, startOffset, TSDB.tagv_width());
            startOffset += TSDB.tagv_width();
        }

        return rowkey;
    }
其中的ByteMap就是TreeMap,见org.hbase.async.Bytes.ByteMap
/** A convenient map keyed with a byte array.  */
public static final class ByteMap<V> extends TreeMap<byte[], V>
  implements Iterable<Map.Entry<byte[], V>> {

  public ByteMap() {
    super(MEMCMP);
  }
}
多个tag的排序规则是对tag_id的bytes进行排序,调用的是org.hbase.async.Bytes#memcmp(final byte[] a, final byte[] b)方法,如下
/**
   * {@code memcmp} in Java, hooray.
   * @param a First non-{@code null} byte array to compare.
   * @param b Second non-{@code null} byte array to compare.
   * @return 0 if the two arrays are identical, otherwise the difference
   * between the first two different bytes, otherwise the different between
   * their lengths.
   */
public static int memcmp(final byte[] a, final byte[] b) {
  final int length = Math.min(a.length, b.length);
  if (a == b) {  // Do this after accessing a.length and b.length
    return 0;    // in order to NPE if either a or b is null.
  }
  for (int i = 0; i < length; i++) {
    if (a[i] != b[i]) {
      return (a[i] & 0xFF) - (b[i] & 0xFF);  // "promote" to unsigned.
    }
  }
  return a.length - b.length;
}
压缩(compaction)
相关文档:
http://opentsdb.net/docs/build/html/user_guide/definitions.html#compaction
An OpenTSDB compaction takes multiple columns in an HBase row and merges them into a single column to reduce disk space. This is not to be confused with HBase compactions where multiple edits to a region are merged into one. OpenTSDB compactions can occur periodically for a TSD after data has been written, or during a query.
tsd.storage.enable_compaction:是否开启压缩(默认为true,开启压缩)
为了减少存储空间(讲道理对查询也有好处),opentsdb在写入时序数据的同时会把rowkey放到ConcurrentSkipListMap中,一个daemon线程不断检查System.currentTimeMillis()/1000-3600-1之前的数据能否被压缩,满足压缩条件则会把一小时内的时序数据(它们的rowkey是相同的)查出来在内存压缩(compact)成一列回写(write)到HBase中,然后delete之前的原始数据。或者是查询(query)操作可能也会触发compaction操作。代码见CompactionQueue
final class CompactionQueue extends ConcurrentSkipListMap<byte[], Boolean> {

  public CompactionQueue(final TSDB tsdb) {
      super(new Cmp(tsdb));
      // tsd.storage.enable_appends
      if (tsdb.config.enable_compactions()) {
        // 启用了压缩则会启一个daemon的线程
        startCompactionThread();
      }
  }

  /**
     * Helper to sort the byte arrays in the compaction queue.
     * <p>
     * This comparator sorts things by timestamp first, this way we can find
     * all rows of the same age at once.
     */
    private static final class Cmp implements Comparator<byte[]> {

      /** The position with which the timestamp of metric starts.  */
      private final short timestamp_pos;

      public Cmp(final TSDB tsdb) {
        timestamp_pos = (short) (Const.SALT_WIDTH() + tsdb.metrics.width());
      }

      @Override
      public int compare(final byte[] a, final byte[] b) {
      // 取rowkey中的base_time进行排序
        final int c = Bytes.memcmp(a, b, timestamp_pos, Const.TIMESTAMP_BYTES);
        // If the timestamps are equal, sort according to the entire row key.
        return c != 0 ? c : Bytes.memcmp(a, b);
      }
  }
}
看看上面启动的daemon线程在做啥CompactionQueue#Thrd
/**
   * Background thread to trigger periodic compactions.
   */
  final class Thrd extends Thread {
    public Thrd() {
      super("CompactionThread");
    }

    @Override
    public void run() {
      while (true) {
        final int size = size();
        // 达到最小压缩阈值则触发flush()
          if (size > min_flush_threshold) {
            final int maxflushes = Math.max(min_flush_threshold,
              size * flush_interval * flush_speed / Const.MAX_TIMESPAN);
            final long now = System.currentTimeMillis();
            // 检查上个整点的数据能否被压缩
            flush(now / 1000 - Const.MAX_TIMESPAN - 1, maxflushes);
          }
      }
    }
}
再看CompactionQueue#flush(final long cut_off, int maxflushes)
private Deferred<ArrayList<Object>> flush(final long cut_off, int maxflushes) {
    final ArrayList<Deferred<Object>> ds =
      new ArrayList<Deferred<Object>>(Math.min(maxflushes, max_concurrent_flushes));
    int nflushes = 0;
    int seed = (int) (System.nanoTime() % 3);
    for (final byte[] row : this.keySet()) {
      final long base_time = Bytes.getUnsignedInt(row,
          Const.SALT_WIDTH() + metric_width);
      if (base_time > cut_off) {
        // base_time比较靠近当前时间,则直接跳出
        break;
      } else if (nflushes == max_concurrent_flushes) {
        break;
      }
      // 这里会发向hbase发get请求获取时序数据,在callback中进行压缩操作
      ds.add(tsdb.get(row).addCallbacks(compactcb, handle_read_error));
    }
    return group;
}
最后看一下compaction具体做了啥,见CompactionQueue#Compaction#compact()
public Deferred<Object> compact() {
  // merge the datapoints, ordered by timestamp and removing duplicates
  final ByteBufferList compacted_qual = new ByteBufferList(tot_values);
  final ByteBufferList compacted_val = new ByteBufferList(tot_values);

  mergeDatapoints(compacted_qual, compacted_val);

  // build the compacted columns
  final KeyValue compact = buildCompactedColumn(compacted_qual, compacted_val);

  final boolean write = updateDeletesCheckForWrite(compact);

  final byte[] key = compact.key();

  deleted_cells.addAndGet(to_delete.size());  // We're going to delete this.

  if (write) {
    // 把压缩后的结果回写到tsdb表
    Deferred<Object> deferred = tsdb.put(key, compact.qualifier(), compact.value(), compactedKVTimestamp);

    if (!to_delete.isEmpty()) {
      // 压缩结果写入成功后 delete查询出来的cells
      deferred = deferred.addCallbacks(new DeleteCompactedCB(to_delete), handle_write_error);
    }
    return deferred;
  }
}

// delete compacted cells的回调
private final class DeleteCompactedCB implements Callback<Object, Object> {

  /** What we're going to delete.  */
  private final byte[] key;
  private final byte[][] qualifiers;

  @Override
  public Object call(final Object arg) {
    return tsdb.delete(key, qualifiers).addErrback(handle_delete_error);
  }

  @Override
  public String toString() {
    return "delete compacted cells";
  }
}
追踪整个compaction过程,我们不难发现其中多了不少get、write、delete请求,数据量非常大的情况下无形给HBase带来不小压力。留意一下,这里可能也是我们重点优化的地方。
追加模式(appends)
相关文档:
http://opentsdb.net/docs/build/html/user_guide/writing/index.html#appends
Also in 2.2, writing to HBase columns via appends is now supported. This can improve both read and write performance in that TSDs will no longer maintain a queue of rows to compact at the end of each hour, thus preventing a massive read and re-write operation in HBase. However due to the way appends operate in HBase, an increase in CPU utilization, store file size and HDFS traffic will occur on the region servers. Make sure to monitor your HBase servers closely.
tsd.storage.enable_appends:默认是false
在追加模式下,opentsdb写入的时候,会将rowkey相同的点的value值写到一个单独的ColumnQualifier(0x050000)中。所以与之前的直接写入模式是兼容的,这就意味着可以随时启用或者禁用追加模式。
/** The prefix ID of append columns */
public static final byte APPEND_COLUMN_PREFIX = 0x05;

/** The full column qualifier for append columns */
public static final byte[] APPEND_COLUMN_QUALIFIER = new byte[]{APPEND_COLUMN_PREFIX, 0x00, 0x00};
显然这就是我们想要的压缩后的效果。少了把已经写入HBase的数据拉过来在opentsdb内存压缩,回写数据,再删除原数据的一系列操作,当然了压力应该是丢给了HBase。
追加模式会消耗更多的HBase集群的资源(官方是这么说的,究竟多大,有待研究),另外本人猜测对于大量高并发的写入可能有锁的同步问题,讲道理单从瞬间写入性能考虑,追加模式下的性能应该是不及之前的直接写入。
opentsdb UID的分配(UID Assignment)
相关文档:
http://opentsdb.net/docs/build/html/user_guide/uids.html#uid
相信到这里应该已经到UID有一定的认识了,使用UID大大节省了存储空间。
Within the storage system there is a counter that is incremented for each metric, tagk and tagv. When you create a new tsdb-uid table, this counter is set to 0 for each type.
很类似mysql中的自增主键。见UniqueId#allocateUid()
private Deferred<Long> allocateUid() {
// randomize_id默认是false,两种方式:一种是随机数uid,另外一种是递增uid
// tagk和tagv目前无法配置,用的是递增uid(metric倒是可配 tsd.core.uid.random_metrics默认false)
    if (randomize_id) {
    return Deferred.fromResult(RandomUniqueId.getRandomUID());
    } else { //实际走这里,会去hbase的tsdb-uid表请求递增uid
    return client.atomicIncrement(new AtomicIncrementRequest(table,
                                    MAXID_ROW, ID_FAMILY, kind));
    }
}
tsdb-uid表中rowkey为0x00的cell中存有目前三种类型的最大UID

这里我们看到metric、tagk、tagv三种类型的UID映射是独立的。另外,注意两个与此相关的配置项
tsd.core.auto_create_metrics:默认为false,是否给tsdb-uid表中不存在的metric分配UID,false的情况下,写入新的metric时序数据会抛出异常tsd.core.preload_uid_cache:默认为false,是否程序启动时就从tsdb-uid表获取UID并缓存在本地,见TSDB#TSDB(final HBaseClient client, final Config config)
if (config.getBoolean("tsd.core.preload_uid_cache")) {
    final ByteMap<UniqueId> uid_cache_map = new ByteMap<UniqueId>();
    uid_cache_map.put(METRICS_QUAL.getBytes(CHARSET), metrics);
    uid_cache_map.put(TAG_NAME_QUAL.getBytes(CHARSET), tag_names);
    uid_cache_map.put(TAG_VALUE_QUAL.getBytes(CHARSET), tag_values);
    UniqueId.preloadUidCache(this, uid_cache_map);
}
从这里我们也可以看到使用这种递增UID分配方式,先来的tagk必然会分配到数值较小的UID,后来的tagk会分配到数值较大的UID,如此一来结合上文写入的时候rowkey中的tags会按照tagk_uid的byte数组进行排序,就能得出最先写入的tagk是排在rowkey中较为靠前的位置,那么知道了这种规则,在某些情况下对于查询优化有没有帮助呢?
opentsdb 查询细节(Reading)
相关文档:
http://opentsdb.net/docs/build/html/user_guide/query/index.html
查询放在这个地方讲是因为我们只有弄清楚数据是怎么存的,才会明白如何取。通过前文我们知道写入的时候rowkey中的tags会按照tagk_uid的byte数组进行排序,那么同样从HBase读数据的时候讲道理也应该这样排序是不是。来看QueryUtil#setDataTableScanFilter()
但是,正常情况下的scan(除非查询的时候设置explicit_tags为true),对于tag的过滤并不是直接拼在rowkey中,而是放在scanner.setFilter(regex_filter)
final byte[] start_row = new byte[metric_salt_width + Const.TIMESTAMP_BYTES];
final byte[] end_row = new byte[metric_salt_width + Const.TIMESTAMP_BYTES];
scanner.setStartKey(start_row);
scanner.setStopKey(end_row);

// 关于regex_filter生成下面有简单例子
if (!(explicit_tags && enable_fuzzy_filter)) {
    scanner.setFilter(regex_filter);
    return;
}
QueryUtil#getRowKeyUIDRegex()
// Generate a regexp for our tags.  Say we have 2 tags: { 0 0 1 0 0 2 }
// and { 4 5 6 9 8 7 }, the regexp will be:
// "^.{7}(?:.{6})*\\Q\000\000\001\000\000\002\\E(?:.{6})*\\Q\004\005\006\011\010\007\\E(?:.{6})*$"
官方对查询设置explicit_tags为true的介绍:
http://opentsdb.net/docs/build/html/user_guide/query/filters.html#explicit-tags
意思我已经知道了要查询的metric明确只有这些tags,想查询的时序数据不会出现其他tag,这样opentsdb就会把用户过滤的tag直接拼到rowkey中,一定程度上优化了查询。见代码
if (explicit_tags && enable_fuzzy_filter) {
    fuzzy_key = new byte[prefix_width + (row_key_literals.size() *
        (name_width + value_width))];
    fuzzy_mask = new byte[prefix_width + (row_key_literals.size() *
        (name_width + value_width))];
    System.arraycopy(scanner.getCurrentKey(), 0, fuzzy_key, 0,
        scanner.getCurrentKey().length);

    // 因为已经明确了只有哪些指定的tag,这个时候才会把tags直接拼到startKey中
    scanner.setStartKey(fuzzy_key);
}
explicit_tags为true的情况下,会用FuzzyRowFilter,看一下源码中的描述
/**
 * FuzzyRowFilter is a server-side fast-forward filter that allows skipping
 * whole range of rows when scanning. The feature is available in HBase
 * 0.94.5 and above.
 * <p>
 * It takes two byte array to match a rowkey, one to hold the fixed value
 * and one to hold a mask indicating which bytes of the rowkey must match the
 * fixed value. The two arrays must have the same length.
 * <p>
 * Bytes in the mask can take two values, 0 meaning that the corresponding byte
 * in the rowkey must match the corresponding fixed byte and 1 meaning that the
 * corresponding byte in the rowkey can take any value.
 * <p>
 * One can combine several {@link FuzzyFilterPair} to match multiple patterns at
 * once.
 * <p>
 * Example :
 * You store logs with this rowkey design :
 *   group(3bytes)timestamp(4bytes)severity(1byte)
 *
 * You want to get all FATAL("5") logs :
 *   * Build a FuzzyFilterPair with
 *     - rowkey     : "????????5"
 *     - fuzzy mask : "111111110"
 * And CRITICAL("4") logs only for web servers :
 *   * Add another FuzzyFilterPair with
 *     - rowkey     : "web????4"
 *     - fuzzy mask : "00011110"
 *
 * @since 1.7
 */
public final class FuzzyRowFilter extends ScanFilter {
// ...
}
总结一下就是,如果你明确你要查的数据有哪几个tag,建议查询的时候指定explicit_tags为true,有助于查询优化。
# Example 1:
http://host:4242/api/query?start=1h-ago&m=sum:explicit_tags:sys.cpu.system{host=web01}

# Example 2:
http://host:4242/api/query?start=1h-ago&m=sum:explicit_tags:sys.cpu.system{host=*}{dc=*}

# Example 3:
{
    "start":1584408560754,
    "end":1584409460754,
    "msResolution":false,
    "queries":[
        {
            "aggregator":"avg",
            "metric":"metric.test",
            "downsample":"5m-avg",
            "explicitTags":true,
            "filters":[
                {
                    "type":"literal_or",
                    "tagk":"instance",
                    "filter":"total",
                    "groupBy":true
                },
                {
                    "type":"literal_or",
                    "tagk":"ip",
                    "filter":"192.168.1.1",
                    "groupBy":true
                }
            ]
        }
    ]
}
关于tsd.storage.use_otsdb_timestamp这个配置与HBase特性有关。下篇写优化的时候再讲,这里提出来放在这里。TsdbQuery#getScanner(final int salt_bucket)
// tsd.storage.use_otsdb_timestamp
if (tsdb.getConfig().use_otsdb_timestamp()) {
      long stTime = (getScanStartTimeSeconds() * 1000);
      long endTime = end_time == UNSET ? -1 : (getScanEndTimeSeconds() * 1000);
      if (tsdb.getConfig().get_date_tiered_compaction_start() <= stTime &&
          rollup_query == null) {
        // TODO - we could set this for rollups but we also need to write
        // the rollup columns at the proper time.
        scanner.setTimeRange(stTime, endTime);
      }
}
rowkey中加salt的情况(Salting)
相关文档:
http://opentsdb.net/docs/build/html/user_guide/writing/index.html#salting
时序数据的写入,写热点是一个不可规避的问题,当某个metric下数据点很多时,则该metric很容易造成写入热点,即往一个region server写,甚至同一个region,如果这样,对这部分数据的读写都会落到HBase集群中的一台机器上,无法发挥集群的处理能力,甚至直接将某个region server压垮。加salt就是为了将时序数据的rowkey打散,从而分配到不同的region中,以均衡负载。
When enabled, a configured number of bytes are prepended to each row key. Each metric and combination of tags is then hashed into one "bucket", the ID of which is written to the salt bytes
从2.2开始,OpenTSDB采取了允许将metric加salt,加salt后的变化就是在rowkey前会拼上一个桶编号(bucket index)。
To
enable saltingyou must modify the config file parametertsd.storage.salt.widthand optionallytsd.storage.salt.buckets. We recommend setting thesalt widthto1and determine the number ofbucketsbased on a factor of the number ofregion serversin your cluster. Note that atquerytime, the TSD will firetsd.storage.salt.bucketsnumber ofscannersto fetch data. The proper number of salt buckets must be determined through experimentation as at some pointquery performancemay suffer due to having too many scanners open and collating the results. In the future the salt width and buckets may be configurable but we didn't want folks changing settings on accident and losing data.
对上面的描述解释一下:
tsd.storage.salt.width:rowkey加多少个byte前缀(默认0(即不开启),如果启用的话 建议1)
tsd.storage.salt.buckets:分桶数(默认20,建议根据region servers数确定)
- 写入的时候如果启用了
salt,则根据metric_uid+所有[tagK+tagV]uid组成的byte数组,计算hashcode值,对分桶数取模,得出salt位
RowKey#prefixKeyWithSalt(注意:取的是关键代码,去除了干扰信息)
public static void prefixKeyWithSalt(final byte[] row_key) {
    // tsd.storage.salt.width
    if (Const.SALT_WIDTH() > 0) {
      final int tags_start = Const.SALT_WIDTH() + TSDB.metrics_width() +
          Const.TIMESTAMP_BYTES;

      // we want the metric and tags, not the timestamp
      final byte[] salt_base =
          new byte[row_key.length - Const.SALT_WIDTH() - Const.TIMESTAMP_BYTES];
      System.arraycopy(row_key, Const.SALT_WIDTH(), salt_base, 0, TSDB.metrics_width());
      System.arraycopy(row_key, tags_start,salt_base, TSDB.metrics_width(),
          row_key.length - tags_start);
      // 这里通过对salt_buckets取模得出salt位的数值
      int modulo = Arrays.hashCode(salt_base) % Const.SALT_BUCKETS();// tsd.storage.salt.buckets

      final byte[] salt = getSaltBytes(modulo);
      // 填充salt位的byte
      System.arraycopy(salt, 0, row_key, 0, Const.SALT_WIDTH());
    }
}
- 这个时候大多数人就会疑惑了,在
rowkey前加了salt位,那么查询的时候怎么搞?
客户端查询OpenTSDB一条数据,OpenTSDB将这个请求拆成分桶数个查询到HBase,然后返回桶数个结果集到OpenTSDB层做合并。对HBase并发请求相应的也会桶数倍的扩大。见TsdbQuery#findSpans()
if (Const.SALT_WIDTH() > 0) {
    final List<Scanner> scanners = new ArrayList<Scanner>(Const.SALT_BUCKETS());
    for (int i = 0; i < Const.SALT_BUCKETS(); i++) {
      // 构建出等于分桶数大小个scanner
      scanners.add(getScanner(i));
    }
    scan_start_time = DateTime.nanoTime();
    return new SaltScanner(tsdb, metric, scanners, spans, scanner_filters,
        delete, rollup_query, query_stats, query_index, null,
        max_bytes, max_data_points).scan();
}
在每一个scanner的rowkey前面填充bucket index作为salt位,这样才能去hbase中scan到完整的结果,见QueryUtil#getMetricScanner()
public static Scanner getMetricScanner(final TSDB tsdb, final int salt_bucket,
      final byte[] metric, final int start, final int stop,
      final byte[] table, final byte[] family) {

    if (Const.SALT_WIDTH() > 0) {
      final byte[] salt = RowKey.getSaltBytes(salt_bucket);
      // 这里把salt_bucket填充到rowkey中
      System.arraycopy(salt, 0, start_row, 0, Const.SALT_WIDTH());
      System.arraycopy(salt, 0, end_row, 0, Const.SALT_WIDTH());
    }
    return scanner;
}
其他配置(Configuration)
相关文档:
opentsdb的配置:http://opentsdb.net/docs/build/html/user_guide/configuration.htmlAsyncHBase client的配置:http://opentsdb.github.io/asynchbase/docs/build/html/configuration.html
opentsdb使用的hbase client是http://opentsdb.github.io/asynchbase/
public TSDB(final HBaseClient client, final Config config) {
    this.config = config;
    if (client == null) {
      final org.hbase.async.Config async_config;
      if (config.configLocation() != null && !config.configLocation().isEmpty()) {
        try {
          // AsyncHBase client读取和opentsdb一样的文件
          // 所以 有一些需要设置AsyncHBase client的地方直接写在opentsdb的配置文件就能生效
          async_config = new org.hbase.async.Config(config.configLocation());
        } catch (final IOException e) {
          throw new RuntimeException("Failed to read the config file: " +
              config.configLocation(), e);
        }
      } else {
        async_config = new org.hbase.async.Config();
      }
      async_config.overrideConfig("hbase.zookeeper.znode.parent",
          config.getString("tsd.storage.hbase.zk_basedir"));
      async_config.overrideConfig("hbase.zookeeper.quorum",
          config.getString("tsd.storage.hbase.zk_quorum"));
      this.client = new HBaseClient(async_config);
    } else {
      this.client = client;
    }
}
性能优化的一方面可能与参数调优有关,有些与启动参数,操作系统设置等有关,有些参数就是写在配置文件的(比如说最大连接数、超时时间等等)
这里提一下前面没有讲到的与opentsdb相关的两个配置。
tsd.query.skip_unresolved_tagvs:默认为false,查询的时候遇到不存在的tagv时候是否跳过,true则跳过,false则抛出异常,个人感觉这个默认false极不友好。TagVFilter#resolveTags()#TagVErrback
/**
  * Allows the filter to avoid killing the entire query when we can't resolve
  * a tag value to a UID.
  */
class TagVErrback implements Callback<byte[], Exception> {
  @Override
  public byte[] call(final Exception e) throws Exception {
    if (config.getBoolean("tsd.query.skip_unresolved_tagvs")) {
      LOG.warn("Query tag value not found: " + e.getMessage());
      return null;
    } else {
      // 默认情况下直接抛出异常
      throw e;
    }
  }
}
AsyncHBase Configuration中的hbase.rpc.timeout:How long, in milliseconds, to wait for a response to an RPC from a region server before failing the RPC with a RpcTimedOutException. This value can be overridden on a per-RPC basis. A value of 0 will not allow RPCs to timeout
http接口(HTTP API)
相关文档:
http://opentsdb.net/docs/build/html/api_http/index.html
常用:
- put:
http://opentsdb.net/docs/build/html/api_http/put.html - query:
http://opentsdb.net/docs/build/html/api_http/query/index.html - uid:
http://opentsdb.net/docs/build/html/api_http/uid/index.html - stats:
http://opentsdb.net/docs/build/html/api_http/stats/index.html
同时我们注意到:OpenTSDB3.0相关的工作正在进行中(work-in-progress),详情:http://opentsdb.net/docs/3x/build/html/index.html
opentsdb连接Kerberos认证的HBase(非重点,仅顺手记录于此)
相关文档:
http://opentsdb.github.io/asynchbase/docs/build/html/authentication.html
http://opentsdb.github.io/asynchbase/docs/build/html/configuration.html(搜kerberos关键字)
相关问题讨论:
https://github.com/OpenTSDB/opentsdb/issues/491
参考带有Kerberos认证hbase docker镜像Dockerfile项目:
https://github.com/Knappek/docker-phoenix-secure
该项目中bootstrap-phoenix.sh、docker-compose.yml以及config_files下的配置文件很有参考价值
具体操作
- 根据实际情况在
/etc/opentsdb/opentsdb.conf配置 末尾添加:
hbase.security.auth.enable=true
hbase.security.authentication=kerberos
hbase.sasl.clientconfig=Client
hbase.kerberos.regionserver.principal=hbase/_HOST@EXAMPLE.COM
- 根据实际情况新建
hbase-client.jaas文件,文件内容基本如下样子
Client {
    com.sun.security.auth.module.Krb5LoginModule required
    useKeyTab=true
    storeKey=true
    useTicketCache=false
    keyTab="/etc/security/keytabs/hbase.keytab"
    principal="hbase/phoenix.docker.com";
};
- 修改
/usr/share/opentsdb/etc/init.d/opentsdb文件,修改启动参数
# start command的位置(约第78行处)加上 -Djava.security.auth.login.config=hbase-client.jaas文件路径
# 注意:如果Zookeeper没有加Kerberos认证,再加一个参数 -Dzookeeper.sasl.client=false
JVMARGS="-Djava.security.auth.login.config=/.../jaas.conf"
重启opentsdb,如果成功,则能看到如下示例日志:
13:31:55.045 INFO [
ZooKeeperSaslClient.run] - Client will useGSSAPI as SASL mechanism.
13:31:55.062 INFO [Login.getRefreshTime] - TGT valid starting at: Fri Apr 03 13:31:54 CST 2020
13:31:55.062 INFO [Login.getRefreshTime] - TGT expires: Sat Apr 04 13:31:54 CST 2020
13:31:55.255 INFO [
KerberosClientAuthProvider.run] - Client will useGSSAPI as SASL mechanism.
13:31:55.269 INFO [RegionClient.channelConnected] - Initialized security helper: org.hbase.async.SecureRpcHelper96@6471f1e for region client: RegionClient@63709091(chan=null, #pending_rpcs=2, #batched=0, #rpcs_inflight=0)
13:31:55.276 INFO [SecureRpcHelper96.handleResponse] -SASL client context established. Negotiated QoP: auth on for: RegionClient@63709091(chan=null, #pending_rpcs=2, #batched=0, #rpcs_inflight=0)
写在后面
阅读、探索的过程很累,遇到不太理解的地方又会很困惑,但柳暗花明又一村,凌绝顶一览众山小的喜悦却难以言表。另外,整理的过程也挺烦人,既然花时间整理了,我尽量让感兴趣的读者能从中有一丝收获。当然了,整理的过程也锻炼了我学习知识、解决问题的思路与能力。由于本人能力之有限、理解之不透彻,文中如有错误的理解、不恰当的描述,衷心希望朋友提出一起讨论!


 浙公网安备 33010602011771号