
在互联网高速发展的今天,尤其在电子商务的发展,要求服务器能够提供不间断服务。在电子商务中,如果服务器宕机,造成的损失是不可估量的。要保证服务器不间断服务,就需要对服务器实现冗余。在众多的实现服务器冗余的解决方案中,Pacemaker为我们提供了廉价的、可伸缩的高可用解决方案。
双机热备测试环境如下:
|
1
2
3
4
5
|
主节点:10.0.0.20副节点:10.0.0.21虚拟IP:10.0.0.100 |
一、关闭selinux和防火墙-两台机均执行
1、 关闭selinux
|
1
2
|
$ sudo sed -i “s/SELINUX=enforcing/SELINUX=disabled/g” /etc/selinux/config$ sudo reboot |
2、 闭防火墙
|
1
2
|
$ sudo systemctl stop firewalld$ sudo systemctl disable firewalld |
二、两台机安装Pacamaker
1、 利用yum安装Pacemaker
|
1
|
$ sudo yum install -y fence-agents-all corosync pacemaker pcs |
2、 修改两台机的hostname
|
1
2
3
4
5
|
#主节点改为node1$ sudo hostnamectl set-hostname node1#副节点$ sudo hostnamectl -set-hostname node2 |
3、 修改两台机的hosts
|
1
2
3
4
|
$ sudo vim /etc/hosts 10.0.0.20 node1 10.0.0.21 node2 |
三、node1与node2实现无密钥访问
|
1
2
3
4
5
6
7
|
#在两台机均运行以下命令$ sudo -i# ssh-keygen# ssh-copy-id -p 22 root@10.0.0.20# ssh-copy-id -p 22 root@10.0.0.21 |
四、配置两台机的集群用户hacluster,此帐户在安装Pacemaker时已经自动创建。
|
1
2
3
|
#设置hacluster用户的密码$ sudo passwd hacluster |
五、配置集群节点之间的认证
1、 启动并设置开机启动pcsd服务,两台机上均执行以下命令
|
1
2
3
|
$ sudo systemctl start pcsd$ sudo systemctl enable pcsd |
2、 配置节点间的认证,以下命令只在node1节点上执行
|
1
2
3
|
#以下操作需要输入用户名hacluster和密码$ sudo pcs cluster auth node1 node2 |
到此为止,节点认证配置完成!
六、Pacemaker可以为多种服务提供支持,例如Apache、MySQL、Xen等,可使用的类型有IP地址、文件系统、服务、fence设备等。以下以Apache为例。
1、 两台机均安装httpd
|
1
|
$ sudo yum install -y httpd |
2、 设置httpd.conf-两台主机均配置
|
1
2
3
4
5
6
7
8
9
10
|
$ sudo vim /etc/httpd/conf/httpd.conf Listen 0.0.0.0:80 ServerName www.node1.com //另外一台为www.node2.coom#设置服务器状态页面以便集群检测 <Location /server-status> SetHandler server-status Require all granted </Location> |
3、Pacemaker可以控制httpd服务的启动和关闭,所以node1和node2配置完httpd后需关闭httpd服务。
|
1
|
$ sudo systemctl stop httpd |
七、 新建并启动集群,以下操作均在node1上执行
1、 新建一个名为mycluster的集群
|
1
|
$ sudo pcs cluster setup --name mycluster node1 node2 |
2、 启动集群
|
1
|
$ sudo pcs cluster start --all |
3、 设置自启动集群
|
1
2
3
4
|
$ sudo pcs cluster enable –all# 查看集群状态$ sudo pcs status |
通过以上在node1的设置后,所有的设置都会同步在node2上。
八、为集群添加资源
|
1
2
3
4
5
6
7
8
9
|
#添加一个名为VIP的IP地址资源#使用heartbeat作为心跳检测#集群每隔30s检查该资源一次$ sudo pcs resource create VIP ocf:heartbeat:IPaddr2 ip=10.0.0.100 cidr_netmask=24 op monitor interval=30s$ sudo pcs resource create Web ocf:heartbeat:apache configfile=/etc/httpd/conf/httpd.conf statusurl="http://127.0.0.1/server-status" op monitor interval=30s$ sudo pcs status |
九、调整资源,让VIP和Web两个资源“捆绑”在一起。
|
1
2
3
4
5
6
7
8
9
|
# 方式一:将VIP和Web添加到myweb组中$ sudo pcs resource group add myweb VIP$ sudo pcs resource group add myweb Web# 方式二:使用托管约束$ sudo pcs constraint colocation add Web VIP INFINITY# 设置先启动VIP,再启动Web$ sudo pcs constraint order start VIP then start Web |
十、优先级:如果node1与node2的硬件配置不同,那么应该调整节点的优先级,让资源运行于硬件配置更好的服务器上,待其失效后再转移至较低配置的服务器上。这就需要配置优先级(Pacemaker中称为Location)。
1、调整Location
|
1
2
3
|
# 数值越大表示优先级越高$ sudo pcs constraint location Web prefers node1=10$ sudo pcs constraint location Web prefers node2=5 |
2、查看设置结果
|
1
|
$ sudo crm_simulate -sL |
3、验证VIP是否启用-需显示IP10.0.0.100
|
1
|
$ ip addr show |
4、验证httpd是否启动
|
1
|
$ ps -aux|grep httpd |
5、报错:WARNING: no stonith devices and stonith-enabled is not false,请执行以下命令:
|
1
|
$ sudo pcs property set stonith-enabled=false |
十一、 启动后正常情况下VIP设置在主节点10.0.0.20上。如主节点故障,则节点node2自动接管服务,方法是直接重启节点node1,然后观察备用节点是否接管了主机的资源,测试过程如下:
1、 在节点node1上执行重启操作
|
1
2
|
#执行重启$ sudo reboot |
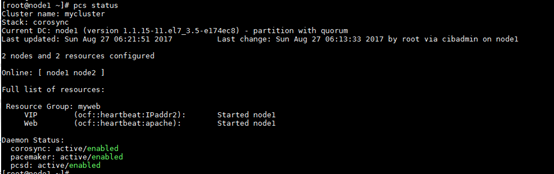
2、node1重启前截图
3、node1重启后状态如下图
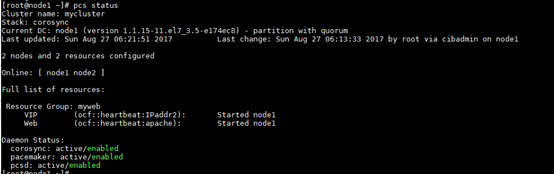
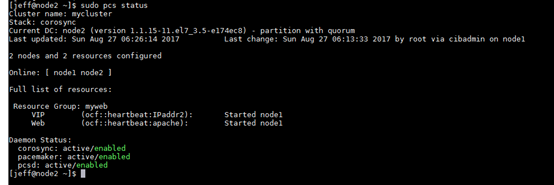
4、当节点node1故障时,地点node2收不到心跳请求,超过设置的时间节点后node2启用资源接管程序,上述命令输出中说明VIP和Web已经被节点node2成功接管。如果节点node1恢复且设置了优先级,VIP和Web又会重新被节点node1接管。下图为node1重启后的截图:

 浙公网安备 33010602011771号