
零基础学习SpringBoot3笔记01_2023-01-13
2023-01-13
参考
传送门:超详细的VsCode创建SpringBoot项目(图文并茂)
1. 环境
1.1. 软件环境
- 安装JDK17并配置环境变量,略
- 安装MySQL5.5并配置环境变量,略
- 安装MySQL客户端工具HeidiSQL,略
- 开发工具:IntelliJ或者VSCode,这里用的是IntelliJ
- 安装插件MybatisX
- 安装Postman
1.2. 配置文件基本信息
spring:
  datasource:  # 配置mysql
    driver-class-name: com.mysql.cj.jdbc.Driver
    url: jdbc:mysql://IP:端口/表名?characterEncoding=UTF-8&zeroDateTimeBehavior=convertToNull&allowMultiQueries=true&serverTimezone=Asia/Shanghai&useSSL=false
    username: *********
    password: *********
server:
  port: 8080  # 默认端口

mybatis:
  mapper-locations: classpath:mappers/*.xml
2. 查库接口
查库接口的编写顺序是:
- 建表
- 建表是为了持久化数据
- 创建实体类
- 实体类用于和表结构关联
- 创建接口类
- 接口类用于声明对数据库的操作接口,包括名称、入参、出参
- 创建MyBatis映射
- MyBatis映射用于声明每个接口对应的入参、出参以及所使用的SQL语句
- 创建Controller
- Controller用于向外部提供访问地址以及实现业务调用
- 测试
- 用于验证接口数据是否与设计一致
2.1. 建表
这里用的数据库是MySQL,客户端是HeidiSQL
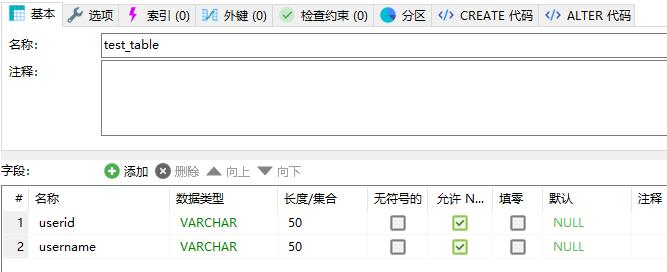
现在自己准备好增删改查的语句并在HeidiSQL通过测试。
2.2. 创建实体类
建包:entity
实体类要放在entity包下,类名对应表名,成员名称对应字段名称,如下:
package cn.bugr.vscode_springboot.entity;

import lombok.Data;

@Data // @Data注解会帮助我们自动生成set和get方法
public class TestTable {
	private String userid;
	private String username;
}
2.3. 创建接口
建包:dao、建接口类,里面声明一个方法,查询所有,如下:
package cn.bugr.vscode_springboot.dao;

import java.util.List;
import org.apache.ibatis.annotations.Mapper;
import cn.bugr.vscode_springboot.entity.TestTable;

@Mapper // 注入到容器中
public interface ITestTableDao {

	List<TestTable> findAll();

}
2.4. 创建映射
在resources下建目录mappers,在mappers下建文件TestTableMapper.xml,注意文件名跟上面实体类对应。
<?xml version="1.0" encoding="UTF-8"?>
<!DOCTYPE mapper
	PUBLIC "-//mybatis.org//DTD Mapper 3.0//EN"
	"http://mybatis.org/dtd/mybatis-3-mapper.dtd">
   <!-- 会以namespace 和 id 在mapper 中查询具体的方法
		resultType 表示返回对象的数据类型
		parameterType 表示传入的数据对象
		id  唯一标识,要与命名空间(抽象方法)中定义的方法名称一致
	-->
<mapper namespace="cn.bugr.vscode_springboot.dao.ITestTableDao">

  <select id="findAll" resultType="cn.bugr.vscode_springboot.entity.TestTable">
    select userid, username from test_table
  </select>

</mapper>
2.5. 创建Controller
建package为controller,在里面建类TestTableController,如下:
package cn.bugr.vscode_springboot.controller;

import java.util.List;

import org.springframework.beans.factory.annotation.Autowired;
import org.springframework.web.bind.annotation.GetMapping;
import org.springframework.web.bind.annotation.PathVariable;
import org.springframework.web.bind.annotation.RequestMapping;
import org.springframework.web.bind.annotation.RestController;

import cn.bugr.vscode_springboot.dao.ITestTableDao;
import cn.bugr.vscode_springboot.entity.TestTable;

@RestController // 注册为spring的一个组件,这样才能在里面使用@Autowaire,才能使用Dao接口
@RequestMapping("/test") // 定义请求前缀,影响里面的所有定义
public class TestTableController {

	@Autowired // 自动注入
	private ITestTableDao iTestTableDao;

	// @GetMapping表示get请求,路径中的花括号表示传参
	@GetMapping("/findall")
	public List<TestTable> testTable() {
		return iTestTableDao.findAll();
	}
}
2.6. 测试
使用Postman进行测试,由于上面的请求是GetMapping,所以在Postman中也要使用GET,点击Send之后会得到服务器的返回数据,如下:
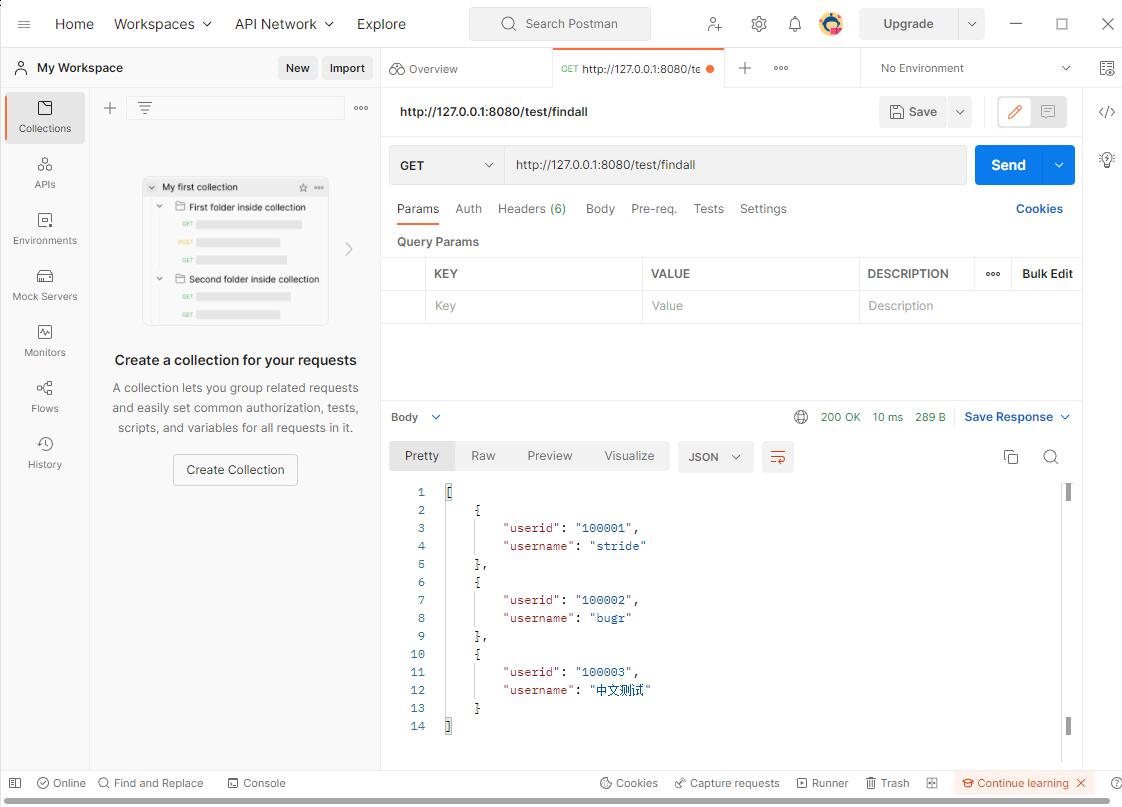
把以上内容练会、练懂,再进行下一步
2.7. 封装返回结果
从上一步的返回结果中可以看到,查询数据被直接返回了,但实际应用中,如果数据为空,则前端并不知道是操作失败了还是想要的数据就是空,所以返回结果应该包含操作状态(code)、错误码(msg)、数据(data),如:
// 有错误时返回的例子:
{
    code: '400',
    msg: 'session已过期'
}
// 成功时返回的例子:
{
    code: '200',
    data:[{
      id: '1000001',
      username: 'zhangsan',
      realname: '张三'
    }]
}
2.7.1. 创建返回类
建包common,建类Result.java,如下:
package cn.bugr.vscode_springboot.common;

import lombok.Data;

@Data
public class Result {
	// 标识,与前端约定好标识码
	private String code;
	// 如果code表示错误,msg应存储错误信息
	private String msg;
	// 数据对象,code表示成功时应有此数据
	private Object data;

	private static final String SUCCESS_CODE = "200";
	private static final String ERROR_CODE = "-1";
	private static final String SUCCESS_MSG = "请求成功";

	/**
	 * 操作成功,无返回值
	 *
	 * @return
	 */
	public static Result success() {
		Result result = new Result();
		result.setCode(SUCCESS_CODE);
		result.setMsg(SUCCESS_MSG);
		return result;
	}

	/**
	 * 操作成功,有返回值
	 *
	 * @return
	 */
	public static Result success(Object obj) {
		Result result = new Result();
		result.setCode(SUCCESS_CODE);
		result.setMsg(SUCCESS_MSG);
		result.setData(obj);
		return result;
	}

	/**
	 * 操作失败
	 *
	 * @param errorMsg
	 * @return
	 */
	public static Result error(String errorMsg) {
		Result result = new Result();
		result.setCode(ERROR_CODE);
		result.setMsg(errorMsg);
		return result;
	}
}
2.7.2. 修改Controller
Controller类中只有一个方法,返回了查询所有的数据:
return iTestTableDao.findAll();
将其改为
return Result.success(iTestTableDao.findAll());
此时返回值类型为Result,所以也要修改方法声明为Result,修改Controller的返回值类型为Result,最终如下:
TestTableController.java
package cn.bugr.vscode_springboot.controller;

import org.springframework.beans.factory.annotation.Autowired;
import org.springframework.web.bind.annotation.GetMapping;
import org.springframework.web.bind.annotation.RequestMapping;
import org.springframework.web.bind.annotation.RestController;

import cn.bugr.vscode_springboot.common.Result;
import cn.bugr.vscode_springboot.dao.ITestTableDao;

@RestController // 注册为spring的一个组件,这样才能在里面使用@Autowaire,才能使用Dao接口
@RequestMapping("/test") // 定义请求前缀,影响里面的所有定义
public class TestTableController {

	@Autowired // 自动注入
	private ITestTableDao iTestTableDao;

	// @GetMapping表示get请求,路径中的花括号表示传参
	@GetMapping("/findall")
	public Result testTable() {
		return Result.success(iTestTableDao.findAll());
	}
}
使用Postman测试
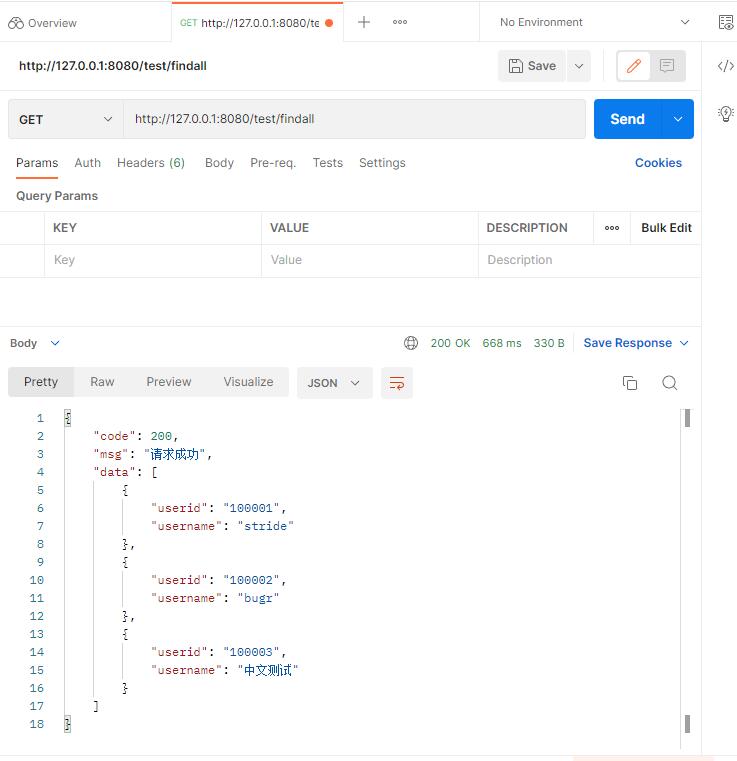
这样的数据,就可以给前端使用了。
2.8.请求类型
从客户端发来的请求,一般按照Restful规范设置请求类型:
- 查询使用GET
- 新增使用POST
- 修改使用UPDATE
- 删除使用DELETE
2.8.1. 实现
上面做的 findAll 练习并不一定适合在实际应用中使用,绝大多数情况下都是有查询参数的,如查询某个用户的某个信息、查询某条短信数据等,所以接下来是带参数的查询。
步骤:
- 在Dao中添加接口
- 添加映射
- 添加Controller
- 测试
下面是全部代码,仔细看注释。
ITestTableDao.java
package cn.bugr.vscode_springboot.dao;

import java.util.List;

import org.apache.ibatis.annotations.Mapper;
import org.apache.ibatis.annotations.Param;
import org.springframework.web.bind.annotation.RequestBody;

import cn.bugr.vscode_springboot.entity.TestTable;

@Mapper // 注入到容器中
public interface ITestTableDao {

	List<TestTable> findAll();

	TestTable findById(String id);

	// 当有多个参数的时候,必须使用@Param指定参数名称
	TestTable findByTestTable(@Param("id") String id, @Param("name") String name);

	TestTable findByTestTableObj(@RequestBody TestTable table);

	// insert/update/delete只会返回数字,即:此操作影响了几行
	int insert(TestTable table);

	int update(@Param("id") String id, @Param("name") String name);

	int delete(String id);
}
TestTableMapper.xml
<?xml version="1.0" encoding="UTF-8"?>
<!DOCTYPE mapper
	PUBLIC "-//mybatis.org//DTD Mapper 3.0//EN"
	"http://mybatis.org/dtd/mybatis-3-mapper.dtd">
   <!-- 会以namespace 和 id 在mapper 中查询具体的方法
			resultType 表示返回对象的数据类型
			parameterType 表示传入的数据对象
			id  唯一标识,要与命名空间(抽象方法)中定义的方法名称一致
	-->
<mapper namespace="cn.bugr.vscode_springboot.dao.ITestTableDao">

	<select id="findAll" resultType="cn.bugr.vscode_springboot.entity.TestTable">
    select userid, username from test_table
	</select>

	<select id="findById" resultType="cn.bugr.vscode_springboot.entity.TestTable">
		select userid, username from test_table where userid = #{id}
	</select>

	<select id="findByTestTable" resultType="cn.bugr.vscode_springboot.entity.TestTable">
		select userid, username from test_table where userid = #{id} and username = #{name}
	</select>

	<select id="findByTestTableObj" resultType="cn.bugr.vscode_springboot.entity.TestTable">
		select userid, username from test_table where userid = #{table.id} and username = #{table.name}
	</select>

	<!-- 这个insert传的是对象,直接用花括号使用对象中的成员名称,传入数据使用json形式,注意后面的测试方法 -->
	<insert id="insert">
		insert into test_table (userid, username) values ( #{userid}, #{username} )
	</insert>

	<!-- update也可以使用对象,但这里为了演示只使用了字符串 -->
	<update id="update">
		update test_table set username= #{name} where userid = #{id}
	</update>

	<delete id="delete">
		delete from test_table where userid = #{id}
	</delete>

</mapper>
TestTableController.java
package cn.bugr.vscode_springboot.controller;
import org.springframework.beans.factory.annotation.Autowired;
import org.springframework.web.bind.annotation.DeleteMapping;
import org.springframework.web.bind.annotation.GetMapping;
import org.springframework.web.bind.annotation.PathVariable;
import org.springframework.web.bind.annotation.PostMapping;
import org.springframework.web.bind.annotation.PutMapping;
import org.springframework.web.bind.annotation.RequestBody;
import org.springframework.web.bind.annotation.RequestMapping;
import org.springframework.web.bind.annotation.RestController;
import cn.bugr.vscode_springboot.common.Result;
import cn.bugr.vscode_springboot.dao.ITestTableDao;
import cn.bugr.vscode_springboot.entity.TestTable;
@RestController // 注册为spring的一个组件,这样才能在里面使用@Autowaire,才能使用Dao接口
@RequestMapping("/test") // 定义请求前缀,影响里面的所有定义
public class TestTableController {
@Autowired // 自动注入
private ITestTableDao iTestTableDao;
// @GetMapping表示get请求,路径中的花括号表示传参
@GetMapping("/findall")
public Result testTable() {
return Result.success(iTestTableDao.findAll());
}
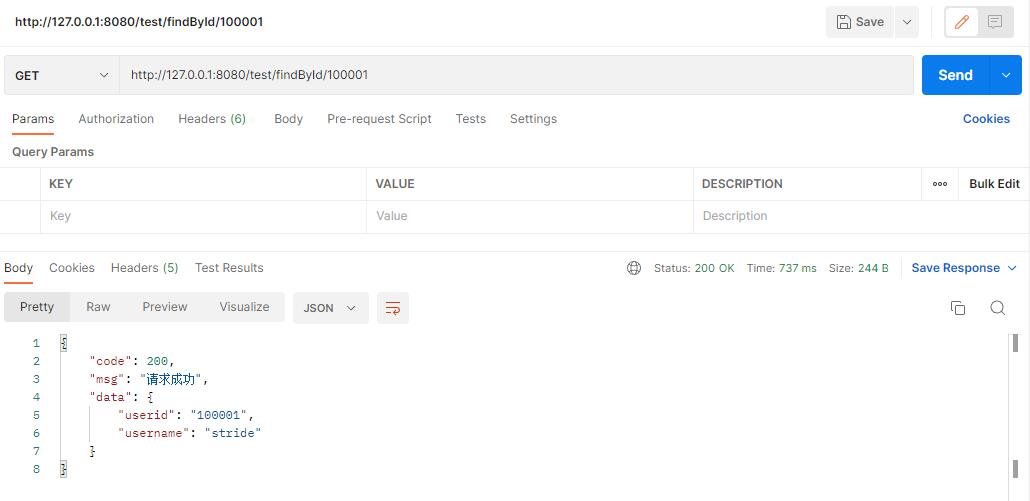
@GetMapping("/findById/{id}") // http://127.0.0.1:8080/test/findById/100001
public Result findById(@PathVariable String id) {
return Result.success(iTestTableDao.findById(id));
}
@GetMapping("/findByTestTable")
public Result findByTestTable(String id, String name) {
return Result.success(iTestTableDao.findByTestTable(id, name));
}
@PostMapping("/addTestTable")
public Result insert(@RequestBody TestTable table) {
return Result.success(iTestTableDao.insert(table));
}
@PutMapping("/updateTestTable")
public Result update(String id, String name) {
if (id == null || id.length() == 0 || name == null || name.length() == 0) {
return Result.error("参数错误");
}
return Result.success(iTestTableDao.update(id, name));
}
@DeleteMapping("/deleteTestTable")
public Result delete(String id) {
return Result.success(iTestTableDao.delete(id));
}
}
2.8.2. 测试
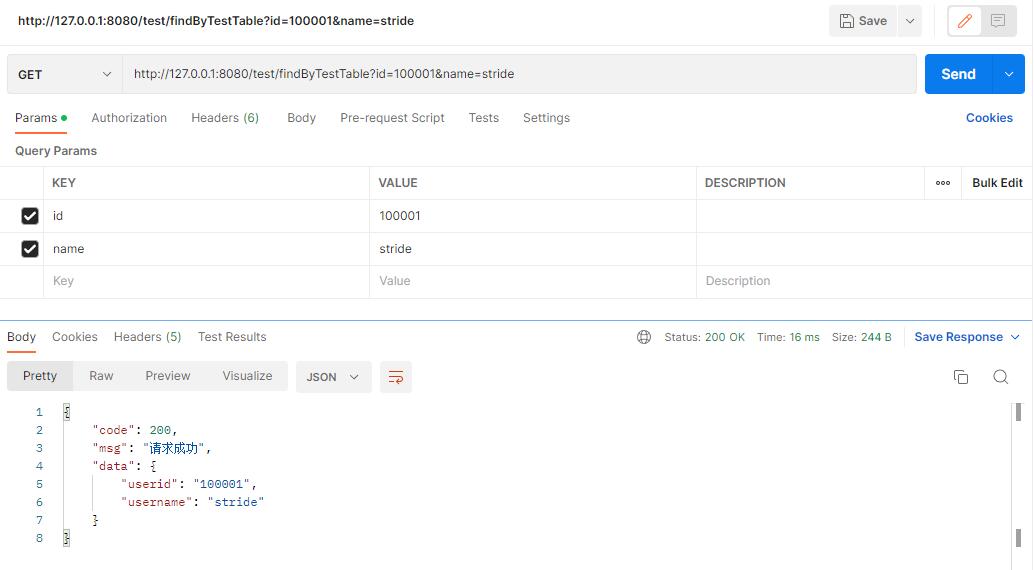
下图是Restful风格的GET请求
下图是传统链接的GET请求
下图是传入JSON数据的测试方法,实际应用中绝大多数情况都是使用此方法向后台传递数据,注意方法为POST,接下来选择了BODY、raw、JSON。

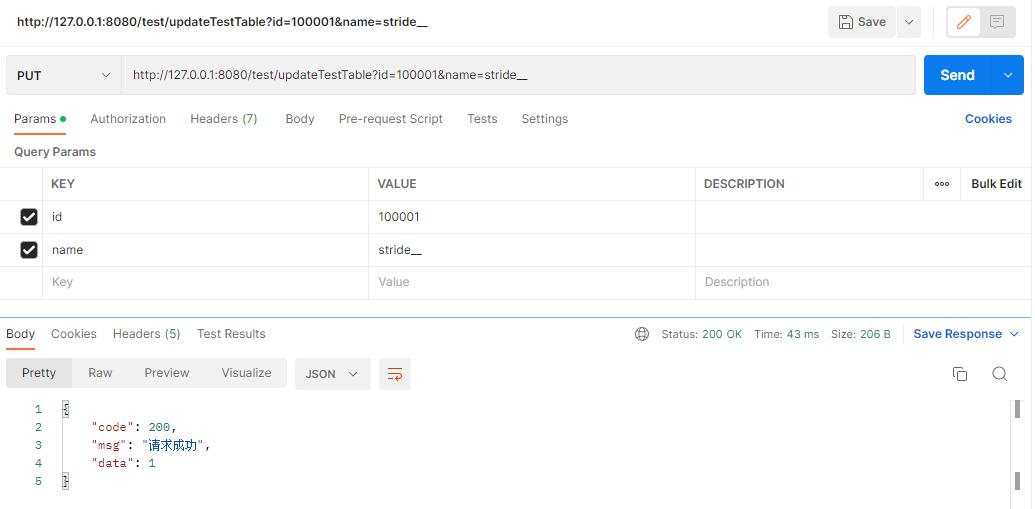
下图是要修改用户名,方法为PUT
下图是DELETE方法

2.9. 允许跨域
前端服务所在IP、端口与后端服务的IP、端口不同则会报跨域错误,添加一个配置文件即可解决。
在网上搜索 spring boot 跨域 ,找一个全局跨域的代码,如:
在 common 包下建类 GlobalCorsConfig
package cn.bugr.vscode_springboot.common;

import org.springframework.context.annotation.Bean;
import org.springframework.context.annotation.Configuration;
import org.springframework.web.cors.CorsConfiguration;
import org.springframework.web.cors.UrlBasedCorsConfigurationSource;
import org.springframework.web.filter.CorsFilter;

@Configuration
public class GlobalCorsConfig {

	@Bean
	public CorsFilter corsFilter() {
		// 1. 添加 CORS配置信息
		CorsConfiguration config = new CorsConfiguration();
		// 放行哪些原始域
		config.addAllowedOrigin("*");
		// 是否发送 Cookie
		config.setAllowCredentials(true);
		// 放行哪些请求方式
		config.addAllowedMethod("*");
		// 放行哪些原始请求头部信息
		config.addAllowedHeader("*");
		// 暴露哪些头部信息
		config.addExposedHeader("*");
		// 2. 添加映射路径
		UrlBasedCorsConfigurationSource corsConfigurationSource = new UrlBasedCorsConfigurationSource();
		corsConfigurationSource.registerCorsConfiguration("/**", config);
		// 3. 返回新的CorsFilter
		return new CorsFilter(corsConfigurationSource);
	}
}
这样,被分离的前端就可以与后端交互了。
2.10. 复杂条件查询
-------- 以下无正文 --------

 浙公网安备 33010602011771号