Python - 获取微信好友地域分布 Python - 获取朋友圈朋友性别比例 Python-根据微信好友个性签名生成词云
效果
依赖
该demo需要下载两个依赖模块:
pip install wxpy==0.3.9.8
pip install echarts-countries-pypkg==0.1.6
pip install pyecharts_snapshot==0.2.0   # 下载失败:pip install -i https://pypi.doubanio.com/simple/ pyecharts_snapshot
pip install echarts-countries-pypkg==0.1.6  # 全球国家地图
pip install echarts-china-provinces-pypkg==0.0.3   # 中国省级地图
pip install echarts-china-cities-pypkg==0.0.9    # 中国市级地图
注意,别忘了下载地图.......
代码示例
from wxpy import *
from pyecharts import Map
import webbrowser
bot = Bot()
friends = bot.friends()
area_dic = {} # 定义一个字典,用来存放省市以及省市人数
for friend in friends:
# friend.province # 所在省份
# friend.city # 所在城市
print(friend, friend.province)
if friend.province not in area_dic:
area_dic[friend.province] = 1
else:
area_dic[friend.province] += 1
attr = area_dic.keys()
value = area_dic.values()
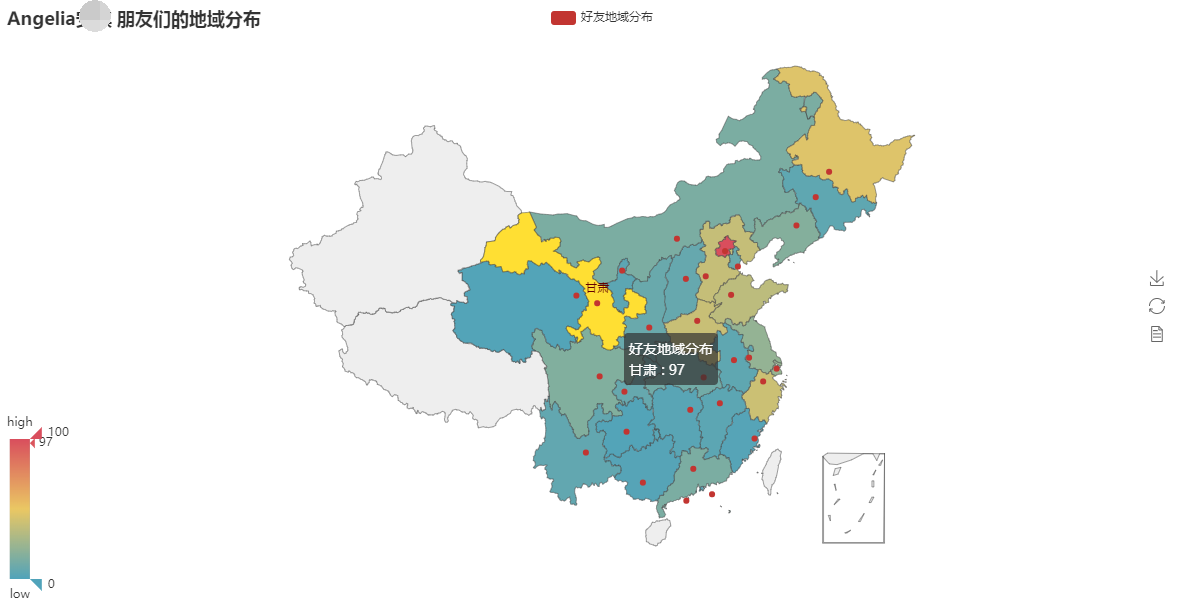
map = Map("%s 朋友们的地域分布" % bot.self.name, width=1200, height=600)
map.add(
"好友地域分布",
attr,
value,
maptype='china',
# maptype='world',
is_visualmap=True, # 结合体VisualMap
) # 图表名称str,属性名称list,属性所对应的值list,
# is_visualmap -> bool 是否使用视觉映射组件
map.render('area.html')
webbrowser.open("area.html")
before
注意,有的人在扫码登陆的时候,提示:
KeyError: 'pass_ticket'
这是因为你的微信账号现在已经不允许登录网页版......
效果展示
依赖
pip install wxpy  # 备用下载地址:pip install -i https://pypi.tuna.tsinghua.edu.cn/simple wxpy
pip install pyecharts==0.5.11       # 备用下载地址:pip install -i https://pypi.tuna.tsinghua.edu.cn/simple pyecharts==0.5.11
pip install pyecharts_snapshot  # 备用下载地址:pip install -i https://pypi.tuna.tsinghua.edu.cn/simple pyecharts_snapshot
注意,为了避免pyecharts版本问题带来的不变,这里使用指定版本。
代码示例
import wxpy
import webbrowser
from pyecharts import Pie
# 1. 登录
bot = wxpy.Bot() # cache_path=True 可以不填,但每次都要重新扫描
# 2. 获取所有的朋友对象,放到列表中
friends = bot.friends()
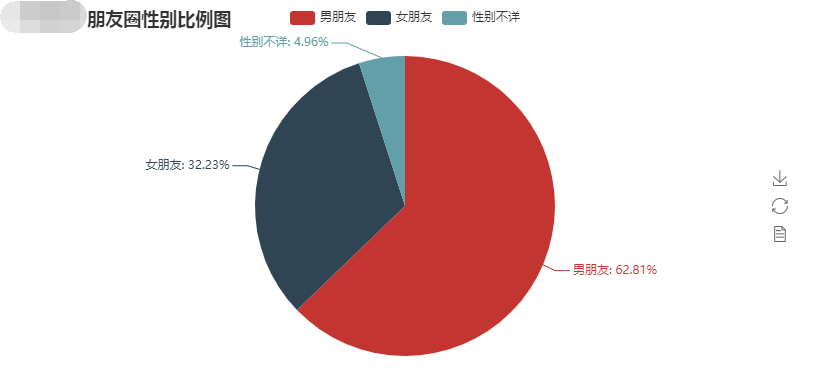
attr = ['男朋友', '女朋友', '性别不详']
value = [0, 0, 0]
for friend in friends:
print(friend.name, friend.sex)
if friend.sex == 1: # 1代表男性
value[0] += 1
elif friend.sex == 2: # 2代表女性
value[1] += 1
else: # 未指定性别的
value[2] += 1
# 3. 处理为图像
pie = Pie('%s 朋友圈性别比例图' % bot.self.name)
pie.add('', attr, value, is_label_show=True) # 图表名称str,属性名称list,属性所对应的值list,is_label_show是否显示标签
pie.render('sex.html') # 生成html页面
# 4. 打开浏览器展示
webbrowser.open('sex.html')
弹出框微信扫码即可。
欢迎指正,that's all
目录
效果


依赖
pip install -i https://pypi.doubanio.com/simple/ wxpy
pip install -i https://pypi.doubanio.com/simple/ jieba
pip install -i https://pypi.doubanio.com/simple/ numpy
pip install -i https://pypi.doubanio.com/simple/ matplotlib
pip install -i https://pypi.doubanio.com/simple/ wordcloud
pip install -i https://pypi.doubanio.com/simple/ Pillow
注意:下载wordcloud的时候,可能会报如下错误:
error: Microsoft Visual C++ 14.0 is required. Get it with "Microsoft Visual C++ Build Tools": http://landinghub.visualstudio.com/visual-cpp-build-tools
缺少C++相关依赖。而给的链接地址已经失效,所以,必须我们自己解决,解决办法在后面
示例代码
import re
import wxpy
import jieba
import numpy as np
import matplotlib.pyplot as plt
from wordcloud import WordCloud, STOPWORDS
from PIL import Image

# 1. 登录,获取好友列表,用手机扫二维码登录
bot = wxpy.Bot(cache_path=True)

# 2. 获取好友的个性签名
s = ''
for friend in bot.friends():
    content = re.findall(r'[一-覦]+', friend.signature)  # 几乎把所有的中文都包含了
    s += ''.join(content)

# 3. 制作词云
wl_space_split = ' '.join(jieba.lcut(s))  # jieba返回分好的词
# stop_words = set(STOPWORDS)
abel_mask = np.array(Image.open('cat.jpg'))   # 用于生成配色方案的图片,可以是任意图片,建议图片越清晰越好
# 4. 生成词云
wc = WordCloud(
    background_color='black',  # 背景颜色
    font_path='simfang.ttf',   # 字体
    max_words=3000,  # 最大词数
    max_font_size=100,  # 显示字体最大值
    random_state=42,   # 为每个词返回一个PIL颜色
    mask=abel_mask,  # 以该参数值作图绘制词云
    stopwords=STOPWORDS,  # 屏蔽词
    # stopwords= STOPWORDS.add('中国'),   # 在内置屏蔽词的基础上添加自定义屏蔽词
).generate(wl_space_split)  # 生成词云

# 5. 保存生成的词云图片
wc.to_file('词云.png')

# 6. 展示词云
img = Image.open('词云.png')
img.show()
词云模板


解决wordcloud报错问题
既然是缺少c++的依赖,那么我们就去下载,下载网址,或者直接点击该链接下载,然后安装即可。完了再重新下载wordcloud。
欢迎斧正,that's all see also:[python 玩转微信系列2 生成好友个性签名词云](https://www.jianshu.com/p/a60b6ef1e6f6) | [这个也行](https://www.cnblogs.com/guobaoyuan/articles/10846387.html)

 浙公网安备 33010602011771号