nginx访客日志
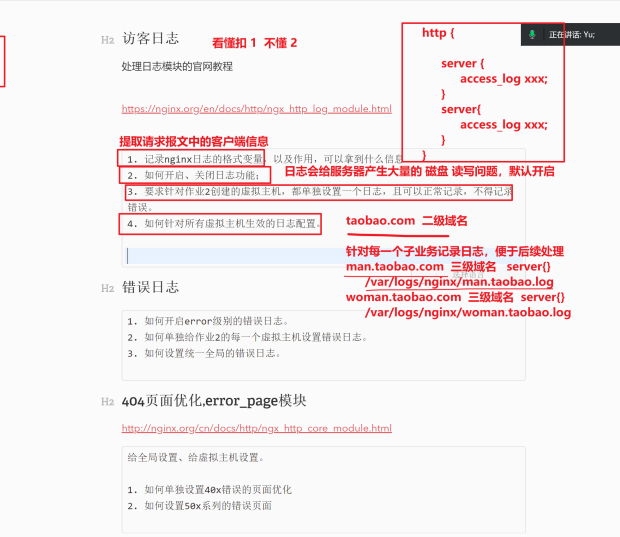
访客日志
处理日志模块的官网教程
https://nginx.org/en/docs/http/ngx_http_log_module.html
nginx日志变量的格式,作用 找到nginx所有的内置变量,以及作用解释
https://nginx.org/en/docs/

https://nginx.org/en/docs/http/ngx_http_core_module.html#var_remote_addr

当你的nginx访客日志,需要记录更多的client请求信息,你可以来这里找,添加更多的变量,加入到如下的日志格式化参数中
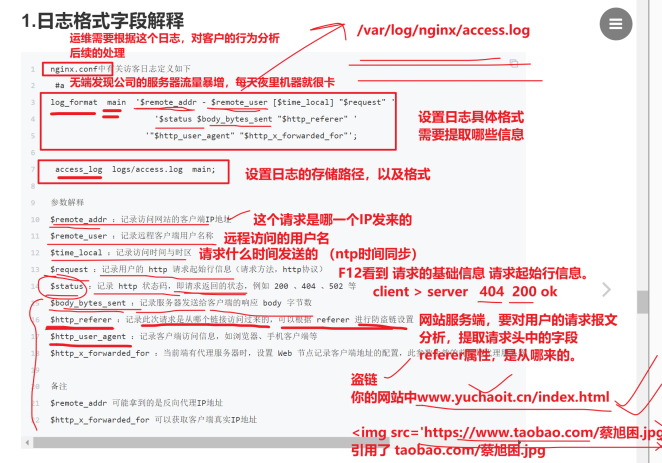
nginx.conf中有关访客日志定义如下
 #a
log_format  main  '$remote_addr - $remote_user [$time_local] "$request" '
                      '$status $body_bytes_sent "$http_referer" '
                    '"$http_user_agent" "$http_x_forwarded_for"';

 access_log  logs/access.log  main;

参数解释
# 看到这个请求是从什么IP发来的。 remote_addr
$remote_addr :记录访问网站的客户端IP地址
$remote_user :记录远程客户端用户名称
$time_local :记录访问时间与时区
$request :记录用户的 http 请求起始行信息(请求方法,http协议)
$status :记录 http 状态码,即请求返回的状态,例如 200 、404 、502 等
$body_bytes_sent :记录服务器发送给客户端的响应 body 字节数
$http_referer :记录此次请求是从哪个链接访问过来的,可以根据 referer 进行防盗链设置
$http_user_agent :记录客户端访问信息,如浏览器、手机客户端等
$http_x_forwarded_for :当前端有代理服务器时,设置 Web 节点记录客户端地址的配置,此参数生效的前提是代理服务器上也进行了相关的 x_forwarded_for 设置

备注
$remote_addr 可能拿到的是反向代理IP地址
$http_x_forwarded_for 可以获取客户端真实IP地址
生产环境下的日志实践经验

开启,关闭日志功能(先看默认的日志功能怎么用)
逐步分析,主配置文件nginx.con
[root@web-8 /etc/nginx]#cat /etc/nginx/nginx.conf

user  www;
worker_processes  auto;

error_log  /var/log/nginx/error.log notice;
pid        /var/run/nginx.pid;


events {
    worker_connections  1024;
}


http {
    include       /etc/nginx/mime.types;
    default_type  application/octet-stream;

    log_format  main  '$remote_addr - $remote_user [$time_local] "$request" '
                      '$status $body_bytes_sent "$http_referer" '
                      '"$http_user_agent" "$http_x_forwarded_for"';

    access_log  /var/log/nginx/access.log  main;

    sendfile        on;
    #tcp_nopush     on;

    keepalive_timeout  65;

    #gzip  on;

    include /etc/nginx/conf.d/*.conf;
}
检测日志
tail -f /var/log/nginx/access.log
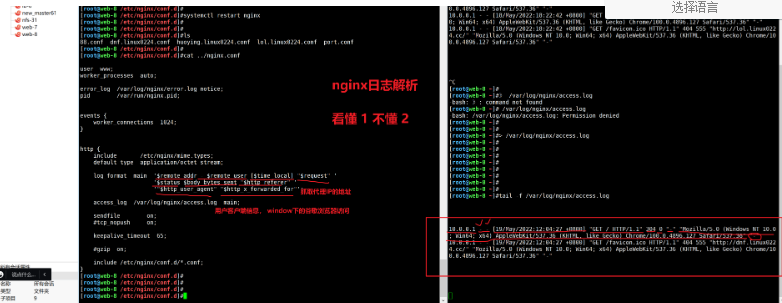
所有的子域名的日志都被统一记录到了一个文件中

关闭日志功能
有时候在代理服务器上,转发服务器上,nginx日志可能不用记录,节省磁盘IO的资源
http {
    include       /etc/nginx/mime.types;
    default_type  application/octet-stream;

    log_format  main  '$remote_addr - $remote_user [$time_local] "$request" '
                      '$status $body_bytes_sent "$http_referer" '
                      '"$http_user_agent" "$http_x_forwarded_for"';

    #access_log  /var/log/nginx/access.log  main;
    access_log off;
修改nginx访客日志的格式
自己添加,可以捕获更多的客户端的信息
https://nginx.org/en/docs/

https://nginx.org/en/docs/http/ngx_http_core_module.html#var_remote_addr

当你的nginx访客日志,需要记录更多的client请求信息,你可以来这里找,添加更多的变量,加入到如下的日志格式化参数中


log_format  main  '$document_uri  $remote_addr - $remote_user [$time_local] "$request" '
                      '$status $body_bytes_sent "$http_referer" '
                      '"$http_user_agent" "$http_x_forwarded_for"';
单个虚拟主机,记录日志
针对每一个网站,单独的记录日志文件,便于分类管理。
正确的日志使用姿势如下。
语法就是,将日志格式的配置参数,别写在http{}花括号中,而是写在各自的server{}虚拟主机中即可。
# 语法要求,log_format 格式化的日志的名字,还不得重复
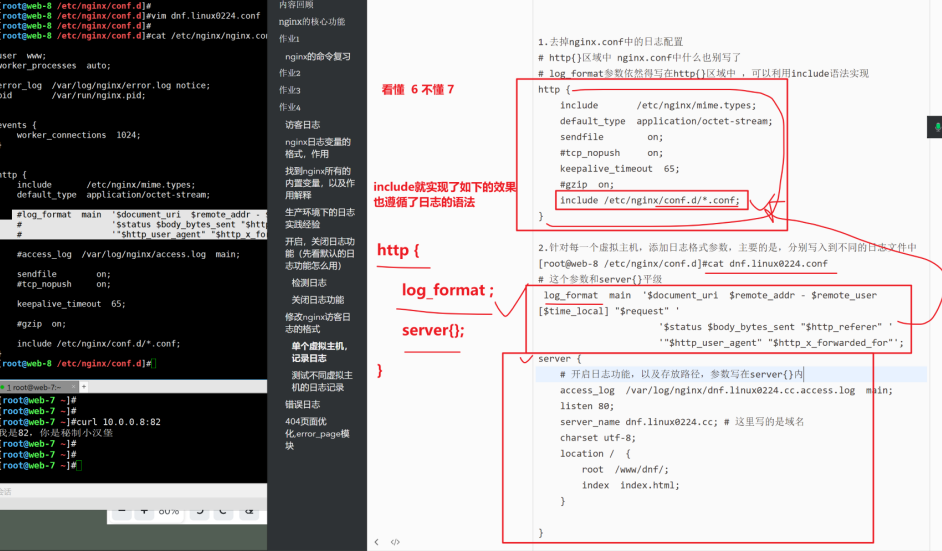
1.去掉nginx.conf中的日志配置
# http{}区域中 nginx.conf中什么也别写了
# log_format参数依然得写在http{}区域中 ,可以利用include语法实现
http {
include /etc/nginx/mime.types;
default_type application/octet-stream;
sendfile on;
#tcp_nopush on;
keepalive_timeout 65;
#gzip on;
include /etc/nginx/conf.d/*.conf;
}
2.针对每一个虚拟主机,添加日志格式参数,主要的是,分别写入到不同的日志文件中
[root@web-8 /etc/nginx/conf.d]#cat dnf.linux0224.conf
# 这个参数和server{}平级
log_format main '$document_uri $remote_addr - $remote_user [$time_local] "$request" '
'$status $body_bytes_sent "$http_referer" '
'"$http_user_agent" "$http_x_forwarded_for"';
server {
# 开启日志功能,以及存放路径,参数写在server{}内
access_log /var/log/nginx/dnf.linux0224.cc.access.log main;
listen 80;
server_name dnf.linux0224.cc; # 这里写的是域名
charset utf-8;
location / {
root /www/dnf/;
index index.html;
}
}
3. 单独记录lol域名业务的访客日志
[root@web-8 /etc/nginx/conf.d]#cat lol.linux0224.conf
log_format main2 '$remote_addr - $remote_user [$time_local] "$request" '
'$status $body_bytes_sent "$http_referer" '
'"$http_user_agent" "$http_x_forwarded_for"';
server {
access_log /var/log/nginx/lol.linux0224.cc.access.log main2;
listen 80;
server_name lol.linux0224.cc;
charset utf-8;
location / {
root /www/lol/;
index index.html;
}
}
4.注意,开启access_log日志的参数,可以写在server{}区域里,但是日志格式化的参数,只能写在http{}区域中
测试不同虚拟主机的日志记录
现在有2个虚拟主机,单独记录了日志
dnf页面的访问情况,与日志记录
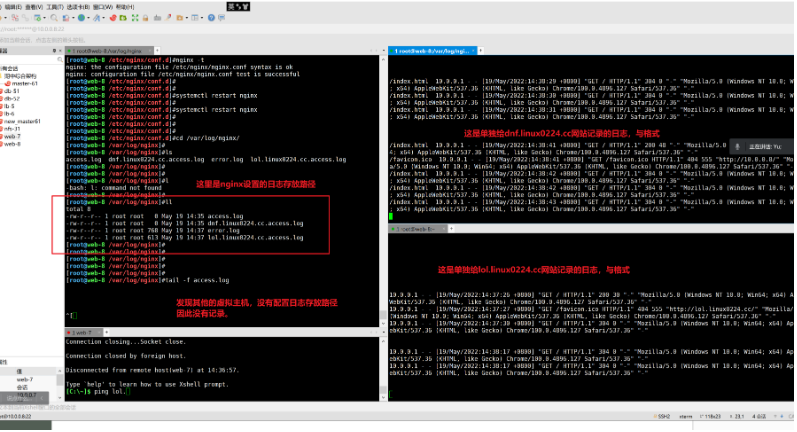
那其他的虚拟主机,日志不记录了吗?
解读日志的写入顺序
看你如何涉及了,你是继续针对每一个虚拟主机,添加日志
遵循上述讲解的语法
2. 剩余其他的虚拟主机日志,全部统一记录到 /var/log/nginx/all-server-accesss.log

如下写法,就会去记录,除了你单独指定的虚拟主机的日志,剩下的日志,都会写入到这个all-server-accesss.log 文件中


nginx.conf 主配置如下
# 定义一个全局的设置
http {
    include       /etc/nginx/mime.types;
    default_type  application/octet-stream;

    log_format  main3  '$document_uri  $remote_addr - $remote_user [$time_local] "$request" '
                      '$status $body_bytes_sent "$http_referer" '
                      '"$http_user_agent" "$http_x_forwarded_for"';

    access_log  /var/log/nginx/all-server-accesss.log  main3;

    sendfile        on;
    #tcp_nopush     on;

    keepalive_timeout  65;

    #gzip  on;

    include /etc/nginx/conf.d/*.conf;
}
你觉得,默认的日志,和单独指定的日志,太混乱,
1.你就这么做,每一个虚拟主机,单独的设置日志参数,就行了,不需要去关心那个默认的日志(记录一堆网站的请求,也没什么实际意义)
nginx提供的日志
记录用户访问记录的 ,access_log

记录nginx运行错误的日志  error_log

关于该参数的官网文档,以及具体的用法
https://nginx.org/en/docs/ngx_core_module.html#error_log

和access_log用法一样去以及
http{}
server{} 区域里面

Syntax:	error_log file [level];
Default:
error_log logs/error.log error;
Context:	main, http, mail, stream, server, location


具体的level是指,日志记录的详细程度
有这些值让你填写
debug, info, notice, warn, error, crit, alert

从左到右,详细程度分别是 从 大  >>> 小

debug 会记录超级详细的信息,没必要,占用大量的磁盘空间
crit 表示nginx以及出现严重错误,以及崩溃了,才记录日志。。记录的内容太少
一般用的,以及默认的就是error日志级别,能够记录基本的,常见错误。
错误日志
1. 如何开启error级别的错误日志。
# 单独给的lol虚拟主机网址,设置错误日志,eroor级别 ,配置如下
# 支持写入http{}  server{}
[root@web-8 /etc/nginx/conf.d]#cat  lol.linux0224.conf

log_format  main2  '$remote_addr - $remote_user [$time_local] "$request" '
                      '$status $body_bytes_sent "$http_referer" '
                      '"$http_user_agent" "$http_x_forwarded_for"';

server {
    access_log  /var/log/nginx/lol.linux0224.cc.access.log  main2;
    error_log /var/log/nginx/lol-error.log error;

    listen 80;
    server_name lol.linux0224.cc;
	charset utf-8;
    location /  {
        root  /www/lol/;
        index  index.html;
    }

}

重启服务
[root@web-8 /etc/nginx/conf.d]#systemctl restart nginx

检查日志
[root@web-8 /etc/nginx/conf.d]#tail -f /var/log/nginx/lol-error.log

错误日志的,特点是记录,访问时的出错信息
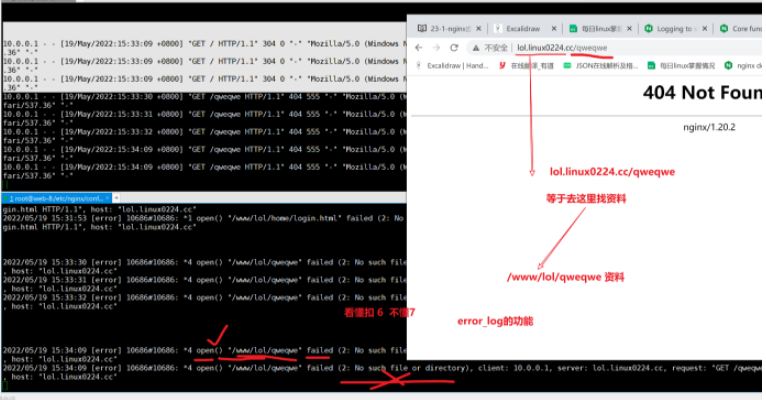
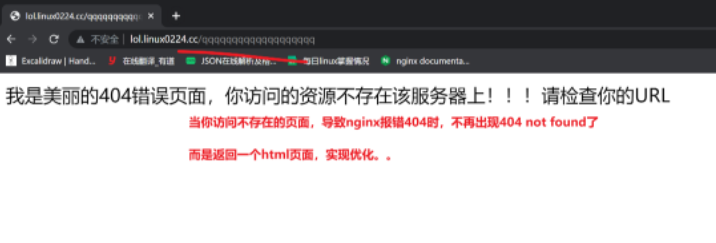
404页面优化,error_page模块
错误页面优化,nginx,默认访问出错后,会返回不同的错误页面
如 -
- 40x系列的页面
- 404 not found 服务器上找不到该资源
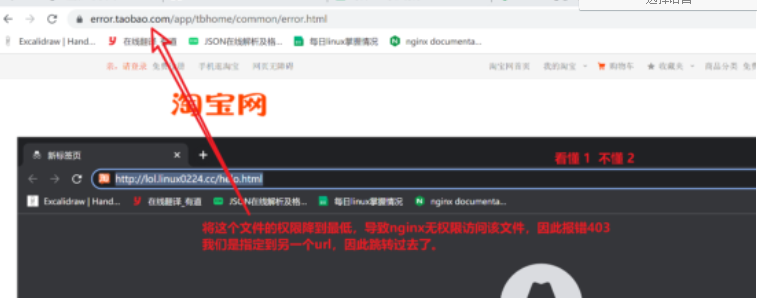
- 403 Forbidden 禁止访问(权限不够,找权限的问题)
- 如50x系列的页面
- 学nginx反向代理
- 但是默认的都太丑,对其优化
语法
# error_page  响应状态码    相对路径的html文件/ 填入url ;

error_page 404             /404.html;
error_page 500 502 503 504 /50x.html;
优化错误页面,指向本地的html文件
针对lol的虚拟主机设置
[root@web-8 ~]#cat /etc/nginx/conf.d/lol.linux0224.conf
log_format main2 '$remote_addr - $remote_user [$time_local] "$request" '
'$status $body_bytes_sent "$http_referer" '
'"$http_user_agent" "$http_x_forwarded_for"';
# 当404错误时,返回当前机器上的my404.html
# 当403错误时,跳转到淘宝这个错误页面上
server {
access_log /var/log/nginx/lol.linux0224.cc.access.log main2;
error_log /var/log/nginx/lol-error.log error;
error_page 404 /my404.html;
error_page 403 https://error.taobao.com/app/tbhome/common/error.html;
listen 80;
server_name lol.linux0224.cc;
charset utf-8;
location / {
root /www/lol/;
index index.html;
}
}
# 创建404错误页面
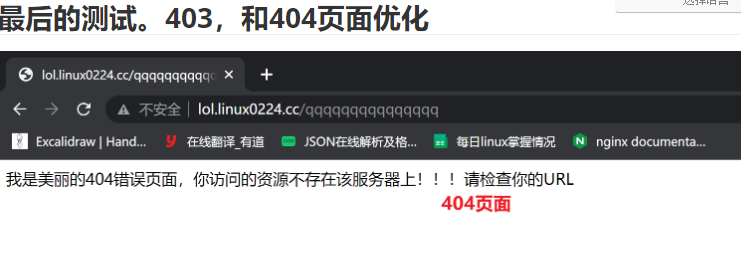
echo "我是美丽的404错误页面,你访问的资源不存在该服务器上!!!请检查你的URL" > /www/lol/my404.html
[root@web-8 ~]#nginx -t
nginx: the configuration file /etc/nginx/nginx.conf syntax is ok
nginx: configuration file /etc/nginx/nginx.conf test is successful
[root@web-8 ~]#
[root@web-8 ~]#
[root@web-8 ~]#systemctl restart nginx
再次测试错误页面,针对lol这个虚拟主机
404错误页面
403错误的设置
指定跳转到另一个url,
403指定跳转到当前机器的一个文件
[root@web-8 /etc/nginx/conf.d]#cat lol.linux0224.conf

log_format  main2  '$remote_addr - $remote_user [$time_local] "$request" '
                      '$status $body_bytes_sent "$http_referer" '
                      '"$http_user_agent" "$http_x_forwarded_for"';

server {
    access_log  /var/log/nginx/lol.linux0224.cc.access.log  main2;
    error_log /var/log/nginx/lol-error.log error;
    error_page  404  /my404.html;
    error_page  403  /my403.html;


    listen 80;
    server_name lol.linux0224.cc;
	charset utf-8;
    location /  {
        root  /www/lol/;
        index  index.html;
    }

}


 浙公网安备 33010602011771号