
Spring Boot学习笔记
SpringBoot基于约定优于配置的思想,可以让开发人员不必在配置与逻辑业务之间进行思维的切换,全身心的投入到逻辑业务的代码编写中,从而大大提高了开发的效率,一定程度上缩短了项目周期。
起步依赖:起步依赖本质上是一个Maven项目对象模型,定义了对其它库的传递依赖,这些东西加在一起即支持某项功能。简单的说,起步依赖就是将具备某种功能的坐标打包到一起,并提供一些默认的功能。
自动配置:SpringBoot的自动配置,指的是SpringBoot,会自动将一些配置类的bean注册进IOC容器,我们可以需要的地方使用@Autowired或者@Resource等注解来使用它。
SpringBoot: 简单、快速、方便地搭建项目;对主流开发框架的无配置集成;极大提高了开发、部署效率。
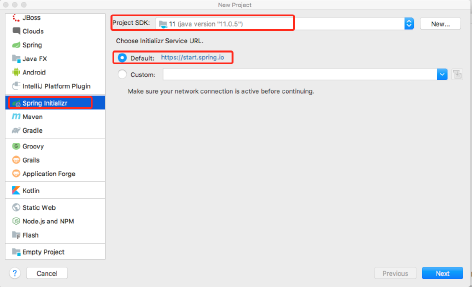
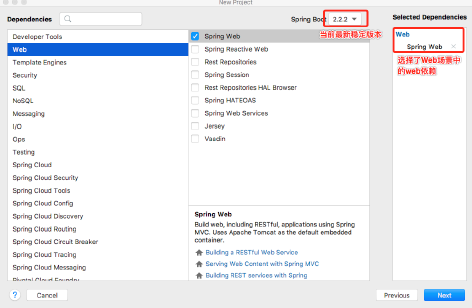
使用Spring Initializr方式构建Spring Boot项目

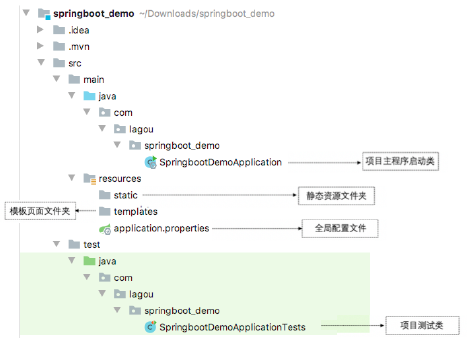
创建好的项目结构图
单元测试与热部署
添加spring-boot-starter-test测试依赖启动器。在项目的pom.xml文件中添加spring-boot-starter-test测试依赖启动器,实例代码如下:
<dependency>
    <groupId>org.springframework.boot</groupId>
    <artifactId>spring-boot-starter-test</artifactId>
    <scope>test</scope>
</dependency>
编写单元测试类和测试方法
//测试启动器,并加载Spring Boot测试注解
@RunWith(SpringRunner.class)
//标记为Spring Boot单元测试类,并加载项目的ApplicationContext上下文环境
@SpringBootTest
class SpringbootDemoApplicationTests {
    @Autowired
   private DemoController demoController;
   // 自动创建的单元测试方法实例
   @Test
   void contextLoads() {
        String demo = demoController.demo();
        System.out.println(demo);
  }
}
热部署
添加spring-boot-devtools热部署依赖启动器
<dependency>
   <groupId>org.springframework.boot</groupId>
  <artifactId>spring-boot-devtools</artifactId>
</dependency>
IDEA工具热部署设置
选择IDEA工具界面的File -> Settings选项,打开Compiler面板设置页面
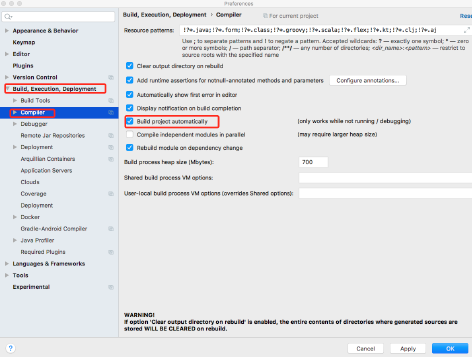
选择Build下的Compiler选项,在右侧勾选"Build project automatically"选项将项目设置为自动编译,单机Apply -> OK按钮保存设置。
在项目任意页面中使用组合快捷键"Ctrl+Shift+Alt+/"打开Maintenance选项框,选中并打开Registry页面,具体如下图所示
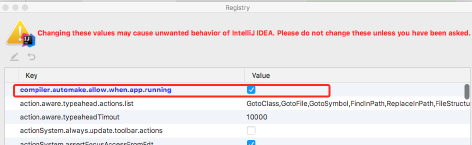
列表中找到"compliler.automake.allow.when.app.running", 将该选项后的Value值勾选,用于指定IDEA工具在程序运行过程中自动编译,最后单击Close按钮完成设置。
导出war包
1)pom.xml文件中配置打包方式为war
<packaging>war</packaging>
2)修改启动类,继承SpringBootServletInitializer类, 新增configure方法。
@SpringBootApplication
@MapperScan("com.example.mapper")//与dao层的@Mapper二选一写上即可(主要作用是扫包)
public class UserPerson4Application extends SpringBootServletInitializer{
    public static void main(String[] args) {
        SpringApplication.run(UserPerson4Application.class, args);
    }
    @Override
    protected SpringApplicationBuilder configure(SpringApplicationBuilder builder) {
       // 注意这里要指向原先用main方法执行的Application启动类
       return builder.sources(UserPerson4Application.class);
    }
}
3)点击build->build artified->选择自己需要的war。
全局配置文件
application.properties配置文件
# 应用名称
spring.application.name=springboot_thymeleaf
# 应用服务 WEB 访问端口
server.port=8080
# spring 静态资源扫描路径
spring.resources.static_locations=classpath:/static/
# 数据库驱动:
spring.datasource.driver-class-name=com.mysql.cj.jdbc.Driver
# 数据源名称
spring.datasource.name=defaultDataSource
# 数据库连接地址
spring.datasource.url=jdbc:mysql://localhost:3306/thymeleaf?serverTimezone=UTC
# 数据库用户名&密码:
spring.datasource.username=root
spring.datasource.password=root
# 访问template下的html文件需要配置模板
spring.thymeleaf.prefix.classpath=classpath:/templates/
# 是否启用缓存
spring.thymeleaf.cache=false
# 模板文件后缀
spring.thymeleaf.suffix=.html
# 模板文件编码
spring.thymeleaf.encoding=UTF-8
public class Pet {
    private String type;
    private String name;
}
 //Person类作为Bean注入到Spring容器中
@Component
//将配置文件中已Person开头的属性注入到该类中
@ConfigurationProperties(prefix = "person")
public class Person {
    private int id;
    private String name;
    private List hobby;
    private String[] family;
    private Map map;
    private Pet pet;
}
配置文件中编写Person属性值
编写配置文件时出现提示,添加Spring Boot提供的配置处理器依赖。
<dependency>
    <groupId>org.springframework.boot</groupId>
    <artifactId>spring-boot-configuration-processor</artifactId>
    <optional>true</optional>
</dependency>
application.yaml配置文件
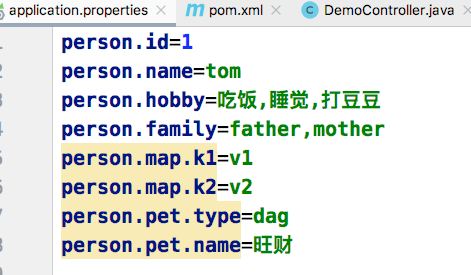
//对Person类属性配置
person:
id: 1
name: lucy
hobby: [吃饭;,睡觉,打豆豆]
family: [father,mother]
map: {k1: v1,k2: v2}
pet: {type: dog,name: 旺财}
使用@Value注入配置文件中值
@Component
public class Person {
    @Value("${person.id}")
    private int id;
}
使用@PropertySource加载配置文件
打开Spring Boot的resources目录,在项目的类路径下新建一个test.properties自定义配置文件,在该配置文件中编写需要设置的配置属性。
test.id=110
test.name=test
在pojo包下新建一个配置类MyProperties, 提供test.properties自定义配置文件中对应的属性,并根据@PropertySource注解的使用进行配置
//自定义配置类
@Configuration
 // 指定自定义配置文件位置和名称
@PropertySource("classpath:test.properties")
//开启对应类的属性注入功能
@EnableConfigurationProperties(MyProperties.class)
// 指定配置文件注入属性前缀
@ConfigurationProperties(prefix = "test")
public class MyProperties {
    private int id;
    private String name;

}
使用@Configuration注解编写自定义配置类
 // 注解声明的配置类
@Configuration
public class MyConfig {
     // 将返回值对象作为组件添加到Spring容器中,该组件id默认为方法名
    @Bean
    public MyService myService(){
        return new MyService();
    }
}
随机数设置及参数的引用
// 配置随机值
my.secret=${random.value}
// 配置随机整数
my.number=${random.int}
//配置随机long类型
my.bignumber=${random.long}
// 配置随机uuid类型值
my.uuid=${random.uuid}
// 配置小于10的随机整数
my.number.less.than.ten=${random.int(10)}
// 配置随机数在1024~65536之间的随机整数
my.number.in.range=${random.int[1024,65536]}
# 随机值设置及参数间引用设置
tom.age=${random.int[10,20]}
tom.description=tom的年龄了能是${tom.age}
Spring Boot 整合Redis
1)添加依赖
<dependency>
    <groupId>org.springframework.boot</groupId>
    <artifactId>spring-boot-starter-data-redis</artifactId>
</dependency>
2)编写实体类
 // 指定操作实体类对象在Redis数据库中的存储空间
@RedisHash("persons")
public class Person implements Serializable {
    // 标识实体类主键
    @Id
    private String id;
     // 标识对应属性在数据库中生成二级索引
    @Indexed
    private String firstname;
    @Indexed
    private String lastname;
    private Address address;
}

public class Address {
  @Indexed
  private String city;
  @Indexed
  private String country;
}
3)编写Repository接口, 继承CrudRepository
public interface PersonRepository extends CrudRepository<Person, String> {
    List<Person> findByAddress_City(String name);
}
4) Redis数据库连接配置
# Redis服务器地址
spring.redis.host=127.0.0.1
# Redis端口号
spring.redis.port=6379
# Redis密码
spring.redis.password=
基于注解的Redis缓存实现
@Service
public class CommentService {
    @Autowired
    private CommentRepository commentRepository;
    @Cacheable(cacheNames = "comment",unless = "#result==null")
    public Comment findCommentById(Integer id) {
        Optional<Comment> comment = commentRepository.findById(id);
        if(comment.isPresent()) {
            Comment comment1 = comment.get();
            return comment1;
        }
        return null;
    }

    @CachePut(cacheNames = "comment",key = "#result.id")
        public Comment updateComment(Comment comment) {
        commentRepository.updateComment(comment.getAuthor(),             comment.getaId());
        return comment;
    }

    @CacheEvict(cacheNames = "comment")
    public void deleteComment(int comment_id) {
        commentRepository.deleteById(comment_id);
    }
}
Redis默认数据序列化方式是JDK,可以改成Json方便查看存储的数据。
@Configuration
public class RedisConfig {
  @Bean
  public RedisTemplate<Object, Object> redisTemplate(RedisConnectionFactory redisConnectionFactory) {
    RedisTemplate<Object, Object> template = new RedisTemplate();
    template.setConnectionFactory(redisConnectionFactory);
    // 使用Json格式序列化对象,对缓存数据Key和Value进行转换
    Jackson2JsonRedisSerializer jacksonSeial = new
    Jackson2JsonRedisSerializer(Object.class);
    // 解决查询缓存转换异常的问题
    ObjectMapper om = new ObjectMapper();
    om.setVisibility(PropertyAccessor.ALL, JsonAutoDetect.Visibility.ANY);
    om.enableDefaultTyping(ObjectMapper.DefaultTyping.NON_FINAL);
    jacksonSeial.setObjectMapper(om);
    // 设置RedisTemplate模板API序列化格式为JSON
    template.setDefaultSerializer(jacksonSeial);
    return template;
  }
}
Spring Boot视图技术
Spring Boot不太支持常用的JSP模板,在使用Spring Boot框架进行页面设计时,一般会选择Thymeleaf模板。
常用标签
th:标签 说明
th:insert 布局标签 替换内容到引入的标签
th:replace  页面片段包含(类似于JSP中的include标签)
th:each  元素遍历
th:if  条件判断,如果为真
th:unless  条件判断,如果为假
th:switch  条件判断,选择性匹配
th:case  条件判断,选择性匹配
th:value  属性值修改,指定标签属性
th:field th:field="*{name}"用来绑定后台对象和表单数据
th:href  用于设定链接地址
th:src  用于设定链接地址
th:text  用于指定标签显示的文本内容
1.变量表达式${...} 主要用于获取上下文中的变量值
<p th:text="${title}">这是标题</p>
同时,Thymeleaf变量所在域提供了一些内置对象
# ctx  上下文对象
# vars  上下文变量
# locale  上下文区域设置
# request   Web Context  HttpServletRequest对象
# response  Web Context  HttpServletResponse对象
# session  Web Context   HttpSession对象
# servletContext   Web Context   ServletContext对象
The locale country is: <span th:text="${#locale.country}">US</span>
2.选择变量表达式*{...}
选择变量表达式和变量表达式用法类似,一般用于从被选定对象而不是上下文中获取属性值,如果没有选定对象则和变量表达式一样。
<div th:object="${book}">
  <p>title: <span th:text="*{title}">标题</span>.</p>
</div>
3. 消息表达式#{...}
主要用于国际化内容的动态展示和替换
4. @{...}链接表达式
<a th:href="@{http://localhost:8080/order/details(orderId=${o.id})}">view</a>
<a th:href="@{/order/details(orderId=${o.id})}">view</a>
5. 片段表达式
<div th:insert="~{thymeleafDemo::title}"></div>

 浙公网安备 33010602011771号