shiro拦截器源码分析
首先了解filter的工作原理,参考博文https://www.iteye.com/blog/jinnianshilongnian-1736348
挑选一个内置的拦截器开始讲解

下面是shiro的基础拦截器类以及张开涛博文的讲解
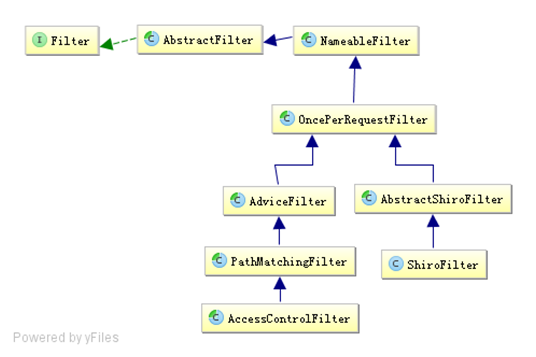
1、NameableFilter
NameableFilter给Filter起个名字,如果没有设置默认就是FilterName;还记得之前的如authc吗?当我们组装拦截器链时会根据这个名字找到相应的拦截器实例;
2、OncePerRequestFilter
OncePerRequestFilter用于防止多次执行Filter的;也就是说一次请求只会走一次拦截器链;另外提供enabled属性,表示是否开启该拦截器实例,默认enabled=true表示开启,如果不想让某个拦截器工作,可以设置为false即可。
3、ShiroFilter
ShiroFilter是整个Shiro的入口点,用于拦截需要安全控制的请求进行处理,这个之前已经用过了。
4、AdviceFilter
AdviceFilter提供了AOP风格的支持,类似于SpringMVC中的Interceptor:
preHandler:类似于AOP中的前置增强;在拦截器链执行之前执行;如果返回true则继续拦截器链;否则中断后续的拦截器链的执行直接返回;进行预处理(如基于表单的身份验证、授权)
postHandle:类似于AOP中的后置返回增强;在拦截器链执行完成后执行;进行后处理(如记录执行时间之类的);
afterCompletion:类似于AOP中的后置最终增强;即不管有没有异常都会执行;可以进行清理资源(如接触Subject与线程的绑定之类的);
5、PathMatchingFilter
PathMatchingFilter提供了基于Ant风格的请求路径匹配功能及拦截器参数解析的功能,如“roles[admin,user]”自动根据“,”分割解析到一个路径参数配置并绑定到相应的路径:
pathsMatch:该方法用于path与请求路径进行匹配的方法;如果匹配返回true;
onPreHandle:在preHandle中,当pathsMatch匹配一个路径后,会调用opPreHandler方法并将路径绑定参数配置传给mappedValue;然后可以在这个方法中进行一些验证(如角色授权),如果验证失败可以返回false中断流程;默认返回true;也就是说子类可以只实现onPreHandle即可,无须实现preHandle。如果没有path与请求路径匹配,默认是通过的(即preHandle返回true)。
6、AccessControlFilter
AccessControlFilter提供了访问控制的基础功能;比如是否允许访问/当访问拒绝时如何处理等:
isAccessAllowed:表示是否允许访问;mappedValue就是[urls]配置中拦截器参数部分,如果允许访问返回true,否则false;
onAccessDenied:表示当访问拒绝时是否已经处理了;如果返回true表示需要继续处理;如果返回false表示该拦截器实例已经处理了,将直接返回即可。
onPreHandle会自动调用这两个方法决定是否继续处理:
从shiroflter开始,这是shiro应用的入口
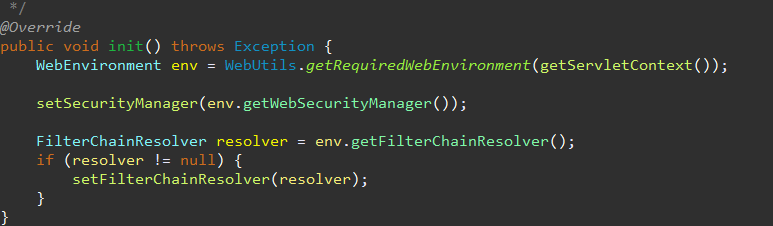
这里面只有一个初始方法,可以看到所有的数据都从WebEnvironment中获取,拦截器的加载和shiro的初始化都与它有关,我们看看
而WebEnvironment是如何创建出来的呢,不放太多图,

WebEnvironment的创建在EnvironmentLoaderListener,
这里面只有两个方法
void contextInitialized(ServletContextEvent sce); // 当容器启动时调用
void contextDestroyed(ServletContextEvent sce); // 当容器关闭时调用
作用就是在容器启动时创建WebEnvironment对象,这里起作用的是他的父类,注意看这个方法,原文参考https://blog.csdn.net/huangbaokang/article/details/77575331
 // 可在 web.xml 的 context-param 中定义 WebEnvironment 接口的实现类(默认为 IniWebEnvironment)
public static final String ENVIRONMENT_CLASS_PARAM = "shiroEnvironmentClass";
// 可在 web.xml 的 context-param 中定义 Shiro 配置文件的位置
    public static final String CONFIG_LOCATIONS_PARAM = "shiroConfigLocations";
 // 在 ServletContext 中存放 WebEnvironment 的 key
    public static final String ENVIRONMENT_ATTRIBUTE_KEY = EnvironmentLoader.class.getName() + ".ENVIRONMENT_ATTRIBUTE_KEY";

    private static final Logger log = LoggerFactory.getLogger(EnvironmentLoader.class);


// 从 ServletContext 中获取相关信息,并创建 WebEnvironment 实例
public WebEnvironment initEnvironment(ServletContext servletContext) throws IllegalStateException {
       //确保webenvironment只创建一次
        if (servletContext.getAttribute(ENVIRONMENT_ATTRIBUTE_KEY) != null) {
            String msg = "There is already a Shiro environment associated with the current ServletContext.  " +
                    "Check if you have multiple EnvironmentLoader* definitions in your web.xml!";
            throw new IllegalStateException(msg);
        }

        servletContext.log("Initializing Shiro environment");
        log.info("Starting Shiro environment initialization.");

        long startTime = System.currentTimeMillis();

        try {
            //创建webenviroment实例
            WebEnvironment environment = createEnvironment(servletContext);
            //在servletContext中存放webenviroment实例
            servletContext.setAttribute(ENVIRONMENT_ATTRIBUTE_KEY, environment);

            log.debug("Published WebEnvironment as ServletContext attribute with name [{}]",
                    ENVIRONMENT_ATTRIBUTE_KEY);

            if (log.isInfoEnabled()) {
                long elapsed = System.currentTimeMillis() - startTime;
                log.info("Shiro environment initialized in {} ms.", elapsed);
            }

            return environment;
        } catch (RuntimeException ex) {
            log.error("Shiro environment initialization failed", ex);
            servletContext.setAttribute(ENVIRONMENT_ATTRIBUTE_KEY, ex);
            throw ex;
        } catch (Error err) {
            log.error("Shiro environment initialization failed", err);
            servletContext.setAttribute(ENVIRONMENT_ATTRIBUTE_KEY, err);
            throw err;
        }
    }
 protected WebEnvironment createEnvironment(ServletContext sc) {
        // 确定 WebEnvironment 接口的实现类
        Class<?> clazz = determineWebEnvironmentClass(sc);

        // 确保该实现类实现了 MutableWebEnvironment 接口
        if (!MutableWebEnvironment.class.isAssignableFrom(clazz)) {
            throw new ConfigurationException();
        }

        // 从 ServletContext 中获取 Shiro 配置文件的位置参数,并判断该参数是否已定义
        String configLocations = sc.getInitParameter(CONFIG_LOCATIONS_PARAM);
        boolean configSpecified = StringUtils.hasText(configLocations);

        // 若配置文件位置参数已定义,则需确保该实现类实现了 ResourceConfigurable 接口
        if (configSpecified && !(ResourceConfigurable.class.isAssignableFrom(clazz))) {
            throw new ConfigurationException();
        }

        // 通过反射创建 WebEnvironment 实例,将其转型为 MutableWebEnvironment 类型,并将 ServletContext 放入该实例中
        MutableWebEnvironment environment = (MutableWebEnvironment) ClassUtils.newInstance(clazz);
        environment.setServletContext(sc);

        // 若配置文件位置参数已定义,且该实例是 ResourceConfigurable 接口的实例(实现了该接口),则将此参数放入该实例中
        if (configSpecified && (environment instanceof ResourceConfigurable)) {
            ((ResourceConfigurable) environment).setConfigLocations(configLocations);
        }

        // 可进一步定制 WebEnvironment 实例(在子类中扩展)
        customizeEnvironment(environment);

        // 调用 WebEnvironment 实例的 init 方法
        LifecycleUtils.init(environment);

        // 返回 WebEnvironment 实例
        return environment;
    }
可能顺序有点乱,别急,在创建时会调用determineWebEnvironmentClass在servletContext中寻找是否配置了shiroConfigLocations对象

如果没有会默认创建一个IniWebEnviroment对象,这里我们直接看默认方法
public void init() {
        Ini ini = getIni();

        String[] configLocations = getConfigLocations();

        if (log.isWarnEnabled() && !CollectionUtils.isEmpty(ini) &&
                configLocations != null && configLocations.length > 0) {
            log.warn("Explicit INI instance has been provided, but configuration locations have also been " +
                    "specified.  The {} implementation does not currently support multiple Ini config, but this may " +
                    "be supported in the future. Only the INI instance will be used for configuration.",
                    IniWebEnvironment.class.getName());
        }

        if (CollectionUtils.isEmpty(ini)) {
            log.debug("Checking any specified config locations.");
            ini = getSpecifiedIni(configLocations);
        }

        if (CollectionUtils.isEmpty(ini)) {
            log.debug("No INI instance or config locations specified.  Trying default config locations.");
            ini = getDefaultIni();
        }

        if (CollectionUtils.isEmpty(ini)) {
            String msg = "Shiro INI configuration was either not found or discovered to be empty/unconfigured.";
            throw new ConfigurationException(msg);
        }

        setIni(ini);

        configure();
    }
这个初始方法会调用configure,它会默认帮你创建WebSecurityManager和FilterChainResolver
主要看shiro的这个filterChain,它是自定义拦截器的关键
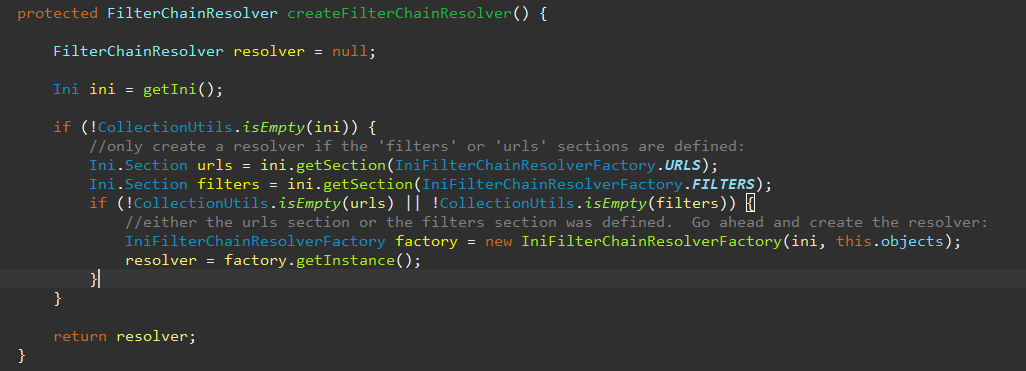
如果你配置了相关filter和url则会使用IniFilterChainResolverFactory的getInstance方法初始化一个FilterChainResolver。
这个创建过程除了加载自定义的拦截器还会加载默认的filter
一直追溯到

到这里,shiro的初始化也就完成,拦截器也全部加载完毕
然后结合默认的拦截器看看shiro中拦截器的具体执行过程
这里我选择userFilter
请求发起之后spring会寻找配置的shiro拦截器,将请求交由它处理,具体操作在DelegatingFilterProxy、
首先找到代理bean,

可以看看这个bean是哪里来的,之前讲了WebEnvironment容器初始化是会初始化一个FilterChainResolver
DelegatingFilterProxy会调用getbean来寻找符合的bean

实现追溯很长直接放出来,这个beanName就是ShiroFilter,可以看到这里调用了getobject方法,直接寻找shiro里面的实现
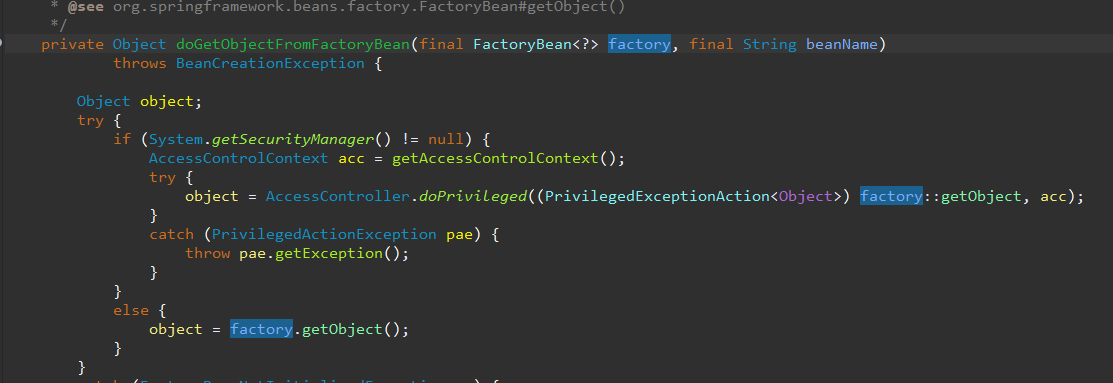
就在ShiroFilterFactoryBean中
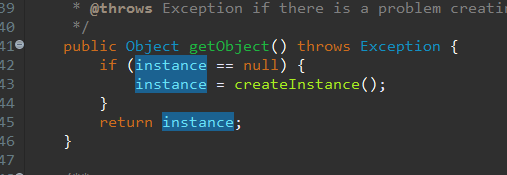
这个instance就是AbstractShiroFilter,所以返回的也是这个对象
ShiroFilterFactoryBean返回的对象是AbstractShiroFilter这个类很关键还包含了subject创建,后面说,然后调用代理对象执行dofilter()

但是AbstractShiroFilter也没有重写dofilter(),所以会调用OncePerRequestFilter的dofilter,这个dofilter是为了防止拦截器多次执行,然后调用子类AbstractShiroFilter的
doFilterInternal,执行的excuteChain

这里面有个获取拦截链FilterChain的方法是getExecutionChain
protected FilterChain getExecutionChain(ServletRequest request, ServletResponse response, FilterChain origChain) {

        FilterChain chain = origChain;

        FilterChainResolver resolver = getFilterChainResolver();
        if (resolver == null) {
            log.debug("No FilterChainResolver configured.  Returning original FilterChain.");
            return origChain;
        }
       //获取所有shiro的代理filter
        FilterChain resolved = resolver.getChain(request, response, origChain);
        if (resolved != null) {
            log.trace("Resolved a configured FilterChain for the current request.");
            chain = resolved;
        } else {
            log.trace("No FilterChain configured for the current request.  Using the default.");
        }

        return chain;
    }
执行chain.dofilter()这里的chain可以是你的自定义拦截器或者shiro内置的拦截器,打开一个内置的拦截器

这里面继承了AccessControllerFilter的两个方法
isAccessAllowed:表示是否允许访问
onAccessDenied:表示当访问拒绝时是否已经处理了
在这个AccessControllerFilter里面onPreHandle会自动调用这两个方法
继续上面的dofilter方法,可以看见拦截器里面是没有实现的,所以会寻找它的父类实现,还是这个OncePerRequestFilter
还是看看这个方法

这里会根据你传入的filterChain调用对应子类的实现,这里是在adviceChain

这里就会调用preHandle来决定请求继续运行或者失败,子类实现在pathmatchingfilter中,执行是调用onPreHandle,就是上面讲的,决定请求的下一步
isAccessAllowed会判断是否已经登录,成功会继续执行下面的拦截链,否则会交由onAccessDenied处理

ok,差不多这里就完了,还有什么要补充的话,留言给我就行
FilterChainResolver

 浙公网安备 33010602011771号