Vue源码循序渐进-Watcher那些事儿
上一篇数据响应式原理对Vue的实现MVVM的核心思想进行了学习,里面提到订阅-发布模式的订阅者主要用于响应数据发射变化的更新通知,当然,我们可以这么认为,Vue中的发布者其实也有可能是订阅者,可以订阅来自其其它组件的更新通知。本文主要对Vue中有哪些Watcher、在什么时候这些Wathcer会被触发,以及从源码角度尝试总结。
想一下,我们需要数据响应的场景? 比如一个购物车功能,看某宝的购物车界面(自动忽略购买内容 ^^):
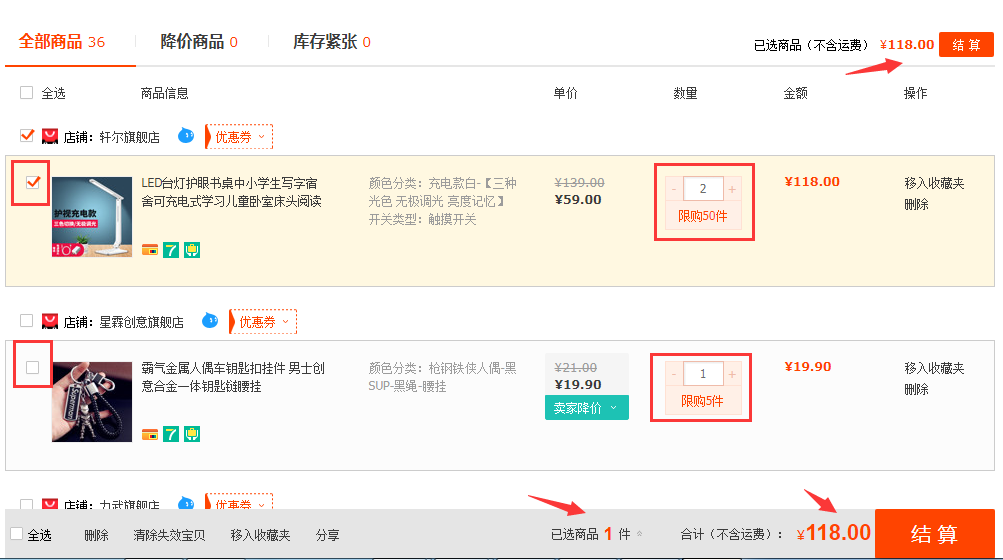
在购物车方式下单前,我们需要考虑: 需要选择哪些来购买,选择的商品可能买多件,选择好要购买的商品的时候,我们要对要花费的RMB进行实时计算,也就是点击页面的复选框和修改数量的按钮都会影响核算的总消费,这个就可以利用到Vue里面的计算属性了:
new Vue({
  name: 'cart',
  data () {
    return {
      selectedCarts: []
    }
  },
  watch: {
    /**
     * 监视selectedCarts变化
     * */
    selectedCarts: {
      handler: function (oldVal, newVal) {
        // do something
      },
      deep: true
    }
  },
  computed: {
    /**
     * 计算总价格
     * @returns {number}
     */
    totalPrice () {
      let totalPrice = 0.0
      this.selectedCarts.forEach((cart) => {
        totalPrice += cart.num * cart.price;
      })
      return totalPrice;
    }
  }
});
上面示例,就可以computed里的总价格totalPrice就可以根据选中的购物车条目selectedCarts计算得出,在计算出总价格后,会在页面呈现出计算的结果。此外,我们可以通过Vue的watch属性观察selectedCarts的变化,根据新旧值比较,可以下发更新购物车记录操作(数量)。我们来看一下这个例子中需要Vue数据做出响应的几个地方:
1. 通过computed属性计算选中的购物车条目的总价格;
2. 通过监视选中的条目下发更新功能;
3. 总价格发生变动时,页面要及时呈现。
1、2、3点基本就蕴含Vue中的几种Watcher: 1.自定义Watcher; 2. Computed属性(实际上也是Watcher); 3.渲染Watcher(Render Watcher),接下来对这几种Watcher细细评味。
1. 自定义Watcher
自定义Watcher可以监视的对象包括基本属性、对象、数组(后两种都需要指定deep深层次监听属性),具体使用可以看Vue官网watch,好了,知道自定义Wathcer怎么使用,接下来就看一看Vue内部是怎么使用的:
-> vue/src/core/instance/state.js
function initWatch (vm: Component, watch: Object) {
  for (const key in watch) {
    const handler = watch[key]
    // 对数组中的每一个元素进行监视
    if (Array.isArray(handler)) {
      for (let i = 0; i < handler.length; i++) {
        createWatcher(vm, key, handler[i])
      }
    } else {
      createWatcher(vm, key, handler)
    }
  }
}

function createWatcher (
  vm: Component,
  expOrFn: string | Function,
  handler: any,
  options?: Object
) {
  // 如果指定的参数为纯对象如:
  // a: {
  //       hander: 'methodName',
  //       deep: Boolean
  //    }
  if (isPlainObject(handler)) {
    options = handler
    handler = handler.handler
  }
  // 如果handler是字符串,则表示方法名,需要根据方法名来获取到该方法的句柄
  if (typeof handler === 'string') {
    handler = vm[handler]
  }
  // 内部调用$watch
  return vm.$watch(expOrFn, handler, options)
}

// $watch()方法
Vue.prototype.$watch = function (
    expOrFn: string | Function,
    cb: any,
    options?: Object
  ): Function {
    const vm: Component = this
   // 纯对象递归调用
    if (isPlainObject(cb)) {
      return createWatcher(vm, expOrFn, cb, options)
    }
    options = options || {}

    // 用户自定义Watcher
    options.user = true
    // 创建一个Watcher实例
    const watcher = new Watcher(vm, expOrFn, cb, options)
    // 立即执行回调?
    if (options.immediate) {
      try {
        cb.call(vm, watcher.value)
      } catch (error) {
        handleError(error, vm, `callback for immediate watcher "${watcher.expression}"`)
      }
    }
    return function unwatchFn () {
      watcher.teardown()
    }
  }
对应watch中的所观察的数据进行初始化操作,实际上就是为它们创建一个Watcher实例,当然对数据、对象是要循环、递归创建。
2. Computed属性
computed其数据来源是在props或data中定义好的数据(初始化initState时数据能变得可观察),Vue官网介绍了属性的用途,主要是解决在template模板中表达式过复杂的问题,都在说computed是基于缓存的,即只有依赖源数据发生改变才会触发computed对应数据的计算操作,那么,我们应该有好奇它到底是怎么个缓存法,续析computed源码:
-> src/core/instance/state.js
function initComputed (vm: Component, computed: Object) {
  // $flow-disable-line
  const watchers = vm._computedWatchers = Object.create(null)
  // computed properties are just getters during SSR
  const isSSR = isServerRendering()

  for (const key in computed) {
    // 获取对应computed属性的定义 function或者表达式
    const userDef = computed[key]
    const getter = typeof userDef === 'function' ? userDef : userDef.get
    ...

    // 非服务端渲染方式
    if (!isSSR) {
      // create internal watcher for the computed property.
      watchers[key] = new Watcher(
        vm,
        getter || noop,
        noop,
        computedWatcherOptions // 定义了属性: { lazy: true }
      )
    }
    ...
    // component-defined computed properties are already defined on the
    // component prototype. We only need to define computed properties defined
    // at instantiation here.
    ...
    defineComputed(vm, key, userDef)
    ...
  }
}
遍历options中的computed属性并在非服务器渲染方式的情况下,依次为每一个计算属性产生一个Watcher,即computed就是依赖Watcher实现的,但具体和普通的Watcher有什么不同?(后面会进行介绍),继续看defineComputed实现:
export function defineComputed (
  target: any,
  key: string,
  userDef: Object | Function
) {
  // 非服务器端渲染,则用缓存
  const shouldCache = !isServerRendering()
  if (typeof userDef === 'function') { // 函数方式
    sharedPropertyDefinition.get = shouldCache
      ? createComputedGetter(key)
      : createGetterInvoker(userDef)
    sharedPropertyDefinition.set = noop // 空函数
  } else { // 对象方式
    sharedPropertyDefinition.get = userDef.get
      ? shouldCache && userDef.cache !== false
        ? createComputedGetter(key)
        : createGetterInvoker(userDef.get)
      : noop
    sharedPropertyDefinition.set = userDef.set || noop
  }
  ...
  // 数据劫持
  Object.defineProperty(target, key, sharedPropertyDefinition)
}
找到efineComputed中的核心方法createComputedGetter,主要是设置数据劫持操作的getter方法:
function createComputedGetter (key) {
  return function computedGetter () {
    const watcher = this._computedWatchers && this._computedWatchers[key]
    if (watcher) {
      if (watcher.dirty) { // dirty标志数据是否发生变化
        watcher.evaluate()  // 执行watcher.get()方法,并设置dirty为false
      }
      if (Dep.target) { // 收集依赖
        watcher.depend()
      }
      return watcher.value
    }
  }
}
这儿我们就基本探索到computed属性计算的核心操作,我们通过判断当前watcher(computed)的dirty标志位判断是否需要进行从新计算即执行watcher.evaluate内部的watcher.get方法,并设置dirty属性为false(主要是在执行get后重置数据为未更新状态,便于后续的观察操作),我们用购物车示例中的选中的购物车data.selectedCarts数据源结合数据响应式原理讲到的数据订阅-发布模式来简单分析一下这个计算过程,给出一个计算流程图:
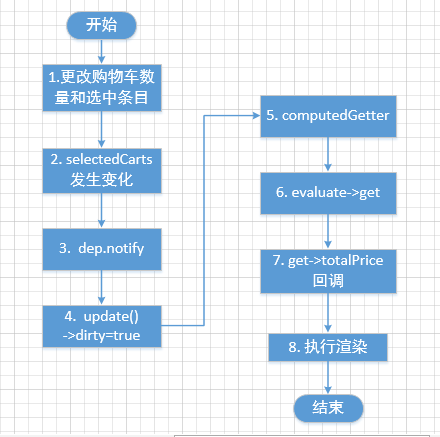
说明:
1. 更新购物车选中条目or更新条目购买数量
2. 触发选中购物车条目selectedCarts的setter进行数据劫持处理
3. setter通知观察者notify->update->设置totalPrice对应的Watcher的dirty=true
4. 页面renderWatcher准备渲染,通过调用totalPriceWatcher的computedGetter的evaluate->get,然后回调totalPrice()方法,计算结果;注意在如果totalPrice依赖的数据源selectedCarts未发生改变时,就会通过computedGetter方法直接返回之前的数据(watcher.value),这也就应证了之前所说的computed是基于缓存的说法。
3. Render Watcher
组件实例化时会产生一个Watcher,在组件$mount的时候,在mountComponent()中会实例化一个Watcher,并挂载到vm的_watchers上,这个Watcher最终会回调Vue的渲染函数从而完成Vue的更新渲染:
 new Watcher(vm, updateComponent, noop, {
    before () {
      if (vm._isMounted && !vm._isDestroyed) {
        callHook(vm, 'beforeUpdate')
      }
    }
  }, true /* isRenderWatcher */)
 updateComponent = () => {
      // vm._render() 由vm.$options.render()生成的vnode节点
      vm._update(vm._render(), hydrating)
    }
4. 总结
本文简要分析了Vue中的Watcher类别,并简要从源码角度分析了这三种Watcher的实现,文笔粗浅,难免理解不到位,欢迎指正。
另外,欢迎去本人git 可相互学习和star。

 浙公网安备 33010602011771号