


MyBatis初级实战之六:一对多关联查询
欢迎访问我的GitHub
https://github.com/zq2599/blog_demos
内容:所有原创文章分类汇总及配套源码,涉及Java、Docker、Kubernetes、DevOPS等;
本篇概览
-
本文是《MyBatis初级实战》系列的第六篇,继续实践从多表获取数据;
-
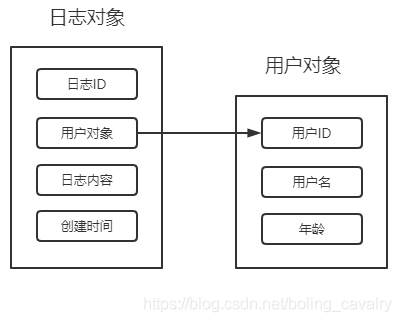
回顾上一篇,咱们实战了多表关联的一对一关系,如下图所示,查找日志记录时,把对应的用户信息查出:
![在这里插入图片描述]()
-
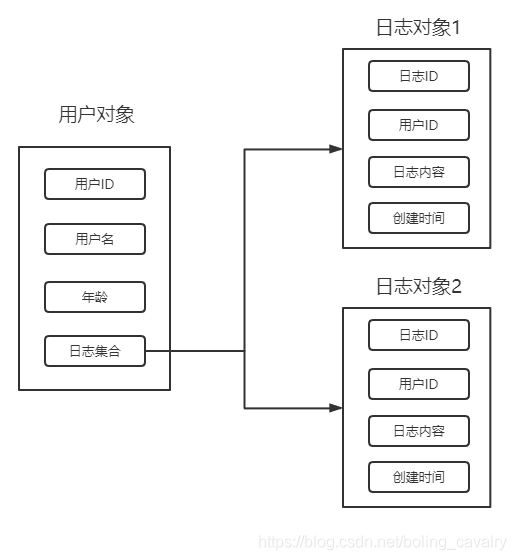
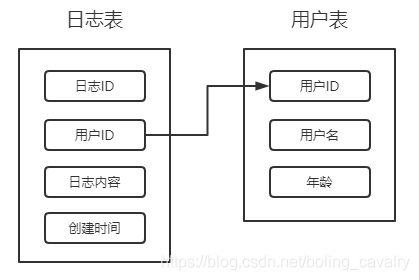
本篇要实践的是一对多关系:查询用户记录时,把该用户的所有日志记录都查出来,逻辑关系如下图:
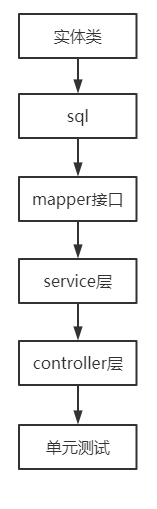
- 在具体编码实现一对多查询时,分别使用联表和嵌套两种方式实现,每种方式都按照下图的步骤执行:
源码下载
- 如果您不想编码,可以在GitHub下载所有源码,地址和链接信息如下表所示(https://github.com/zq2599/blog_demos):
| 名称 | 链接 | 备注 |
|---|---|---|
| 项目主页 | https://github.com/zq2599/blog_demos | 该项目在GitHub上的主页 |
| git仓库地址(https) | https://github.com/zq2599/blog_demos.git | 该项目源码的仓库地址,https协议 |
| git仓库地址(ssh) | git@github.com:zq2599/blog_demos.git | 该项目源码的仓库地址,ssh协议 |
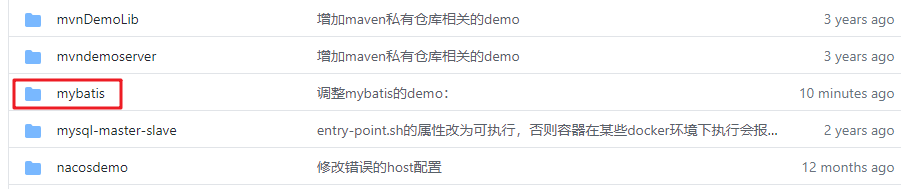
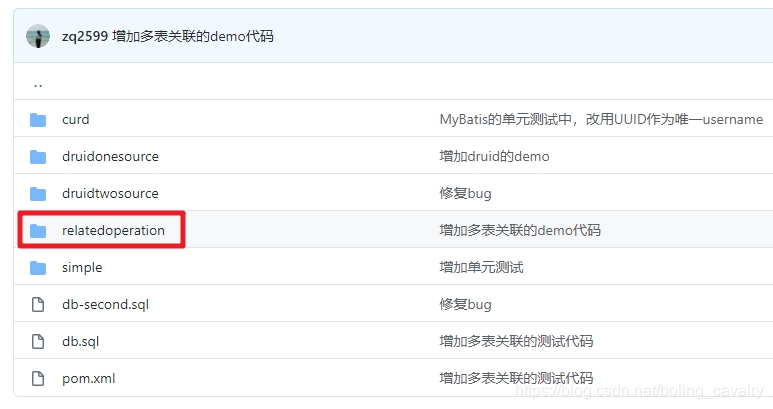
- 这个git项目中有多个文件夹,本章的应用在mybatis文件夹下,如下图红框所示:
3. mybatis是个父工程,里面有数个子工程,本篇的源码在relatedoperation子工程中,如下图红框所示:
准备数据
- 本次实战,在名为mybatis的数据库中建立两个表(和前面几篇文章中的表结构一模一样):user和log表;
- user表记录用户信息,非常简单,只有三个字段:主键、名称、年龄
- log表记录用户行为,四个字段:主键、用户id、行为描述、行为时间
- user和log的关系如下图:
5. 建表和添加数据的语句如下:
use mybatis;

DROP TABLE IF EXISTS `user`;

CREATE TABLE `user` (
  `id` int(32) NOT NULL AUTO_INCREMENT,
  `name` varchar(32) NOT NULL,
  `age` int(32) NOT NULL,
  PRIMARY KEY (`id`)
) ENGINE=InnoDB AUTO_INCREMENT=3 DEFAULT CHARSET=utf8;

DROP TABLE IF EXISTS `log`;

CREATE TABLE `log` (
  `id` int(32) NOT NULL AUTO_INCREMENT,
  `user_id` int(32),
  `action` varchar(255) NOT NULL,
  `create_time` datetime not null,
  PRIMARY KEY (`id`)
) ENGINE=InnoDB AUTO_INCREMENT=3 DEFAULT CHARSET=utf8;

INSERT INTO mybatis.user (id, name, age) VALUES (3, 'tom', 11);

INSERT INTO mybatis.log (id, user_id, action, create_time) VALUES (3, 3, 'read book', '2020-08-07 08:18:16');
INSERT INTO mybatis.log (id, user_id, action, create_time) VALUES (4, 3, 'go to the cinema', '2020-09-02 20:00:00');
INSERT INTO mybatis.log (id, user_id, action, create_time) VALUES (5, 3, 'have a meal', '2020-10-05 12:03:36');
INSERT INTO mybatis.log (id, user_id, action, create_time) VALUES (6, 3, 'have a sleep', '2020-10-06 13:00:12');
INSERT INTO mybatis.log (id, user_id, action, create_time) VALUES (7, 3, 'write', '2020-10-08 09:21:11');
关于多表关联查询的两种方式
- 多表关联查询的实现有联表和嵌套查询两种,它们的差异在Mybatis中体现在resultMap的定义上:
- 联表时,resultMap内使用collection子节点,将联表查询的结果映射到关联对象集合;
- 嵌套时,resultMap内使用association子节点,association的select属性触发一次新的查询;
- 上述两种方式都能成功得到查询结果,接下来逐一尝试;
联表查询
- 本篇继续使用上一篇中创建的子工程relatedoperation;
- 实体类UserWithLogs.java如下,可见成员变量logs是用来保存该用户所有日志的集合:
package com.bolingcavalry.relatedoperation.entity;

import io.swagger.annotations.ApiModel;
import io.swagger.annotations.ApiModelProperty;
import lombok.Data;
import lombok.NoArgsConstructor;
import java.util.List;

@Data
@NoArgsConstructor
@ApiModel(description = "用户实体类(含行为日志集合)")
public class UserWithLogs {

    @ApiModelProperty(value = "用户ID")
    private Integer id;

    @ApiModelProperty(value = "用户名", required = true)
    private String name;

    @ApiModelProperty(value = "用户地址", required = false)
    private Integer age;

    @ApiModelProperty(value = "行为日志", required = false)
    private List<Log> logs;
}
- 保存SQL的UserMapper.xml如下,先把联表查询的SQL写出来,结果在名为
leftJoinResultMap的resultMap中处理:
<?xml version="1.0" encoding="UTF-8"?>
<!DOCTYPE mapper PUBLIC "-//mybatis.org//DTD Mapper 3.0//EN" "http://mybatis.org/dtd/mybatis-3-mapper.dtd">
<mapper namespace="com.bolingcavalry.relatedoperation.mapper.UserMapper">

    <select id="leftJoinSel" parameterType="int" resultMap="leftJoinResultMap">
        select
            u.id as user_id,
            u.name as user_name,
            u.age as user_age,
            l.id as log_id,
            l.user_id as log_user_id,
            l.action as log_action,
            l.create_time as log_create_time

        from mybatis.user as u
                 left join mybatis.log as l
                           on u.id = l.user_id
        where u.id = #{id}
    </select>
</mapper>
- leftJoinResultMap这个resultMap是一对多的关键,里面的collection将log的所有记录映射到logs集合中:
    <resultMap id="leftJoinResultMap" type="UserWithLogs">
        <id property="id" column="user_id"/>
        <result  property="name" column="user_name" jdbcType="VARCHAR"/>
        <result property="age" column="user_age" jdbcType="INTEGER" />
        <collection property="logs" ofType="Log">
            <id property="id" column="log_id"/>
            <result property="userId" column="log_user_id" jdbcType="INTEGER" />
            <result property="action" column="log_action" jdbcType="VARCHAR" />
            <result property="createTime" column="log_create_time" jdbcType="TIMESTAMP" />
        </collection>
    </resultMap>
- 接口定义UserMapper.java :
@Repository
public interface UserMapper {
    UserWithLogs leftJoinSel(int id);
}
- service层:
@Service
public class UserService {
    @Autowired
    UserMapper userMapper;

    public UserWithLogs leftJoinSel(int id) {
        return userMapper.leftJoinSel(id);
    }
}
- controller层的代码略多,是因为想把swagger信息做得尽量完整:
@RestController
@RequestMapping("/user")
@Api(tags = {"UserController"})
public class UserController {
    @Autowired
    private UserService userService;

    @ApiOperation(value = "根据ID查找user记录(包含行为日志),联表查询", notes="根据ID查找user记录(包含行为日志),联表查询")
    @ApiImplicitParam(name = "id", value = "用户ID", paramType = "path", required = true, dataType = "Integer")
    @RequestMapping(value = "/leftjoin/{id}", method = RequestMethod.GET)
    public UserWithLogs leftJoinSel(@PathVariable int id){
        return userService.leftJoinSel(id);
    }
}
- 最后是单元测试,在前文创建的ControllerTest.java中新建内部类User用于user表相关的单元测试,可见封装了一个私有方法queryAndCheck负责请求和验证结果,后面的嵌套查询也会用到:
    @Nested
    @TestMethodOrder(MethodOrderer.OrderAnnotation.class)
    @DisplayName("用户服务")
    class User {

        /**
         * 通过用户ID获取用户信息有两种方式:left join和嵌套查询,
         * 从客户端来看,仅一部分path不同,因此将请求和检查封装到一个通用方法中,
         * 调用方法只需要指定不同的那一段path
         * @param subPath
         * @throws Exception
         */
        private void queryAndCheck(String subPath) throws Exception {
            String queryPath = "/user/" + subPath + "/" + TEST_USER_ID;

            log.info("query path [{}]", queryPath);

            mvc.perform(MockMvcRequestBuilders.get(queryPath).accept(MediaType.APPLICATION_JSON))
                    .andExpect(status().isOk())
                    .andExpect(jsonPath("$.id").value(TEST_USER_ID))
                    .andExpect(jsonPath("$..logs.length()").value(5))
                    .andDo(print());
        }

        @Test
        @DisplayName("通过用户ID获取用户信息(包含行为日志),联表查询")
        @Order(1)
        void leftJoinSel() throws Exception {
            queryAndCheck(SEARCH_TYPE_LEFT_JOIN);
        }
    }
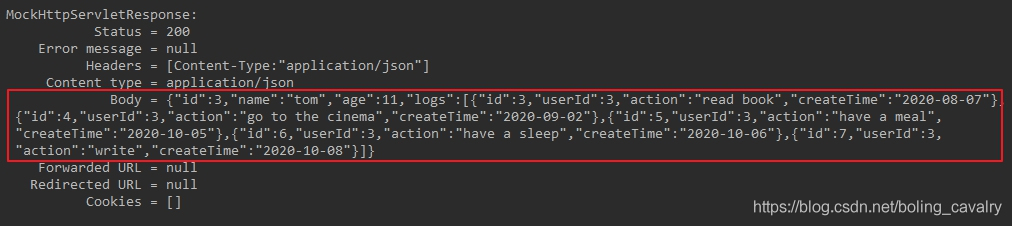
- 执行上述单元测试方法leftJoinSel,得到结果如下:

- 为了便于观察,我将上图红框中的JSON数据做了格式化,如下所示,可见log表中的五条记录都被关联出来了,作为整个user对象的一个字段:
{
    "id": 3,
    "name": "tom",
    "age": 11,
    "logs": [
        {
            "id": 3,
            "userId": 3,
            "action": "read book",
            "createTime": "2020-08-07"
        },
        {
            "id": 4,
            "userId": 3,
            "action": "go to the cinema",
            "createTime": "2020-09-02"
        },
        {
            "id": 5,
            "userId": 3,
            "action": "have a meal",
            "createTime": "2020-10-05"
        },
        {
            "id": 6,
            "userId": 3,
            "action": "have a sleep",
            "createTime": "2020-10-06"
        },
        {
            "id": 7,
            "userId": 3,
            "action": "write",
            "createTime": "2020-10-08"
        }
    ]
}
- 以上就是通过联表的方式获取一对多关联结果,接下来咱们尝试嵌套查询;
嵌套查询
- 嵌套查询的基本思路是将多次查询将结果合并,关键点还是在SQL和resultMap的配置上,先看嵌套查询的SQL,在UserMapper.xml文件中,如下,可见仅查询了user表,并未涉及log表:
    <select id="nestedSel" parameterType="int" resultMap="nestedResultMap">
        select
            u.id as user_id,
            u.name as user_name,
            u.age as user_age
        from mybatis.user as u
        where u.id = #{id}
    </select>
- 上面的SQL显示结果保存在名为nestedResultMap的resultMap中,来看这个resultMap,如下,可见实体类的logs字段对应的是一个association节点,该节点的select属性代表这是个子查询,查询条件是user_id:
    <!-- association节点的select属性会触发嵌套查询-->
    <resultMap id="nestedResultMap" type="UserWithLogs">
        <!-- column属性中的user_id,来自前面查询时的"u.id as user_id" -->
        <id property="id" column="user_id"/>
        <!-- column属性中的user_name,来自前面查询时的"u.name as user_name" -->
        <result  property="name" column="user_name" jdbcType="VARCHAR"/>
        <!-- column属性中的user_age,来自前面查询时的"u.age as user_age" -->
        <result property="age" column="user_age" jdbcType="INTEGER" />
        <!-- select属性,表示这里要执行嵌套查询,将user_id传给嵌套的查询 -->
        <association property="logs" column="user_id" select="selectLogByUserId"></association>
    </resultMap>
- 名为selectLogByUserId的SQL和resultMap如下,即查询log表:
    <select id="selectLogByUserId" parameterType="int" resultMap="log">
        select
            l.id,
            l.user_id,
            l.action,
            l.create_time
        from mybatis.log as l
        where l.user_id = #{user_id}
    </select>

    <resultMap id="log" type="log">
        <id property="id" column="id"/>
        <result column="user_id" jdbcType="INTEGER" property="userId"/>
        <result column="action" jdbcType="VARCHAR" property="action"/>
        <result column="create_time" jdbcType="TIMESTAMP" property="createTime"/>
        <result column="user_name" jdbcType="VARCHAR" property="userName"/>
    </resultMap>
- 以上就是嵌套查询的关键点了,接下来按部就班的在LogMapper、LogService、LogController中添加方法即可,下面是LogController中对应的web接口,稍后会在单元测试中调用这个接口进行验证:
    @ApiOperation(value = "根据ID查找user记录(包含行为日志),嵌套查询", notes="根据ID查找user记录(包含行为日志),嵌套查询")
    @ApiImplicitParam(name = "id", value = "用户ID", paramType = "path", required = true, dataType = "Integer")
    @RequestMapping(value = "/nested/{id}", method = RequestMethod.GET)
    public UserWithLogs nestedSel(@PathVariable int id){
        return userService.nestedSel(id);
    }
- 单元测试的代码很简单,调用前面封装好的queryAndCheck方法即可:
        @Test
        @DisplayName("通过用户ID获取用户信息(包含行为日志),嵌套查询")
        @Order(2)
        void nestedSel() throws Exception {
            queryAndCheck(SEARCH_TYPE_NESTED);
        }
- 执行单元测试的结果如下图红框所示,和前面的联表查询一样:
- 两种方式的一对多关联查询都试过了,接下来看看两者的区别;
联表和嵌套的区别
- 首先是联表查询的日志,如下,只有一次查询:
2020-10-21 20:25:05.754  INFO 15408 --- [           main] c.b.r.controller.ControllerTest          : query path [/user/leftjoin/3]
2020-10-21 20:25:09.910  INFO 15408 --- [           main] com.alibaba.druid.pool.DruidDataSource   : {dataSource-1} inited
2020-10-21 20:25:09.925 DEBUG 15408 --- [           main] c.b.r.mapper.UserMapper.leftJoinSel      : ==>  Preparing: select u.id as user_id, u.name as user_name, u.age as user_age, l.id as log_id, l.user_id as log_user_id, l.action as log_action, l.create_time as log_create_time from mybatis.user as u left join mybatis.log as l on u.id = l.user_id where u.id = ?
2020-10-21 20:25:10.066 DEBUG 15408 --- [           main] c.b.r.mapper.UserMapper.leftJoinSel      : ==> Parameters: 3(Integer)
2020-10-21 20:25:10.092 DEBUG 15408 --- [           main] c.b.r.mapper.UserMapper.leftJoinSel      : <==      Total: 5
- 再来看看嵌套查询的日志,两次:
2020-10-21 20:37:29.648  INFO 24384 --- [           main] c.b.r.controller.ControllerTest          : query path [/user/nested/3]
2020-10-21 20:37:33.867  INFO 24384 --- [           main] com.alibaba.druid.pool.DruidDataSource   : {dataSource-1} inited
2020-10-21 20:37:33.880 DEBUG 24384 --- [           main] c.b.r.mapper.UserMapper.nestedSel        : ==>  Preparing: select u.id as user_id, u.name as user_name, u.age as user_age from mybatis.user as u where u.id = ?
2020-10-21 20:37:34.018 DEBUG 24384 --- [           main] c.b.r.mapper.UserMapper.nestedSel        : ==> Parameters: 3(Integer)
2020-10-21 20:37:34.041 DEBUG 24384 --- [           main] c.b.r.m.UserMapper.selectLogByUserId     : ====>  Preparing: select l.id, l.user_id, l.action, l.create_time from mybatis.log as l where l.user_id = ?
2020-10-21 20:37:34.043 DEBUG 24384 --- [           main] c.b.r.m.UserMapper.selectLogByUserId     : ====> Parameters: 3(Integer)
2020-10-21 20:37:34.046 DEBUG 24384 --- [           main] c.b.r.m.UserMapper.selectLogByUserId     : <====      Total: 5
2020-10-21 20:37:34.047 DEBUG 24384 --- [           main] c.b.r.mapper.UserMapper.nestedSel        : <==      Total: 1
- 至此,MyBatis常用的多表关联查询实战就完成了,希望能给您一些参考,接下来的文章,咱们继续体验MyBatis带给我们的各种特性。
你不孤单,欣宸原创一路相伴
欢迎关注公众号:程序员欣宸
微信搜索「程序员欣宸」,我是欣宸,期待与您一同畅游Java世界...
https://github.com/zq2599/blog_demos

 浙公网安备 33010602011771号