


Swagger 快速上手
导语:
相信无论是前端还是后端开发,都或多或少地被接口文档折磨过。前端经常抱怨后端给的接口文档与实际情况不一致。后端又觉得编写及维护接口文档会耗费不少精力,经常来不及更新。其实无论是前端调用后端,还是后端调用后端,都期望有一个好的接口文档。但是这个接口文档对于程序员来说,就跟注释一样,经常会抱怨别人写的代码没有写注释,然而自己写起代码起来,最讨厌的,也是写注释。所以仅仅只通过强制来规范大家是不够的,随着时间推移,版本迭代,接口文档往往很容易就跟不上代码了。
建议先直接导文章末尾,看一下Swagger是个什么东西
1.下载依赖包pom.xml
  <!-- https://mvnrepository.com/artifact/io.springfox/springfox-swagger2 -->
        <dependency>
            <groupId>io.springfox</groupId>
            <artifactId>springfox-swagger2</artifactId>
            <version>2.9.2</version>
        </dependency>
        <!-- https://mvnrepository.com/artifact/io.springfox/springfox-swagger-ui -->
        <dependency>
            <groupId>io.springfox</groupId>
            <artifactId>springfox-swagger-ui</artifactId>
            <version>2.9.2</version>
        </dependency>
2.写配置类
 1 package com.ybzn.config;
 2
 3 import com.ybzn.swagger.HelloController;
 4 import org.springframework.beans.factory.annotation.Autowired;
 5 import org.springframework.beans.factory.annotation.Qualifier;
 6 import org.springframework.boot.autoconfigure.thymeleaf.ThymeleafAutoConfiguration;
 7 import org.springframework.context.annotation.Bean;
 8 import org.springframework.context.annotation.Configuration;
 9 import org.springframework.web.bind.annotation.GetMapping;
10 import org.springframework.web.bind.annotation.RestController;
11 import org.springframework.web.servlet.HandlerMapping;
12 import springfox.documentation.builders.PathSelectors;
13 import springfox.documentation.builders.RequestHandlerSelectors;
14 import springfox.documentation.service.ApiInfo;
15 import springfox.documentation.service.Contact;
16 import springfox.documentation.spi.DocumentationType;
17 import springfox.documentation.spring.web.plugins.Docket;
18 import springfox.documentation.swagger2.annotations.EnableSwagger2;
19
20 import java.util.ArrayList;
21
22 /**
23  * @EnableSwagger2开启Swagger2,如果没有这个是无法启动的
24  * @author Hugo
25  * @time 2020/4/8
26  */
27 @Configuration
28 @EnableSwagger2
29 public class SwaggerConfig {
30
31
32     @Bean
33     public Docket docket(){
34
35         return new Docket(DocumentationType.SWAGGER_2)
36                 .apiInfo(apiInfo())
37                 .select()
38                 //RequestHandlerSelectors ,扫描配置接口的方式
39                 //basePackage: 扫描需要的包
40                 // any(): 扫描全部
41                 // none(): 不扫描,包过滤
42                 // withMethodAnnotation : 扫描方法上面的注解
43                 // withClassAnnotation : 扫描类上面的注解
44                 .apis(RequestHandlerSelectors.basePackage("com.ybzn.swagger"))
45                 //paths() 过滤什么路径,只有hugo下面的才可以访问
46                 .paths(PathSelectors.ant("/hugo/**"))
47                 .build();
48     }
49
50     private ApiInfo apiInfo(){
51         //作者信息
52         Contact DEFAULT_CONTACT = new Contact("Hugo", "www.baidu.com", "1192179830@qq.com");
53
54         return  new ApiInfo("LMJ 的API 测试文档", "我的API接口测试文档", "1.0", "urn:tos", DEFAULT_CONTACT, "Apache 2.0", "http://www.apache.org/licenses/LICENSE-2.0", new ArrayList());
55     }
56 }
3.撰写控制类,这样就可以直接扫码到了
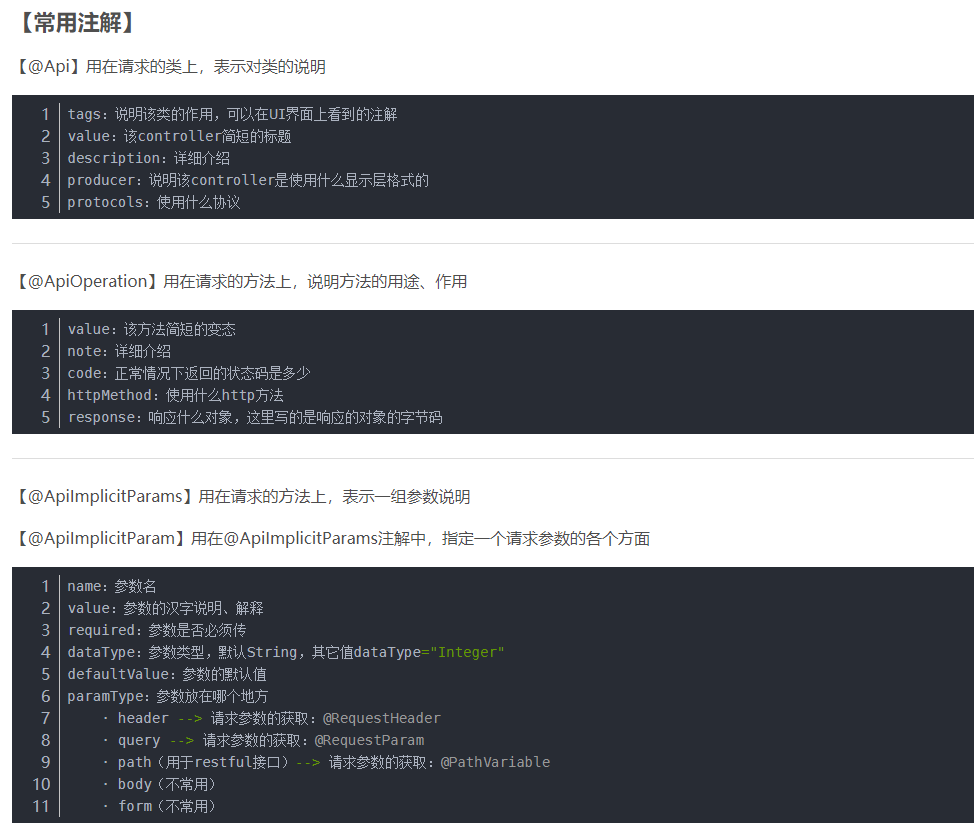
 1 package com.ybzn.swagger;
 2
 3 import io.swagger.annotations.ApiOperation;
 4 import org.springframework.web.bind.annotation.GetMapping;
 5 import org.springframework.web.bind.annotation.PostMapping;
 6 import org.springframework.web.bind.annotation.RequestMapping;
 7 import org.springframework.web.bind.annotation.RestController;
 8
 9 import javax.websocket.server.PathParam;
10
11 /**
12  * @author Hugo
13  * @time 2020/4/8
14  */
15 @RestController
16 @RequestMapping("/hugo")
17 public class HelloController {
18
19     @GetMapping("/index")
20     public String helloSwagger(){
21         return "Hello";
22     }
23
24     @GetMapping("/test1")
25     public String test1(){
26         return "Hello111";
27     }
28     @PostMapping("/test2")
29     @ApiOperation("get控制类,带参数的")
30     public String wsaw(@PathParam("username") String username){
31         return "Hello222"+username;
32     }
33
34     /**
35      * 只要我们的接口中,返回值存在实体类,
36      * 就会被扫描到Swagger上面来
37      * @return
38      */
39     @PostMapping(value = "/user")
40     public User user(User user){
41         User user1 = new User();
42         user1.username=user.username;
43         user1.password=user.password;
44         return  user1;
45     }
46
47
48 }
4.实体类可以加API注释
 1 /**
 2  * @author Hugo
 3  * @time 2020/4/8
 4  */
 5 @ApiModel("用户实体类")
 6 public class User {
 7     @ApiModelProperty("用户名")
 8     public String username;
 9     @ApiModelProperty("密码")
10     public String password;
11 }
5.访问http://localhost:8080/swagger-ui.html页面

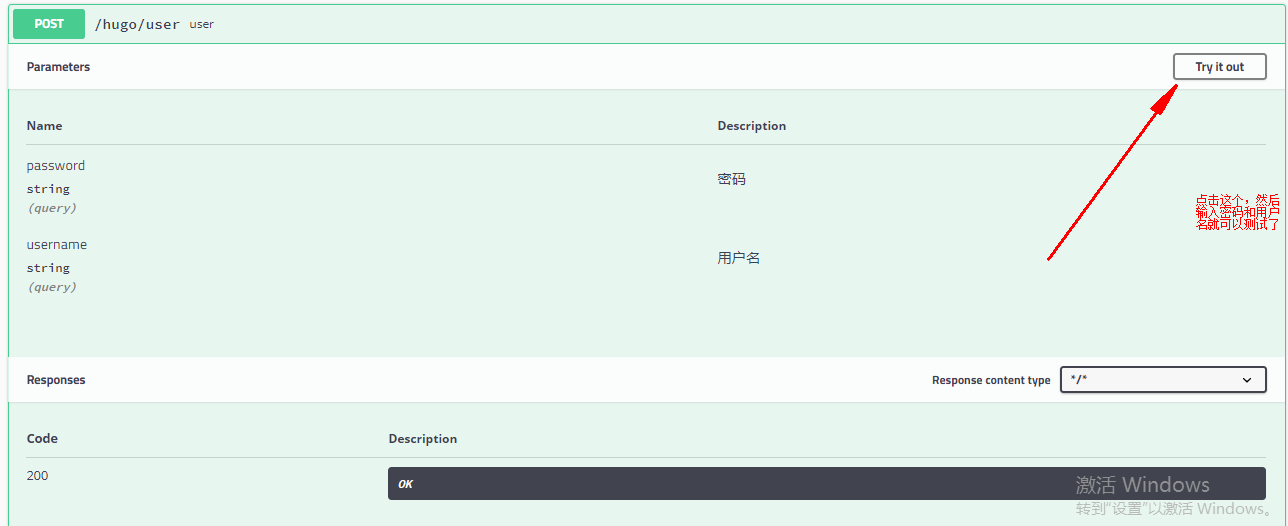
下拉就可以看到测试结果。

 浙公网安备 33010602011771号