
Sonic Pi笔记
Sonic Pi笔记
Sonic Pi使用Ruby语言开发,可以使用代码编写简单音乐
合成器(Synths)
Synths是synthesizer(合成器)的缩写,指的是能产生声音的东西
play指令可以触发合成器,后面数字大小与音调有关,也可以使用音符名称
play :c4
play 60  # 60对应c4
play :cs4
play :cb4  # s代表升调,b代表降调
多个play会同时播放
# 下面三个音符会同时播放,产生和弦
play 72
play 75
play 79
sleep指令可以指定两个指令之间的休眠时间,数字代表拍子数(beats)
play 72
sleep 0.5  # 休眠半拍
play 75
sleep 0.5
play 79
合成器选项
合成器选项添加到play后,用英文逗号隔开。
选项有两个部分,名称和值,名称和值之间用:和空格隔开。
若相同的选项有不同的值,以最后一个为准。
amp选项
amp是Amplitude(振幅)的缩写,是声音响度的计算机表示
- 可以改变音量,效果类似放大器
- 数值越大,音量越大
ℹ️尽量使用低振幅,即在 0 到 0.5 的范围内以避免压缩[1]。
pan选项
- 改变声音的立体效果
1表示声音完全从右声道发出,-1则相反,默认为0
rate选项
- 改变样本声音的播放速度
- 正数代表正放,负数代表倒放
cutoff选项
改变合成器的截止值
切换合成器
通过use_synth来切换合成器,仅影响跟随的play
Notice that the
use_synthcommand only affects the following calls toplay. Think of it like a big switch - new calls toplaywill play whatever synth it’s currently pointing to. You can move the switch to a new synth withuse_synth.
ADSR包络
通过ADSR振幅包络,可以提供两方面的控制:
- 声音的持续时间
- 声音的幅度
淡出
通过release:参数控制声音的持续时间,产生淡出。
Longer release times produce longer synth fade outs.
淡入
通过attack:参数控制声音的进入,产生淡入。
By default, the attack phase is 0 for all synths which means they move from 0 amplitude to 1 immediately. This gives the synth an initial percussive sound. However, you may wish to fade your sound in. This can be achieved with the
attack:opt. Try fading in some sounds:
延音
通过sustain:参数控制延音阶段,这是声音在起音和释放阶段之间保持在全振幅的时间。
The sustain time is useful for important sounds you wish to give full presence in the mix before entering an optional release phase.
衰减
通过decay:参数控制从起音到延音之间、从attack_level到decay_level的时间
level
可以设置attack_level, decay_level和sustain_level的值来更好的控制
具体效果如下:
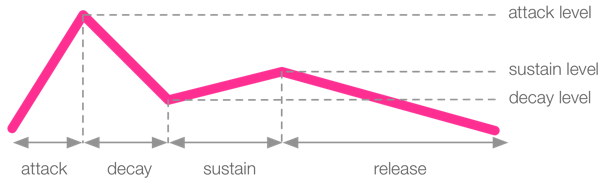
小结
综上所述,Sonic Pi 的 ADSR 包络有以下几个阶段:
- attack - time from 0 amplitude to the
attack_level,
attack - 从 0 振幅到attack_level, 的时间 - decay - time to move amplitude from
attack_leveltodecay_level,
decay - 将振幅从attack_level移动到decay_level的时间 , - sustain - time to move the amplitude from
decay_leveltosustain_level,
sustain - 将振幅从decay_level移动到sustain_level的时间 , - release - time to move amplitude from
sustain_levelto 0
release - 将振幅从sustain_level移动到 0 的时间
需要注意的是,声音的持续时间是每个阶段的时间总和。
采样
播放采样
通过sample :播放采样
start参数
- 可以选择
0-1之间的任意值作为起点 0是样本起点,1是终点
finish参数
- 可以选择
0-1之间的任意值作为起点 0是样本起点,1是终点- 若起点的值大于终点的值,则倒着播放采样
采样参数
amp参数
与合成器的amp:用法相同
pan参数
与合成器的pan:用法相同
rate参数
与合成器的rate:用法相同
ADSR包络
淡入(attack)
默认以全振幅播放
延音(sustain)
默认为扣除其他部分后的剩余时间,若其他部分总和超出样本持续时间则设为0
Sonic Pi therefore calculates how long the sample is, deducts any attack, decay and release times and uses the result as your sustain time. If the attack, decay and release values add up to more than the duration of the sample, the sustain is simply set to 0.
淡出(release)
默认在结束时淡出,被设置时在末尾淡出
# loop_amen采样的长度1.753310657596372秒
sample :loop_amen, release: 0.75
# 在最后0.75秒淡出
显式延音
外部采样
本地采样
通过sample :"采样的路径"播放本地的wav、alff和flac文件
采样包
随机化
rrand()函数
生成范围内的随机数,例如rrand(50, 80)生成50~80范围内的随机数
rrand_i()函数
- 生成范围内随机整数
use_random_seed
- 改变所用的随机数种子
choose函数
从列表中随机选择一个
choose([60, 65, 72]) # 从[60, 65, 72]中随机选择一个
效果
添加效果
使用with_fx命令,可以给演奏添加效果
with_fx :bitcrusher do
    play 60
    sleep 1
    play 62
    sleep 1
    play 64
end
查找效果
可以在帮助中的FX模块查找效果
制作一首歌曲
鼓点
live_loop指令
一个可以和其他多个live_loop同步的无限循环
live_loop :drums do
  sample :drum_heavy_kick
  sleep 1  # 一个live_loop中至少要有一个sleep指令
end
use_bpm指令
bpm指歌曲每分钟的节拍数,与歌曲的节奏有关
use_bpm 60  # 每分钟60拍
use_bpm 54  # 每分钟54拍
高振幅产生响亮的声音,低振幅产生安静的声音。就像 Sonic Pi 使用数字来表示时间和音符一样,它使用数字来表示振幅。振幅为 0 表示无声(您不会听到任何声音),而振幅为 1 是正常音量。您甚至可以将振幅提高到 2、10、100。但是,您应该注意,当所有声音的整体振幅过高时,Sonic Pi 会使用所谓的压缩器将它们全部压缩,以确保声音不会对您的耳朵造成太大影响。这通常会使声音变得浑浊和奇怪。因此,请尽量使用低振幅,即在 0 到 0.5 的范围内以避免压缩。 ↩︎

 浙公网安备 33010602011771号