基于springboot的spring-ws服务端与客户端实现
本示例以一个部门服务接口为例(Depts)
创建服务端
1. 创建springboot项目,导入maven依赖
<?xml version="1.0" encoding="UTF-8"?>
<project xmlns="http://maven.apache.org/POM/4.0.0" xmlns:xsi="http://www.w3.org/2001/XMLSchema-instance"
         xsi:schemaLocation="http://maven.apache.org/POM/4.0.0 https://maven.apache.org/xsd/maven-4.0.0.xsd">
    <modelVersion>4.0.0</modelVersion>
    <parent>
        <groupId>org.springframework.boot</groupId>
        <artifactId>spring-boot-starter-parent</artifactId>
        <version>2.4.2</version>
        <relativePath/> <!-- lookup parent from repository -->
    </parent>
    <groupId>com.example</groupId>
    <artifactId>springboot-groovy</artifactId>
    <version>0.0.1-SNAPSHOT</version>
    <name>springboot-groovy</name>
    <description>GroovyDemo</description>
    <properties>
        <java.version>1.8</java.version>
        <project.build.sourceEncoding>UTF-8</project.build.sourceEncoding>
        <project.reporting.outputEncoding>UTF-8</project.reporting.outputEncoding>
    </properties>
    <dependencies>
        <dependency>
            <groupId>org.springframework.boot</groupId>
            <artifactId>spring-boot-starter-web</artifactId>
        </dependency>

        <dependency>
            <groupId>org.springframework.boot</groupId>
            <artifactId>spring-boot-starter-web</artifactId>
        </dependency>

        <!--spring-webservice-->
        <dependency>
            <groupId>org.springframework.boot</groupId>
            <artifactId>spring-boot-starter-web-services</artifactId>
        </dependency>
        <dependency>
            <groupId>wsdl4j</groupId>
            <artifactId>wsdl4j</artifactId>
        </dependency>


    </dependencies>

    <build>
        <plugins>
            <!-- springboot打jar包插件 -->
            <plugin>
                <groupId>org.springframework.boot</groupId>
                <artifactId>spring-boot-maven-plugin</artifactId>
                <configuration>
                    <excludes>
                        <exclude>
                            <groupId>org.projectlombok</groupId>
                            <artifactId>lombok</artifactId>
                        </exclude>
                    </excludes>
                </configuration>
            </plugin>

            <!--xsd构建实体类插件-->
            <plugin>
                <groupId>org.codehaus.mojo</groupId>
                <artifactId>jaxb2-maven-plugin</artifactId>
                <version>2.5.0</version>
                <executions>
                    <execution>
                        <id>xjc</id>
                        <goals>
                            <goal>xjc</goal>
                        </goals>
                    </execution>
                </executions>
                <configuration>
                    <sources>
                        <source>${project.basedir}/src/main/resources/xsd/depts.xsd</source>
                    </sources>
                </configuration>
            </plugin>
        </plugins>
    </build>

</project>
2.创建xsd模型,头部的命名空间根据包名起名就可以,注意.替换成/;对象和属性怎么配置请百度了解下xml就好
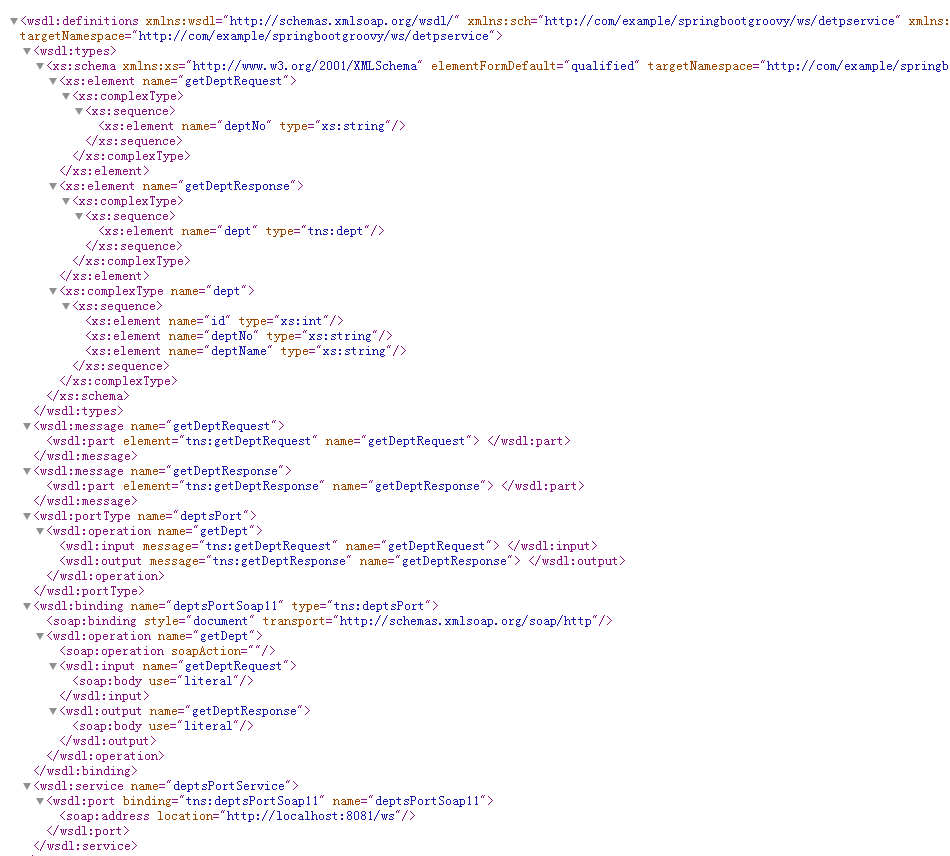
<xs:schema xmlns:xs="http://www.w3.org/2001/XMLSchema" xmlns:tns="http://com/example/springbootgroovy/ws/detpservice"
           targetNamespace="http://com/example/springbootgroovy/ws/detpservice" elementFormDefault="qualified">

    <xs:element name="getDeptRequest">
        <xs:complexType>
            <xs:sequence>
                <xs:element name="deptNo" type="xs:string"/>
            </xs:sequence>
        </xs:complexType>
    </xs:element>

    <xs:element name="getDeptResponse">
        <xs:complexType>
            <xs:sequence>
                <xs:element name="dept" type="tns:dept"/>
            </xs:sequence>
        </xs:complexType>
    </xs:element>

    <xs:complexType name="dept">
        <xs:sequence>
            <xs:element name="id" type="xs:int"/>
            <xs:element name="deptNo" type="xs:string"/>
            <xs:element name="deptName" type="xs:string"/>
        </xs:sequence>
    </xs:complexType>

</xs:schema>
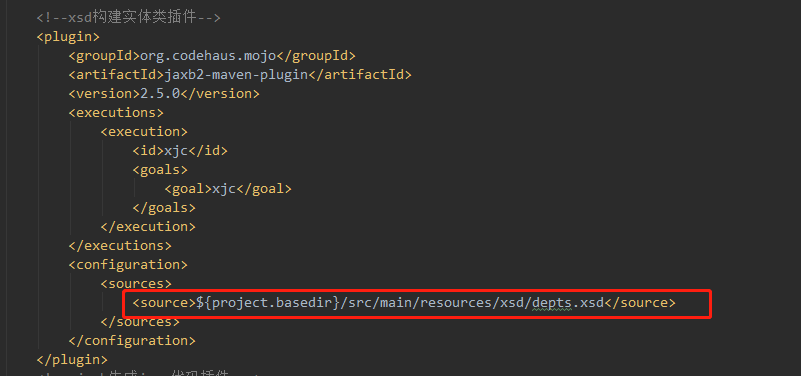
3.将xsd文件路径配置到pom.xml的插件中,根据业务模块需求可以填写多个原型文件,
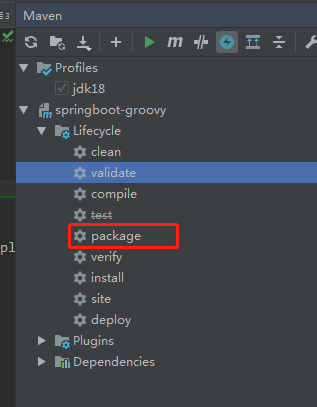
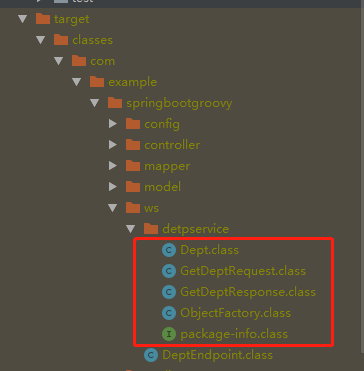
4.使用mvn clean package 操作,先根据上面配置的xsd构建出java类,完成后在target目录下生成java文件(生成路径根据xsd中的命名空间定义的)
5.创建webservice端点(不好意思,用groovy写的,加个public就是java代码了)
 1 @Endpoint //声明是一个端点
 2 class DeptEndpoint {
 3
 4     //配置命名空间信息
 5     @PayloadRoot(namespace = "http://com/example/springbootgroovy/ws/detpservice", localPart = "getDeptRequest")
 6     @ResponsePayload
 7     //参数和返回值分别为maven插件构建的请求体和响应体
 8     GetDeptResponse getDept(@RequestPayload GetDeptRequest request) {
 9 //webservice服务具体代码内容
10         def dept = new Dept()
11         dept.deptNo = "dp001"
12         dept.deptName = "deptName"
13
14         def response = new GetDeptResponse()
15         response.dept = dept
16
17         return response
18     }
19 }
6.创建spring-ws配置类,暴露wsdl文档路径
 1 @EnableWs//启用webservice
 2 @Configuration
 3 class WebServiceServerConfig extends WsConfigurerAdapter {
 4 //声明一个ws的servlet,专门接收/ws后缀的请求,和普通的controller分开
 5     @Bean
 6     ServletRegistrationBean<MessageDispatcherServlet> messageDispatcherServlet(ApplicationContext applicationContext) {
 7         def servlet = new MessageDispatcherServlet()
 8         servlet.setApplicationContext(applicationContext)
 9         servlet.setTransformWsdlLocations(true)
10         new ServletRegistrationBean<>(servlet, "/ws/*")
11     }
12
13 //声明scheam对象,指向xsd路径
14     @Bean
15     XsdSchema deptSchema() {
16         new SimpleXsdSchema(new ClassPathResource("xsd/depts.xsd"))
17     }
18
19     //创建服务对象,注解中的name就是wsdl文档请求路径
20     @Bean(name = "depts")
21     DefaultWsdl11Definition defaultWsdl11Definition(XsdSchema countriesSchema) {
22         def wsdl11Definition = new DefaultWsdl11Definition()
23         wsdl11Definition.setPortTypeName("deptsPort")
24         wsdl11Definition.setLocationUri("/ws")
25         wsdl11Definition.setTargetNamespace("http://com/example/springbootgroovy/ws/detpservice")
26         wsdl11Definition.setSchema(countriesSchema)
27         wsdl11Definition
28     }
29 }
7.测试,将项目跑起来,访问localhost:8080/ws/depts.wsdl,出现wsdl文档说明接口配置成功
至此,server端已配置完成!
-----------------------------------------------------------------------------------------------------------------------------------------------------
Client端配置
以下是参照spring官方的教程配置的,不过感觉比较墨迹,如果想简单点直接用cxf的wsdl2java命令生成代码也可以,再粘贴到项目中照样可以请求成功,如果想遵循官方的,请继续往下看:
1.首先还是构建springboot工程,添加pom依赖
  1 <?xml version="1.0" encoding="UTF-8"?>
  2 <project xmlns="http://maven.apache.org/POM/4.0.0" xmlns:xsi="http://www.w3.org/2001/XMLSchema-instance"
  3          xsi:schemaLocation="http://maven.apache.org/POM/4.0.0 https://maven.apache.org/xsd/maven-4.0.0.xsd">
  4     <modelVersion>4.0.0</modelVersion>
  5     <parent>
  6         <groupId>org.springframework.boot</groupId>
  7         <artifactId>spring-boot-starter-parent</artifactId>
  8         <version>2.4.2</version>
  9         <relativePath/> <!-- lookup parent from repository -->
 10     </parent>
 11     <groupId>com.example</groupId>
 12     <artifactId>springboot-groovy</artifactId>
 13     <version>0.0.1-SNAPSHOT</version>
 14     <name>springboot-groovy</name>
 15     <description>GroovyDemo</description>
 16     <properties>
 17         <java.version>1.8</java.version>
 18         <project.build.sourceEncoding>UTF-8</project.build.sourceEncoding>
 19         <project.reporting.outputEncoding>UTF-8</project.reporting.outputEncoding>
 20     </properties>
 21     <dependencies>
 22         <dependency>
 23             <groupId>org.springframework.boot</groupId>
 24             <artifactId>spring-boot-starter-web</artifactId>
 25         </dependency>
 26
 27         <dependency>
 28             <groupId>org.springframework.boot</groupId>
 29             <artifactId>spring-boot-starter-web</artifactId>
 30         </dependency>
 31
 32         <!--spring-webservice-->
 33         <dependency>
 34             <groupId>org.springframework.boot</groupId>
 35             <artifactId>spring-boot-starter-web-services</artifactId>
 36         </dependency>
 37         <dependency>
 38             <groupId>wsdl4j</groupId>
 39             <artifactId>wsdl4j</artifactId>
 40         </dependency>
 41
 42
 43     </dependencies>
 44
 45     <build>
 46         <plugins>
 47             <!-- springboot打jar包插件 -->
 48             <plugin>
 49                 <groupId>org.springframework.boot</groupId>
 50                 <artifactId>spring-boot-maven-plugin</artifactId>
 51                 <configuration>
 52                     <excludes>
 53                         <exclude>
 54                             <groupId>org.projectlombok</groupId>
 55                             <artifactId>lombok</artifactId>
 56                         </exclude>
 57                     </excludes>
 58                 </configuration>
 59             </plugin>
 60
 80             <!-- jaxb生成java代码插件 -->
 81             <plugin>
 82                 <groupId>org.jvnet.jaxb2.maven2</groupId>
 83                 <artifactId>maven-jaxb2-plugin</artifactId>
 84                 <version>0.14.0</version>
 85                 <executions>
 86                     <execution>
 87                         <goals>
 88                             <goal>generate</goal>
 89                         </goals>
 90                     </execution>
 91                 </executions>
 92                 <configuration>
 93                     <schemaLanguage>WSDL</schemaLanguage>
 94                     <!-- 根据wsdl生成java代码的路径 -->
 95                     <generatePackage>com.example.springbootgroovy.wsclient.wsdl</generatePackage>
 96                     <schemas>
 97                         <schema>
 98                             <!--wsdl提供方地址-->
 99                             <url>http://localhost:8080/ws/depts.wsdl</url>
100                         </schema>
101                     </schemas>
102                 </configuration>
103             </plugin>
104
105
106         </plugins>
107     </build>
108
109 </project>
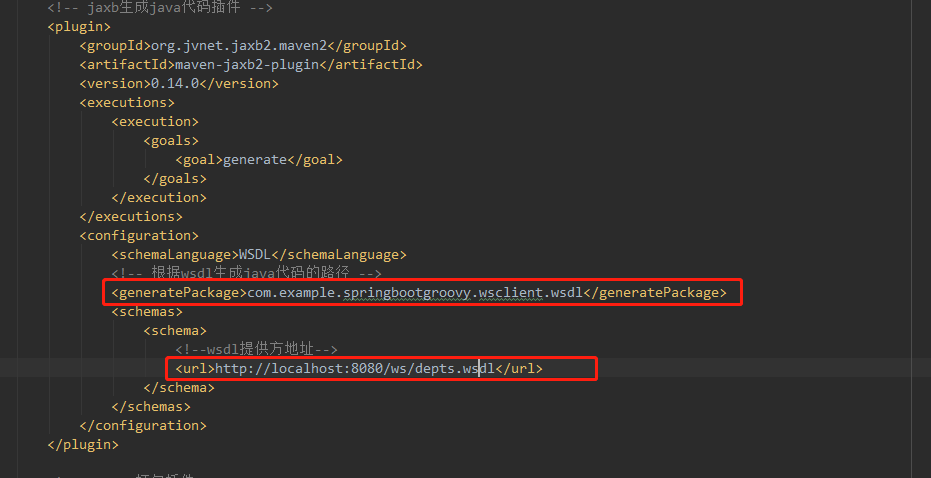
2.在pom build插件中配置代码生成路径,生成java代码
①generatePackage元素下配置生成的包名
②url配置服务提供方的wsdl接口地址,因为构建插件是根据wsdl生成的
3.继续使用maven执行 mvn clean package 命令生成代码,代码同样生成到target下,路径是上面generatePackage配置的,注意:源码中不生成java文件,只生成编译好的class文件
4.创建客户端类
public class DeptsClient extends WebServiceGatewaySupport { private static final Logger log = LoggerFactory.getLogger(DeptsClient.class); public GetDeptResponse getDept() { //创建请求参数对象 GetDeptRequest request = new GetDeptRequest(); request.setDeptNo("1"); log.info("Requesting location for " + request);
//从父类获取服务模板 GetDeptResponse response = (GetDeptResponse) getWebServiceTemplate()
//配置服务接口地址,注点意不带.wsdl了;传递请求参数request .marshalSendAndReceive("http://localhost:8080/ws/depts", request, new SoapActionCallback(
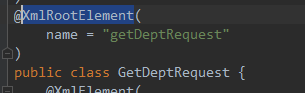
//此处配置命名空间信息,从wsdl中查找填写;或者从生成的代码中查看package-info.java中的namespace 加上 request对象中配置的@XmlRootElement注解中配置的name值,不明白看下图
"http://com/example/springbootgroovy/ws/detpservice/getDeptRequest")); return response; } }

5.编写客户端配置类
@Configuration
public class WebServiceClientConfig {
  //创建服务的marshaller
  @Bean
  public Jaxb2Marshaller marshaller() {
    Jaxb2Marshaller marshaller = new Jaxb2Marshaller();
//设置上下文包名,就是build插件配置的包名
    marshaller.setContextPath("com.example.springbootgroovy.wsclient.wsdl");
    return marshaller;
  }

  @Bean
  public DeptsClient deptsClient(Jaxb2Marshaller marshaller) {
  //创建client对象
    DeptsClient client = new DeptsClient();
//配置默认接口地址(暂时不知道有啥用)
    client.setDefaultUri("http://localhost:8080/ws");
//填充marshaller
    client.setMarshaller(marshaller);
    client.setUnmarshaller(marshaller);
    return client;
  }
}
6.测试接口调用,不用说了吧
@SpringBootApplication
public class Application {
  public static void main(String[] args) {
    SpringApplication.run(Application.class, args);
  }

  @Bean
  CommandLineRunner lookup(DeptsClient quoteClient) {
    return args -> {
      GetDeptResponse response = quoteClient.getDept();
      Dept dept = response.getDept();
      System.err.printf(dept.getDeptName() + dept.getDeptNo());
    };
  }
}

 浙公网安备 33010602011771号