
深度定制RuoYi-Vue-Plus:从侧边栏到顶部导航的UI布局重构实战
在现代企业级后台管理系统的开发中,前端UI布局的灵活性与可定制性至关重要。RuoYi-Vue-Plus作为一款基于Spring Boot和Vue 3的流行开源框架,其默认的侧边栏导航布局虽然经典,但有时无法满足特定的产品设计或用户体验需求。本文将深入探讨如何对RuoYi-Vue-Plus的前端页面布局进行深度改造,特别是将传统的侧边栏菜单体系,重构为更符合现代Web应用趋势的“顶部一级导航 + 左侧二级导航”的混合布局模式。通过本次实战,您不仅能掌握Vue 3组件化开发的核心技巧,还能深入理解动态路由与状态管理(Pinia)在前端架构中的协同工作逻辑。
一、需求分析与布局重构的核心思路
在项目迭代过程中,我们常会遇到调整导航结构的需求。例如,当一级菜单项过多时,传统的侧边栏会显得冗长,而将一级菜单移至顶部,二级菜单保留在侧边,能有效利用屏幕空间,提升导航的清晰度和操作效率。这种布局在诸如阿里云控制台、腾讯云等大型SaaS平台中非常常见。
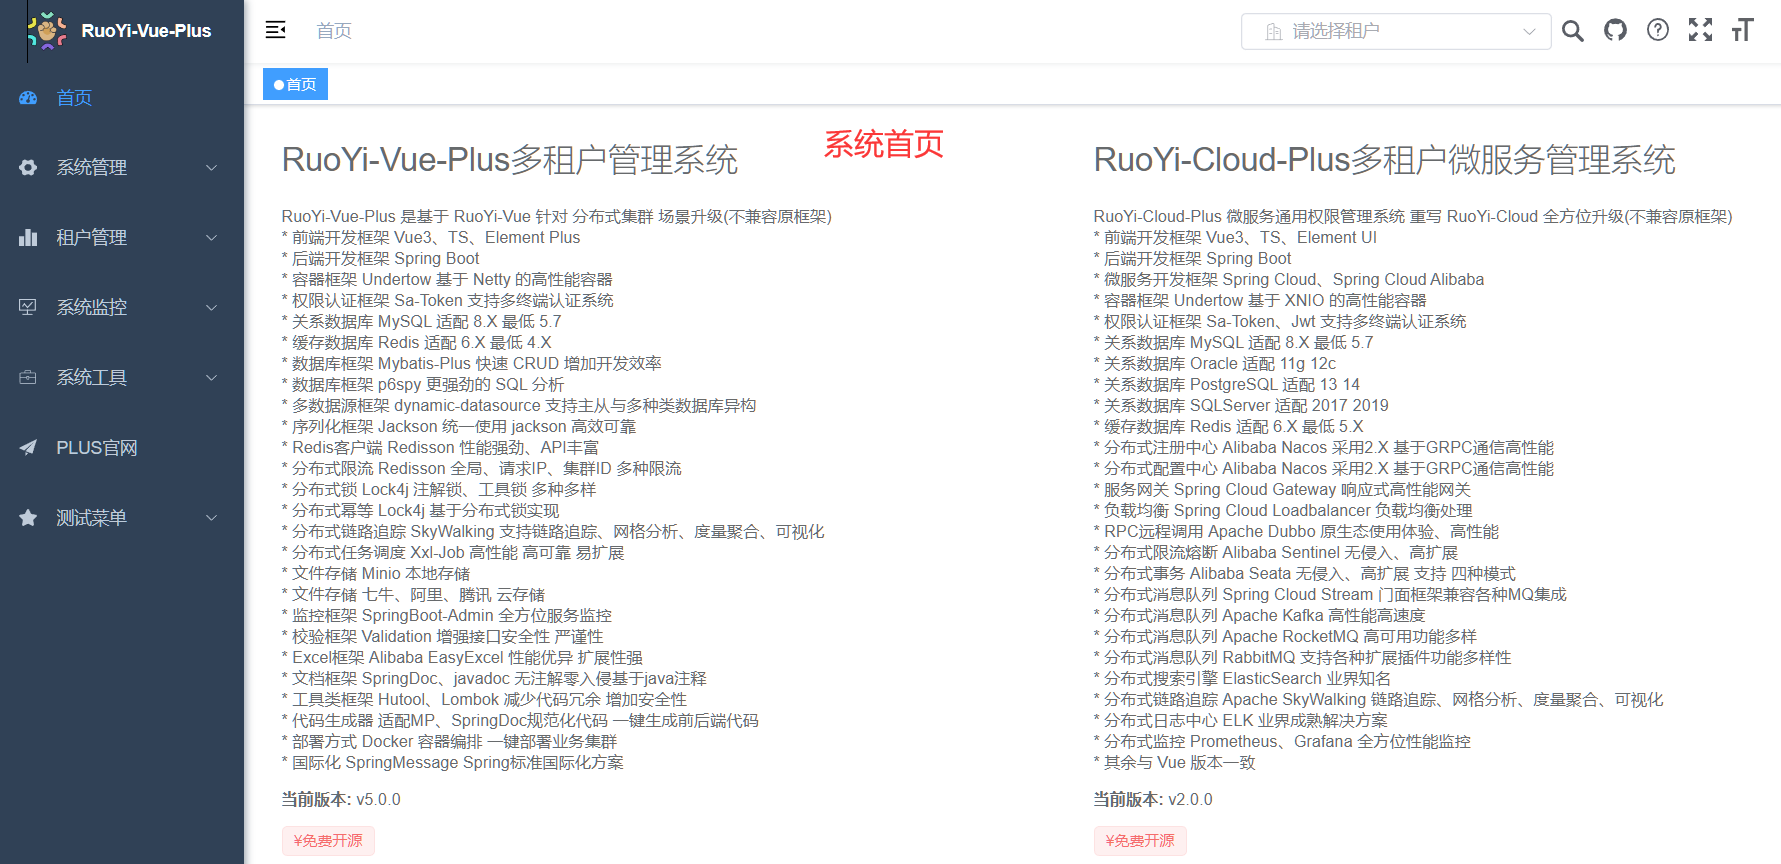
我们的目标是将RuoYi-Vue-Plus的默认布局,从下图所示的经典侧边栏模式:
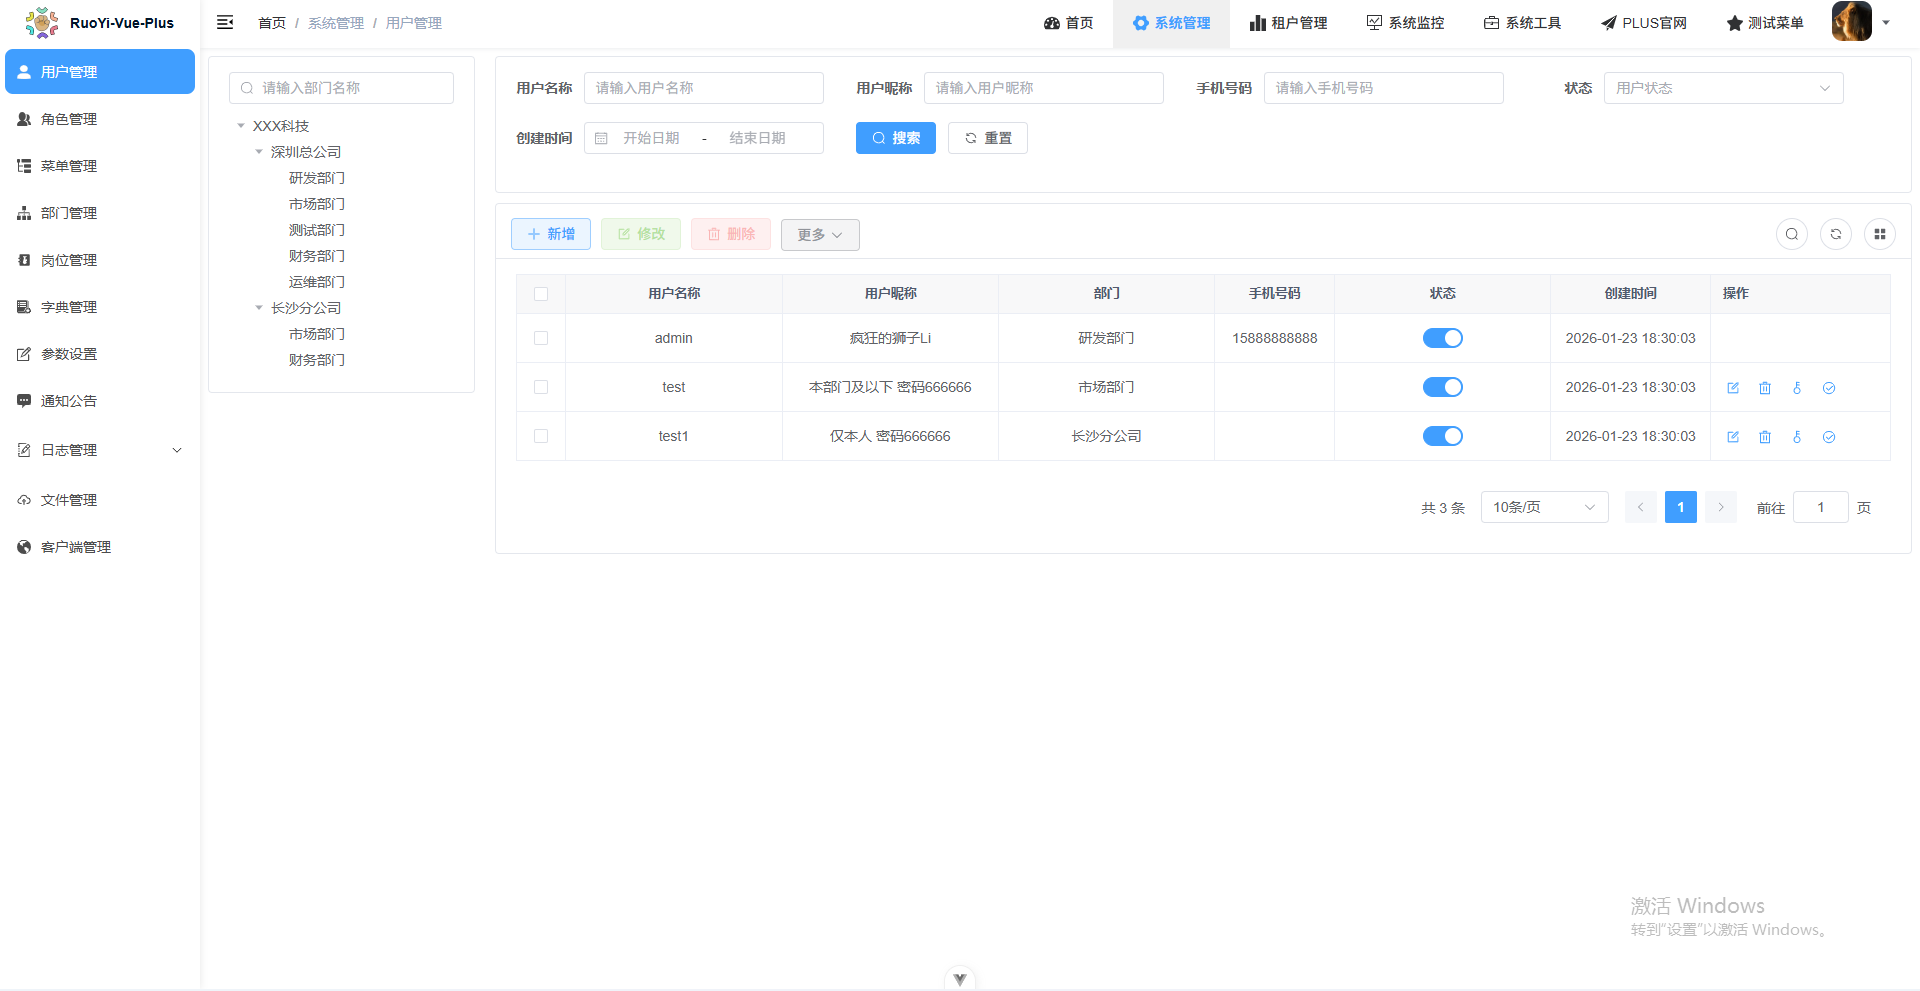
改造为如下图所示的新型混合导航模式:
要实现这一转变,其核心思路在于解耦菜单的渲染逻辑:
① 重新定义SidebarItem.vue组件的渲染逻辑,即:将一个递归组件替换为普通组件,用于渲染顶级菜单按钮;
② 记录并处理好顶级菜单按钮的激活状态(activeTopMenuPath),以及注意同步到全局状态(usePermissionStore)即可;
③ 根据顶级菜单的激活状态(activeTopMenuPath),对usePermissionStore提供的完整的菜单列表sidebarRouters进行过滤,然后交给src\layout\components\Sidebar组件组件渲染即可。
简单来说,我们需要建立一个全局状态来追踪当前激活的一级菜单,然后根据这个状态,动态地过滤并渲染出对应的二级菜单列表。这要求我们对RuoYi-Vue-Plus的动态菜单生成流程有清晰的认识,特别是与 /dev-api/system/menu/getRouters 接口返回的数据结构,以及 src\layout\components\Sidebar 目录下的源码逻辑。
二、构建定制的顶部一级导航菜单组件
首先,我们需要创建一个独立的组件来承载顶部的一级菜单。最佳实践是复制并改造原有的侧边栏组件,以避免直接修改核心代码带来的维护风险。
- 创建组件目录与文件:在
src\layout\components\目录下,复制整个Sidebar文件夹,并将其重命名为TopNavMenu。这个新目录将专门用于我们定制的顶部导航。 - 规划组件结构:
TopNavMenu目录下通常包含index.vue(主入口)、SidebarItem.vue(菜单项组件)等文件。我们需要对这些文件进行针对性修改。
下图展示了定制化组件目录的结构:
2.1 改造菜单项组件 (SidebarItem.vue)
顶部导航的菜单项通常更简洁,可能不需要展示图标或复杂的嵌套结构。我们需要修改 SidebarItem.vue 组件,将其渲染逻辑适配为水平导航条目的形式。关键修改点包括:
- 将菜单项渲染为按钮(
el-button)或简单的导航链接(router-link)。 - 移除与侧边栏折叠、子菜单缩进相关的逻辑。
- 重点处理点击事件,当用户点击某个一级菜单时,需要更新全局状态,记录当前选中的菜单路径。
以下是修改后的 SidebarItem.vue 组件核心代码示例:
<script setup lang="ts">
import { isString } from '@/utils/validate';
import { RouteRecordRaw } from 'vue-router';
const emits = defineEmits(['click']);
const props = defineProps({
item: {
type: Object as PropType,
required: true
},
isNest: {
type: Boolean,
default: false
},
basePath: {
type: String,
default: ''
},
activePath: {
// 从父组件接收全局激活路径
type: String,
required: true
}
});
const onlyOneChild = ref({});
const isActive = computed(() => props.item.path === props.activePath);
// 处理点击导航
const handleClick = (target: any) => {
emits('click', target.path);
};
const hasOneShowingChild = (parent: RouteRecordRaw, children?: RouteRecordRaw[]) => {
if (!children) {
children = [];
}
const showingChildren = children.filter((item) => {
if (item.hidden) {
return false;
}
onlyOneChild.value = item;
return true;
});
// When there is only one child router, the child router is displayed by default
if (showingChildren.length === 1) {
return true;
}
// Show parent if there are no child router to display
if (showingChildren.length === 0) {
onlyOneChild.value = { ...parent, path: '', noShowingChildren: true };
return true;
}
return false;
};
const hasTitle = (title: string | undefined): string => {
if (!title || title.length <= 5) {
return '';
}
return title;
};
</script>
提示:你可以根据实际UI设计需求,将 el-button 替换为任何自定义的Vue组件,以实现特定的视觉效果和交互行为。
2.2 处理导航激活状态 (index.vue)
在 TopNavMenu\index.vue 中,我们需要组装所有的菜单项,并管理整个顶部导航栏的激活状态。这里我们使用了Element Plus的 el-menu 组件,并将其模式设置为水平(mode="horizontal")。
修改后的 index.vue 组件源码如下:
<script setup lang="ts">
import SidebarItem from './SidebarItem.vue';
import variables from '@/assets/styles/variables.module.scss';
import { useAppStore } from '@/store/modules/app';
import { useSettingsStore } from '@/store/modules/settings';
import { usePermissionStore } from '@/store/modules/permission';
import { RouteRecordRaw } from 'vue-router';
const { proxy } = getCurrentInstance() as ComponentInternalInstance;
const route = useRoute();
const appStore = useAppStore();
const settingsStore = useSettingsStore();
const permissionStore = usePermissionStore();
const { activeTopMenuPath } = storeToRefs(permissionStore);
const sidebarRouters = computed(() => permissionStore.getSidebarRoutes());
const sideTheme = computed(() => settingsStore.sideTheme);
const theme = computed(() => settingsStore.theme);
const isCollapse = computed(() => !appStore.sidebar.opened);
const activeMenu = computed(() => {
  const { meta, path } = route;
  // if set path, the sidebar will highlight the path you set
  if (meta.activeMenu) {
    return meta.activeMenu;
  }
  return path;
});
const bgColor = computed(() => (sideTheme.value === 'theme-dark' ? variables.menuBackground : variables.menuLightBackground));
const textColor = computed(() => (sideTheme.value === 'theme-dark' ? variables.menuColor : variables.menuLightColor));
const handleSideBarItemClick = (_activePath: string) => {
  console.log('handleSideBarItemClick', _activePath);
  permissionStore.setActiveTopMenu(_activePath);
};
onMounted(() => {
  console.log('sidebar mounted', sidebarRouters.value);
  //获取hidden属性设置为true的菜单项
  const filterRouters = sidebarRouters.value.filter((item) => item.hidden);
  console.log('filterRouters', filterRouters);
});
</script>
⚠️ 注意:这里的 el-menu 组件主要是为了快速实现激活状态的高亮和样式管理。本质上,你可以用普通的 <div> 容器配合CSS来实现同样的布局,el-menu 并非强制选择。这体现了前端开发的灵活性,无论是使用Vue、React还是Angular,核心思想都是状态驱动视图。
下图直观展示了顶部导航菜单的激活状态效果:
三、全局状态管理:同步一级菜单激活状态
为了实现顶部导航与左侧边栏的联动,我们必须有一个“单一数据源”来记录当前激活的一级菜单。在RuoYi-Vue-Plus中,权限和路由状态由Pinia管理,对应的Store文件是 src\store\modules\permission.ts。
我们需要在此Store中新增一个响应式状态(如 activeTopMenuPath)以及修改它的方法(如 setActiveTopMenu)。当用户在顶部点击菜单时,调用此方法更新状态;左侧边栏组件则监听这个状态,并据此过滤要显示的二级菜单。
修改后的 permission.ts 关键部分如下:
import { defineStore } from 'pinia';
import router, { constantRoutes, dynamicRoutes } from '@/router';
import store from '@/store';
import { getRouters } from '@/api/menu';
import auth from '@/plugins/auth';
import { RouteRecordRaw } from 'vue-router';
import Layout from '@/layout/index.vue';
import ParentView from '@/components/ParentView/index.vue';
import InnerLink from '@/layout/components/InnerLink/index.vue';
import { ref } from 'vue';
import { createCustomNameComponent } from '@/utils/createCustomNameComponent';
// 匹配views里面所有的.vue文件
const modules = import.meta.glob('./../../views/**/*.vue');
export const usePermissionStore = defineStore('permission', () => {
  const routes = ref([]);
  const addRoutes = ref([]);
  const defaultRoutes = ref([]);
  const topbarRouters = ref([]);
  const sidebarRouters = ref([]);
  //当前激活的一级菜单路由
  const activeTopMenuPath = ref('');
  const getRoutes = (): RouteRecordRaw[] => {
    return routes.value as RouteRecordRaw[];
  };
  const getDefaultRoutes = (): RouteRecordRaw[] => {
    return defaultRoutes.value as RouteRecordRaw[];
  };
  const getSidebarRoutes = (): RouteRecordRaw[] => {
    return sidebarRouters.value as RouteRecordRaw[];
  };
  const getTopbarRoutes = (): RouteRecordRaw[] => {
    return topbarRouters.value as RouteRecordRaw[];
  };
  // 当前激活的一级菜单路由
  const setActiveTopMenu = (menuPath: string) => {
    activeTopMenuPath.value = menuPath;
  };
  const setRoutes = (newRoutes: RouteRecordRaw[]): void => {
    addRoutes.value = newRoutes;
    routes.value = constantRoutes.concat(newRoutes);
  };
  const setDefaultRoutes = (routes: RouteRecordRaw[]): void => {
    defaultRoutes.value = constantRoutes.concat(routes);
  };
  const setTopbarRoutes = (routes: RouteRecordRaw[]): void => {
    topbarRouters.value = routes;
  };
  const setSidebarRouters = (routes: RouteRecordRaw[]): void => {
    sidebarRouters.value = routes;
  };
  const generateRoutes = async (): Promise => {
    const res = await getRouters();
    const { data } = res;
    const sdata = JSON.parse(JSON.stringify(data));
    const rdata = JSON.parse(JSON.stringify(data));
    const defaultData = JSON.parse(JSON.stringify(data));
    const sidebarRoutes = filterAsyncRouter(sdata);
    const rewriteRoutes = filterAsyncRouter(rdata, undefined, true);
    const defaultRoutes = filterAsyncRouter(defaultData);
    const asyncRoutes = filterDynamicRoutes(dynamicRoutes);
    asyncRoutes.forEach((route) => {
      router.addRoute(route);
    });
    setRoutes(rewriteRoutes);
    setSidebarRouters(constantRoutes.concat(sidebarRoutes));
    setDefaultRoutes(sidebarRoutes);
    setTopbarRoutes(defaultRoutes);
    // 路由name重复检查
    duplicateRouteChecker(asyncRoutes, sidebarRoutes);
    return new Promise((resolve) => resolve(rewriteRoutes));
  };
  /**
   * 遍历后台传来的路由字符串,转换为组件对象
   * @param asyncRouterMap 后台传来的路由字符串
   * @param lastRouter 上一级路由
   * @param type 是否是重写路由
   */
  const filterAsyncRouter = (asyncRouterMap: RouteRecordRaw[], lastRouter?: RouteRecordRaw, type = false): RouteRecordRaw[] => {
    return asyncRouterMap.filter((route) => {
      if (type && route.children) {
        route.children = filterChildren(route.children, undefined);
      }
      // Layout ParentView 组件特殊处理
      if (route.component?.toString() === 'Layout') {
        route.component = Layout;
      } else if (route.component?.toString() === 'ParentView') {
        route.component = ParentView;
      } else if (route.component?.toString() === 'InnerLink') {
        route.component = InnerLink;
      } else {
        route.component = loadView(route.component, route.name as string);
      }
      if (route.children != null && route.children && route.children.length) {
        route.children = filterAsyncRouter(route.children, route, type);
      } else {
        delete route.children;
        delete route.redirect;
      }
      return true;
    });
  };
  const filterChildren = (childrenMap: RouteRecordRaw[], lastRouter?: RouteRecordRaw): RouteRecordRaw[] => {
    let children: RouteRecordRaw[] = [];
    childrenMap.forEach((el) => {
      el.path = lastRouter ? lastRouter.path + '/' + el.path : el.path;
      if (el.children && el.children.length && el.component?.toString() === 'ParentView') {
        children = children.concat(filterChildren(el.children, el));
      } else {
        children.push(el);
      }
    });
    return children;
  };
  return {
    activeTopMenuPath,
    routes,
    topbarRouters,
    sidebarRouters,
    defaultRoutes,
    getRoutes,
    getDefaultRoutes,
    getSidebarRoutes,
    getTopbarRoutes,
    setActiveTopMenu,
    setRoutes,
    generateRoutes,
    setSidebarRouters
  };
});
// 动态路由遍历,验证是否具备权限
export const filterDynamicRoutes = (routes: RouteRecordRaw[]) => {
  const res: RouteRecordRaw[] = [];
  routes.forEach((route) => {
    if (route.permissions) {
      if (auth.hasPermiOr(route.permissions)) {
        res.push(route);
      }
    } else if (route.roles) {
      if (auth.hasRoleOr(route.roles)) {
        res.push(route);
      }
    }
  });
  return res;
};
export const loadView = (view: any, name: string) => {
  let res;
  for (const path in modules) {
    const viewsIndex = path.indexOf('/views/');
    let dir = path.substring(viewsIndex + 7);
    dir = dir.substring(0, dir.lastIndexOf('.vue'));
    if (dir === view) {
      res = createCustomNameComponent(modules[path], { name });
      return res;
    }
  }
  return res;
};
// 非setup
export const usePermissionStoreHook = () => {
  return usePermissionStore(store);
};
interface Route {
  name?: string | symbol;
  path: string;
  children?: Route[];
}
/**
 * 检查路由name是否重复
 * @param localRoutes 本地路由
 * @param routes 动态路由
 */
function duplicateRouteChecker(localRoutes: Route[], routes: Route[]) {
  // 展平
  function flatRoutes(routes: Route[]) {
    const res: Route[] = [];
    routes.forEach((route) => {
      if (route.children) {
        res.push(...flatRoutes(route.children));
      } else {
        res.push(route);
      }
    });
    return res;
  }
  const allRoutes = flatRoutes([...localRoutes, ...routes]);
  const nameList: string[] = [];
  allRoutes.forEach((route) => {
    const name = route.name.toString();
    if (name && nameList.includes(name)) {
      const message = `路由名称: [${name}] 重复, 会造成 404`;
      console.error(message);
      ElNotification({
        title: '路由名称重复',
        message,
        type: 'error'
      });
      return;
    }
    nameList.push(route.name.toString());
  });
} 技术延伸:这种跨组件状态共享的模式,在React中可以通过Context或Redux实现,在Angular中则常依赖Service。Vue 3的Pinia(或Vuex)提供了清晰、类型友好的解决方案,是构建复杂前端应用的基石。
四、集成定制组件与加工二级菜单
4.1 集成顶部导航到NavBar
RuoYi-Vue-Plus的顶部区域由 Navbar.vue 组件控制。我们需要将新建的 TopNavMenu 组件引入并放置到合适的位置,通常是在Logo和用户信息下拉菜单之间。
修改后的 src\layout\components\Navbar.vue 完整源码如下:
![]()
{{ proxy.$t('navbar.personalCenter') }}
{{ proxy.$t('navbar.layoutSetting') }}
{{ proxy.$t('navbar.logout') }}
<script setup lang="ts">
import SearchMenu from './TopBar/search.vue';
import { useAppStore } from '@/store/modules/app';
import { useUserStore } from '@/store/modules/user';
import { useSettingsStore } from '@/store/modules/settings';
import { useNoticeStore } from '@/store/modules/notice';
import { getTenantList } from '@/api/login';
import { dynamicClear, dynamicTenant } from '@/api/system/tenant';
import { TenantVO } from '@/api/types';
import notice from './notice/index.vue';
import router from '@/router';
import { ElMessageBoxOptions } from 'element-plus/es/components/message-box/src/message-box.type';
import TopNavMenu from './TopNavMenu/index.vue';
const appStore = useAppStore();
const userStore = useUserStore();
const settingsStore = useSettingsStore();
const noticeStore = storeToRefs(useNoticeStore());
const newNotice = ref(0);
const { proxy } = getCurrentInstance() as ComponentInternalInstance;
const userId = ref(userStore.userId);
const companyName = ref(undefined);
const tenantList = ref([]);
// 是否切换了租户
const dynamic = ref(false);
// 租户开关
const tenantEnabled = ref(true);
// 搜索菜单
const searchMenuRef = ref>();
const openSearchMenu = () => {
searchMenuRef.value?.openSearch();
};
// 动态切换
const dynamicTenantEvent = async (tenantId: string) => {
if (companyName.value != null && companyName.value !== '') {
await dynamicTenant(tenantId);
dynamic.value = true;
await proxy?.$router.push('/');
await proxy?.$tab.closeAllPage();
await proxy?.$tab.refreshPage();
}
};
const dynamicClearEvent = async () => {
await dynamicClear();
dynamic.value = false;
await proxy?.$router.push('/');
await proxy?.$tab.closeAllPage();
await proxy?.$tab.refreshPage();
};
/** 租户列表 */
const initTenantList = async () => {
const { data } = await getTenantList(true);
tenantEnabled.value = data.tenantEnabled === undefined ? true : data.tenantEnabled;
if (tenantEnabled.value) {
tenantList.value = data.voList;
}
};
defineExpose({
initTenantList
});
const toggleSideBar = () => {
appStore.toggleSideBar(false);
};
const logout = async () => {
await ElMessageBox.confirm('确定注销并退出系统吗?', '提示', {
confirmButtonText: '确定',
cancelButtonText: '取消',
type: 'warning'
} as ElMessageBoxOptions);
userStore.logout().then(() => {
router.replace({
path: '/login',
query: {
redirect: encodeURIComponent(router.currentRoute.value.fullPath || '/')
}
});
proxy?.$tab.closeAllPage();
});
};
const emits = defineEmits(['setLayout']);
const setLayout = () => {
emits('setLayout');
};
// 定义Command方法对象 通过key直接调用方法
const commandMap: { [key: string]: any } = {
setLayout,
logout
};
const handleCommand = (command: string) => {
// 判断是否存在该方法
if (commandMap[command]) {
commandMap[command]();
}
};
//用深度监听 消息
watch(
() => noticeStore.state.value.notices,
(newVal) => {
newNotice.value = newVal.filter((item: any) => !item.read).length;
},
{ deep: true }
);
</script>
4.2 动态过滤并渲染左侧二级菜单
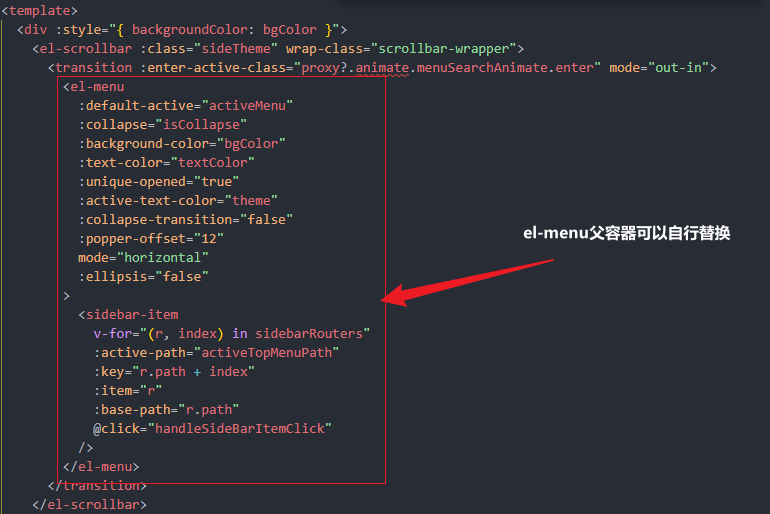
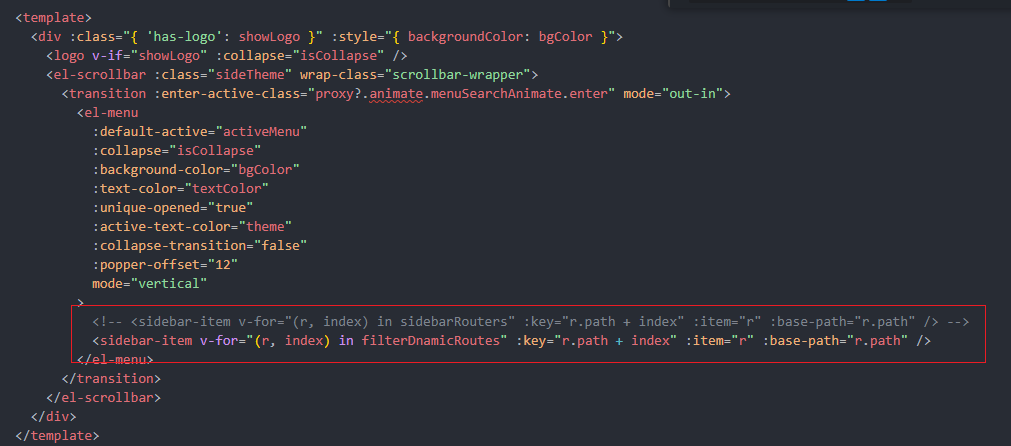
这是整个改造的画龙点睛之笔。原始的侧边栏组件(Sidebar\index.vue)会渲染完整的菜单树。现在,我们需要让它根据全局Store中的 activeTopMenuPath,只渲染属于当前激活一级菜单下的子菜单。
其核心逻辑可以概括为:
注意:被注释掉的是原来的渲染逻辑,正在使用的是修改之后的渲染逻辑——只需要重新构造一个filterDnamicRoutes即可。
我们需要在侧边栏组件中计算出一个新的菜单列表。修改思路如下图所示:
以下是修改后的侧边栏 index.vue 组件的完整代码,其中关键部分是实现上述过滤逻辑的computed属性:
<script setup lang="ts">
import Logo from './Logo.vue';
import SidebarItem from './SidebarItem.vue';
import variables from '@/assets/styles/variables.module.scss';
import { useAppStore } from '@/store/modules/app';
import { useSettingsStore } from '@/store/modules/settings';
import { usePermissionStore } from '@/store/modules/permission';
import { RouteRecordRaw } from 'vue-router';
const { proxy } = getCurrentInstance() as ComponentInternalInstance;
const route = useRoute();
const appStore = useAppStore();
const settingsStore = useSettingsStore();
const permissionStore = usePermissionStore();
const { activeTopMenuPath } = storeToRefs(permissionStore);
const sidebarRouters = computed(() => permissionStore.getSidebarRoutes());
const showLogo = computed(() => settingsStore.sidebarLogo);
const sideTheme = computed(() => settingsStore.sideTheme);
const theme = computed(() => settingsStore.theme);
const isCollapse = computed(() => !appStore.sidebar.opened);
const activeMenu = computed(() => {
  const { meta, path } = route;
  // if set path, the sidebar will highlight the path you set
  if (meta.activeMenu) {
    return meta.activeMenu;
  }
  return path;
});
//二级菜单过滤
const filterDnamicRoutes = computed(() => {
  //根据activeTopMenuPath查找一级菜单项
  // return sidebarRouters.value.filter((item) => item.path === activeTopMenuPath.value);
  //不带一级菜单名称的
  const _topMenuItem = sidebarRouters.value.find((item) => item.path === activeTopMenuPath.value);
  const _topMenuPath = _topMenuItem?.path || '';
  const _chilren = (_topMenuItem.children || []).map((_item) => {
    return { ..._item, path: _topMenuPath + '/' + _item.path };
  });
  return _chilren; //Array.isArray(_topMenuItem?.children) && _topMenuItem?.children?.length > 0 ? _topMenuItem?.children : [];
});
const bgColor = computed(() => (sideTheme.value === 'theme-dark' ? variables.menuBackground : variables.menuLightBackground));
const textColor = computed(() => (sideTheme.value === 'theme-dark' ? variables.menuColor : variables.menuLightColor));
</script>
✅ 完成效果:经过以上所有步骤,一个全新的“顶栏-侧栏”混合导航布局便成功实现。用户点击顶部不同的一级菜单,左侧边栏会无缝切换对应的二级菜单列表,交互流畅,逻辑清晰。
[AFFILIATE_SLOT_2]五、总结与最佳实践建议
通过对RuoYi-Vue-Plus前端布局的这次深度定制,我们不仅完成了一个具体的UI改造需求,更实践了一套可复用的前端架构方法:“状态驱动 + 组件解耦”。关键要点总结如下:
- 理解源码是基础:动手前务必厘清框架的动态路由、菜单渲染流程,避免盲目修改。
- 状态管理是关键:使用Pinia(或Vuex)管理跨组件状态,是实现复杂交互的优雅方案。
- 组件化思维:通过复制和定制的方式创建新组件(如
TopNavMenu),最大程度保持了原有代码的稳定性和可维护性。 - 灵活运用UI库:像Element Plus这样的UI库组件(如
el-menu)可以加速开发,但也要明白其底层原理,必要时可替换为纯自定义组件。
这种布局改造思路具有普适性,不仅适用于Vue技术栈,对于使用React+Ant Design或Angular+NG-ZORRO的项目同样具有参考价值。希望本文能为你下一次的UI架构升级提供扎实的技术指导和灵感。

 浙公网安备 33010602011771号