
Linux 下mysql5.7安装搬运 该安装说明坑最少
本文搬运来自CSDN 请叫我猿叔叔 的博客https://blog.csdn.net/qq_35206261/article/details/81321201
遵循 CC 4.0 by-sa 版权协议,转载请附上原文出处链接和本声明。
一. 简介
下载路径:https://dev.mysql.com//Downloads/MySQL-5.7/mysql-5.7.21-linux-glibc2.12-x86_64.tar.gz
系统环境: centOS 7, mysql 5.7.18
二. 安装步骤
2.1 卸载旧的mysql
2.1.1 删除mysql的安装文件
查询mysql的安装文件:
[root@ali228 ~]# find / -name mysql
/usr/local/env/mysql
/usr/local/env/mysql/mysql
/usr/local/env/mysql/mysql/bin/mysql
/usr/local/env/mysql/mysql/include/mysql
/usr/local/env/mysql/mysql/data/mysql
[root@ali228 ~]#
卸载:
[root@ali228 ~]# rm -rf /usr/local/env/mysql/mysql
[root@ali228 ~]#
2.1.2 删除mysql的配置文件
删除/etc/my.cnf文件
[root@ali228 ~]# rm -rf /etc/my.cnf
删除/etc/init.d/下跟mysql有关的全部文件,一般包括mysql文件或mysqld文件。
[root@ali228 mysql]# rm -rf /etc/init.d/mysql
[root@ali228 mysql]# rm -rf /etc/init.d/mysqlId
2.1.3 删除mysql用户和用户组
[root@ali228 ~]# userdel mysql
userdel: user 'mysql' does not exist
至此,卸载OK!
2.2 安装MySQL
2.2.1 下载安装包mysql-5.7.18-linux-glibc2.5-x86_64.tar.gz
安装包路径: https://dev.mysql.com/downloads/mysql/5.7.html#downloads
上传mysql-5.7.18-linux-glibc2.5-x86_64.tar.gz到/usr/local/env/mysql目录下并解压
[root@ali228 ~]# cd /usr/local/env/mysql/
[root@ali228 mysql]# tar -zxvf mysql-5.7.18-linux-glibc2.5-x86_64.tar.gz
重命名为mysql
2.2.2 添加用户组mysql和用户mysql,并将其添加到mysql用户组中
[root@ali228 mysql]# groupadd mysql
[root@ali228 mysql]# useradd -r -g mysql mysql
注: useradd -r参数表示mysql用户是系统用户,不可用于登录系统。
useradd -g参数表示把mysql用户添加到mysql用户组中。
2.2.3 检查是否安装了 libaio
[root@baidu64 ~]# rpm -qa | grep libaio
如果没有安装,使用如下命令安装
[root@baidu64 ~]# yum search libaio
2.2.4 配置my.cnf文件
[root@baidu64 ~]# touch /etc/my.cnf
注意: 使用默认的644权限和用户,不要做修改;
将如下内容拷贝到里面:
[mysql]

# 设置mysql客户端默认字符集

default-character-set=utf8

socket=/tmp/mysql.sock

[mysqld]

#skip-name-resolve

#设置3306端口

port=3306

socket=/tmp/mysql.sock


# 设置mysql的安装目录

basedir=/usr/local/env/mysql/mysql

# 设置mysql数据库的数据的存放目录

datadir=/usr/local/env/mysql/mysql/data

# 允许最大连接数

max_connections=200

# 服务端使用的字符集默认为8比特编码的latin1字符雿

character-set-server=utf8

# 创建新表时将使用的默认存储引擿

default-storage-engine=INNODB

#lower_case_table_name=1

max_allowed_packet=16M
2.2.5 创建data文件夹
[root@baidu64 mysql]# pwd
/usr/local/env/mysql/mysql
[root@baidu64 mysql]# mkdir data
2.2.6 将mysql目录的所属用户和组改为mysql
[root@baidu64 mysql]# chown -R mysql:mysql ./
2.2.7 初始化mysqld 生成初始化密码
[root@baidu64 mysql]# ./bin/mysqld --initialize --user=mysql --basedir=/usr/local/env/mysql/mysql --datadir=/usr/local/env/mysql/mysql/data
此时,控制台打印如下:
2018-10-24T04:25:13.673365Z 0 [Warning] TIMESTAMP with implicit DEFAULT value is deprecated. Please use --explicit_defaults_for_timestamp server option (see documentation for more details).
2018-10-24T04:25:15.808961Z 0 [Warning] InnoDB: New log files created, LSN=45790
2018-10-24T04:25:16.105505Z 0 [Warning] InnoDB: Creating foreign key constraint system tables.
2018-10-24T04:25:16.184776Z 0 [Warning] No existing UUID has been found, so we assume that this is the first time that this server has been started. Generating a new UUID: cec94f21-d744-11e8-a0b5-fa163ed8e403.
2018-10-24T04:25:16.188372Z 0 [Warning] Gtid table is not ready to be used. Table 'mysql.gtid_executed' cannot be opened.
2018-10-24T04:25:16.189074Z 1 [Note] A temporary password is generated for root@localhost: i;lknXwO;5,s
[root@baidu64 mysql]#
结尾: i;lknXwO;5,s 就是初始化的密码。
3 常规配置
3.1 设置开机启动
3.1.1 复制mysql.server脚本到资源目录,并赋予执行权限:
[root@baidu64 mysql]# cp ./support-files/mysql.server /etc/rc.d/init.d/mysqld
[root@baidu64 mysql]# chmod +x /etc/rc.d/init.d/mysqld
3.1.2 将 mysqld 服务加入到系统服务并检测是否生效:
[root@baidu64 mysql]# chkconfig --add mysqld
[root@baidu64 mysql]# chkconfig --list mysqld
Note: This output shows SysV services only and does not include native
systemd services. SysV configuration data might be overridden by native
systemd configuration.
If you want to list systemd services use 'systemctl list-unit-files'.
To see services enabled on particular target use
'systemctl list-dependencies [target]'.

mysqld 0:off 1:off 2:on 3:on 4:on 5:on 6:off
得到如下结果说明生效。
注: 查看启动项:chkconfig --list | grep -i mysql 删除启动项:chkconfig --del mysql
启动mysqld:
[root@baidu64 mysql]# service mysqld start
Starting MySQL.Logging to '/usr/local/env/mysql/mysql/data/baidu64.err'.
[ OK ]
3.2 配置环境变量
3.2.1 打开/etc/profile配置文件,添加如下内容:
#mysql环境变量
PATH=$PATH:/usr/local/env/mysql/mysql/bin
export PATH
3.2.2 执行命令,使其生效:
[root@baidu64 mysql]# source /etc/profile
3.2.3 校验是否成功:
[root@baidu64 mysql]# echo $PATH
/usr/local/sbin:/usr/local/bin:/usr/sbin:/usr/bin:/home/env/jdk/jdk8/jdk1.8.0_171/bin:/root/bin:/home/env/jdk/jdk8/jdk1.8.0_171/bin:/usr/local/env/mysql/mysql/bin
3.3 初次登录 修改访问密码
3.3.1 无密码登录
[root@baidu64 mysql]# mysql -uroot -p
Enter password:
Welcome to the MySQL monitor. Commands end with ; or \g.
Your MySQL connection id is 5
Server version: 5.7.18

Copyright (c) 2000, 2017, Oracle and/or its affiliates. All rights reserved.

Oracle is a registered trademark of Oracle Corporation and/or its
affiliates. Other names may be trademarks of their respective
owners.

Type 'help;' or '\h' for help. Type '\c' to clear the current input statement.

mysql>
注意: 此时密码使用上面自动生成的初始化密码: i;lknXwO;5,s 即可
3.3.2 修改登录密码:
mysql> SET PASSWORD = PASSWORD('123456');
Query OK, 0 rows affected, 1 warning (0.00 sec)
mysql> use mysql;
Reading table information for completion of table and column names
You can turn off this feature to get a quicker startup with -A

Database changed
mysql> update user set authentication_string=PASSWORD('123456') where User='root';
Query OK, 0 rows affected, 1 warning (0.00 sec)
Rows matched: 1 Changed: 0 Warnings: 1

mysql>
3.4 允许远程访问
mysql> grant all privileges on *.* to root@"%" identified by "password" with grant option;
Query OK, 0 rows affected, 1 warning (0.00 sec)

mysql> flush privileges;
Query OK, 0 rows affected (0.00 sec)

mysql>
3.5 使用navicate远程连接报错
如果使用navicate进行远程连接访问,报如下错误:
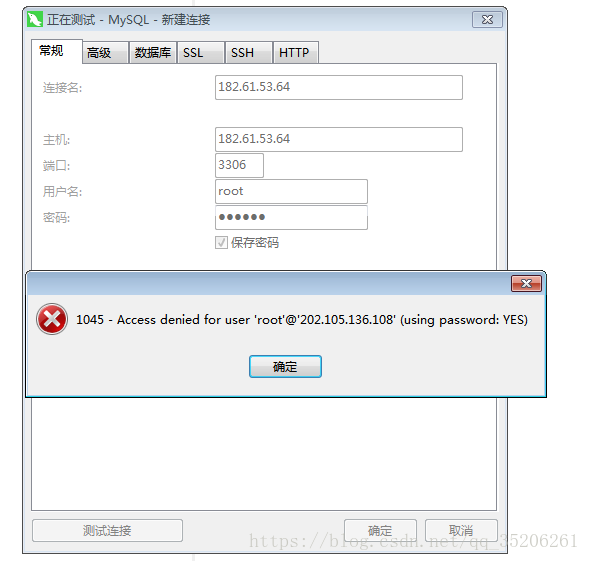
解决方法如下:
3.5.1 关闭mysql服务
[root@baidu64 mysql]# service mysql stop
Redirecting to /bin/systemctl stop mysql.service
3.5.2 修改/etc/my.cnf修改为无密码登录
在my.cnf配置文件添加如下内容:
# mysql无密码登录
skip-grant-tables
3.5.3 重启mysql服务
[root@baidu64 mysql]# service mysql restart
Redirecting to /bin/systemctl restart mysql.service
3.5.4 无密码登录mysql
注意: 此时登录不带p参数:
[root@baidu64 mysql]# mysql -u root
Welcome to the MySQL monitor. Commands end with ; or \g.
Your MySQL connection id is 3
Server version: 5.7.18 MySQL Community Server (GPL)

Copyright (c) 2000, 2017, Oracle and/or its affiliates. All rights reserved.

Oracle is a registered trademark of Oracle Corporation and/or its
affiliates. Other names may be trademarks of their respective
owners.

Type 'help;' or '\h' for help. Type '\c' to clear the current input statement.

mysql>
3.5.5 再次修改mysql密码:
mysql> use mysql;
Reading table information for completion of table and column names
You can turn off this feature to get a quicker startup with -A

Database changed
mysql> update mysql.user set authentication_string=password('123456') where user='root' ;
Query OK, 1 row affected, 1 warning (0.00 sec)
Rows matched: 2 Changed: 1 Warnings: 1

mysql>
3.5.6 然后将my.cnf无密码登录配置去掉(就是上面刚加的那句话)
3.5.7 退出mysql,并重启:
mysql> quit
Bye
[root@baidu64 mysql]# service mysql restart
Redirecting to /bin/systemctl restart mysql.service
[root@baidu64 mysql]#
3.5.8 再次使用navicat连接:

如此 OK!

 浙公网安备 33010602011771号