springcloud基础入门
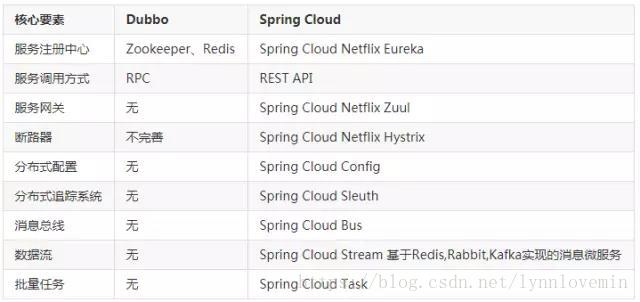
先了解一下springcloud和dubbo的区别
dubbo由于是二进制的传输,占用带宽会更少
springCloud是http协议传输,带宽会比较多,同时使用http协议一般会使用JSON报文,消耗会更大
dubbo的开发难度较大,原因是dubbo的jar包依赖问题很多大型工程无法解决
springcloud的接口协议约定比较自由且松散,需要有强有力的行政措施来限制接口无序升级
dubbo的注册中心可以选择zk,redis等多种,springcloud的注册中心只能用eureka或者自研
springcloud的最大的特点是可以很好的和restful模式进行交互
dubbo是基于rpc的
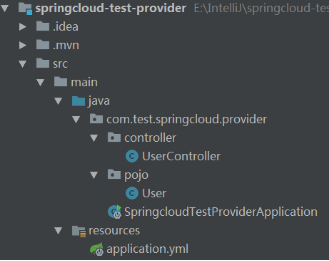
在开始SpringCloud之前,先看一下一个简单的服务提供者和服务消费者。服务提供者提供一个REST风格的HTTP接口给服务消费者。
1.1 普通的提供者
1.1.1 pom.xml
<parent>
    <groupId>org.springframework.boot</groupId>
    <artifactId>spring-boot-starter-parent</artifactId>
    <version>1.5.13.RELEASE</version>
    <relativePath/>
</parent>

<properties>
    <project.build.sourceEncoding>UTF-8</project.build.sourceEncoding>
    <project.reporting.outputEncoding>UTF-8</project.reporting.outputEncoding>
    <java.version>1.8</java.version>
</properties>

<dependencies>
    <dependency>
        <groupId>org.springframework.boot</groupId>
        <artifactId>spring-boot-starter-web</artifactId>
    </dependency>

    <dependency>
        <groupId>org.springframework.boot</groupId>
        <artifactId>spring-boot-starter-test</artifactId>
        <scope>test</scope>
    </dependency>
</dependencies>
<build>
    <plugins>
        <plugin>
            <groupId>org.springframework.boot</groupId>
            <artifactId>spring-boot-maven-plugin</artifactId>
        </plugin>
    </plugins>
</build>
1.1.1 关键代码
package com.test.springcloud.provider.pojo;

public class User {
    private Long id;
    private String username;
    //getter/setter略

}
Controller
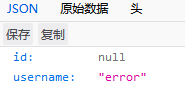
package com.test.springcloud.provider.controller;

import com.test.springcloud.provider.pojo.User;
import org.springframework.web.bind.annotation.GetMapping;
import org.springframework.web.bind.annotation.PathVariable;
import org.springframework.web.bind.annotation.RestController;

@RestController
public class UserController {
    @GetMapping("/simple/{id}")//rest 风格,微服务一般都使用 rest 风格
    public User findById(@PathVariable Long id) {
        User user=new User();
        user.setId(id);
        user.setUsername("hello "+id);
        return user;
    }
1.1.1 application.yml
server:
port: 8081
1.1 普通的消费者

1.1.1 pom.xml
parent>
   <groupId>org.springframework.boot</groupId>
   <artifactId>spring-boot-starter-parent</artifactId>
   <version>1.5.13.RELEASE</version>
   <relativePath/> <!-- lookup parent from repository -->
</parent>

<properties>
   <project.build.sourceEncoding>UTF-8</project.build.sourceEncoding>
   <project.reporting.outputEncoding>UTF-8</project.reporting.outputEncoding>
   <java.version>1.8</java.version>
</properties>
<dependencies>
   <dependency>
      <groupId>org.springframework.boot</groupId>
      <artifactId>spring-boot-starter-web</artifactId>
   </dependency>
   <dependency>
      <groupId>org.springframework.boot</groupId>
      <artifactId>spring-boot-starter-test</artifactId>
      <scope>test</scope>
   </dependency>
</dependencies>

<build>
   <plugins>
      <plugin>
         <groupId>org.springframework.boot</groupId>
         <artifactId>spring-boot-maven-plugin</artifactId>
      </plugin>
   </plugins>
</build>
实体类:
package com.test.springcloud.consumer.pojo;

public class User {
    private Long id;
    private String username;
    //getter/setter略
}
Controller
package com.test.springcloud.consumer.controller;

import com.test.springcloud.consumer.pojo.User;
import org.springframework.beans.factory.annotation.Autowired;
import org.springframework.beans.factory.annotation.Value;
import org.springframework.web.bind.annotation.GetMapping;
import org.springframework.web.bind.annotation.PathVariable;
import org.springframework.web.bind.annotation.RestController;
import org.springframework.web.client.RestTemplate;

@RestController
public class UserController {
    @Autowired
    private RestTemplate restTemplate;// rest 请求模板类

    @Value("${user.userServicePath}")//从配置文件中读取指定属性,名字和配置中保持一致即可
    private String userServicePath;

    @GetMapping("/user/{id}")
    public User findById(@PathVariable Long id) {
        //调用指定的地址,传递参数过去,将返回的数据解析为 user 格式
        // return this.restTemplate.getForObject("http://localhost:7900/simple/"+ id, User.class);//硬编码,不好
        return this.restTemplate.getForObject(this.userServicePath + id, User.class);//通过配置文件注入地址的方式
    }
}
启动类
package com.test.springcloud.consumer;

import org.springframework.boot.SpringApplication;
import org.springframework.boot.autoconfigure.SpringBootApplication;
import org.springframework.context.annotation.Bean;
import org.springframework.web.client.RestTemplate;

@SpringBootApplication
public class SpringcloudTestConsumerApplication {
   @Bean
   public RestTemplate restTemplate() {
      return new RestTemplate();
   }
   public static void main(String[] args) {
      SpringApplication.run(SpringcloudTestConsumerApplication.class, args);
   }
}
1.1.1 application.yml
server:
  port: 8082
userPath: http://localhost:8080/user/
1.1 Eureka
在消费者调用服务的时候,服务提供者的地址是以硬编码的形式写在配置文件中的。如果服务端迁移就需要改变地址。我们可以将服务注册到Eureka,消费者不必关心提供者的真实地址,通过Eureka中的服务名直
<parent>
   <groupId>org.springframework.boot</groupId>
   <artifactId>spring-boot-starter-parent</artifactId>
   <version>1.5.13.RELEASE</version>
   <relativePath/>
</parent>

<properties>
   <project.build.sourceEncoding>UTF-8</project.build.sourceEncoding>
   <project.reporting.outputEncoding>UTF-8</project.reporting.outputEncoding>
   <java.version>1.8</java.version>
   <spring-cloud.version>Edgware.SR2</spring-cloud.version>
</properties>

<dependencies>
   <dependency>
      <groupId>org.springframework.boot</groupId>
      <artifactId>spring-boot-starter-web</artifactId>
   </dependency>
   <dependency>
      <groupId>org.springframework.cloud</groupId>
      <artifactId>spring-cloud-starter-netflix-eureka-server</artifactId>
   </dependency>

   <dependency>
      <groupId>org.springframework.boot</groupId>
      <artifactId>spring-boot-starter-test</artifactId>
      <scope>test</scope>
   </dependency>
</dependencies>

<dependencyManagement>
   <dependencies>
      <dependency>
         <groupId>org.springframework.cloud</groupId>
         <artifactId>spring-cloud-dependencies</artifactId>
         <version>${spring-cloud.version}</version>
         <type>pom</type>
         <scope>import</scope>
      </dependency>
   </dependencies>
</dependencyManagement>

<build>
   <plugins>
      <plugin>
         <groupId>org.springframework.boot</groupId>
         <artifactId>spring-boot-maven-plugin</artifactId>
      </plugin>
   </plugins>
</build>
接调用服务即可。
1.1.1 启动类
在启动类上增加@EnableEurekaServer注解
server:
port: 8083
eureka:
instance:
hostname: localhost
client:
serviceUrl:
defaultZone: http://${eureka.instance.hostname}:${server.port}/eureka/
启动8083端口访问

能看见一个管理的后台
1.1.1 修改服务提供者
pom.xml中添加SpringCloud的引用
<dependencyManagement>
    <dependencies>
        <dependency>
            <groupId>org.springframework.cloud</groupId>
            <artifactId>spring-cloud-dependencies</artifactId>
            <version>Edgware.SR2</version>
            <type>pom</type>
            <scope>import</scope>
        </dependency>
    </dependencies>
</dependencyManagement>
<dependencies>
    <dependency>
        <groupId>org.springframework.boot</groupId>
        <artifactId>spring-boot-starter-web</artifactId>
    </dependency>
    <dependency>
        <groupId>org.springframework.cloud</groupId>
        <artifactId>spring-cloud-starter-eureka</artifactId>
    </dependency>
    <dependency>
        <groupId>org.springframework.boot</groupId>
        <artifactId>spring-boot-starter-test</artifactId>
        <scope>test</scope>
    </dependency>
</dependencies>
启动类上添加注解@EnableEurekaClient:
yml配置文件
server:
  port: 8081
eureka:
  client:
    serviceUrl:
      defaultZone: http://localhost:8083/eureka/
spring:
  application:
    name: service-provider  #这个名字就是调用服务时的名字
1.1.1 修改消费者
pom.xml同提供者一样
启动类添加注解@EnableEurekaClient还有restTemplate上的@LoadBalanced
完整的application.yml
erver:
  port: 8082
user: #此处 user没有任何含义,主要是一个名字而已
  #即便在这里也类似于硬编码, 还是不够灵活,定义提供者的位置
  #userServicePath: http://localhost:8081/simple/
  userServicePath: http://SERVICE-PROVIDER/simple/
eureka:
  client:
    serviceUrl:
      defaultZone: http://localhost:8083/eureka/
spring:
  application:
    name: service-comsumer
1.1 ribbon负载均衡
在消费者中添加依赖:
<dependency>
   <groupId>org.springframework.cloud</groupId>
   <artifactId>spring-cloud-starter-ribbon</artifactId>
</dependency>
启动两次提供者(一个运行main方法,一个maven启动),修改端口,模拟同一个服务部署在不同的服务器上,如端口为8084。稍稍修改一些controller中的代码,区分两个服务:
然后访问
1. Feign
Feign是一个声明式的伪Http客户端,它使得写Http客户端变得更简单。使用Feign,只需要创建一个接口并注解。Feign默认集成了Ribbon,并和Eureka结合,默认实现了负载均衡的效果。
<parent>
   <groupId>org.springframework.boot</groupId>
   <artifactId>spring-boot-starter-parent</artifactId>
   <version>1.5.13.RELEASE</version>
   <relativePath/> <!-- lookup parent from repository -->
</parent>

<properties>
   <project.build.sourceEncoding>UTF-8</project.build.sourceEncoding>
   <project.reporting.outputEncoding>UTF-8</project.reporting.outputEncoding>
   <java.version>1.8</java.version>
   <spring-cloud.version>Edgware.SR2</spring-cloud.version>
</properties>

<dependencies>
   <dependency>
      <groupId>org.springframework.boot</groupId>
      <artifactId>spring-boot-starter-web</artifactId>
   </dependency>
   <dependency>
      <groupId>org.springframework.cloud</groupId>
      <artifactId>spring-cloud-starter-eureka</artifactId>
   </dependency>
   <dependency>
      <groupId>org.springframework.cloud</groupId>
      <artifactId>spring-cloud-starter-feign</artifactId>
   </dependency>
   <dependency>
      <groupId>org.springframework.boot</groupId>
      <artifactId>spring-boot-starter-test</artifactId>
      <scope>test</scope>
   </dependency>
</dependencies>

<dependencyManagement>
   <dependencies>
      <dependency>
         <groupId>org.springframework.cloud</groupId>
         <artifactId>spring-cloud-dependencies</artifactId>
         <version>${spring-cloud.version}</version>
         <type>pom</type>
         <scope>import</scope>
      </dependency>
   </dependencies>
</dependencyManagement>

<build>
   <plugins>
      <plugin>
         <groupId>org.springframework.boot</groupId>
         <artifactId>spring-boot-maven-plugin</artifactId>
      </plugin>
   </plugins>
</build>
启动类添加@EnableEurekaClient注解和@EnableFeignClients
1.1 service
package com.test.springcloud.feign.consumer.service;

import com.test.springcloud.feign.consumer.pojo.User;
import org.springframework.cloud.netflix.feign.FeignClient;
import org.springframework.web.bind.annotation.PathVariable;
import org.springframework.web.bind.annotation.RequestMapping;
import org.springframework.web.bind.annotation.RequestMethod;

@FeignClient(value = "SERVICE-PROVIDER")
public interface UserService {
    @RequestMapping(value = "/simple/{id}", method = RequestMethod.GET)
    User getUserById(@PathVariable(value = "id") Long id);
}
@FeignClient的值是服务提供者在Eureka上的名字。
方法上@RequestMapping的值是请求服务提供者时的路径。参数的传递方式和SpringMVC的Controller接收参数时语法一样,如@PathVariable,@RequestParam
User类同服务提供者中的一样。
1.1 Controller
package com.test.springcloud.feign.consumer.controller;

import com.test.springcloud.feign.consumer.pojo.User;
import com.test.springcloud.feign.consumer.service.UserService;
import org.springframework.beans.factory.annotation.Autowired;
import org.springframework.web.bind.annotation.RequestMapping;
import org.springframework.web.bind.annotation.RequestMethod;
import org.springframework.web.bind.annotation.RequestParam;
import org.springframework.web.bind.annotation.RestController;

@RestController
public class UserController {
    @Autowired
    private UserService userService;

    @RequestMapping(value = "/test", method = RequestMethod.GET)
    public User sayHi(@RequestParam Long id) {
        return userService.getUserById(id);
    }
}
1.1 application.yml
eureka:
  client:
    serviceUrl:
      defaultZone: http://localhost:8083/eureka/
server:
  port: 8085
spring:
  application:
    name: service-feign
1. 断路器Hystrix
1.1 Ribbon使用断路器
在ribbon的消费者工程中加入断路器依赖:
<dependency>
   <groupId>org.springframework.cloud</groupId>
   <artifactId>spring-cloud-starter-hystrix</artifactId>
</dependency>
启动类上添加注解@EnableHystrix
启动项目,在服务提供者挂掉的时候,会看到提示信息:
如果不做熔断,会在请求服务提供者超时之后报错:

1.2Feign使用熔断器
在yml配置文件增默认自带熔断器打开
feign:
  hystrix:
    enabled: true
在消费的service层修改
@FeignClient(value = "SERVICE-PROVIDER", fallback = TestServiceFallback.class)
public interface TestService {
    @RequestMapping(value = "/user/{id}", method = RequestMethod.GET)
    User getUserById(@PathVariable(value = "id") Integer id);

}
创建TestService的实现类TestServiceFallback
@Component
public class TestServiceFallback implements TestService {
    @Override
    public User getUserById(Integer id) {
        User user = new User();
        user.setId(-2);
        user.setName("server error2");
        return user;
    }
1.3 Hystrix Dashboard (Hystrix 仪表盘)
在pom中添加依赖(feign和robbin)
<dependency>
   <groupId>org.springframework.cloud</groupId>
   <artifactId>spring-cloud-starter-hystrix</artifactId>
</dependency>
<dependency>
   <groupId>org.springframework.boot</groupId>
   <artifactId>spring-boot-starter-actuator</artifactId>
</dependency>
<dependency>
   <groupId>org.springframework.cloud</groupId>
   <artifactId>spring-cloud-starter-hystrix-dashboard</artifactId>
</dependency>
再启动类加
@EnableHystrix
@EnableHystrixDashboard注解
启动访问localhost:port/hystrix

访问服务的提供者 能看到这个界面可以清晰的看到这个请求的成功率和失败率

1. 路由Zuul
新建工程pom配置
<parent>
   <groupId>org.springframework.boot</groupId>
   <artifactId>spring-boot-starter-parent</artifactId>
   <version>1.5.13.RELEASE</version>
   <relativePath/> <!-- lookup parent from repository -->
</parent>

<properties>
   <project.build.sourceEncoding>UTF-8</project.build.sourceEncoding>
   <project.reporting.outputEncoding>UTF-8</project.reporting.outputEncoding>
   <java.version>1.8</java.version>
   <spring-cloud.version>Edgware.SR3</spring-cloud.version>
</properties>

<dependencies>
   <dependency>
      <groupId>org.springframework.cloud</groupId>
      <artifactId>spring-cloud-starter-eureka</artifactId>
   </dependency>
   <dependency>
      <groupId>org.springframework.boot</groupId>
      <artifactId>spring-boot-starter-web</artifactId>
   </dependency>
   <dependency>
      <groupId>org.springframework.cloud</groupId>
      <artifactId>spring-cloud-starter-zuul</artifactId>
   </dependency>
   <dependency>
      <groupId>org.springframework.boot</groupId>
      <artifactId>spring-boot-starter-test</artifactId>
      <scope>test</scope>
   </dependency>
</dependencies>

<dependencyManagement>
   <dependencies>
      <dependency>
         <groupId>org.springframework.cloud</groupId>
         <artifactId>spring-cloud-dependencies</artifactId>
         <version>${spring-cloud.version}</version>
         <type>pom</type>
         <scope>import</scope>
      </dependency>
   </dependencies>
</dependencyManagement>

<build>
   <plugins>
      <plugin>
         <groupId>org.springframework.boot</groupId>
         <artifactId>spring-boot-maven-plugin</artifactId>
      </plugin>
   </plugins>
</build>
yml文件的配置
eureka:
  client:
    serviceUrl:
      defaultZone: http://localhost:8083/eureka/
server:
  port: 8086
spring:
  application:
    name: service-zuul
zuul:
  routes:
    api-a:
      path: /api-a /**
      serviceId: service-consumer
    api-b:
      path: /api-b /**
      serviceId: service-feign
routes定义了请求转发的规则。path是url访问路径,serviceId是对应的Eureka中的服务
http://localhost:8086/api-a/user/1会发送到service-consumer对应的工程
http://localhost:8086/api-b/test?id=2会发送到feign的工程
启动类:
@SpringBootApplication
@EnableEurekaClient
@EnableZuulProxy
public class Zuul0723Application {

    public static void main(String[] args) {
        SpringApplication.run(Zuul0723Application.class, args);
    }
}

 浙公网安备 33010602011771号