005-多线程-JUC线程池-Future、FutureTask、CompletionService 、CompletableFuture
一、概述
创建线程的两种方式,一种是直接继承Thread,另外一种就是实现Runnable接口。这两种方式都有一个缺陷就是:在执行完任务之后无法获取执行结果。如果需要获取执行结果,就必须通过共享变量或者使用线程通信的方式来达到效果,这样使用起来就比较麻烦。而自从Java 1.5开始,就提供了Callable和Future,通过它们可以在任务执行完毕之后得到任务执行结果。
详述:https://www.cnblogs.com/bjlhx/p/7588971.html
1.1、Runnable接口
它是一个接口,里面只声明了一个run()方法:
public interface Runnable {
    public abstract void run();
}
由于run()方法返回值为void类型,所以在执行完任务之后无法返回任何结果。
1.2、Callable接口
Callable接口位于java.util.concurrent包下,在它里面也只声明了一个方法,只不过这个方法叫做call()。
public interface Callable<V> {
    V call() throws Exception;
}
是一个泛型接口,call()函数返回的类型就是传递进来的V类型。Callable接口可以看作是Runnable接口的补充,call方法带有返回值,并且可以抛出异常。
1.3、Future接口
Future的核心思想是:
一个方法,计算过程可能非常耗时,等待方法返回,显然不明智。可以在调用方法的时候,立马返回一个Future,可以通过Future这个数据结构去控制方法f的计算过程。
Future类位于java.util.concurrent包下,它是一个接口:这里的控制包括:
get方法:获取计算结果(如果还没计算完,也是必须等待的)这个方法会产生阻塞,会一直等到任务执行完毕才返回;
get(long timeout, TimeUnit unit)用来获取执行结果,如果在指定时间内,还没获取到结果,就直接返回null。
cancel方法:还没计算完,可以取消计算过程,如果取消任务成功则返回true,如果取消任务失败则返回false。参数mayInterruptIfRunning表示是否允许取消正在执行却没有执行完毕的任务,如果设置true,则表示可以取消正在执行过程中的任务。如果任务已经完成,则无论mayInterruptIfRunning为true还是false,此方法肯定返回false,即如果取消已经完成的任务会返回false;如果任务正在执行,若mayInterruptIfRunning设置为true,则返回true,若mayInterruptIfRunning设置为false,则返回false;如果任务还没有执行,则无论mayInterruptIfRunning为true还是false,肯定返回true。
isDone方法:判断是否计算完
isCancelled方法:判断计算是否被取消,方法表示任务是否被取消成功,如果在任务正常完成前被取消成功,则返回 true。
也就是说Future提供了三种功能:
1)判断任务是否完成;
2)能够中断任务;
3)能够获取任务执行结果。
Future就是对于具体的Runnable或者Callable任务的执行结果进行取消、查询是否完成、获取结果。必要时可以通过get方法获取执行结果,该方法会阻塞直到任务返回结果。
因为Future只是一个接口,所以是无法直接用来创建对象使用的,因此就有了下面的FutureTask。
使用Callable+Future获取执行结果:


public class Test {
    public static void main(String[] args) {
        ExecutorService executor = Executors.newCachedThreadPool();
        Task task = new Task();
        Future<Integer> result = executor.submit(task);
        executor.shutdown();

        try {
            Thread.sleep(1000);
        } catch (InterruptedException e1) {
            e1.printStackTrace();
        }

        System.out.println("主线程在执行任务");

        try {
            System.out.println("task运行结果"+result.get());
        } catch (InterruptedException e) {
            e.printStackTrace();
        } catch (ExecutionException e) {
            e.printStackTrace();
        }

        System.out.println("所有任务执行完毕");
    }
}
class Task implements Callable<Integer>{
    @Override
    public Integer call() throws Exception {
        System.out.println("子线程在进行计算");
        Thread.sleep(3000);
        int sum = 0;
        for(int i=0;i<100;i++)
            sum += i;
        return sum;
    }
}
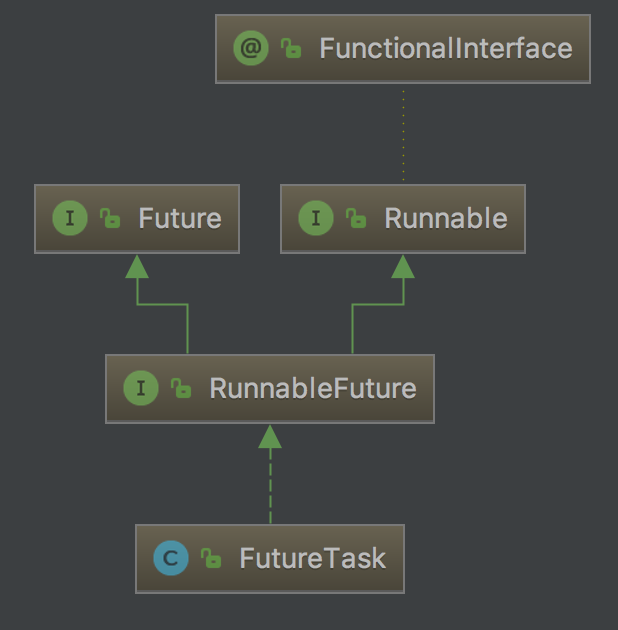
1.4、FutureTask类
FutureTask继承体系中的核心接口是Future。事实上,FutureTask是Future接口的一个唯一实现类。
如何获取Callable的返回结果:一般是通过FutureTask这个中间媒介来实现的。整体的流程是这样的:
把Callable实例当作参数,生成一个FutureTask的对象,然后把这个对象当作一个Runnable,作为参数另起线程。
1.4.1、FutureTask结构
1.4.2、FutureTask使用
方式一、使用thread方式
FutureTask实现了Runnable,因此它既可以通过Thread包装来直接执行,也可以提交给ExecuteService来执行。以下使用Thread包装线程方式启动
    public static void main(String[] args) throws Exception {
        Callable<Integer> call = () -> {
            System.out.println("计算线程正在计算结果...");
            Thread.sleep(3000);
            return 1;
        };
        FutureTask<Integer> task = new FutureTask<>(call);
        Thread thread = new Thread(task);
        thread.start();

        System.out.println("main线程干点别的...");

        Integer result = task.get();
        System.out.println("从计算线程拿到的结果为:" + result);
    }
方式二、使用 ExecutorService
ExecutorService executor = Executors.newFixedThreadPool(2);线程池方式
    public static void main(String[] args) {
        Callable<String> callable1=()->{
            Thread.sleep(2000);
            return Thread.currentThread().getName();
        };
        Callable<String> callable2=()->{
            Thread.sleep(3000);
            return Thread.currentThread().getName();
        };
        FutureTask<String> futureTask1 = new FutureTask<>(callable1);// 将Callable写的任务封装到一个由执行者调度的FutureTask对象
        FutureTask<String> futureTask2 = new FutureTask<>(callable2);

        ExecutorService executor = Executors.newFixedThreadPool(2);        // 创建线程池并返回ExecutorService实例
        executor.execute(futureTask1);  // 执行任务
        executor.execute(futureTask2);
        //同时开启了两个任务
        long startTime = System.currentTimeMillis();
        while (true) {
            try {
                if(futureTask1.isDone() && futureTask2.isDone()){//  两个任务都完成
                    System.out.println("Done");
                    executor.shutdown();                          // 关闭线程池和服务
                    return;
                }

                if(!futureTask1.isDone()){ // 任务1没有完成,会等待,直到任务完成
                    System.out.println("FutureTask1 output="+futureTask1.get());
                }

                System.out.println("Waiting for FutureTask2 to complete");
                String s = futureTask2.get(200L, TimeUnit.MILLISECONDS);
                if(s !=null){
                    System.out.println("FutureTask2 output="+s);
                }
            } catch (InterruptedException | ExecutionException e) {
                e.printStackTrace();
            }catch(TimeoutException e){
                //do nothing
            }
            System.out.println((System.currentTimeMillis()-startTime));
        }
    }
使用Callable+FutureTask获取执行结果
public class Test {
    public static void main(String[] args) {
        //第一种方式
        ExecutorService executor = Executors.newCachedThreadPool();
        Task task = new Task();
        FutureTask<Integer> futureTask = new FutureTask<Integer>(task);
        executor.submit(futureTask);
        executor.shutdown();

        //第二种方式,注意这种方式和第一种方式效果是类似的,只不过一个使用的是ExecutorService,一个使用的是Thread
        /*Task task = new Task();
        FutureTask<Integer> futureTask = new FutureTask<Integer>(task);
        Thread thread = new Thread(futureTask);
        thread.start();*/

        try {
            Thread.sleep(1000);
        } catch (InterruptedException e1) {
            e1.printStackTrace();
        }

        System.out.println("主线程在执行任务");

        try {
            System.out.println("task运行结果"+futureTask.get());
        } catch (InterruptedException e) {
            e.printStackTrace();
        } catch (ExecutionException e) {
            e.printStackTrace();
        }

        System.out.println("所有任务执行完毕");
    }
}
class Task implements Callable<Integer>{
    @Override
    public Integer call() throws Exception {
        System.out.println("子线程在进行计算");
        Thread.sleep(3000);
        int sum = 0;
        for(int i=0;i<100;i++)
            sum += i;
        return sum;
    }
}
1.5、CompletionService
原理:内部通过阻塞队列+FutureTask,实现了任务先完成可优先获取到,即结果按照完成先后顺序排序。
package com.lhx.cloud.futruetask;

import java.time.LocalDateTime;
import java.util.ArrayList;
import java.util.List;
import java.util.concurrent.*;

public class CompletionServiceDemo {
    public static void main(String[] args)  {
        Long start = System.currentTimeMillis();
        //开启5个线程
        ExecutorService exs = Executors.newFixedThreadPool(5);
        try {
            int taskCount = 10;
            //结果集
            List<Integer> list = new ArrayList<>();
            //1.定义CompletionService
            CompletionService<Integer> completionService = new ExecutorCompletionService<>(exs);
            List<Future<Integer>> futureList = new ArrayList<>();
            //2.添加任务
            for(int i=0;i<taskCount;i++){
                futureList.add(completionService.submit(new Task(i+1)));
            }
            //==================结果归集===================
            //方法1:future是提交时返回的,遍历queue则按照任务提交顺序,获取结果
//            for (Future<Integer> future : futureList) {
//                System.out.println("====================");
//                Integer result = future.get();//线程在这里阻塞等待该任务执行完毕,按照
//                System.out.println("任务result="+result+"获取到结果!"+new Date());
//                list.add(result);
//            }

//            //方法2.使用内部阻塞队列的take()
            for(int i=0;i<taskCount;i++){
                Integer result = completionService.take().get();//采用completionService.take(),内部维护阻塞队列,任务先完成的先获取到
                System.out.println(LocalDateTime.now()+"---任务i=="+result+"完成!");
                list.add(result);
            }
            System.out.println("list="+list);
            System.out.println("总耗时="+(System.currentTimeMillis()-start));
        } catch (Exception e) {
            e.printStackTrace();
        } finally {
            exs.shutdown();//关闭线程池
        }

    }


    static class Task implements Callable<Integer>{
        Integer i;

        public Task(Integer i) {
            super();
            this.i=i;
        }

        @Override
        public Integer call() throws Exception {
            if(i==5){
                Thread.sleep(5000);
            }else{
                Thread.sleep(1000);
            }
            System.out.println("线程:"+Thread.currentThread().getName()+"任务i="+i+",执行完成!");
            return i;
        }

    }
}
建议:使用率也挺高,而且能按照完成先后排序,建议如果有排序需求的优先使用。只是多线程并发执行任务结果归集,也可以使用。
二、CompletableFuture
2.1、对标Futrue
Future 接口,用于描述一个异步计算的结果。虽然 Future 以及相关使用方法提供了异步执行任务的能力,但是对于结果的获取却是很不方便,只能通过阻塞或者轮询的方式得到任务的结果。
阻塞的方式显然和我们的异步编程的初衷相违背,轮询的方式又会耗费无谓的 CPU 资源,而且也不能及时地得到计算结果,为什么不能用观察者设计模式呢?即当计算结果完成及时通知监听者。
Future局限性,它很难直接表述多个Future 结果之间的依赖性。
2.2、类图
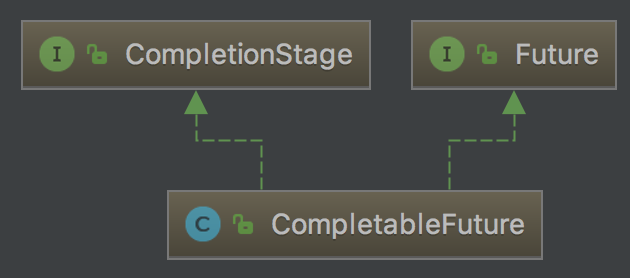
2.2.1、CompletionStage
-
CompletionStage代表异步计算过程中的某一个阶段,一个阶段完成以后可能会触发另外一个阶段
-
一个阶段的计算执行可以是一个Function,Consumer或者Runnable。比如:stage.thenApply(x -> square(x)).thenAccept(x -> System.out.print(x)).thenRun(() -> System.out.println())
-
一个阶段的执行可能是被单个阶段的完成触发,也可能是由多个阶段一起触发
2.2.2、Future
2.3、CompletableFuture详细介绍及使用
public class CompletableFutureTest {

    public static Executor executor = Executors.newFixedThreadPool(5);

    //带 Async 后缀的方法,需要注意的是,并不是说带 Async 就是异步,不带就是同步的意思。而是说带 Async 会被重新放进线程池,由线程池决定何时执行;不带 Async 就会仍然由当前线程执行,不再重新放入线程池中。
    //join()和get()方法都是用来获取CompletableFuture异步之后的返回值

    //region 1、创建:runAsync、supplyAsync
    //    CompletableFuture.compleatedFuture是一个静态辅助方法,用来返回一个已经计算好的CompletableFuture.
    //用于异步任务不需要返回值的情况
    //  CompletableFuture.runAsync(Runnable runnable);
    //  CompletableFuture.runAsync(Runnable runnable, Executor executor);
    //任务需要返回值的情况
    //  CompletableFuture.supplyAsync(Supplier<U> supplier);
    //  CompletableFuture.supplyAsync(Supplier<U> supplier, Executor executor)

    //  这两组方法同时提供了 Executor 参数的重载,用于指定线程池来执行。如果不指定,则使用默认的 ForkJoinPool.commonPool() 线程池,类型与 parallelStream。
    //  注意:这些线程都是Daemon线程,主线程结束Daemon线程不结束,只有JVM关闭时,生命周期终止。
    @Test
    public void testInit() {
        CompletableFuture.supplyAsync(() -> {
            return 1;
        }, executor);
    }
    //endregion


    //region 2、流式计算:串行执行关系【thenRun、thenAccept、thenApply】
    //利用 CompletableFuture ,可以实现流式计算,即当任务 A 执行完毕后,在执行任务 B。
    //这里根据业务不同变种很多,例如 任务 A 需不需要有返回值,任务 B 需不要参数,以及任务 B 自身需不需要返回值等。
    //  CompletableFuture.runAsync(() -> {}).thenRun(() -> {});
    //  CompletableFuture.runAsync(() -> {}).thenAccept(resultA -> {});
    //  CompletableFuture.runAsync(() -> {}).thenApply(resultA -> "resultB");
    //任务 A 没有返回值的情况,即 runAsync():
    //  thenRun():任务 B 在任务 A 执行完毕后执行,任务 B 无需参数也无返回值。
    //  thenAccept():任务 B 在任务 A 执行完毕后执行,任务 B 需要任务 A 的返回结果作为参数,任务 B 无需返回值。(实际上此处任务B的参数一定为 null,因为任务 A 无返回值),任务完成后,添加监听函数。通过thenAccept
    //  thenApply():任务 B 在任务 A 执行完毕后执行,任务 B 需要任务 A 的返回结果作为参数,任务 B 自身也有返回值。实际上此处任务B的参数一定为 null,因为任务 A 无返回值)
    //注意:thenRun() 、thenAccept()、thenApply() 也有对应的带 Async 后缀的方法

    //任务 A 有返回值的情况,即 supplyAsync():
    //  CompletableFuture.supplyAsync(() -> "resultA").thenRun(() -> {});
    //  CompletableFuture.supplyAsync(() -> "resultA").thenAccept(resultA -> {});
    //  CompletableFuture.supplyAsync(() -> "resultA").thenApply(resultA -> resultA + " resultB");
    @Test
    public void testStream() {
        CompletableFuture.supplyAsync(() -> pow3(3), executor)
                .thenApplyAsync(q -> q * q, executor)
                .thenAcceptAsync(p -> System.out.println(p));
        //输出:729.00
    }
    //endregion


    //region 3、计算结果完成时的处理:异常处理【exceptionally、handle】、常规执行【whenComplete】
    //    CompletableFuture 提供了 exceptionally() 和 handle() 方法来进行异常处理,如下所示。
    //    public CompletableFuture<T> exceptionally(Function<Throwable, ? extends T> fn);
    //    public <U> CompletionStage<U> handle(BiFunction<? super T, Throwable, ? extends U> fn);
    //    CompletableFuture 某个任务执行抛出异常,是不会被被抛出到外部来的,同时会影响后续的任务执行。以上一节最后代码为例,我们修改 pow3() 代码,让其抛出异常:
    //    重新运行程序后,控制台没有打印任何异常日志,同时后续任务也终止执行了。
    @Test
    public void testException() {
        CompletableFuture.supplyAsync(() -> pow3Throw(3), executor)
                .thenApplyAsync(q -> q * q, executor)
                .thenAcceptAsync(p -> System.out.println(p));
        //运行成功,无输出
    }

    //    3.1 exceptionally
    //    使用 exceptionally() ,可以当任务内部出现异常时,自行做业务处理,并返回新的结果,并传递给后续任务。
    @Test
    public void testExceptionally() {
        CompletableFuture.supplyAsync(() -> pow3Throw(3), executor)
                .exceptionally(ex -> {
                    System.out.println("ex:" + ex.getMessage());
                    return 0.0D;
                })
                .thenApplyAsync(q -> q * q, executor)
                .thenAcceptAsync(p -> System.out.println(p));
        //        ex:java.lang.IllegalArgumentException: xxx
        //        0.0
    }

    //    3.2 handle
    //    用于处理异常,方法存在有两个参数,参数1为任务本身的返回结果,参数2为任务内抛出的异常。这两个参数至少有一个必然为 null,因此可以通过判断 ex 是否为 null 进行异常处理。
    @Test
    public void testhandle() {
        CompletableFuture.supplyAsync(() -> pow3Throw(3), executor)
                .handle((result, ex) -> {
                    if (null != ex) {
                        System.out.println("ex:" + ex.getMessage());
                        return 0.0D;
                    }
                    return result;
                })
                .thenApplyAsync(q -> q * q, executor)
                .thenAcceptAsync(p -> System.out.println(p));
        //        ex:java.lang.IllegalArgumentException: xxx
        //        0.0
    }

    private static double pow3Throw(double input) {
        throw new IllegalArgumentException("xxx");
    }
    //endregion


    //region 5-栅栏:AND 汇聚关系【两个(thenAcceptBoth、thenCombine、runAfterBoth)、多个(allOf)】、OR 汇聚关系【applyToEither、acceptEither、runAfterEither、anyOf】
    //    场景:存在任务 A,需要异步处理,所有线程处理完毕后,再做其他业务处理
    //    存在任务 A、任务 B、任务 C,任务 A 和 任务 B 可以并行执行,但是必须 任务 A 和 任务 B 全部执行完毕后才能执行任务 C
    //    以往实现这些需求时候,会使用 CountdownLatch 和 Future,现在可以多一个选择了。

    //region 5.1、两个任务栅栏
    //    CompletableFuture<String> cfA = CompletableFuture.supplyAsync(() -> "resultA");
    //    CompletableFuture<String> cfB = CompletableFuture.supplyAsync(() -> "resultB");
    //    cfA.thenAcceptBoth(cfB, (resultA, resultB) -> {});
    //    cfA.thenCombine(cfB, (resultA, resultB) -> "result A + B");
    //    cfA.runAfterBoth(cfB, () -> {});
    //    cfA.thenCompose(resultA -> CompletableFuture.supplyAsync(() -> { return resultA + ":" + "2";  }));

    //    如何实现任务 A 和任务 B 的并行执行(不分先后顺序执行):
    //
    //    thenAcceptBoth():并行执行,需要两个任务的结果作为参数,进行后续处理,无返回值。
    //    thenCombine():并行执行,需要两个任务的结果作为参数,进行后续处理,有返回值。
    //    runAfterBoth():并行执行,不需要两个任务的结果作为参数,进行后续处理,无返回值。
    //    thenCompose() :穿行执行,两个任务,第一个任务的结果作为第二个任务的入参数,第二个任务要等待第一个任务的执行。

    @Test
    public void testthenAcceptBoth() {
        CompletableFuture<Integer> cfA = CompletableFuture.supplyAsync(() -> 1);
        CompletableFuture<Integer> cfB = CompletableFuture.supplyAsync(() -> 2);
        cfA.thenAcceptBoth(cfB, (resultA, resultB) -> {
            System.out.println(resultA + resultB);
        });
    }

    @Test
    public void testthenCombine() throws Exception {
        CompletableFuture<Integer> cfA = CompletableFuture.supplyAsync(() -> 1);
        CompletableFuture<Integer> cfB = CompletableFuture.supplyAsync(() -> 2);
        CompletableFuture<Integer> thenCombine = cfA.thenCombine(cfB, (resultA, resultB) -> {
            return resultA + resultB;
        });
        System.out.println(thenCombine.get());
    }

    @Test
    public void testrunAfterBoth() throws Exception {
        CompletableFuture<Integer> cfA = CompletableFuture.supplyAsync(() -> 1);
        CompletableFuture<Integer> cfB = CompletableFuture.supplyAsync(() -> 2);
        CompletableFuture<Void> thenCombine = cfA.runAfterBoth(cfB, () -> {
            System.out.println(1);
        });
    }

    @Test
    public void testthenCompose() throws ExecutionException, InterruptedException {
        CompletableFuture<Integer> cfA = CompletableFuture.supplyAsync(() -> 1);
        CompletableFuture<String> thenCompose = cfA.thenCompose(resultA -> CompletableFuture.supplyAsync(() -> {
            return resultA + ":" + "2";
        }));
        System.out.println(thenCompose.get());
    }
    //endregion


    //region 5.2、多个任务的栅栏
    //  实现更多任务的并行计算,CompletableFuture 也为我们提供了 allOf() 和 anyOf() 方法。
    //  allOf() 的用法,它聚合了多个任务,并通过 join() 方法进行阻塞等待。需要注意的是,该方法是没有返回值的。
    @Test
    public void testAlOf() {
        List<Double> result = new CopyOnWriteArrayList<>();
        CompletableFuture<Void> future1 = CompletableFuture.runAsync(() -> result.add(pow3(1)));
        CompletableFuture<Void> future2 = CompletableFuture.runAsync(() -> result.add(pow3(2)));
        CompletableFuture<Void> future3 = CompletableFuture.runAsync(() -> result.add(pow3(3)));
        CompletableFuture<Void> future4 = CompletableFuture.runAsync(() -> result.add(pow3(4)));
        CompletableFuture<Void> future5 = CompletableFuture.runAsync(() -> result.add(pow3(5)));
        CompletableFuture.allOf(future1, future2, future3, future4, future5).join();
        System.out.println(result);
    }

    //只要有任意一个 CompletableFuture 任务执行完成就会返回。
    @Test
    public void testanyOf() {
        List<Double> result = new CopyOnWriteArrayList<>();
        CompletableFuture<Void> future1 = CompletableFuture.runAsync(() -> result.add(pow3(1)));
        CompletableFuture<Void> future2 = CompletableFuture.runAsync(() -> result.add(pow3(2)));
        CompletableFuture<Void> future3 = CompletableFuture.runAsync(() -> result.add(pow3(3)));
        CompletableFuture<Void> future4 = CompletableFuture.runAsync(() -> result.add(pow3(4)));
        CompletableFuture<Void> future5 = CompletableFuture.runAsync(() -> result.add(pow3(5)));
        CompletableFuture.anyOf(future1, future2, future3, future4, future5).join();
        System.out.println(result);
    }
    //endregion

    //endregion


    private static double pow3(double input) {
        return Math.pow(input, 3);
    }
}
三、常用多线程并发,取结果归集的几种实现方案
| 描述 | Future | FutureTask | CompletionService | CompletableFuture |
|---|---|---|---|---|
| 原理 | Future接口 | 接口RunnableFuture的唯一实现类,RunnableFuture接口继承自Future+Runnable | 内部通过阻塞队列+FutureTask接口 | JDK8实现了Future, CompletionStage两个接口 |
| 多任务并发执行 | 支持 | 支持 | 支持 | 支持 |
| 获取任务结果的顺序 | 按照提交顺序获取结果 | 未知 | 支持任务完成的先后顺序 | 支持任务完成的先后顺序 |
| 异常捕捉 | 自己捕捉 | 自己捕捉 | 自己捕捉 | 原生API支持,返回每个任务的异常 |
| 建议 | CPU高速轮询,耗资源,或者阻塞,可以使用,但不推荐 | 功能不对口,并发任务这一块多套一层,不推荐使用 | 推荐使用,没有JDK8CompletableFuture之前最好的方案 | API极端丰富,配合流式编程,推荐使用! |
上表来源:https://www.cnblogs.com/dennyzhangdd/p/7010972.html

 浙公网安备 33010602011771号