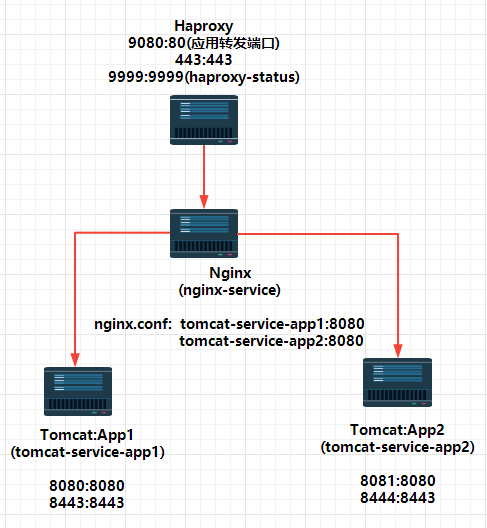
Docker compose 部署【Haproxy +Nginx+Tomcat】
Docker compose 部署【Haproxy +Nginx+Tomcat】
一、Centos 镜像制作
[root@jgharbor centos]# ll
total 8
-rwxrwxr-x. 1 root root 141 Feb 22 11:58 build-command.sh
-rw-rw-r--. 1 root root 294 Feb 22 11:43 Dockerfile
build-command.sh
#!/bin/bash
TAG=$1
docker build -t 192.168.19.178/birkhoffxia/centos-base:${TAG} .
docker push 192.168.19.178/birkhoffxia/centos-base:${TAG}
Dockerfile:这边 加入了www用户为了启动 tomcat 使用
FROM centos:7.8.2003

LABEL maintainer="Birkhoff 807722920@qq.com"


RUN yum install -y epel-release && yum install -y vim wget tree  lrzsz gcc gcc-c++ automake pcre pcre-devel zlib zlib-devel openssl openssl-devel iproute net-tools iotop &&  groupadd www -g 2022 && useradd www -u 2022 -g www
二、Nginx 镜像制作
[root@jgharbor all-in-one]# ll
total 1032
-rwxrwxr-x. 1 root root     144 Feb 22 14:59 build-command.sh
drwxrwxr-x. 2 root root      24 Feb 22 15:00 code
-rw-rw-r--. 1 root root     292 Apr 14  2021 code.tar.gz
-rw-rw-r--. 1 root root     858 Feb 22 15:01 Dockerfile
-rw-rw-r--. 1 root root 1032630 Aug 14  2019 nginx-1.16.1.tar.gz
-rw-rw-r--. 1 root root    2681 Apr 14  2021 nginx.conf
-rw-rw-r--. 1 root root      65 Apr 14  2021 run_nginx.sh
build-command.sh:
#!/bin/bash
docker build -t 192.168.19.178/birkhoffxia/nginx-all-in-one:1.16.1 .
docker push 192.168.19.178/birkhoffxia/nginx-all-in-one:1.16.1
code:vim index.html
<!DOCTYPE html>
<html lang="en">
<head>
    <meta charset="UTF-8">
        <title>马哥教育</title>
        </head>
        <body>
        <h1>测试页面</h1>
        </body>
        </html>
code.tar.gz:上面打包
Dockerfile:
#
#
#base image for m43 nginx
FROM centos:7.8.2003

maintainer  "Birkhoff 807722920@qq.com"

RUN yum install -y epel-release && yum install -y vim wget tree  lrzsz gcc gcc-c++ automake pcre pcre-devel zlib zlib-devel openssl openssl-devel iproute net-tools iotop

#COPY nginx-1.16.1.tar.gz /usr/local/src/
ADD nginx-1.16.1.tar.gz /usr/local/src/

RUN cd /usr/local/src/nginx-1.16.1 && ./configure --prefix=/apps/nginx --with-http_sub_module && make && make install
RUN useradd nginx -u 2022
ADD nginx.conf /apps/nginx/conf/nginx.conf
ADD code.tar.gz /data/nginx/html
#ADD run_nginx.sh /apps/nginx/sbin/run_nginx.sh
#RUN chmod a+x /apps/nginx/sbin/run_nginx.sh
EXPOSE 80 443

#RUN useradd m43
#USER m43
#WORKDIR /opt
#run mkdir 123
#WORKDIR 123


#ENTRYPOINT ["/apps/nginx/sbin/run_nginx.sh"]

ENTRYPOINT ["/apps/nginx/sbin/nginx"]
CMD  ["-g","daemon off;"]
nginx-1.16.1.tar.gz:下载地址:http://nginx.org/download/nginx-1.16.1.tar.gz
nginx.conf:
user  nginx;
worker_processes  auto;

#error_log  logs/error.log;
#error_log  logs/error.log  notice;
#error_log  logs/error.log  info;

#pid        logs/nginx.pid;
#daemon off;

events {
    worker_connections  1024;
}


http {
    include       mime.types;
    default_type  application/octet-stream;

    #log_format  main  '$remote_addr - $remote_user [$time_local] "$request" '
    #                  '$status $body_bytes_sent "$http_referer" '
    #                  '"$http_user_agent" "$http_x_forwarded_for"';

    #access_log  logs/access.log  main;

    sendfile        on;
    #tcp_nopush     on;

    #keepalive_timeout  0;
    keepalive_timeout  65;

    #gzip  on;

    server {
        listen       80;
        server_name  localhost;

        #charset koi8-r;

        #access_log  logs/host.access.log  main;

        location / {
            root   /data/nginx/html;
            index  index.html index.htm;
        }

        #error_page  404              /404.html;

        # redirect server error pages to the static page /50x.html
        #
        error_page   500 502 503 504  /50x.html;
        location = /50x.html {
            root   html;
        }
}
run_nginx.sh:
#!/bin/bash
echo "1.1.1.1" >> /etc/hosts

/apps/nginx/sbin/nginx
构建上传镜像仓库:
[root@jgharbor all-in-one]# chmod a+x build-command.sh
[root@jgharbor all-in-one]# ./build-command.sh
Sending build context to Docker daemon 1.044MB
Step 1/11 : FROM centos:7.8.2003
---> afb6fca791e0
Step 2/11 : maintainer "Birkhoff 807722920@qq.com"
---> Running in 20f25cf50b0c
Removing intermediate container 20f25cf50b0c
---> bb473c971150
Step 3/11 : RUN yum install -y epel-release && yum install -y vim wget tree lrzsz gcc gcc-c++ automake pcre pcre-devel zlib zlib-devel openssl openssl-devel iproute net-tools iotop
---> Running in d86cd9501292
Loaded plugins: fastestmirror, ovl
Determining fastest mirrors
* base: ftp.sjtu.edu.cn
* extras: ftp.sjtu.edu.cn
* updates: ftp.sjtu.edu.cn
Resolving Dependencies
--> Running transaction check
---> Package epel-release.noarch 0:7-11 will be installed
--> Finished Dependency Resolution
Dependencies Resolved
================================================================================
Package Arch Version Repository Size
================================================================================
Installing:
epel-release noarch 7-11 extras 15 k
Transaction Summary
================================================================================
Install 1 Package
Total download size: 15 k
Installed size: 24 k
Downloading packages
Omiit:.......编译安装部分省略
make[1]: Leaving directory `/usr/local/src/nginx-1.16.1'
Removing intermediate container 4996f1be67f0
 ---> 844f47c6ab5a
Step 6/11 : RUN useradd nginx -u 2022
 ---> Running in 4ad8133ba24d
Removing intermediate container 4ad8133ba24d
 ---> 7c73bbc6ed89
Step 7/11 : ADD nginx.conf /apps/nginx/conf/nginx.conf
 ---> dd28bf8dd39e
Step 8/11 : ADD code.tar.gz /data/nginx/html
 ---> fd1d0bc75f20
Step 9/11 : EXPOSE 80 443
 ---> Running in 226a48ecdb92
Removing intermediate container 226a48ecdb92
 ---> a64f6cb66bad
Step 10/11 : ENTRYPOINT ["/apps/nginx/sbin/nginx"]
 ---> Running in 73917dfe14f2
Removing intermediate container 73917dfe14f2
 ---> 55ad86aeb900
Step 11/11 : CMD  ["-g","daemon off;"]
 ---> Running in 71e38ffd6aa0
Removing intermediate container 71e38ffd6aa0
 ---> 922a4782b49d
Successfully built 922a4782b49d
Successfully tagged 192.168.19.178/birkhoffxia/nginx-all-in-one:1.16.1
The push refers to repository [192.168.19.178/birkhoffxia/nginx-all-in-one]
ab75956f51d2: Pushed
e10648cbbc97: Pushed
eef1565f126a: Pushed
71d8340b272a: Pushed
16df317b56f8: Pushed
ba4ccc58e22f: Pushed
fb82b029bea0: Mounted from birkhoffxia/tomcat-xks
1.16.1: digest: sha256:48fd54a34e9349492b285d42f22a0fcb076fcde3f9cc66cc2af6f832abf4a95d size: 1787
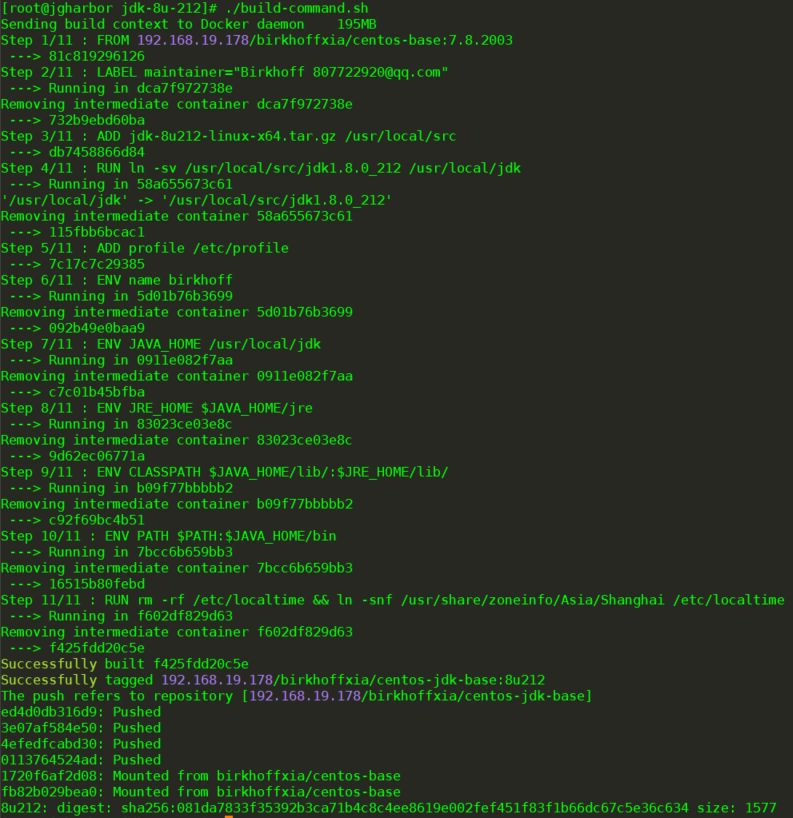
三、JDK镜像制作
[root@jgharbor jdk-8u-212]# ll
total 190456
-rwxrwxr-x. 1 root root       141 Feb 22 12:00 build-command.sh
-rw-rw-r--. 1 root root       466 Feb 22 12:03 Dockerfile
-rw-rw-r--. 1 root root 195013152 Jul 17  2019 jdk-8u212-linux-x64.tar.gz
-rw-rw-r--. 1 root root      2041 Feb 22 11:48 profile
build-command.sh:创建脚本 并 同步到 本地Harbor中
#!/bin/bash
docker build -t 192.168.19.178/birkhoffxia/centos-jdk-base:8u212 .
docker push 192.168.19.178/birkhoffxia/centos-jdk-base:8u212
profile :添加 最后几行环境变量
# /etc/profile

# System wide environment and startup programs, for login setup
# Functions and aliases go in /etc/bashrc

# It's NOT a good idea to change this file unless you know what you
# are doing. It's much better to create a custom.sh shell script in
# /etc/profile.d/ to make custom changes to your environment, as this
# will prevent the need for merging in future updates.

pathmunge () {
    case ":${PATH}:" in
        *:"$1":*)
            ;;
        *)
            if [ "$2" = "after" ] ; then
                PATH=$PATH:$1
            else
                PATH=$1:$PATH
            fi
    esac
}


if [ -x /usr/bin/id ]; then
    if [ -z "$EUID" ]; then
        # ksh workaround
        EUID=`/usr/bin/id -u`
        UID=`/usr/bin/id -ru`
    fi
    USER="`/usr/bin/id -un`"
    LOGNAME=$USER
    MAIL="/var/spool/mail/$USER"
fi

# Path manipulation
if [ "$EUID" = "0" ]; then
    pathmunge /usr/sbin
    pathmunge /usr/local/sbin
else
    pathmunge /usr/local/sbin after
    pathmunge /usr/sbin after
fi

HOSTNAME=`/usr/bin/hostname 2>/dev/null`
HISTSIZE=1000
if [ "$HISTCONTROL" = "ignorespace" ] ; then
    export HISTCONTROL=ignoreboth
else
    export HISTCONTROL=ignoredups
fi

export PATH USER LOGNAME MAIL HOSTNAME HISTSIZE HISTCONTROL

# By default, we want umask to get set. This sets it for login shell
# Current threshold for system reserved uid/gids is 200
# You could check uidgid reservation validity in
# /usr/share/doc/setup-*/uidgid file
if [ $UID -gt 199 ] && [ "`/usr/bin/id -gn`" = "`/usr/bin/id -un`" ]; then
    umask 002
else
    umask 022
fi

for i in /etc/profile.d/*.sh /etc/profile.d/sh.local ; do
    if [ -r "$i" ]; then
        if [ "${-#*i}" != "$-" ]; then
            . "$i"
        else
            . "$i" >/dev/null
        fi
    fi
done

unset i
unset -f pathmunge

export JAVA_HOME=/usr/local/jdk
export TOMCAT_HOME=/apps/tomcat
export PATH=$JAVA_HOME/bin:$JAVA_HOME/jre/bin:$TOMCAT_HOME/bin:$PATH
export CLASSPATH=.$CLASSPATH:$JAVA_HOME/lib:$JAVA_HOME/jre/lib:$JAVA_HOME/lib/tools.jar
jdk-8u212-linux-x64.tar.gz: 下载地址:https://www.oracle.com/java/technologies/javase/javase8-archive-downloads.html
Dockerfile:编辑Dockerfile 文件
FROM 192.168.19.178/birkhoffxia/centos-base:7.8.2003

LABEL maintainer="Birkhoff 807722920@qq.com"
ADD jdk-8u212-linux-x64.tar.gz /usr/local/src

RUN ln -sv /usr/local/src/jdk1.8.0_212 /usr/local/jdk

ADD profile /etc/profile

#为了能否让root读到全局环境变量,很重要
ENV name birkhoff
ENV JAVA_HOME /usr/local/jdk
ENV JRE_HOME $JAVA_HOME/jre
ENV CLASSPATH $JAVA_HOME/lib/:$JRE_HOME/lib/
ENV PATH $PATH:$JAVA_HOME/bin

#为了保证时间和宿主机时间一致
RUN rm -rf /etc/localtime && ln -snf /usr/share/zoneinfo/Asia/Shanghai /etc/localtime
进入容器确认是否 /etc/profile 写入容器中
#docker run -it --rm 192.168.19.178/birkhoffxia/centos-jdk-base:8u212
[root@bafba3e54526 /]# cat /etc/profile
[root@bafba3e54526 /]# env
[root@bafba3e54526 /]#java -version
四、Tomcat镜像制作
[root@jgharbor tomcat-base-8.5.65]# ll
total 10288
-rw-rw-r--. 1 root root 10523269 Mar 30  2021 apache-tomcat-8.5.65.tar.gz
-rwxrwxr-x. 1 root root      150 Feb 22 12:27 build-command.sh
-rw-rw-r--. 1 root root      229 Feb 22 12:43 Dockerfile
build-command.sh:
#!/bin/bash
docker build -t 192.168.19.178/birkhoffxia/tomcat-centos-base:v8.5.65 .
docker push 192.168.19.178/birkhoffxia/tomcat-centos-base:v8.5.65
Dockerfile:
#tomcat base image
FROM 192.168.19.178/birkhoffxia/centos-jdk-base:8u212
LABEL maintainer="Birkhoff 807722920@qq.com"
#VOLUME          /data /apps
ADD apache-tomcat-8.5.65.tar.gz /apps
RUN ln -sv /apps/apache-tomcat-8.5.65 /apps/tomcat
apache-tomcat-8.5.65.tar.gz:下载地址:https://archive.apache.org/dist/tomcat/tomcat-8/v8.5.65/bin/
执行build-command.sh
[root@jgharbor tomcat-base-8.5.65]# chmod +x build-command.sh
[root@jgharbor tomcat-base-8.5.65]# ./build-command.sh
Sending build context to Docker daemon  10.53MB
Step 1/5 : FROM 192.168.19.178/birkhoffxia/centos-jdk-base:8u212
 ---> f425fdd20c5e
Step 2/5 : LABEL maintainer="Birkhoff 807722920@qq.com"
 ---> Running in ef7f9f4dce4d
Removing intermediate container ef7f9f4dce4d
 ---> 4719de8fe641
Step 3/5 : VOLUME        /data /apps
 ---> Running in c2c4eb2e0f27
Removing intermediate container c2c4eb2e0f27
 ---> ae5c509f71ed
Step 4/5 : ADD apache-tomcat-8.5.65.tar.gz /apps
 ---> abe8918889ff
Step 5/5 : RUN ln -sv /apps/apache-tomcat-8.5.65 /apps/tomcat
 ---> Running in 60bd9118c71c
'/apps/tomcat' -> '/apps/apache-tomcat-8.5.65'
Removing intermediate container 60bd9118c71c
 ---> 83909b2aca51
Successfully built 83909b2aca51
Successfully tagged 192.168.19.178/birkhoffxia/tomcat-centos-base:v8.5.65
The push refers to repository [192.168.19.178/birkhoffxia/tomcat-centos-base]
96738a38ead3: Pushed
a686e1b81d31: Pushed
ed4d0db316d9: Mounted from birkhoffxia/centos-jdk-base
3e07af584e50: Mounted from birkhoffxia/centos-jdk-base
4efedfcabd30: Mounted from birkhoffxia/centos-jdk-base
0113764524ad: Mounted from birkhoffxia/centos-jdk-base
1720f6af2d08: Mounted from birkhoffxia/centos-jdk-base
fb82b029bea0: Mounted from birkhoffxia/centos-jdk-base
v8.5.65: digest: sha256:c921b0e04363c4c8f8ec351c1a874303f6b4372ee49986af20fe5dcce97e326e size: 1996
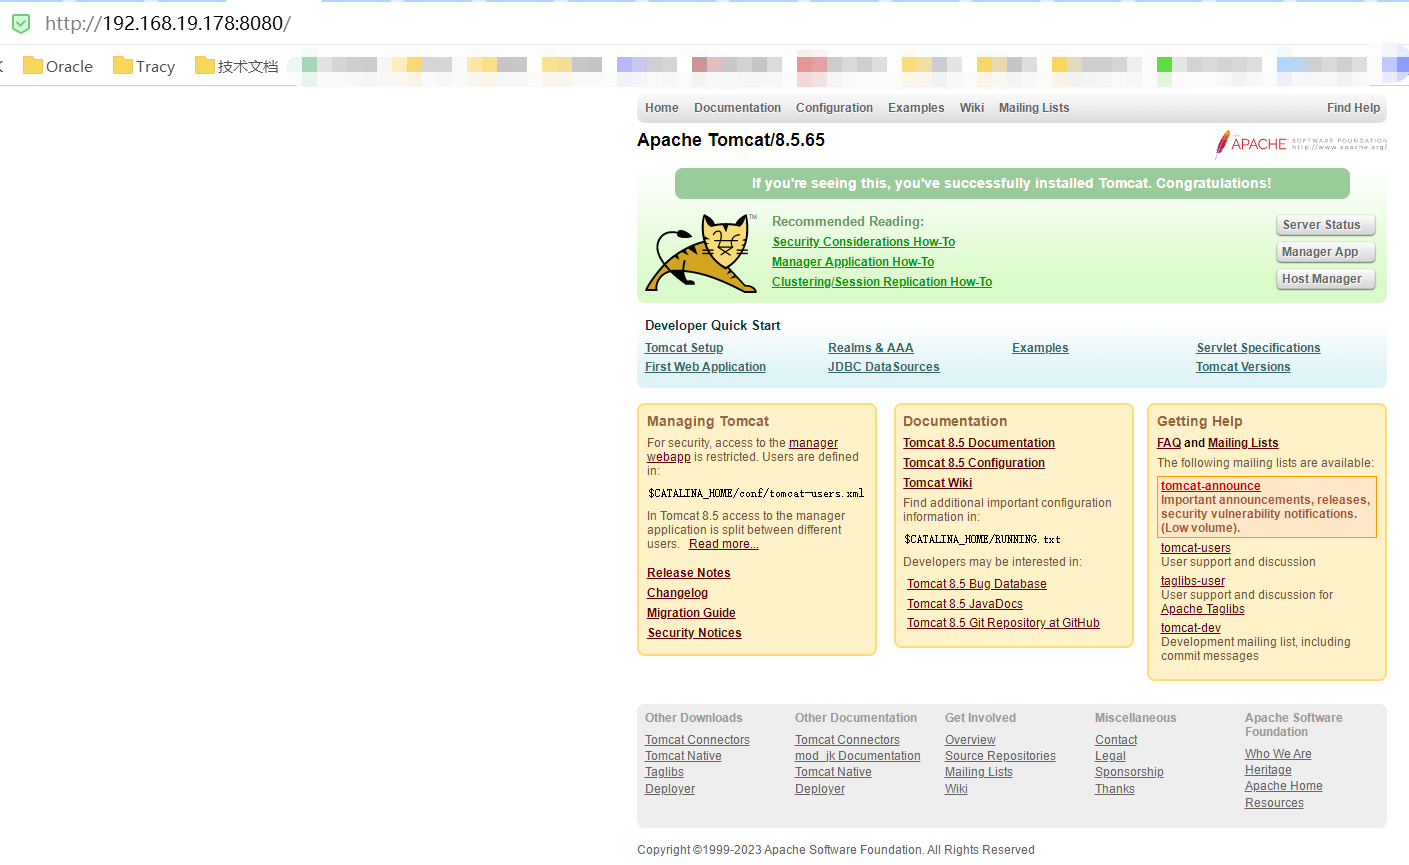
检测tomcat基础镜像是否正常
[root@jgharbor tomcat-base-8.5.65]# docker run -it -p 8080:8080 192.168.19.178/birkhoffxia/tomcat-centos-base:v8.5.65
[root@c45ad68e4f9f /]# chown www.www /apps/ -R
[root@c45ad68e4f9f /]# su - www -c "/apps/tomcat/bin/catalina.sh start"
Using CATALINA_BASE:   /apps/tomcat
Using CATALINA_HOME:   /apps/tomcat
Using CATALINA_TMPDIR: /apps/tomcat/temp
Using JRE_HOME:        /usr/local/jdk
Using CLASSPATH:       /apps/tomcat/bin/bootstrap.jar:/apps/tomcat/bin/tomcat-juli.jar
Using CATALINA_OPTS:
Tomcat started.
[root@c45ad68e4f9f /]# ss -nltp | grep 8080
LISTEN     0      100          *:8080                     *:*
五、业务 Tomcat-App1 镜像制作
[root@jgharbor tomcat-app1]# ll
total 32
-rwxrwxr-x. 1 root root   128 Feb 22 13:11 build-command.sh
-rw-rw-r--. 1 root root   352 Feb 22 13:11 Dockerfile
drwxrwxr-x. 2 root root    23 Feb 22 11:35 myapp
-rw-rw-r--. 1 root root 10240 Feb 22 11:41 myapp.tar.gz
-rwxrwxr-x. 1 root root    80 Apr 14  2021 run_tomcat.sh
-rw-rw-r--. 1 root root  7593 Apr 14  2021 server.xml
build-command.sh
#!/bin/bash
docker build -t 192.168.19.178/birkhoffxia/tomcat-xks:app1 .
docker push 192.168.19.178/birkhoffxia/tomcat-xks:app1
Dockerfile:
#Birkhoff tomcat app1
FROM 192.168.19.178/birkhoffxia/tomcat-centos-base:v8.5.65

LABEL maintainer="Birkhoff 807722920@qq.com"

ADD run_tomcat.sh /apps/tomcat/bin/run_tomcat.sh
ADD server.xml /apps/tomcat/conf/server.xml
ADD myapp.tar.gz /data/tomcat/webapps

RUN chown www.www /data /apps -R

EXPOSE 8080 8443

CMD ["/apps/tomcat/bin/run_tomcat.sh"]
myapp:目录下有个index.jsp文件
[root@jgharbor myapp]# cat index.jsp
<h1>You can see this is a Tomcat Web page [App1]</h1>
myapp.tar.gz:将上面的myapp目录进行打包 tar cf myapp.tar.gz. myapp
run_tomcat.sh:需要有执行权限 chmod a+x run_tomcat.sh 最后加入tail -f 表示让容器在前台可以有个输出
#!/bin/bash
su - www -c "/apps/tomcat/bin/catalina.sh start"
tail -f /etc/hosts
server.xml:tomcat 的 配置文件 使用docker cp 复制到本地进行修改 数据文件路径:/data/tomcat/webapps
    -->
    <!-- Define an SSL/TLS HTTP/1.1 Connector on port 8443 with HTTP/2
         This connector uses the APR/native implementation which always uses
         OpenSSL for TLS.
         Either JSSE or OpenSSL style configuration may be used. OpenSSL style
         configuration is used below.
    -->
    <!--
    <Connector port="8443" protocol="org.apache.coyote.http11.Http11AprProtocol"
               maxThreads="150" SSLEnabled="true" >
        <UpgradeProtocol className="org.apache.coyote.http2.Http2Protocol" />
        <SSLHostConfig>
            <Certificate certificateKeyFile="conf/localhost-rsa-key.pem"
                         certificateFile="conf/localhost-rsa-cert.pem"
                         certificateChainFile="conf/localhost-rsa-chain.pem"
                         type="RSA" />
        </SSLHostConfig>
    </Connector>
    -->

    <!-- Define an AJP 1.3 Connector on port 8009 -->
    <!--
    <Connector protocol="AJP/1.3"
               address="::1"
               port="8009"
               redirectPort="8443" />
    -->

    <!-- An Engine represents the entry point (within Catalina) that processes
         every request.  The Engine implementation for Tomcat stand alone
         analyzes the HTTP headers included with the request, and passes them
         on to the appropriate Host (virtual host).
         Documentation at /docs/config/engine.html -->

    <!-- You should set jvmRoute to support load-balancing via AJP ie :
    <Engine name="Catalina" defaultHost="localhost" jvmRoute="jvm1">
    -->
    <Engine name="Catalina" defaultHost="localhost">

      <!--For clustering, please take a look at documentation at:
          /docs/cluster-howto.html  (simple how to)
          /docs/config/cluster.html (reference documentation) -->
      <!--
      <Cluster className="org.apache.catalina.ha.tcp.SimpleTcpCluster"/>
      -->

      <!-- Use the LockOutRealm to prevent attempts to guess user passwords
           via a brute-force attack -->
      <Realm className="org.apache.catalina.realm.LockOutRealm">
        <!-- This Realm uses the UserDatabase configured in the global JNDI
             resources under the key "UserDatabase".  Any edits
             that are performed against this UserDatabase are immediately
             available for use by the Realm.  -->
        <Realm className="org.apache.catalina.realm.UserDatabaseRealm"
               resourceName="UserDatabase"/>
      </Realm>

      <Host name="localhost"  appBase="/data/tomcat/webapps"   unpackWARs="false" autoDeploy="false">

        <!-- SingleSignOn valve, share authentication between web applications
             Documentation at: /docs/config/valve.html -->
        <!--
        <Valve className="org.apache.catalina.authenticator.SingleSignOn" />
        -->

        <!-- Access log processes all example.
             Documentation at: /docs/config/valve.html
             Note: The pattern used is equivalent to using pattern="common" -->
        <Valve className="org.apache.catalina.valves.AccessLogValve" directory="logs"
               prefix="localhost_access_log" suffix=".txt"
               pattern="%h %l %u %t "%r" %s %b" />

      </Host>
    </Engine>
  </Service>
</Server>
[root@jgharbor tomcat-app1]# docker run -it --rm -p 8080:8080 192.168.19.178/birkhoffxia/tomcat-xks:app1
Using CATALINA_BASE:   /apps/tomcat
Using CATALINA_HOME:   /apps/tomcat
Using CATALINA_TMPDIR: /apps/tomcat/temp
Using JRE_HOME:        /usr/local/jdk
Using CLASSPATH:       /apps/tomcat/bin/bootstrap.jar:/apps/tomcat/bin/tomcat-juli.jar
Using CATALINA_OPTS:
Tomcat started.
127.0.0.1       localhost
::1     localhost ip6-localhost ip6-loopback
fe00::0 ip6-localnet
ff00::0 ip6-mcastprefix
ff02::1 ip6-allnodes
ff02::2 ip6-allrouters
172.17.0.2      27f3707cde62

六、业务 Tomcat-App2 镜像制作:复制上面tomcat-app1 代码
复制上面tomcat-app1 代码
myapp:目录下有个index.jsp文件
[root@jgharbor myapp]# cat index.jsp
<h1>You can see this is a Tomcat Web page [App1]</h1>
myapp.tar.gz:将上面的myapp目录进行打包 tar cf myapp.tar.gz. myapp
build-command.sh
#!/bin/bash
docker build -t 192.168.19.178/birkhoffxia/tomcat-xks:app2 .
docker push 192.168.19.178/birkhoffxia/tomcat-xks:app2
docker run -it --rm -p 8080:8080 192.168.19.178/birkhoffxia/tomcat-xks:app2

七、Docker-compose文件配置 Nginx => Tomcat app1 => Tomcat app2
version: '3.6'
services:
  nginx-service:
    image:  192.168.19.178/birkhoffxia/nginx-all-in-one:1.16.1
    #network_mode: bridge #网络1,使用docker安装后的默认网桥
    networks: #网络2,使用自定义的网络,如果网络不存在则会自动创建该网络并分配子网,并且容器会有两块网卡
      - front
      - backend
    container_name: nginx-web1
    volumes:
      - /root/birkhoffxia_dockercompose/nginx.conf:/apps/nginx/conf/nginx.conf
    expose:
      - 80
      - 443
    ports:
      - "9080:80"
      - "9443:443"
    links:
      - tomcat-service-app1
      - tomcat-service-app2

  tomcat-service-app1:
    image: 192.168.19.178/birkhoffxia/tomcat-xks:app1
    #network_mode: bridge
    networks: #网络2,使用自定义的网络,如果网络不存在则会自动创建该网络并分配子网,并且容器会有两块网卡
#      - front
      - backend
    container_name: tomcat-app1
    volumes:
      - /data/testapp:/data/tomcat/webapps/testapp:ro
    expose:
      - 8080
      - 8443
    ports:
      - "8080:8080"
      - "8443:8443"

  tomcat-service-app2:
    image: 192.168.19.178/birkhoffxia/tomcat-xks:app2
    #network_mode: bridge
    networks: #网络2,使用自定义的网络,如果网络不存在则会自动创建该网络并分配子网,并且容器会有两块网卡
#      - front
      - backend
    container_name: tomcat-app2
    volumes:
      - /data/testapp:/data/tomcat/webapps/testapp:ro
    expose:
      - 8080
      - 8443
    ports:
      - "8081:8080"
      - "8444:8443"

networks:
  front: #自定义前端服务网络
    driver: bridge
  backend:  #自定义后端服务的网络
    driver: bridge
  default: #使用已经存在的docker0默认172.17.0.1/16的网络
    external:
      name: bridge
Nginx配置:主要是 service名字 vim /root/birkhoffxia_dockercompose/nginx.conf
user nginx;
worker_processes  auto;

#error_log  logs/error.log;
#error_log  logs/error.log  notice;
#error_log  logs/error.log  info;

#pid        logs/nginx.pid;
#daemon off;

events {
    worker_connections  1024;
}


http {
    include       mime.types;
    default_type  application/octet-stream;

    #log_format  main  '$remote_addr - $remote_user [$time_local] "$request" '
    #                  '$status $body_bytes_sent "$http_referer" '
    #                  '"$http_user_agent" "$http_x_forwarded_for"';

    #access_log  logs/access.log  main;

    sendfile        on;
    #tcp_nopush     on;

    #keepalive_timeout  0;
    keepalive_timeout  65;

    #gzip  on;

    upstream web {
        server tomcat-service-app1:8080;
        server tomcat-service-app2:8080;
    }

    server {
        listen       80;
        server_name  localhost;

        #charset koi8-r;

        #access_log  logs/host.access.log  main;

        location / {
            root   /data/nginx/html;
            index  index.html index.htm;
        }
        location /myapp {
            proxy_pass http://web;
        }

        #error_page  404              /404.html;

        # redirect server error pages to the static page /50x.html
        #
        error_page   500 502 503 504  /50x.html;
        location = /50x.html {
            root   html;
        }
}
实现 访问 宿主机 9080 Nginx 可以转发给后台Tomcat App1、App2
八、Docker-compose文件配置Haproxy => Nginx => Tomcat app1 => Tomcat app2
Haproxy镜像制作
[root@jgharbor haproxy]# ll
total 2856
-rwxrwxr-x. 1 root root     128 Feb 22 16:10 build-command.sh
-rw-rw-r--. 1 root root     827 Feb 22 16:08 Dockerfile
-rw-rw-r--. 1 root root 2907128 Mar 24  2021 haproxy-2.2.11.tar.gz
-rw-rw-r--. 1 root root     596 Feb 22 16:22 haproxy.cfg
-rwxrwxr-x. 1 root root      88 Apr 14  2021 run_haproxy.sh
build-command.sh
#!/bin/bash
docker build -t 192.168.19.178/birkhoffxia/haproxy:v2.2.11 .
docker push 192.168.19.178/birkhoffxia/haproxy:v2.2.11
Dockerfile
#haproxy image
FROM 192.168.19.178/birkhoffxia/centos-base:7.8.2003

LABEL maintainer="Birkhoff 807722920@qq.com"

RUN yum install libtermcap-devel ncurses-devel libevent-devel readline-devel  gcc gcc-c++ glibc glibc-devel pcre pcre-devel openssl  openssl-devel systemd-devel net-tools vim iotop bc  zip unzip zlib-devel lrzsz tree screen lsof tcpdump wget ntpdate -y

ADD haproxy-2.2.11.tar.gz /usr/local/src

RUN cd /usr/local/src/haproxy-2.2.11 && make  ARCH=x86_64 TARGET=linux-glibc  USE_PCRE=1 USE_OPENSSL=1 USE_ZLIB=1  USE_SYSTEMD=1  USE_CPU_AFFINITY=1 PREFIX=/apps/haproxy && make install PREFIX=/apps/haproxy && cp haproxy  /usr/sbin/ && mkdir /apps/haproxy/run -p

ADD run_haproxy.sh /apps/haproxy/bin/run_haproxy.sh
ADD haproxy.cfg /etc/haproxy/haproxy.cfg

EXPOSE 80 9999

CMD ["/apps/haproxy/bin/run_haproxy.sh"]
haproxy.cfg:这里直接配置 nginx配置的 service的名字
global
chroot /apps/haproxy
#stats socket /var/lib/haproxy/haproxy.sock mode 600 level admin
uid 99
gid 99
daemon
nbproc 1
pidfile /apps/haproxy/run/haproxy.pid
log 127.0.0.1 local3 info

defaults
option http-keep-alive
option  forwardfor
mode http
timeout connect 300000ms
timeout client  300000ms
timeout server  300000ms

listen stats
 mode http
 bind 0.0.0.0:9999
 stats enable
 log global
 stats uri     /haproxy-status
 stats auth    haadmin:123456

listen  web_port
 bind 0.0.0.0:80
 mode http
 log global
 balance roundrobin
 server web1  nginx-service:80  check inter 3000 fall 2 rise 5
run_haproxy.sh: 需要 chmod a+x run_haproxy.sh
#!/bin/bash
/apps/haproxy/sbin/haproxy  -f /etc/haproxy/haproxy.cfg

tail -f /etc/hosts
执行./build-command.sh
Nginx配置:主要是 service名字 vim /root/birkhoffxia_dockercompose/nginx.conf
user nginx;
worker_processes  auto;

#error_log  logs/error.log;
#error_log  logs/error.log  notice;
#error_log  logs/error.log  info;

#pid        logs/nginx.pid;
#daemon off;

events {
    worker_connections  1024;
}


http {
    include       mime.types;
    default_type  application/octet-stream;

    #log_format  main  '$remote_addr - $remote_user [$time_local] "$request" '
    #                  '$status $body_bytes_sent "$http_referer" '
    #                  '"$http_user_agent" "$http_x_forwarded_for"';

    #access_log  logs/access.log  main;

    sendfile        on;
    #tcp_nopush     on;

    #keepalive_timeout  0;
    keepalive_timeout  65;

    #gzip  on;

    upstream web {
        server tomcat-service-app1:8080;
        server tomcat-service-app2:8080;
    }

    server {
        listen       80;
        server_name  localhost;

        #charset koi8-r;

        #access_log  logs/host.access.log  main;

        location / {
            root   /data/nginx/html;
            index  index.html index.htm;
        }
        location /myapp {
            proxy_pass http://web;
        }

        #error_page  404              /404.html;

        # redirect server error pages to the static page /50x.html
        #
        error_page   500 502 503 504  /50x.html;
        location = /50x.html {
            root   html;
        }
}
编辑docker-compose.yml
version: '3.6'
services:
  haproxy-service:
    image:  192.168.19.178/birkhoffxia/haproxy:v2.2.11
    #network_mode: bridge #网络1,使用docker安装后的默认网桥
    networks: #网络2,使用自定义的网络,如果网络不存在则会自动创建该网络并分配子网,并且容器会有两块网卡
      #- front
      - backend
    container_name: haproxy-xks
    expose:
      - 80
      - 443
      - 9999
    ports:
      - "9080:80"
      - "443:443"
      - "9999:9999"
    links:
      - nginx-service

  nginx-service:
    image:  192.168.19.178/birkhoffxia/nginx-all-in-one:1.16.1
    #network_mode: bridge #网络1,使用docker安装后的默认网桥
    networks: #网络2,使用自定义的网络,如果网络不存在则会自动创建该网络并分配子网,并且容器会有两块网卡
      - front
      - backend
    container_name: nginx-web1
    volumes:
      - /root/birkhoffxia_dockercompose/nginx.conf:/apps/nginx/conf/nginx.conf
    #expose:
    #  - 80
    #  - 443
   # ports:
    #  - "9080:80"
    #  - "9443:443"
    links:
      - tomcat-service-app1
      - tomcat-service-app2

  tomcat-service-app1:
    image: 192.168.19.178/birkhoffxia/tomcat-xks:app1
    #network_mode: bridge
    networks: #网络2,使用自定义的网络,如果网络不存在则会自动创建该网络并分配子网,并且容器会有两块网卡
#      - front
      - backend
    container_name: tomcat-app1
    volumes:
      - /data/testapp:/data/tomcat/webapps/testapp:ro
    expose:
      - 8080
      - 8443
    ports:
      - "8080:8080"
      - "8443:8443"

  tomcat-service-app2:
    image: 192.168.19.178/birkhoffxia/tomcat-xks:app2
    #network_mode: bridge
    networks: #网络2,使用自定义的网络,如果网络不存在则会自动创建该网络并分配子网,并且容器会有两块网卡
#      - front
      - backend
    container_name: tomcat-app2
    volumes:
      - /data/testapp:/data/tomcat/webapps/testapp:ro
    expose:
      - 8080
      - 8443
    ports:
      - "8081:8080"
      - "8444:8443"
networks:
front: #自定义前端服务网络
driver: bridge
backend: #自定义后端服务的网络
driver: bridge
default: #使用已经存在的docker0默认172.17.0.1/16的网络
external:
name: bridge
docker-compose down && docker-compose up -d
检查端口是否开启
[root@jgharbor birkhoffxia_dockercompose]# docker ps
CONTAINER ID        IMAGE                                                COMMAND                  CREATED             STATUS                 PORTS                                                                NAMES
4587f44f8344        192.168.19.178/birkhoffxia/haproxy:v2.2.11           "/apps/haproxy/bin/r…"   26 minutes ago      Up 26 minutes          0.0.0.0:443->443/tcp, 0.0.0.0:9999->9999/tcp, 0.0.0.0:9080->80/tcp   haproxy-xks
21997c1ad590        192.168.19.178/birkhoffxia/nginx-all-in-one:1.16.1   "/apps/nginx/sbin/ng…"   26 minutes ago      Up 26 minutes          80/tcp, 443/tcp                                                      nginx-web1
b21b130bf1b7        192.168.19.178/birkhoffxia/tomcat-xks:app1           "/apps/tomcat/bin/ru…"   26 minutes ago      Up 26 minutes          0.0.0.0:8080->8080/tcp, 0.0.0.0:8443->8443/tcp                       tomcat-app1
f1adb13ef295        192.168.19.178/birkhoffxia/tomcat-xks:app2           "/apps/tomcat/bin/ru…"   26 minutes ago      Up 26 minutes          0.0.0.0:8081->8080/tcp, 0.0.0.0:8444->8443/tcp                       tomcat-app2
[root@jgharbor birkhoffxia_dockercompose]# docker exec -it 4587f44f8344 bash
[root@4587f44f8344 /]# ss -tnl
State Recv-Q Send-Q Local Address:Port Peer Address:Port
LISTEN 0 128 *:9999 *:*
LISTEN 0 128 *:80 *:*
LISTEN 0 128 127.0.0.11:34659 *:*
访问地址:http://192.168.19.178:9999/haproxy-status 账户密码:haadmin/123456

访问http://192.168.19.178:9080/myapp/ 此时的9080 指向的是 Haproxy的端口地址


此时的Haproxy 有调用的记录

 浙公网安备 33010602011771号