
[python] 网络数据采集 操作清单 BeautifulSoup、Selenium、Tesseract、CSV等
Python网络数据采集操作清单
BeautifulSoup、Selenium、Tesseract、CSV等
常用正则表达式清单
常用正则表达式符号
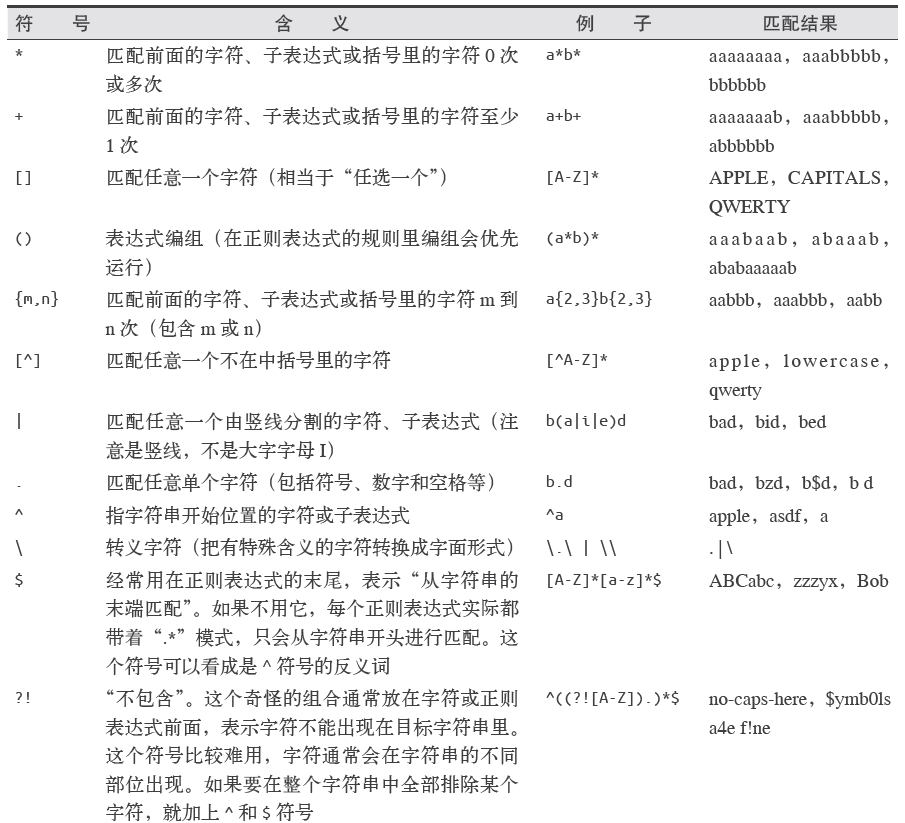
电子邮箱
[A-Za-z0-9\._+]+@[A-Za-z]+\.(com|org|edu|net)
找出所有以”/”开头的链接
    for link in bsObj.findAll("a", href=re.compile("^(/|.*"+includeUrl+")")):
        if link.attrs['href'] is not None:
            if link.attrs['href'] not in internalLinks:
                internalLinks.append(link.attrs['href'])
    return internalLinks
所有以”http”或”www”开头且不包含当前URL的链接
    for link in bsObj.findAll("a",
                              href = re.compile("^(http|www)((?!"+excludeUrl+").)*$")):
        if link.attrs['href'] is not None:
            if link.attrs['href'] not in externalLinks:
                externalLinks.append(link.attrs['href'])
    return externalLinks
查找
.get_text()
会把正在处理的HTML文档中所有的超链接、段落、标签都清楚并返回只包含文字的字符串
.findAll(tag, attributes, recursive, text, limit, keywords)
标签参数tag 前面已经介绍过——你可以传一个标签的名称或多个标签名称组成的Python
列表做标签参数。例如,下面的代码将返回一个包含HTML 文档中所有标题标签的列表:1
.findAll({“h1”,”h2”,”h3”,”h4”,”h5”,”h6”})属性参数attributes 是用一个Python 字典封装一个标签的若干属性和对应的属性值。例如,下面这个函数会返回HTML文档里红色与绿色两种颜色的span 标签:
.findAll(“span”, {“class”:{“green”, “red”}})递归参数recursive 是一个布尔变量。你想抓取HTML文档标签结构里多少层的信息?如果recursive 设置为True,findAll就会根据你的要求去查找标签参数的所有子标签,以及子标签的子标签。如果recursive设置为False,findAll就只查找文档的一级标签。findAll默认是支持递归查找的(recursive默认值是True);一般情况下这个参数不需要设置,除非你真正了解自己需要哪些信息,而且抓取速度非常重要,那时你可以设置递归参数。
文本参数text有点不同,它是用标签的文本内容去匹配,而不是用标签的属性。假如我们想查找前面网页中包含“theprince”内容的标签数量,我们可以把之前的findAll 方法换
成下面的代码:
nameList = bsObj.findAll(text=”the prince”)
print(len(nameList))
输出结果为“7”。范围限制参数limit,显然只用于findAll 方法。find 其实等价于findAll 的limit等于1时的情形。如果你只对网页中获取的前x 项结果感兴趣,就可以设置它。但是要注意,这个参数设置之后,获得的前几项结果是按照网页上的顺序排序的,未必是你想要的那前几项。
还有一个关键词参数keyword,可以让你选择那些具有指定属性的标签。例如:
allText = bsObj.findAll(id=”text”)
print(allText[0].get_text())
通过标签参数tag把标签列表传到.findAll() 里获取一列标签,实就是一个“或”关系的过滤器(即选择所有带标签1或标签2或标签3……的一列标签)。如果你的标签列表很长,就需要花很长时间才能写完。而关键词参数keyword 可以让你增加一个“与”关系的过滤器来简化工作。
.find(tag, attributes, recursive, text, keywords)
同上
导航树
.children
如果你只想找出子标签,可以用.children 标签:
from urllib.request import urlopen
from bs4 import BeautifulSoup
html = urlopen("http://www.pythonscraping.com/pages/page3.html")
bsObj = BeautifulSoup(html)
for child in bsObj.find("table",{"id":"giftList"}).children:
    print(child)
.next_siblings
BeautifulSoup 的next_siblings() 函数可以让收集表格数据成为简单的事情,尤其是处理带标题行的表格:
from urllib.request import urlopen
from bs4 import BeautifulSoup
html = urlopen("http://www.pythonscraping.com/pages/page3.html")
bsObj = BeautifulSoup(html)
for sibling in bsObj.find("table",{"id":"giftList"}).tr.next_siblings:
    print(sibling)
任何时候你获取一个标签的兄弟标签,都不会包含这个标签本身。其次,这个函数只调用后面的兄弟标签。
.previous_sibling
如果你很容易找到一组兄弟标签中的最后一个标签, 那么previous_siblings 函数也会很有用。
当然,还有next_sibling和previous_sibling 函数,与next_siblings 和previous_siblings的作用类似,只是它们返回的是单个标签,而不是一组标签。
.parent和.parents
from urllib.request import urlopen
from bs4 import BeautifulSoup
html = urlopen("http://www.pythonscraping.com/pages/page3.html")
bsObj = BeautifulSoup(html)
print(bsObj.find("img",{"src":"../img/gifts/img1.jpg"
}).parent.previous_sibling.get_text())
获取属性
.attrs
对于一个标签对象,可以用下面的代码获取它的全部属性:
myTag.attrs
要注意这行代码返回的是一个Python 字典对象,可以获取和操作这些属性。比如要获取图
片的资源位置src,可以用下面这行代码:
myImgTag.attrs["src"]
Lambda表达式
BeautifulSoup允许我们把特定函数类型当作findAll 函数的参数。唯一的限制条件是这些函数必须把一个标签作为参数且返回结果是布尔类型。BeautifulSoup用这个函数来评估它遇到的每个标签对象,最后把评估结果为“真”的标签保留,把其他标签剔除。
例如,下面的代码就是获取有两个属性的标签:
soup.findAll(lambda tag: len(tag.attrs) == 2)这行代码会找出下面的标签:
<div class="body" id="content"></div>

<span style="color:red" class="title"></span>
如果你愿意多写一点儿代码,那么在BeautifulSoup 里用Lambda表达式选择标签,将是正则表达式的完美替代方案。
获取资源
urllib.request.urlretrieve
可以根据文件的URL下载文件:
from urllib.request import urlretrieve
from urllib.request import urlopen
from bs4 import BeautifulSoup

html = urlopen("http://www.pythonscraping.com")
bsObj = BeautifulSoup(html)
imageLocation = bsObj.find("a",{"id":"logo"}).find("img")["src"]
urlretrieve(imageLocation, "logo.jpg")
清洗下载地址并计算保存路径
import os
from urllib.request import urlretrieve
from urllib.request import urlopen
from bs4 import BeautifulSoup

downloadDirectory = "downloaded"
baseUrl = "http://pythonscraping.com"

def getAbsoluteURL(baseUrl, source):
    if source.startswith("http://www."):
        url = "http://"+source[11:]
    elif source.startswith("http://"):
        url = source
    elif source.startswith("www."):
        url = "http://"+source[4:]
    else:
        url = baseUrl+"/"+source
    if baseUrl not in url:
        return None
    return url

def getDownloadPath(baseUrl, absoluteUrl, downloadDirectory):
    path = absoluteUrl.replace("www.","")
    path = path.replace(baseUrl, "")
    path = downloadDirectory+path
    directory = os.path.dirname(path)

    if not os.path.exists(directory):
        os.makedirs(directory)

    return path

html = urlopen("http://www.pythonscraping.com")
bsObj = BeautifulSoup(html)
downloadList = bsObj.findAll(src=True)

for download in downloadList:
    fileUrl = getAbsoluteURL(baseUrl, download["src"])
    if fileUrl is not None:
        print(fileUrl)

urlretrieve(fileUrl, getDownloadPath(baseUrl, fileUrl, downloadDirectory))
用CSV保存表格
import csv
from urllib.request import urlopen
from bs4 import BeautifulSoup

html = urlopen("http://en.wikipedia.org/wiki/Comparison_of_text_editors")
bsObj = BeautifulSoup(html, "html.parser")
#The main comparison table is currently the first table on the page
table = bsObj.findAll("table",{"class":"wikitable"})[0]
rows = table.findAll("tr")

csvFile = open("files/editors.csv", 'wt', newline='', encoding='utf-8')
writer = csv.writer(csvFile)
try:
    for row in rows:
        csvRow = []
        for cell in row.findAll(['td', 'th']):
            csvRow.append(cell.get_text())
        writer.writerow(csvRow)
finally:
    csvFile.close()
PyMySQL
要让PyMySQL连上MySQL的话,默认情况下得用到sock文件,
unix_socket='/var/run/mysqld/mysqld.sock'
否则要到
/etc/mysql/mysql.conf.d中修改mysqld.cnf文件,将
bind-address = 127.0.0.1注释掉,这时候就不用sock登录MySQL了。
import pymysql
coon = pymysql.connect(host='127.0.0.1',
                       user='root',
                       passwd='gmf1230132',
                       db='mysql',
                       charset='utf8')
cur = coon.cursor()
cur.execute("USE scraping")

cur.execute("SELECT * FROM pages WHERE id =1")
print(cur.fetchone())
cur.close()
coon.close()
让数据库支持Unicode
ALTER DATABASE scraping CHARACTER SET = utf8mb4 COLLATE = utf8mb4_unicode_ci;
ALTER TABLE pages CONVERT TO CHARACTER SET utf8mb4 COLLATE utf8mb4_unicode_ci;
ALTER TABLE pages CHANGE title title VARCHAR(200) CHARACTER SET utf8mb4 COLLATE utf8mb4_unicode_ci;
ALTER TABLE pages CHANGE content content VARCHAR(10000) CHARACTER SET utf8mb4 COLLATE utf8mb4_unicode_ci;
用函数存储数据
def store(title, content):
    cur.execute("INSERT INTO pages (title, content) VALUES (\"%s\", \"%s\")", (title, content))
    cur.connection.commit()
CSV
StringIO(data)和csv.reader(dataFile)
由于CSV库主要是面向本地文件,就是说CSV文件得存储在电脑上,而进行网络数据采集的时候,很多文件都是在线的。所以从网上直接把文件读成一个字符串,然后转换成StringIO对象,使它具有文件的属性:
from urllib.request import urlopen
from io import StringIO
import csv

data = urlopen("http://pythonscraping.com/files/MontyPythonAlbums.csv").read().decode('ascii','ignore')
dataFile = StringIO(data)
csvReader = csv.reader(dataFile)

for row in csvReader:
    print(row)
csv.DictReader(dataFile)
会返回把CSV文件每一行转换成Python的字典对象返回,而不是列表对象,并保存在dictReader.fieldnames里,
from urllib.request import urlopen
from io import StringIO
import csv

data = urlopen("http://pythonscraping.com/files/MontyPythonAlbums.csv").read().decode('ascii','ignore')
dataFile = StringIO(data)
dictReader = csv.DictReader(dataFile)

print(dictReader.fieldnames)

for row in dictReader:
    print(row)
输出:
['Name', 'Year']
{'Name': "Monty Python's Flying Circus", 'Year': '1970'}
{'Name': 'Another Monty Python Record', 'Year': '1971'}
{'Name': "Monty Python's Previous Record", 'Year': '1972'}
PDF格式与PDFMiner3K
from urllib.request import urlopen
from pdfminer.pdfinterp import PDFResourceManager, process_pdf
from pdfminer.converter import TextConverter
from pdfminer.layout import LAParams
from io import StringIO
from io import open

#下面的例子可以把任意 PDF 读成字符串,然后用 StringIO 转换成文件对象:
def readPDF(pdfFile):
    rsrcmgr = PDFResourceManager()
    retstr = StringIO()
    laparms = LAParams()
    device = TextConverter(rsrcmgr, retstr, laparams=laparms)

    process_pdf(rsrcmgr, device, pdfFile)
    device.close()

    content = retstr.getvalue()
    retstr.close()
    return content

pdfFile = urlopen("http://pythonscraping.com/pages/warandpeace/chapter1.pdf")
outputString = readPDF(pdfFile)
print(outputString)
pdfFile.close()
DOCX格式
from zipfile import ZipFile
from urllib.request import urlopen
from io import BytesIO
from bs4 import BeautifulSoup

wordFile = urlopen("http://pythonscraping.com/pages/AWordDocument.docx").read()
wordFile = BytesIO(wordFile)
document = ZipFile(wordFile)
xml_content = document.read('word/document.xml')

wordObj = BeautifulSoup(xml_content.decode('utf-8'),'lxml')
textStrings = wordObj.findAll("w:t")
for textElem in textStrings:
    closeTag = ""
    try:
        style = textElem.parent.previousSibling.find("w:pstyle")
        if style is not None and style["w:val"] == "Title":
            print("<h1>")
            closeTag = "</h1>"
    except AttributeError:
        pass
    print(textElem.text)
    print(closeTag)
数据清洗
n-gram
在语言学里有一个模型叫n-gram,表示文字或语言中的n个连续的单词组成的序列。在进行自然语言分析时,使用n-gram或者寻找常用词组,可以很容易地把一句话分解成若干个文字片段。
def cleanInput(input):
    input = re.sub('\n+', " ",input)
    input = re.sub('\[[0-9]*\]',"",input)
    input = re.sub(' +'," ",input)
    input = bytes(input, "UTF-8")
    input = input.decode("ascii", "ignore")
    cleanInput = []
    input = input.split(' ')
    for item in input:
        #string.punctuation获取Python所有的标点符号,单词两端的任何标点符号都会被去掉
        item = item.strip(string.punctuation)
        if len(item) > 1 or (item.lower() == 'a' or item.lower() =='i'):
            cleanInput.append(item)
    return cleanInput

def ngrams(input, n):
    input = cleanInput(input)
    output=[]
    for i in range(len(input)-n+1):
        output.append(input[i:i+n])
    return output
OpenRefine
安装时要export JAVA_HOME=/usr/才可以运行./refine
用GREL清洗数据:(在Edit cells→transform里)
if(value.length() != 4, "invalid", value)
OpenRefine 还有许多关于单元格编辑和 GERL 数据变换的方法。详细介绍在 OpenRefine
的 GitHub 页面。
自然语言处理
grams简单的数据清理和化成2-grams
(可以直接from nltk import ngrams,通过使用ngrams(text,n)函数来生成ngrams)
def cleanInput(input):
    input = re.sub('\n+'," ",input).lower()
    input = re.sub('\[[0-9]*\]', "", input)
    input = re.sub(' +', " ", input)
    #input = input.decode("ascii", "ignore")
    cleanInput = []
    input = input.split(' ')
    for item in input:
        item = item.strip(string.punctuation)
        if len(item) > 1 or (item.lower() == 'a' or item.lower() == 'i'):
            cleanInput.append(item)
    return cleanInput


def ngrams(input, n):
    input = cleanInput(input)
    output = {}
    for i in range(len(input)-n+1):
        ngramTemp = " ".join(input[i:i+n])
        if ngramTemp not in output:
            output[ngramTemp] = 0
        output[ngramTemp]+=1
    return output
马尔可夫链
from urllib.request import urlopen
from random import randint

def wordListSum(wordList):
    sum = 0
    for word, value in wordList.items():
        sum += value
    return sum

def retrieveRandomWord(wordList):

    randIndex = randint(1, wordListSum(wordList))
    for word, value in wordList.items():
        randIndex -= value
        if randIndex <=0:
            return word

def buildWordDict(text):
    #剔除换行符和引号
    text = text.replace("\n", " ")
    text = text.replace("\"","")

    #保证每个标点符号都和前面的单词在一起
    #这样不会被剔除,保留在马尔可夫链中
    punctuation = [',','.',';',':']
    for symbol in punctuation:
        text = text.replace(symbol, " "+symbol+" ")

    words = text.split(" ")
    #过滤空单词
    words = [word for word in words if word != ""]

    wordDict = {}
    for i in range(1,len(words)):
        if words[i-1] not in wordDict:
            wordDict[words[i-1]]={}
        if words[i] not in wordDict[words[i-1]]:
            wordDict[words[i-1]][words[i]] = 0
        wordDict[words[i-1]][words[i]] = wordDict[words[i-1]][words[i]] + 1

    return wordDict

text = str(urlopen("http://pythonscraping.com/files/inaugurationSpeech.txt").read(), 'utf-8')
wordDict = buildWordDict(text)

#生成链长位100的马尔可夫链
length = 100
chain =""
currentWord = "I"
for i in range(0,length):
    chain += currentWord+" "
    currentWord = retrieveRandomWord(wordDict[currentWord])

print(chain)
buildWordDict 函数把网上获取的演讲文本的字符串作为参数,然后对字符串做一些清理和格式化处理,去掉引号,把其他标点符号两端加上空格,这样就可以对每一个单词进行有效的处理。最后,再建立如下所示的一个二维字典——字典里有字典:
{word_a : {word_b : 2, word_c : 1, word_d : 1},
word_e : {word_b : 5, word_d : 2},…}
如果我们要画出这个结果的节点模型,那么“word_a”可能就有带 50% 概率的箭头指向“word_b”(四次中的两次),带25%概率的箭头指向“word_c”,还有带 25% 概率的箭头指向“word_d”。
一旦字典建成,不管你现在看到了文章的哪个词,都可以用这个字典作为查询表来选择下一个节点。这个字典的字典是这么使用的,如果我们现在位于“word_e”节点,那么下一步就要把字典 {word_b : 5, word_d : 2}传递到retrieveRandomWord函数。这个函数会按照字典中单词频次的权重随机获取一个单词。
广度优先搜索
class SolutionFound(RuntimeError):
    def __init__(self, message):
        self.message = message

def getLinks(fromPageId):
    cur.execute("SELECT toPageId FROM links WHERE fromPageId = %s", (fromPageId))
    if cur.rowcount == 0:
        return None
    else:
        return [x[0] for x in cur.fetchall()]

def constructDict(currentPageId):
    links = getLinks(currentPageId)
    if links:
        return dict(zip(links, [{}]*len(links)))
    return {}

#链接要么位空,要么包含多个链接
def searchDepth(targetPageId, currentPageId, linkTree, depth):
    if depth == 0:
        return linkTree
    if not linkTree:
        linkTree = constructDict(currentPageId)
        if not linkTree:
            return {}
    if targetPageId in linkTree.keys():
        print("TARGET "+str(targetPageId)+" FOUND!")
        raise SolutionFound("PAGE: "+str(currentPageId))

    for branchKey, branchValue in linkTree.items():
        try:
            # 递归建立链接树
            linkTree[branchKey] = searchDepth(targetPageId, branchKey, branchValue, depth-1)
        except SolutionFound as e:
            print(e.message)
            raise SolutionFound("PAGE: "+str(currentPageId))
    return linkTree

try:
    searchDepth(134951, 1, {}, 4)
    print("No solution found")
except SolutionFound as e:
    print(e.message)
穿越网页表单与登录窗口进行采集
在Python中用Selenium执行JavaScript与Selenium的选择器说明
Selenium 可以让浏览器自动加载页面,获取需要的数据,甚至页面截屏,或者判断网站上某些动作是否发生。
PhantomJS 是一个“无头”(headless)浏览器。它会把网站加载到内存并执行页面上的JavaScript,但是它不会向用户展示网页的图形界面。把Selenium 和PhantomJS结合在一起,就可以运行一个非常强大的网络爬虫了,可以处理cookie、JavaScrip、header,以及任何你需要做的事情。
from selenium import webdriver
import time

#注意设置路径的时候要先把路径带r赋值给一个变量再使用
phantomjs_path = r"D:\Library\PythonScrapy\phantomjs-2.1.1-windows\bin\phantomjs.exe"
driver = webdriver.PhantomJS(
    executable_path=phantomjs_path)
driver.get("http://pythonscraping.com/pages/javascript/ajaxDemo.html")
time.sleep(3)
print(driver.find_element_by_id('content').text)
driver.close()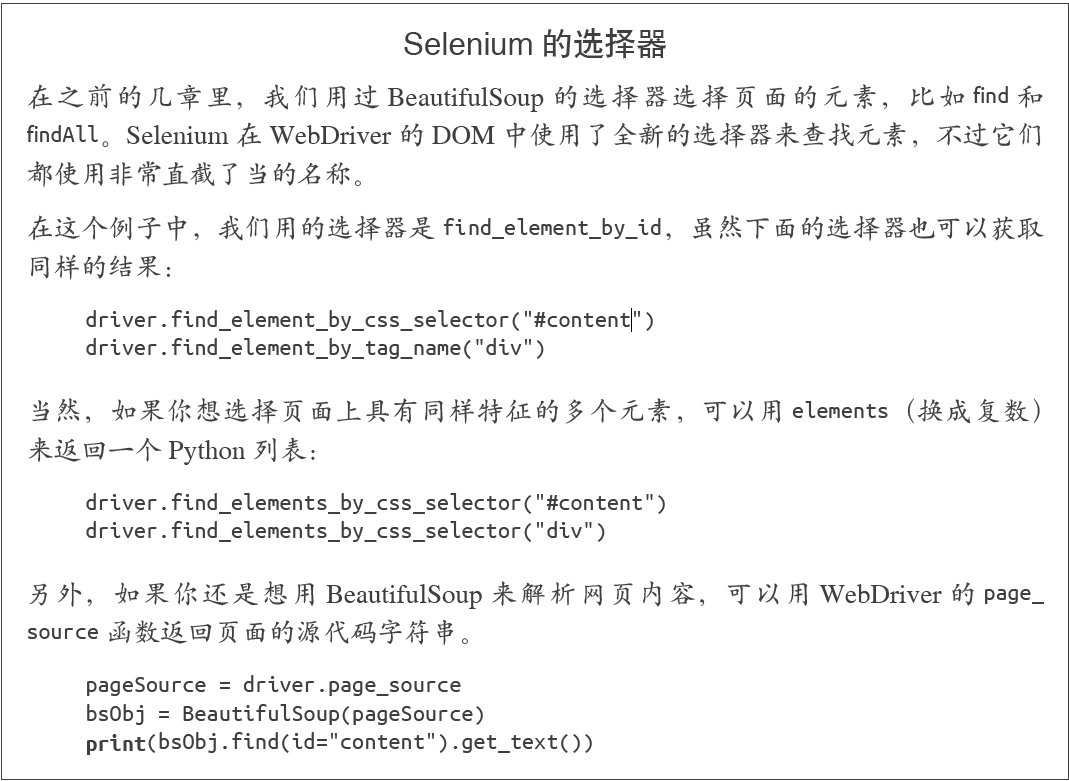
Selenium的隐式等待
from selenium import webdriver
from selenium.webdriver.common.by import By
from selenium.webdriver.support.ui import WebDriverWait
from selenium.webdriver.support import expected_conditions as EC

phantomjs_path = r"D:\Library\PythonScrapy\phantomjs-2.1.1-windows\bin\phantomjs.exe"
driver = webdriver.PhantomJS(
    executable_path=phantomjs_path)
driver.get("http://pythonscraping.com/pages/javascript/ajaxDemo.html")
#WebDriverWait和expected_conditions两个模块组合起来构成了Selenium的隐式等待
try:
    element = WebDriverWait(driver, 10).until(
        EC.presence_of_all_elements_located((By.ID, "loadedButton")))

finally:
    print(driver.find_element_by_id("content").text)
    driver.close()
隐式等待与显式等待的不同之处在于,隐式等待是等DOM 中某个状态发生后再继续运行代码(没有明确的等待时间,但是有最大等待时限,只要在时限内就可以),而显式等待明确设置了等待时间,如前面例子的等待三秒钟。在隐式等待中,DOM 触发的状态是用expected_conditions定义的(这里导入后用了别名EC,是经常使用的简称)。在Selenium库里面元素被触发的期望条件(expected condition)有很多种,包括:
• 弹出一个提示框
• 一个元素被选中(比如文本框)
• 页面的标题改变了,或者某个文字显示在页面上或者某个元素里
• 一个元素在DOM 中变成可见的,或者一个元素从DOM 中消失了
如果你可以不用定位器,就不要用,毕竟这样可以少导入一个模块。但是,定位器是一种十分方便的工具,可以用在不同的应用中,并且具有很好的灵活性。
下面是定位器通过By 对象进行选择的策略。
• ID
在上面的例子里用过;通过HTML 的id 属性查找元素。
• CLASS_NAME
通过HTML的class属性来查找元素。为什么这个函数是CLASS_NAME,而不是简单的CLASS?在Selenium 的Java 库里使用object.CLASS可能会出现问题,.class是Java保留的一个方法。为了让Selenium 语法可以兼容不同的语言,就用CLASS_NAME 代替。
• CSS_SELECTOR
通过CSS 的class、id、tag 属性名来查找元素,用#idName、.className、tagName表示。
• LINK_TEXT
通过链接文字查找HTML 的标签。例如,如果一个链接的文字是“Next”,就可以用(By.LINK_TEXT, “Next”) 来选择。
• PARTIAL_LINK_TEXT
与LINK_TEXT 类似,只是通过部分链接文字来查找。
• NAME
通过HTML 标签的name 属性查找。这在处理HTML 表单时非常方便。
• TAG_NAME
通过HTML 标签的名称查找。
• XPATH
用XPath 表达式(语法在下面介绍)选择匹配的元素。
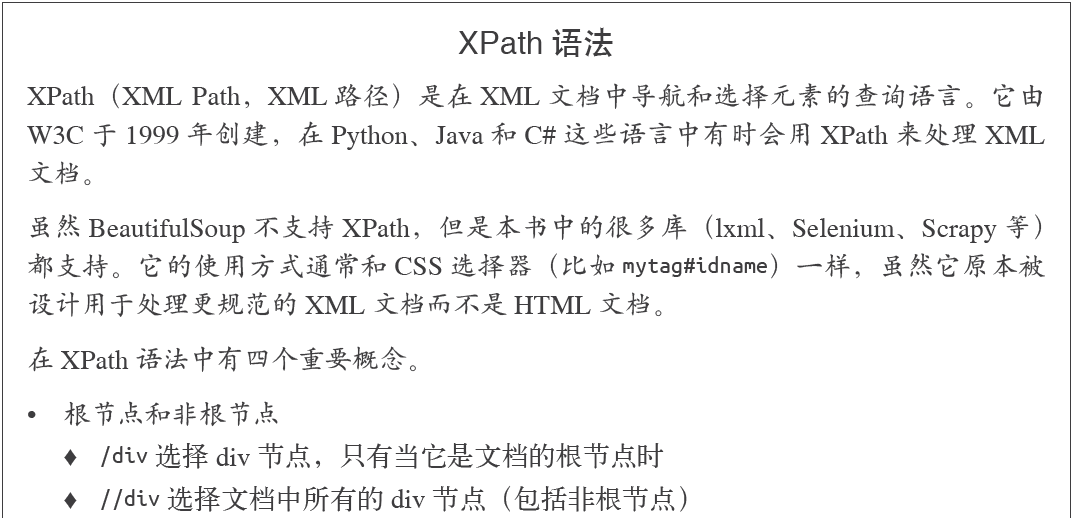

XPATH入门说明
使用正则表达式处理XPATH采集标签
page = driver.find_elements_by_xpath(
        '//tbody[starts-with(@id,"normalthread_")]')
处理重定向
我们可以用一种智能的方法来检测客户端重定向是否完成,首先从页面开始加载时就“监视”DOM 中的一个元素, 然后重复调用这个元素直到Selenium抛出一个StaleElementReferenceException 异常;也就是说,元素不在页面的DOM 里了,说明这时网站已经跳转:
from selenium import webdriver
import time
from selenium.webdriver.remote.webelement import WebElement
from selenium.common.exceptions import StaleElementReferenceException


def waitForLoad(driver):
    elem = driver.find_element_by_tag_name("html")
    count = 0
    while True:
        count += 1
        # 检测该driver十秒钟,当检测不到html标签时抛出异常
        if count > 20:
            print("Timing out after 10 seconds and returning")
            return
        time.sleep(.5)
        # 每隔半秒钟检查一次html标签还在不在,时限为10秒钟,不在的时候会抛出异常,然后结束函数
        try:
            elem == driver.find_element_by_tag_name("html")
        except StaleElementReferenceException:
            return


phantomjs_path = r"D:\Library\PythonScrapy\phantomjs-2.1.1-windows\bin\phantomjs.exe"
driver = webdriver.PhantomJS(executable_path=phantomjs_path)
driver.get("http://pythoncraping.com/pages//javascript/redirectDemo1.html")
waitForLoad(driver)
print(driver.page_source)

#输出结果
Timing out after 10 seconds and returning
<html><head></head><body></body></html>
图像识别与文字处理
Pillow(PIL)
from PIL import Image, ImageFilter

pic = Image.open("avatar.jpg")
blurryAvatar = pic.filter(ImageFilter.GaussianBlur)
blurryAvatar.save("avatar_blurred.jpg")
blurryAvatar.show()
Tesseract
Tesseract 是一个Python的命令行工具,安装之后,要用tesseract命令在Python的外面运行。
中文库也在github中,名字为chi_sim,放到tesseract-ocr安装目录下的tessdata 目录。
需要添加环境变量到PATH: C:\Program Files (x86)\Tesseract-OCR
和TESSDATA_PREFIX:C:\Program Files (x86)\Tesseract-OCR
$tesseract text.tif textoutput
使用pillow过滤掉渐变的背景色,调用命令行执行tesseract(subprocess)
from PIL import Image
import subprocess


def cleanFile(filePath, newFilePath):
    image = Image.open(filePath)
    %常见的过滤方式,将图片处理成高对比度图片
    image = image.point(lambda x: 0 if x < 143 else 255)
    image.save(newFilePath)

    subprocess.call(["tesseract", newFilePath, "output"])

    outputFile = open("output.txt", 'r')
    print(outputFile.read())
    outputFile.close()


cleanFile("text_2.jpg", "text_2_clean.png")

运行结果:
>> & python d:/Library/PythonScrapy/pillowtest.py
Tesseract Open Source OCR Engine v4.00.00alpha with Leptonica
Warning. Invalid resolution 0 dpi. Using 70 instead.
This is some text. written in Arial, that will be read by
Tesseract Here are some symbols: !@#$%"&*()
使用Tesseract爬取ajax图片并进行分析(代码不可用,amazon标签已修改)
import time
from urllib.request import urlretrieve
import subprocess
from selenium import webdriver

phantomjs_path = r"D:\Library\PythonScrapy\phantomjs-2.1.1-windows\bin\phantomjs.exe"
driver = webdriver.PhantomJS(executable_path=phantomjs_path)

driver.get("http://www.amazon.com/War-Peace-Leo-Nikolayevich-Tolstoy/dp/1427030200")
time.sleep(2)
# 单机图书预览按钮
driver.find_element_by_id("sitbLogoImg").click()
imageList = set()

# 等待页面加载完成
time.sleep(5)
# 当向右箭头可以点击时,开始翻页
while "pointer" in driver.find_element_by_id("sitbReaderRightPageTurner").get_attribute("style"):
    driver.find_element_by_id("sitbReaderRightPageTurner").click()
    time.sleep(2)
    # 获取已加载的新页面(一次可以加载多个页面,但是重复的页面不能加载到集合中)
    pages = driver.find_elements_by_xpath("//div[@class='pageImage']/div/img")
    for page in pages:
        image = page.get_attribute("src")
        imageList.add(image)

driver.quit()

# 用Tesseract处理我们收集的图片URL链接
for image in sorted(imageList):
    urlretrieve(image, "page.jpg")
    p = subprocess.Popen(["tesseract", "page.jpg", "page"],
                         stdout=subprocess.PIPE, stderr=subprocess.PIPE)
    p.wait()
    f = open("page.txt", "r")
    print(f.read())
训练Tesseract
一个图片的矩形定位文件如下所示:

第一列符号是图片中的每个字符,后面的4个数字分别是包围这个字符的最小矩形的坐标(图片左下角是原点(0,0),4 个数字分别对应每个字符的左下角x 坐标、左下角y 坐标、右上角x 坐标和右上角y 坐标),最后一个数字“0”表示图片样本的编号。
矩形定位文件必须保存在一个.box后缀的文本文件中。和图片文件一样,文本文件也是用验证码的实际结果命名(例如,4MmC3.box)
同时包含图片文件和.box 文件的数据文件夹,然后自动创建所有必需的训练文件。
训练完成后把eng.trainedddata复制到C:\Program Files (x86)\Tesseract-OCR\tessdata下即可
避开采集陷阱
调用requests库的session来传递cookie
import requests
from bs4 import BeautifulSoup
session = requests.Session()
headers = {"User-Agent":"Mozilla/5.0 (Macintosh; Intel Mac OS X 10_9_5)
            AppleWebKit 537.36 (KHTML, like Gecko) Chrome",
            "Accept":"text/html,application/xhtml+xml,application/xml;
            q=0.9,image/webp,*/*;q=0.8"}
url = "https://www.whatismybrowser.com/developers/what-http-headers-is-my-browser-sending"
req = session.get(url, headers=headers)
bsObj = BeautifulSoup(req.text)
print(bsObj.find("table",{"class":"table-striped"}).get_text)
调用driver的get_cookie()、delete_cookie()、add_cookie()、delete_all_cookies()方法
from selenium import webdriver
phantomjs_path = r"D:\Library\PythonScrapy\phantomjs-2.1.1-windows\bin\phantomjs.exe"

driver = webdriver.PhantomJS(phantomjs_path)
driver.get("http://pythonscraping.com")
driver.implicitly_wait(1)
print(driver.get_cookies())
判断哪些元素是陷阱(包含从一个元素获取另外一个属性的值的方法,get_attribute)
from selenium import webdriver
from selenium.webdriver.remote.webelement import WebElement
phantomjs_path = r"D:\Library\PythonScrapy\phantomjs-2.1.1-windows\bin\phantomjs.exe"

driver = webdriver.PhantomJS(phantomjs_path)
driver.get("http://pythonscraping.com/pages/itsatrap.html")
links = driver.find_elements_by_tag_name("a")
for link in links:
    if not link.is_displayed():
        #从显示不了的a标签中获取href属性
        print("The link " + link.get_attribute("href") + " is a trap")

fields = driver.find_elements_by_tag_name("input")
for field in fields:
    if not field.is_displayed():
        print("Do not change value of " + field.get_attribute("name"))
driver.implicitly_wait(1)
print(driver.get_cookies())

执行结果:
The link http://pythonscraping.com/dontgohere is a trap
Do not change value of phone
Do not change value of email
使用Selenium与网站进行交互
myElement.click()
myElement.click_and_hold()
myElement.release()
myElement.double_click()
myElement.send_keys_to_element("content to enter")
为了一次性完成一个元素的多个操作,可以用动作链(actionchain)储存多个操作,然后在一个程序中执行一次或多次。
填写表单的两种方法(send_keys和ActionChains)
from selenium import webdriver
from selenium.webdriver.remote.webelement import WebElement
from selenium.webdriver.common.keys import Keys
from selenium.webdriver import ActionChains

phantomjs_path = r"D:\Library\PythonScrapy\phantomjs-2.1.1-windows\bin\phantomjs.exe"
driver = webdriver.PhantomJS(phantomjs_path)
driver.get("http://pythonscraping.com/pages/files/form.html")

firstnameField = driver.find_element_by_name("firstname")
lastnameField = driver.find_element_by_name("lastname")
submitButton = driver.find_element_by_id("submit")

# 方法1
firstnameField.send_keys("Ryan")
lastnameField.send_keys("Mitchell")
submitButton.click()

# 方法2
actions = ActionChains(driver).click(firstnameField).send_keys("Ryan") \
    .click(lastnameField).send_keys("Mitchell") \
    .send_keys(Keys.RETURN)
actions.perform()

print(driver.find_element_by_tag_name("body").text)
鼠标拖放动作
from selenium import webdriver
from selenium.webdriver.remote.webelement import WebElement
from selenium.webdriver.common.keys import Keys
from selenium.webdriver import ActionChains

phantomjs_path = r"D:\Library\PythonScrapy\phantomjs-2.1.1-windows\bin\phantomjs.exe"
driver = webdriver.PhantomJS(phantomjs_path)
driver.get("http://pythonscraping.com/pages/javascript/draggableDemo.html")

print(driver.find_element_by_id("message").text)

element = driver.find_element_by_id("draggable")
target = driver.find_element_by_id("div2")
actions = ActionChains(driver)
actions.drag_and_drop(element, target).perform()

print(driver.find_element_by_id("message").text)
截屏
driver.get_screenshot_as_file('tmp/pythonscraping.png')博主随便说说
这个学期比较忙,抽了几个周末的空看完了这本两百多页的,可以算是爬虫入门的书籍,比较让人失望的一点是书中并没有提及有关多线程、并发爬虫的内容,博主接下来打算去了解有关scrapy的资料。同时也很感谢这本书能带给我这些基础知识。如果我整理的操作清单中有什么不对的地方,欢迎大家指出!谢谢大家!
参考资料:
《Python网络数据采集》

 浙公网安备 33010602011771号