

android - 小技巧合集(不断更新)
1.不同条件显示不同图片
有时候,我们为了在一个image view中显示不同的图片,往往会使用:
if (条件1) {
image.setBackground(R.id.xxx1);
} else if (条件2) {
image.setBackground(R.id.xxx2);
} ...
最近发现可以用另一个简便的方法实现相同的功能
首先,在res/drawable下建立一个xml文件,内容如下
<?xml version="1.0" encoding="utf-8"?>
<level-list xmlns:android="http://schemas.android.com/apk/res/android">
    <item android:maxLevel="0" android:drawable="@android:color/transparent" />
    <item android:maxLevel="1" android:drawable="@drawable/image_1" />
    <item android:maxLevel="2" android:drawable="@drawable/image_2" />
    <item android:maxLevel="3" android:drawable="@drawable/image_3" />
</level-list>
然后在layout中把image view的src设置成已创建好的xml文件
程序中变换图片时,只需要使用
imageview.getDrawable().setLevel(0) - 透明
imageview.getDrawable().setLevel(1) - 显示image_1
...
以此类推,好像显示剩余电量就是用这个方法来显示不同图片的
2.倒计时功能的实现之CountdownTimer
在逛论坛的时候,看到一个网友提问,说到了CountDownTimer这个类,从名字上面大家就可以看出来,记录下载时间。将后台线程的创建和Handler队列封装成为了一个方便的类调用。
查看了一下官方文档,这个类及其简单,只有四个方法,上面都涉及到了onTick,onFinsh、cancel和start。其中前面两个是抽象方法,所以要重写一下。
下面是官方给的一个小例子:
 new CountdownTimer(30000, 1000) {
     public void onTick(long millisUntilFinished) {
         mTextField.setText("seconds remaining: " + millisUntilFinished / 1000);
     }
     public void onFinish() {
         mTextField.setText("done!");
     }
  }.start();
直接用的那位网友的代码,自己稍微改动了一下,一个简单的小demo。
package cn.demo;

import android.app.Activity;
import android.os.Bundle;
import android.content.Intent;
import android.os.CountDownTimer;
import android.widget.TextView;
import android.widget.Toast;
public class NewActivity extends Activity {
    private MyCount mc;
    private TextView tv;
    @Override
    protected void onCreate(Bundle savedInstanceState) {
        // TODO Auto-generated method stub
        super.onCreate(savedInstanceState);
        setContentView(R.layout.main);
        tv = (TextView)findViewById(R.id.show);
        mc = new MyCount(30000, 1000);
        mc.start();
    }//end func

    /*定义一个倒计时的内部类*/
    class MyCount extends CountDownTimer {
        public MyCount(long millisInFuture, long countDownInterval) {
            super(millisInFuture, countDownInterval);
        }
        @Override
        public void onFinish() {
            tv.setText("finish");
        }
        @Override
        public void onTick(long millisUntilFinished) {
            tv.setText("请等待30秒(" + millisUntilFinished / 1000 + ")...");
            Toast.makeText(NewActivity.this, millisUntilFinished / 1000 + "", Toast.LENGTH_LONG).show();//toast有显示时间延迟
        }
    }
}
主 要是重写onTick和onFinsh这两个方法,onFinish()中的代码是计时器结束的时候要做的事情;onTick(Long m)中的代码是你倒计时开始时要做的事情,参数m是直到完成的时间,构造方法MyCount()中的两个参数中,前者是倒计的时间数,后者是倒计每秒中间 的间隔时间,都是以毫秒为单位。例如要倒计时30秒,每秒中间间隔时间是1秒,两个参数可以这样写MyCount(30000,1000)。 将后台线程的创建和Handler队列封装成为了一个方便的类调用。
当你想取消的时候使用mc.cancel()方法就行了。
3.android按钮被点击文字颜色变化效果
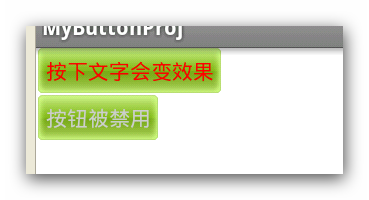
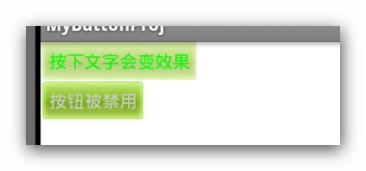
有的时候做应用需要点击按钮时文字颜色也跟着变,松开后又还原,目前发现两种解决方案:第一用图片,如果出现的地方比较多,那么图片的量就相当可观;第二,也就是本文讲到的。废话少说,先贴图片,再上代码。
正常效果:
按下效果:
先在values目录创建color.xml文件,在里面加入以下自定义颜色(注意不是用color标签)的代码:
<?xml version="1.0" encoding="utf-8"?>
<resources>
    <drawable name="red">#f00</drawable>
    <drawable name="green">#0f0</drawable>
    <drawable name="gray">#ccc</drawable>
</resources>
然后在res下新建drawable目录,里面新建btn_bg.xml和btn_color.xml文件,代码如下:
btn_bg.xml
<?xml version="1.0" encoding="utf-8"?>
<selector xmlns:android="http://schemas.android.com/apk/res/android">
    <item android:state_window_focused="false" android:state_enabled="true"
        android:drawable="@drawable/btn_test_normal" />
    <item android:state_enabled="false" android:drawable="@drawable/btn_test_normal" />
    <item android:state_pressed="true" android:drawable="@drawable/btn_test_press" />
    <item android:state_focused="true"  android:drawable="@drawable/btn_test_normal" />
</selector>
btn_color.xml
<?xml version="1.0" encoding="utf-8"?>
<selector xmlns:android="http://schemas.android.com/apk/res/android">
    <item android:state_focused="false" android:state_enabled="true" android:state_pressed="false"
        android:color="@drawable/red" />
    <item android:state_enabled="false" android:color="@drawable/gray" />
    <item android:state_pressed="true" android:color="@drawable/green" />
    <item android:state_focused="true"  android:color="@drawable/red" />
</selector>
最后是测试用的布局文件:
<?xml version="1.0" encoding="utf-8"?>
<LinearLayout xmlns:android="http://schemas.android.com/apk/res/android"
    android:orientation="vertical"
    android:layout_width="fill_parent"
    android:layout_height="fill_parent"
    android:background="@android:color/white"
    >

    <Button
        android:layout_width="wrap_content"
        android:layout_height="wrap_content"
        android:text="按下文字会变效果"
        android:textColor="@drawable/btn_color"
        android:background="@drawable/btn_bg"
        />
    <Button
        android:layout_width="wrap_content"
        android:layout_height="wrap_content"
        android:text="按钮被禁用"
        android:enabled="false"
        android:textColor="@drawable/btn_color"
        android:background="@drawable/btn_bg"
        />

</LinearLayout>
from:http://blog.csdn.net/maylian7700/article/details/6978131
4.Gallery图片重叠后层次修改
在设置gallery的sapcing为负值时,导致右边的图片盖住左边的图片,可通过修改Gallery::getChildDrawingOrder(int,int)解决该问题,
解决方案:
如共有10张图片,正常的排序应当为: 0 1 2 3 4 5 6 7 8 9
当selected序号为5的图片时,将排序改为: 0 1 2 3 4 9 8 7 6 5 则解决图片重叠问题
示例如下:
MyGallery extends Gallery{

    int lastPosition;

    @Override

    protected int getChildDrawingOrder(int childCount, int i) {

        int mFirstPosition = getFirstVisiblePosition();

        int mSelectedPosition = getSelectedItemPosition();

        int selectedIndex = mSelectedPosition - mFirstPosition;

        if(i == 0)

            lastPosition = 0;

        int ret = 0;

        if (selectedIndex < 0) return i;

        if (i == childCount - 1) {

            ret = selectedIndex;

        } else if (i >= selectedIndex) {

        lastPosition++;

        ret = childCount - lastPosition;

        } else {

            ret = i;

        }

        return ret;

    }

}

图5.16 在EditText控件中输入文字和图像
为了实现这个程序,首先来准备一些要用到的素材,也就是要在EditText控件中输入的图像文件。本例准备了9个png图像文件(face1.png至face9.png),都放在了res\drawable目录中。
接下来在屏幕上放一个只能显示3行(可输入多行)的EditText和一个Button,布局文件的代码如下:
<?xml version="1.0" encoding="utf-8"?>
<LinearLayout xmlns:android="http://schemas.android.com/apk/res/android"
    android:orientation="vertical" android:layout_width="fill_parent"
    android:layout_height="fill_parent">
    <EditText android:id="@+id/edittext" android:layout_width="fill_parent"
        android:layout_height="wrap_content" android:lines="3" android:gravity="left|top"/>
    <Button android:layout_width="wrap_content"
        android:layout_height="wrap_content" android:text="随机插入表情"
        android:onClick="onClick_RandomFace" android:layout_marginTop="10dp" />
</LinearLayout>
上面代码的<EditText>标签中将android:gravity属性值设为left|top。以使输入的文本从左上角开始显 示,如果不设置该属性,则输入的文本会从左侧中心位置开始显示(由于设置了android:line=”3”,因此,EditText可同时显示三行的内 容,所以会存在这个问题,如果只显示一行,则不存在这个问题)。
<Button>标签的android:onClick属性值指定了单击事件方法(onClick_RandomFace),在该方法 中随机获得了face1.png至face9.png中任意一个图像资源的ID。最常用的方法是将这9个图像资源ID放到数组中,然后随机产生一个数组索 引来获取相应的图像资源ID。但本例未采用这种方法,而是采用了直接通过反射技术从R.drawable类中获得图像资源ID的方法。这种方法的好处是一 但图像资源非常多时,可以不需要在数组中挨个定义就可以获得任意的图像资源ID。
在5.2.2节使用了<img>标签来插入图像,虽然在EditText控件中插入图像也可采用这种方法。但本例使用了另外一种更简单 的方法,就是使用android.text.style.ImageSpan类来直接插入图像。下面来看看具体的实现代码。
public void onClick_RandomFace(View view)
{
            //  随机产生1至9的整数
    int randomId = 1 + new Random().nextInt(9);
    try
    {
        //  根据随机产生的1至9的整数从R.drawable类中获得相应资源ID(静态变量)的Field对象
        Field field = R.drawable.class.getDeclaredField("face" + randomId);
        //  获得资源ID的值,也就是静态变量的值
        int resourceId = Integer.parseInt(field.get(null).toString());
        //  根据资源ID获得资源图像的Bitmap对象
        Bitmap bitmap = BitmapFactory.decodeResource(getResources(), resourceId);
        //  根据Bitmap对象创建ImageSpan对象
        ImageSpan imageSpan = new ImageSpan(this, bitmap);
        //  创建一个SpannableString对象,以便插入用ImageSpan对象封装的图像
        SpannableString spannableString = new SpannableString("face");
        //  用ImageSpan对象替换face
        spannableString.setSpan(imageSpan, 0, 4, Spannable.SPAN_EXCLUSIVE_EXCLUSIVE);
        //  将随机获得的图像追加到EditText控件的最后
        edittext.append(spannableString);
    }
    catch (Exception e)
    {
    }
}
编写上面代码需要注意如下几点。
1. 由于R.drawable中的资源ID都是public的静态变量,因此,可直接使用Field.get方法获得这些变量的值。如果是 private或protected的变量,需要field.setAccessible(true)设置变量值的访问权限才可以读写这些变量。
2. 使用Field.get方法获得变量值时,如果是静态变量。Field.get方法的参数值设为null即可。如果不是静态变量,需要为Field.get方法指定一个变量所在类的对象作为参数值。
3. 由于EditText类不能直接插入Span对象,因此,需要先使用SpannableString对象来封装Span对象(如本例中的ImageSpan对象),再将SpannableString对象插入到EditText控件中。
6.Android setColorFilter 滤镜效果
通过setColorFilter可以实现滤镜效果。
如: final WallpaperManager wallpaperManager = WallpaperManager.getInstance(this);
//获取壁纸 final Drawable wallpaperDrawable = wallpaperManager.getDrawable();
//指定滤镜颜色以及混合模式
wallpaperDrawable.setColorFilter(Color.RED, PorterDuff.Mode.MULTIPLY);
注意:PorterDuff.Mode枚举值: 1.PorterDuff.Mode.CLEAR所绘制不会提交到画布上。
2.PorterDuff.Mode.SRC
显示上层绘制图片 3.PorterDuff.Mode.DST
显示下层绘制图片 4.PorterDuff.Mode.SRC_OVER
正常绘制显示,上下层绘制叠盖。 5.PorterDuff.Mode.DST_OVER
上下层都显示。下层居上显示。 6.PorterDuff.Mode.SRC_IN
取两层绘制交集。显示上层。 7.PorterDuff.Mode.DST_IN
取两层绘制交集。显示下层。 8.PorterDuff.Mode.SRC_OUT
取上层绘制非交集部分。 9.PorterDuff.Mode.DST_OUT
取下层绘制非交集部分。 10.PorterDuff.Mode.SRC_ATOP
取下层非交集部分与上层交集部分 11.PorterDuff.Mode.DST_ATOP
取上层非交集部分与下层交集部分 12.PorterDuff.Mode.XOR
//变暗 13.PorterDuff.Mode.DARKEN
//调亮 14.PorterDuff.Mode.LIGHTEN
//用于颜色滤镜 15.PorterDuff.Mode.MULTIPLY
16.PorterDuff.Mode.SCREEN

7、改变ImageView的图像
这里我们用点击ImageView切换imgView1和imgView2来演示如何动态切换图像。首先这里讲下图像索引的问题,我们将图像导入工程后,会在R.java下生成一条“记录”,记录了文件的地址,其数值依次排列,如图:

所以,我们定义一个图像索引ImageCnt,也可以说是一个偏移量,通过这个偏移量来引用我们的图像资源。
//声明:
private int ImageCnt = 0;
//实例化:
imgV1 = (ImageView)findViewById(R.id.imageView1);
//设置图像:
imgV1.setImageResource(R.drawable.imgview1);
//设置单击监听器:
imgV1.setOnClickListener(new OnClickListener(){
     @Override
public void onClick(View v) {
        // TODO Auto-generated method stub
        ImageCnt = ImageCnt==0?1:0;
        imgV1.setImageResource(R.drawable.imgview1+ImageCnt);
    }});
8.使得EditText失去焦点
在EditText的父级控件设置成
view.setFocusable(true);
view.setFocusableInTouchMode(true);
然后调用 requestFocus()即可获取焦点,同时edittext失去焦点。
9.关于android:configChanges
1、不设置Activity的android:configChanges时,切屏会重新调用各个生命周期,切横屏时会执行一次,切竖屏时会执行两次
2、设置Activity的android:configChanges="orientation"时,切屏还是会重新调用各个生命周期,切横、竖屏时只会执行一次
3、设置Activity的android:configChanges="orientation|keyboardHidden"时,切屏不会重新调用各个生命周期,只会执行onConfigurationChanged方法
10.Eclipse默认标签TODO,XXX,FIXME和自定义标签[转]
Eclipse中的一些特殊的注释技术包括:
1. // TODO —— 表示尚未完成的待办事项。
2. // XXX —— 表示被注释的代码虽然实现了功能,但是实现方案有待商榷,希望将来能改进。
3. // FIXME —— 表示被注释的代码需要被修正。
4.自定义标签 window-->preferences-->java-->compiler-->Task tags
上述所有注释都会被eclipse task视图所收集。在项目发布前,检查一下task视图是一个很好的习惯
11.将照片添加到相册
privatevoid galleryAddPic(){
    Intent mediaScanIntent =newIntent(Intent.ACTION_MEDIA_SCANNER_SCAN_FILE);
    File f =newFile(mCurrentPhotoPath);
    Uri contentUri =Uri.fromFile(f);
    mediaScanIntent.setData(contentUri);
    this.sendBroadcast(mediaScanIntent);
}
12.Android唯一设备号方案
    final TelephonyManager tm = (TelephonyManager) getBaseContext().getSystemService(Context.TELEPHONY_SERVICE);

    final String tmDevice, tmSerial, androidId;
    tmDevice = "" + tm.getDeviceId();
    tmSerial = "" + tm.getSimSerialNumber();
    androidId = "" + android.provider.Settings.Secure.getString(getContentResolver(), android.provider.Settings.Secure.ANDROID_ID);

    UUID deviceUuid = new UUID(androidId.hashCode(), ((long)tmDevice.hashCode() << 32) | tmSerial.hashCode());
    String deviceId = deviceUuid.toString();
或者使用:
public class Installation {
    private static String sID = null;
    private static final String INSTALLATION = "INSTALLATION";

    public synchronized static String id(Context context) {
        if (sID == null) {
            File installation = new File(context.getFilesDir(), INSTALLATION);
            try {
                if (!installation.exists())
                    writeInstallationFile(installation);
                sID = readInstallationFile(installation);
            } catch (Exception e) {
                throw new RuntimeException(e);
            }
        }
        return sID;
    }

    private static String readInstallationFile(File installation) throws IOException {
        RandomAccessFile f = new RandomAccessFile(installation, "r");
        byte[] bytes = new byte[(int) f.length()];
        f.readFully(bytes);
        f.close();
        return new String(bytes);
    }

    private static void writeInstallationFile(File installation) throws IOException {
        FileOutputStream out = new FileOutputStream(installation);
        String id = UUID.randomUUID().toString();
        out.write(id.getBytes());
        out.close();
    }
}

 浙公网安备 33010602011771号