
Springboot的开发环境(dev)、测试环境(beta)和生产环境(product)打包部署
1、在项目开发过程中需要考虑不同的运行环境:开发环境(dev)、测试环境(beta)和生产环境(product)。在以往的开发过程中通常使用Maven构建工具进行控制,但却需要进行大量的配置。SpringBoot考虑到此类问题,专门设计了profile支持。
备注:尤其是项目开发完毕,在正式环境部署的时候出现问题,进行本地调试的时候就头疼了,因为正式环境的参数配置都和本地不一样,所以使用Springboot的profile配置就极大节省了时间,也简化了操作,方便自己使用,避免了搞不清那些配置是正式的,那些是本地环境的。
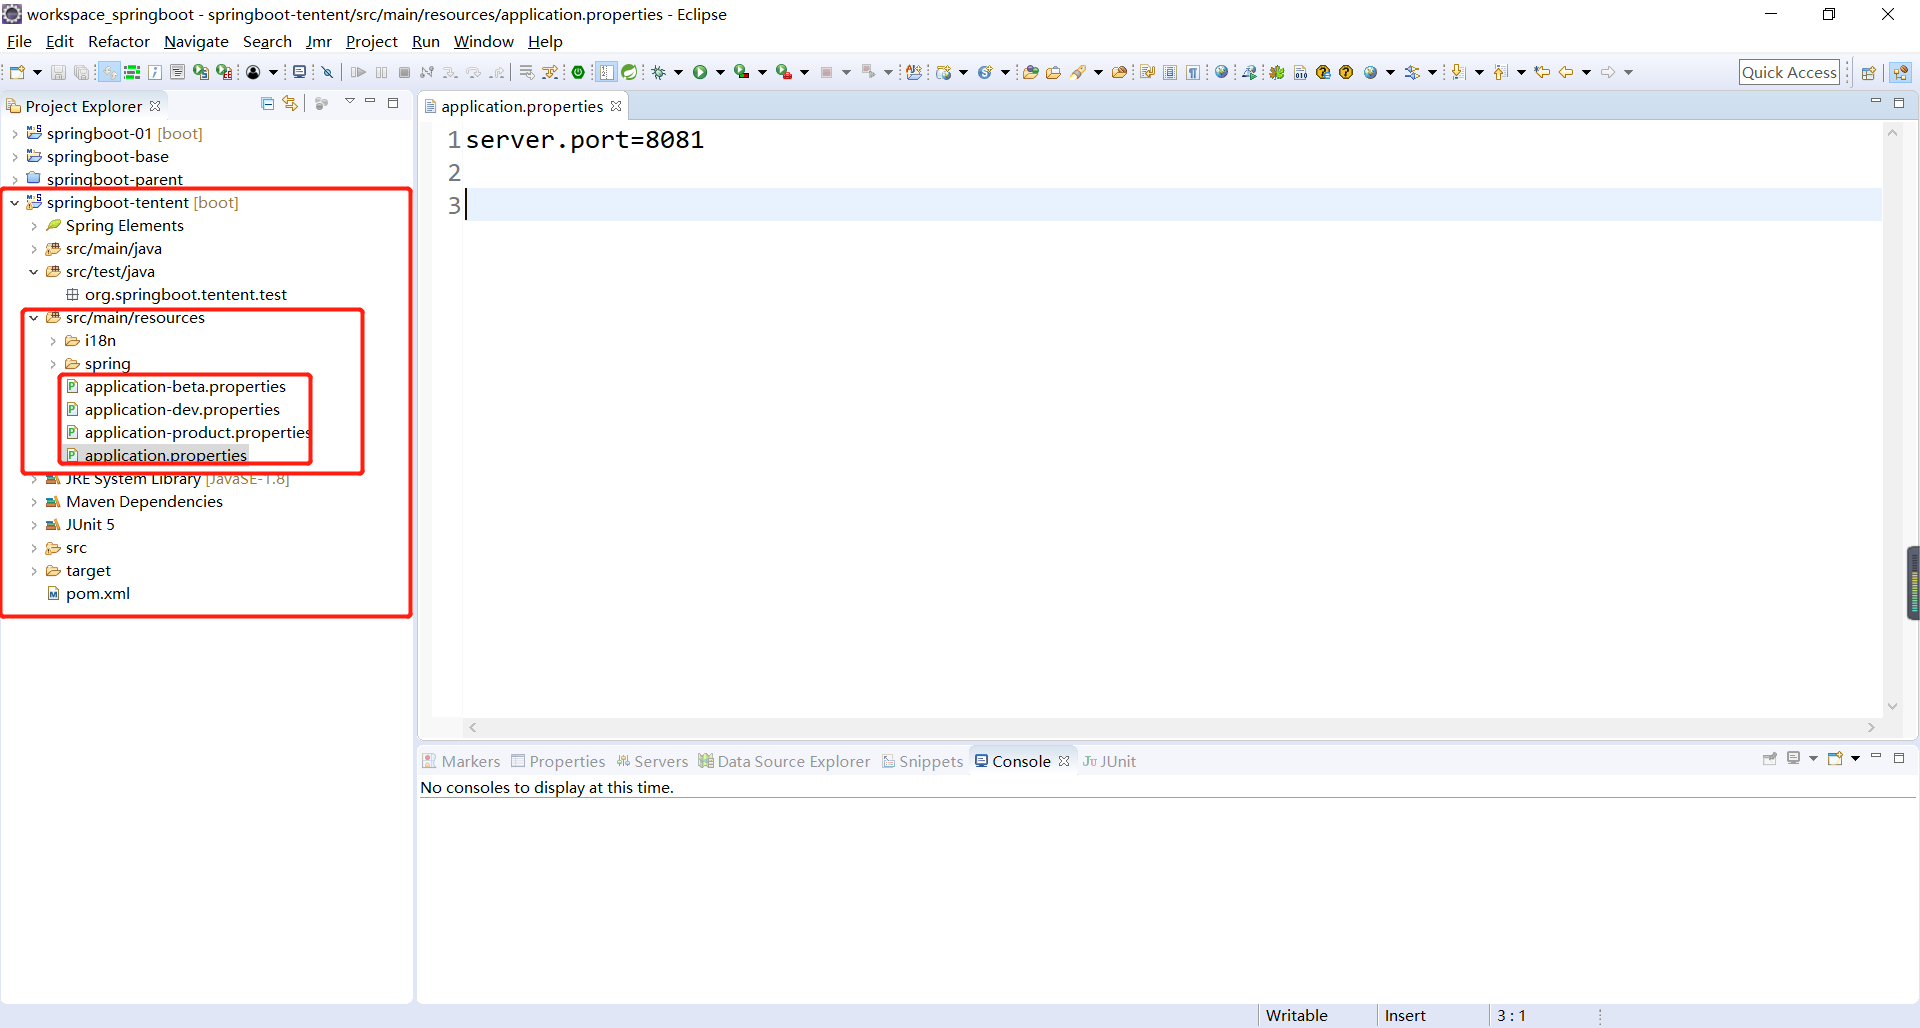
2、首先,创建开发环境,测试环境,生产环境的三种配置文件,外加application.properties配置文件,如下所示:
application-beta.properties、application-dev.properties、application-product.properties三个配置文件分别指定项目的端口号为8082、8083、8084,application.properties配置文件指定激活的环境,如下所示:
1 spring.profiles.active=beta
为了使项目正常进行打包,还需要修改pom.xml文件,追加resource配置,主要的功能是进行源文件夹中内容的打包输出,配置完成后可以将配置文件打包到*.jar文件中。,如下所示:
 1 <?xml version="1.0"?>
 2 <project
 3     xsi:schemaLocation="http://maven.apache.org/POM/4.0.0
 4     http://maven.apache.org/xsd/maven-4.0.0.xsd"
 5     xmlns="http://maven.apache.org/POM/4.0.0"
 6     xmlns:xsi="http://www.w3.org/2001/XMLSchema-instance">
 7     <modelVersion>4.0.0</modelVersion>
 8
 9     <parent>
10         <groupId>com.bie</groupId>
11         <artifactId>springboot-base</artifactId>
12         <version>0.0.1-SNAPSHOT</version>
13     </parent>
14
15     <!-- 父项目已经指定,这里可以省略 -->
16     <!-- <groupId>com.bie</groupId> -->
17     <artifactId>springboot-tentent</artifactId>
18     <!-- <version>0.0.1-SNAPSHOT</version> -->
19     <name>springboot-tentent</name>
20     <url>http://maven.apache.org</url>
21
22     <properties>
23         <project.build.sourceEncoding>UTF-8</project.build.sourceEncoding>
24     </properties>
25
26     <dependencies>
27         <dependency>
28             <groupId>org.springframework.boot</groupId>
29             <artifactId>spring-boot-starter-web</artifactId>
30         </dependency>
31         <dependency>
32             <groupId>org.springframework.boot</groupId>
33             <artifactId>spring-boot-starter-test</artifactId>
34             <scope>test</scope>
35         </dependency>
36         <dependency>
37             <groupId>junit</groupId>
38             <artifactId>junit</artifactId>
39             <scope>test</scope>
40         </dependency>
41         <dependency>
42             <groupId>org.springframework.boot</groupId>
43             <artifactId>spring-boot-starter-jetty</artifactId>
44         </dependency>
45     </dependencies>
46
47     <build>
48         <plugins>
49             <!-- 该插件的主要功能是进行项目的打包发布处理 -->
50             <plugin>
51                 <groupId>org.springframework.boot</groupId>
52                 <artifactId>spring-boot-maven-plugin</artifactId>
53                 <!-- 设置程序执行的主类 -->
54                 <configuration>
55                     <mainClass>org.springboot.tentent.Springboot01Application</mainClass>
56                 </configuration>
57                 <executions>
58                     <execution>
59                         <goals>
60                             <goal>repackage</goal>
61                         </goals>
62                     </execution>
63                 </executions>
64             </plugin>
65         </plugins>
66         <resources>
67             <resource>
68                 <directory>src/main/resources</directory>
69                 <includes>
70                     <include>**/*.properties</include>
71                     <include>**/*.yml</include>
72                     <include>**/*.xml</include>
73                     <include>**/*.tld</include>
74                 </includes>
75                 <filtering>false</filtering>
76             </resource>
77             <resource>
78                 <directory>src/main/java</directory>
79                 <includes>
80                     <include>**/*.properties</include>
81                     <include>**/*.xml</include>
82                     <include>**/*.tld</include>
83                 </includes>
84                 <filtering>false</filtering>
85             </resource>
86         </resources>
87     </build>
88
89
90 </project>
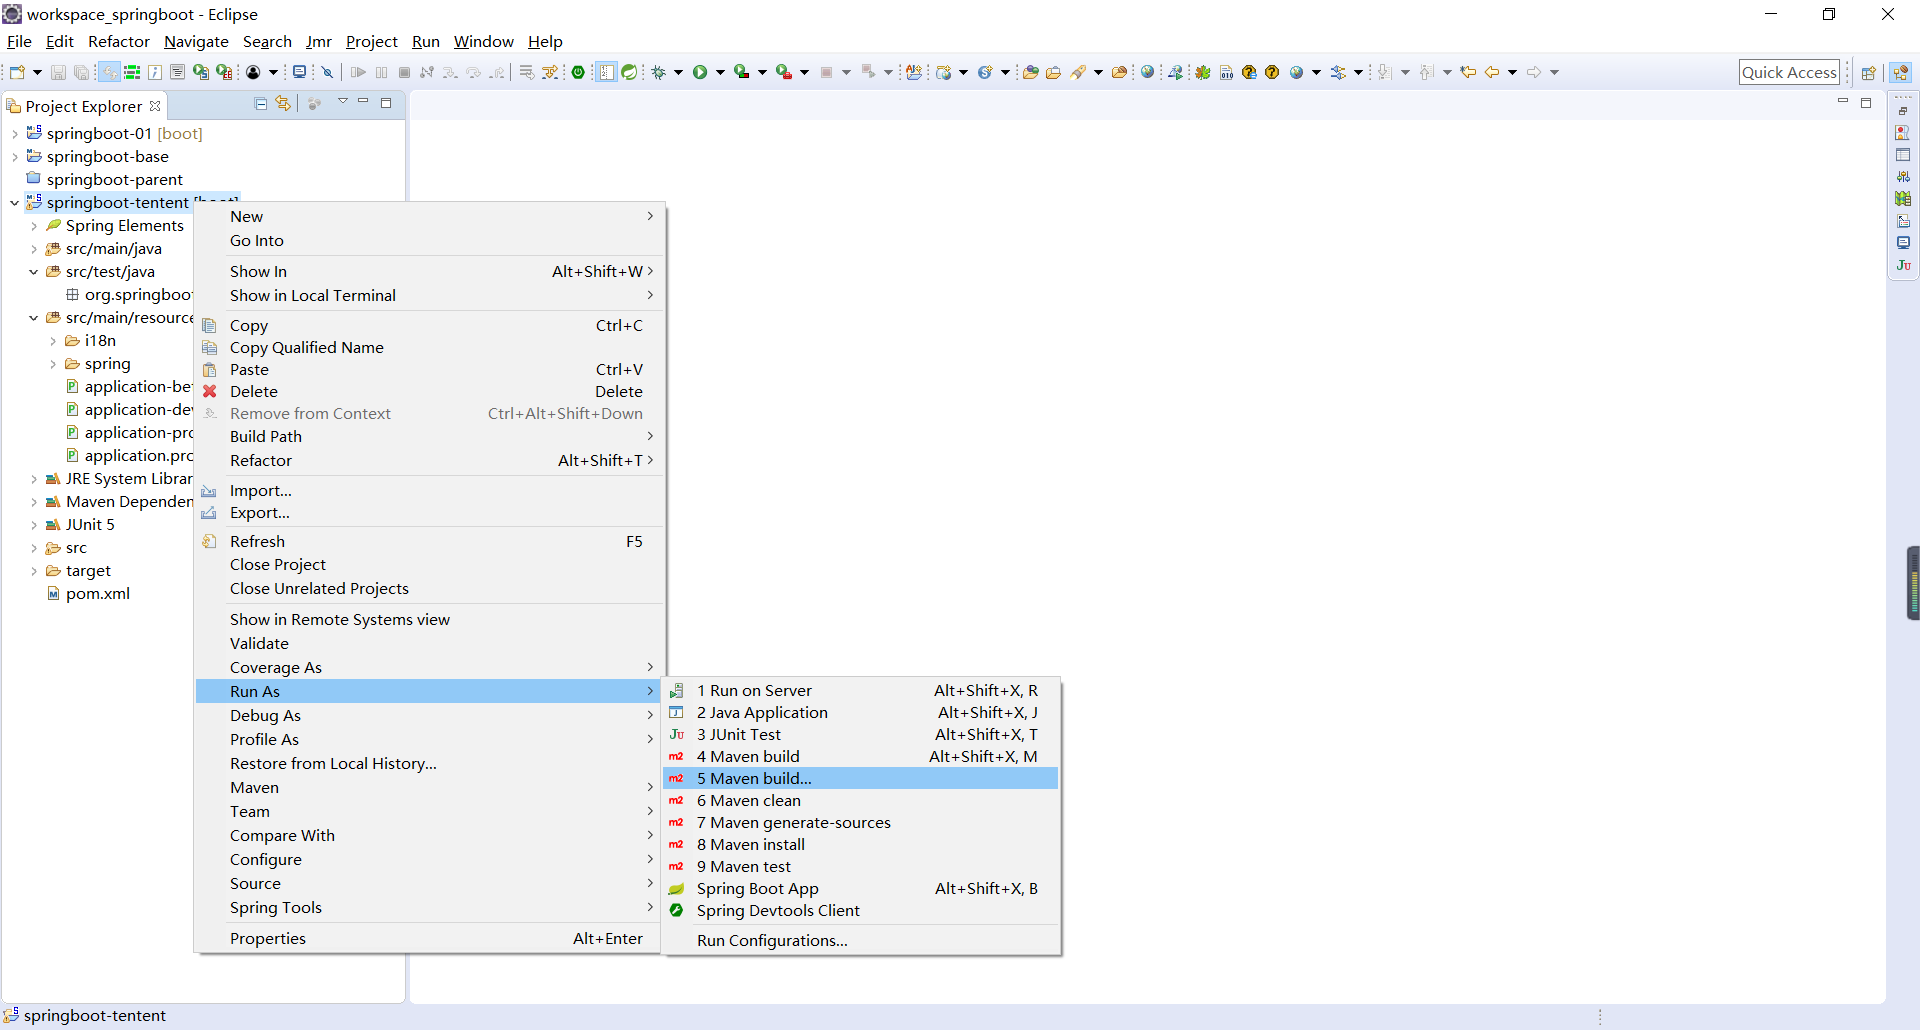
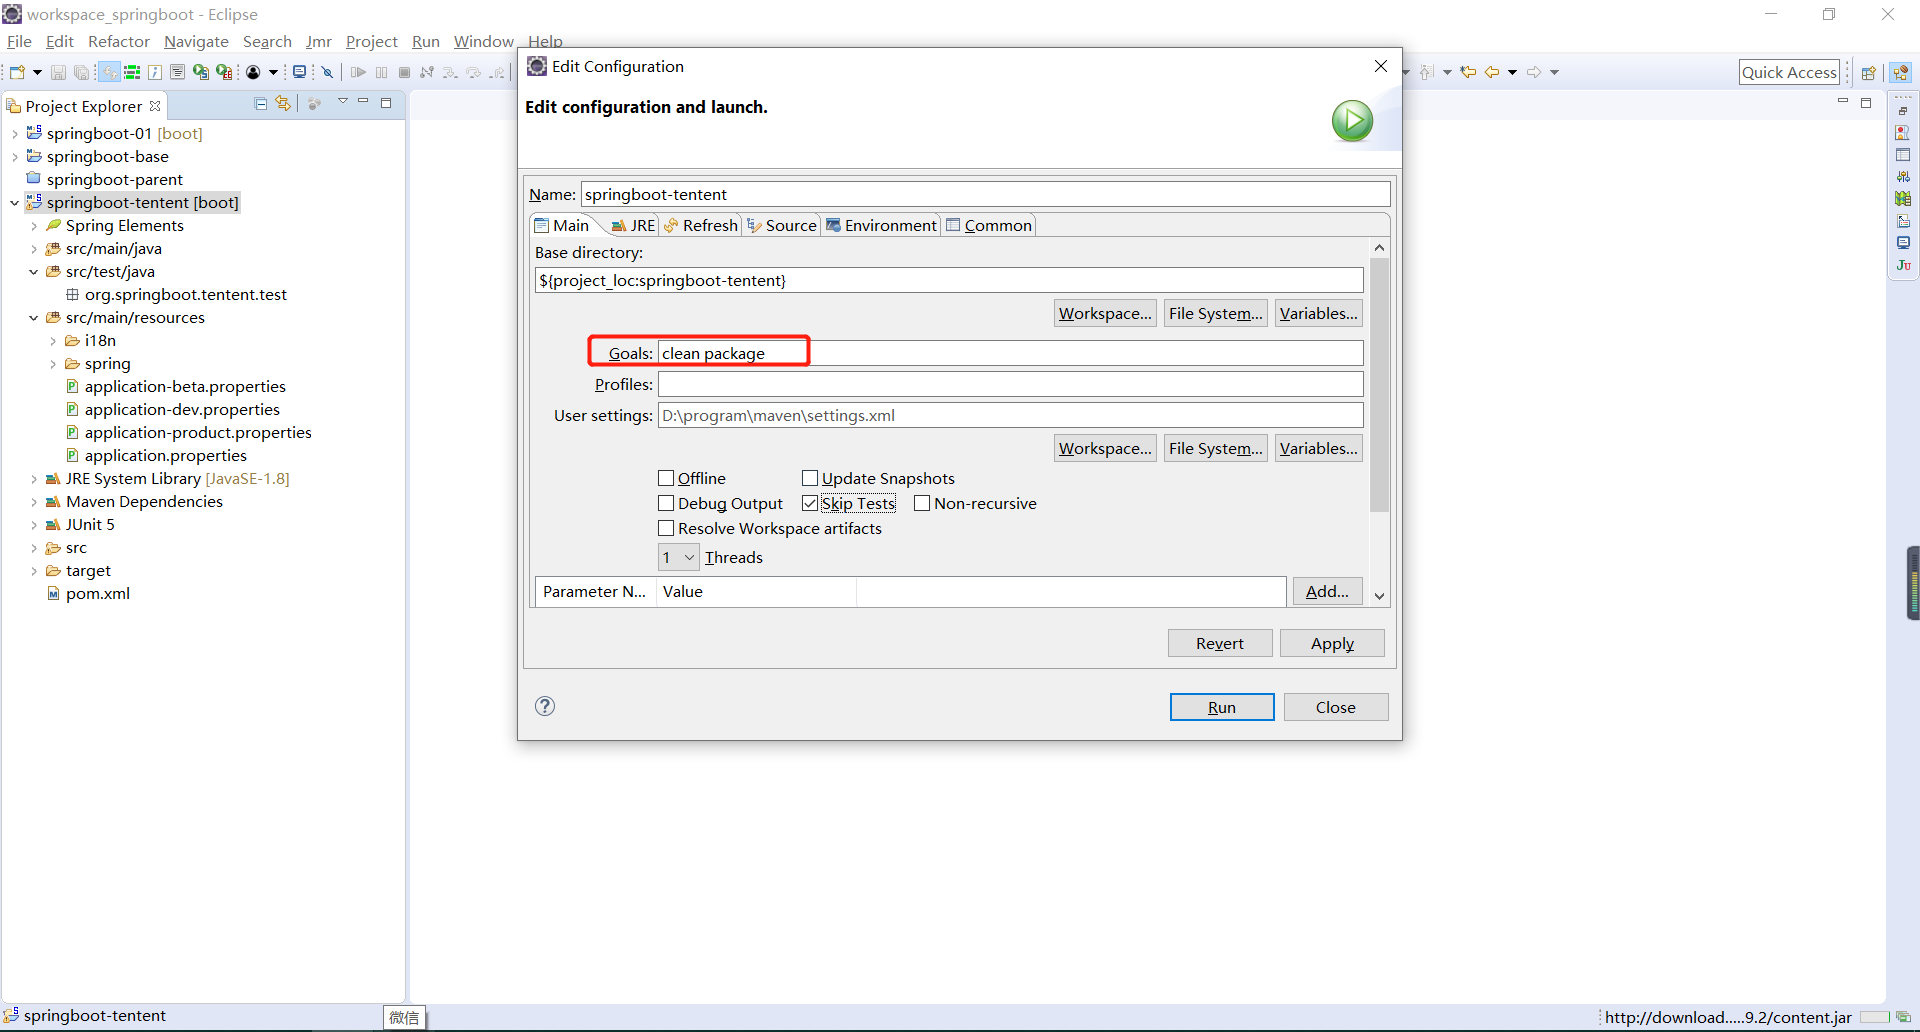
修改完pom.xml配置文件之后,记得更新项目,Maven -> Update Project。此时开始,为项目打包,这里直接通过Eclipse进行打包配置,如下所示:
由于在application.properties指定的是spring.profiles.active=beta,所以如果直接运行打好的jar包,那么运行的就是测试环境的端口号,项目打包完成后运行程序,如果不做出任何的指定,那么默认配置的活跃profile(beta)就将直接起作用(java -jar xxx.jar)。

如果想要切换到不同的profile环境,可以在启动时动态配置(java -jar .\springboot-parent.jar --spring.profiles.active=product),如下所示:
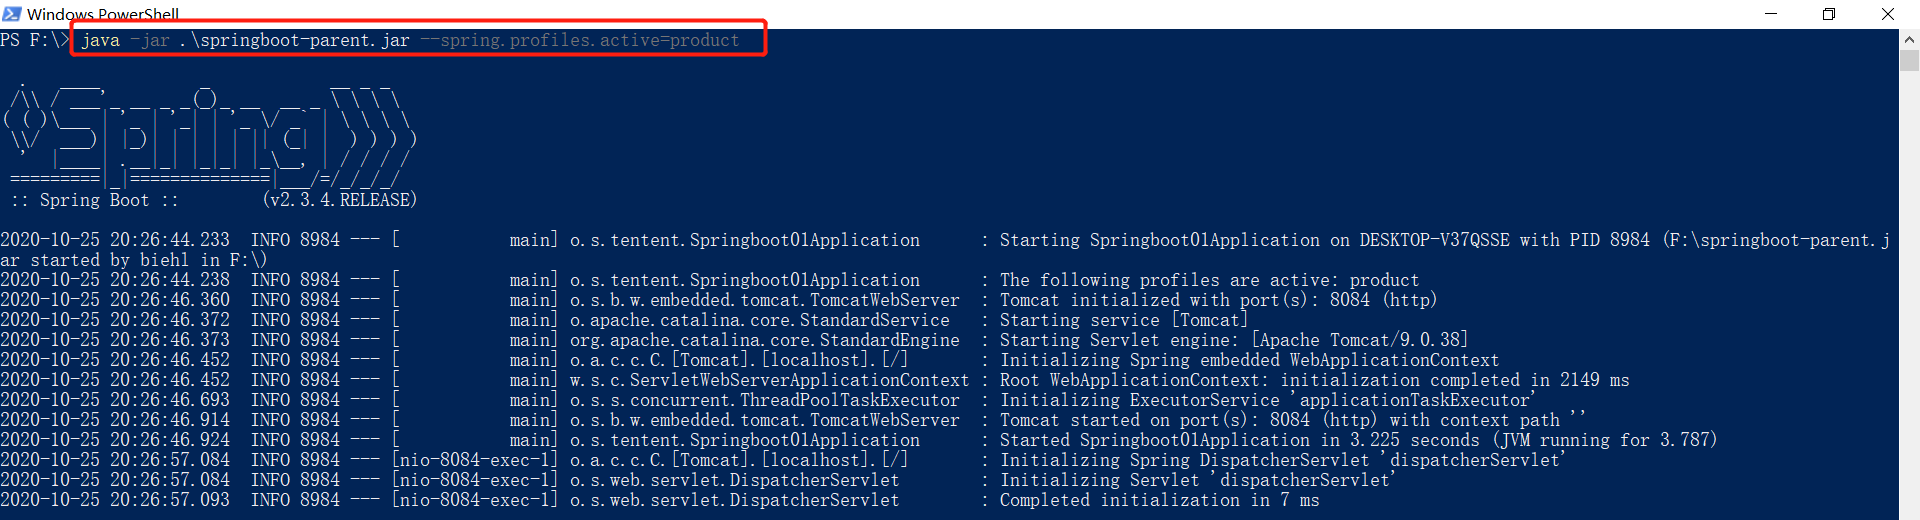
演示效果,如下所示:

注意:*.properties与*.yml配置不同。
使用application.yml进行多profile配置的时候,只需要在一个配置文件中使用“---”分割不同的profile配置。但是此类模式不适合于application.properties配置,此时应该采用不同的*.properties保存不同的配置,才可以实现多profile。

 浙公网安备 33010602011771号