
RabbitMQ与Spring的框架整合之Spring AMQP实战
1、SpringAMQP用户管理组件RabbitAdmin。
RabbitAdmin类可以很好的操作RabbitMQ,在Spring中直接进行注入即可。注意,autoStartup必须设置为true,否则Spring容器不会加载RabbitAdmin类。RabbitAdmin底层实现就是从Spring容器中获取Exchange交换机、Binding绑定、RoutingKey路由键以及Queue队列的@Bean声明。
然后使用RabbitTemplate的execute方法执行对应的声明、修改、删除等一系列RabbitMQ基础功能操作。例如,添加一个交换机、删除一个绑定、清空一个队列里面的消息等待操作。
2、由于使用的maven工程配合了Springboot整合Spring与RabbitMQ的知识。所以先引入依赖包,如下所示:
 1 <?xml version="1.0" encoding="UTF-8"?>
 2 <project xmlns="http://maven.apache.org/POM/4.0.0"
 3     xmlns:xsi="http://www.w3.org/2001/XMLSchema-instance"
 4     xsi:schemaLocation="http://maven.apache.org/POM/4.0.0
 5     https://maven.apache.org/xsd/maven-4.0.0.xsd">
 6     <modelVersion>4.0.0</modelVersion>
 7     <parent>
 8         <groupId>org.springframework.boot</groupId>
 9         <artifactId>spring-boot-starter-parent</artifactId>
10         <version>2.2.1.RELEASE</version>
11         <relativePath /> <!-- lookup parent from repository -->
12     </parent>
13     <groupId>com.bie</groupId>
14     <artifactId>rabbitmq-spring</artifactId>
15     <version>0.0.1-SNAPSHOT</version>
16     <name>rabbitmq-spring</name>
17     <description>Demo project for Spring Boot</description>
18
19     <properties>
20         <project.build.sourceEncoding>UTF-8</project.build.sourceEncoding>
21         <project.reporting.outputEncoding>UTF-8
22         </project.reporting.outputEncoding>
23         <java.version>1.8</java.version>
24         <maven-jar-plugin.version>3.1.1</maven-jar-plugin.version>
25     </properties>
26
27     <dependencies>
28         <!-- Spring与RabbitMQ整合的包 -->
29         <dependency>
30             <groupId>org.springframework.boot</groupId>
31             <artifactId>spring-boot-starter-amqp</artifactId>
32         </dependency>
33         <dependency>
34             <groupId>org.springframework.boot</groupId>
35             <artifactId>spring-boot-starter-web</artifactId>
36         </dependency>
37
38         <dependency>
39             <groupId>org.springframework.boot</groupId>
40             <artifactId>spring-boot-starter-test</artifactId>
41             <scope>test</scope>
42             <exclusions>
43                 <exclusion>
44                     <groupId>org.junit.vintage</groupId>
45                     <artifactId>junit-vintage-engine</artifactId>
46                 </exclusion>
47             </exclusions>
48         </dependency>
49         <dependency>
50             <groupId>org.springframework.amqp</groupId>
51             <artifactId>spring-rabbit-test</artifactId>
52             <scope>test</scope>
53         </dependency>
54         <!-- RabbitMQ基础核心包 -->
55         <dependency>
56             <groupId>com.rabbitmq</groupId>
57             <artifactId>amqp-client</artifactId>
58         </dependency>
59     </dependencies>
60
61     <build>
62         <plugins>
63             <plugin>
64                 <groupId>org.springframework.boot</groupId>
65                 <artifactId>spring-boot-maven-plugin</artifactId>
66             </plugin>
67         </plugins>
68     </build>
69
70 </project>
由于使用的是Springboot项目配合RabbitMQ来做的,所以配置文件这里使用了注解来替换,所以启动的时候,加载如下所示配置类,如下所示:
 1 package com.bie;
 2
 3 import org.springframework.amqp.rabbit.connection.CachingConnectionFactory;
 4 import org.springframework.amqp.rabbit.connection.ConnectionFactory;
 5 import org.springframework.amqp.rabbit.core.RabbitAdmin;
 6 import org.springframework.context.annotation.Bean;
 7 import org.springframework.context.annotation.ComponentScan;
 8 import org.springframework.context.annotation.Configuration;
 9
10 /**
11  *
12  * @author biehl
13  *
14  */
15 @Configuration
16 @ComponentScan(basePackages = "com.bie")
17 public class RabbitMQConfig {
18
19     /**
20      * 将ConnectionFactory注入到bean容器中
21      *
22      * @return
23      */
24     @Bean
25     public ConnectionFactory connectionFactory() {
26         CachingConnectionFactory connectionFactory = new CachingConnectionFactory();
27         connectionFactory.setAddresses("192.168.110.133:5672");
28         connectionFactory.setUsername("guest");
29         connectionFactory.setPassword("guest");
30         connectionFactory.setVirtualHost("/");
31         return connectionFactory;
32     }
33
34     /**
35      * 参数依赖上面注入的ConnectionFactory类,所以保持参数名称和注入的ConnectionFactory一致
36      *
37      * @param connectionFactory
38      * @return
39      */
40     @Bean
41     public RabbitAdmin rabbitAdmin(ConnectionFactory connectionFactory) {
42         RabbitAdmin rabbitAdmin = new RabbitAdmin(connectionFactory);
43         // 注意:autoStartup必须设置为true,否则Spring容器不会加载RabbitAdmin类。
44         rabbitAdmin.setAutoStartup(true);
45         return rabbitAdmin;
46     }
47
48 }
项目主启动类,如下所示:
 1 package com.bie;
 2
 3 import org.springframework.boot.SpringApplication;
 4 import org.springframework.boot.autoconfigure.SpringBootApplication;
 5
 6 @SpringBootApplication
 7 public class RabbitmqSpringApplication {
 8
 9     public static void main(String[] args) {
10         SpringApplication.run(RabbitmqSpringApplication.class, args);
11     }
12
13 }
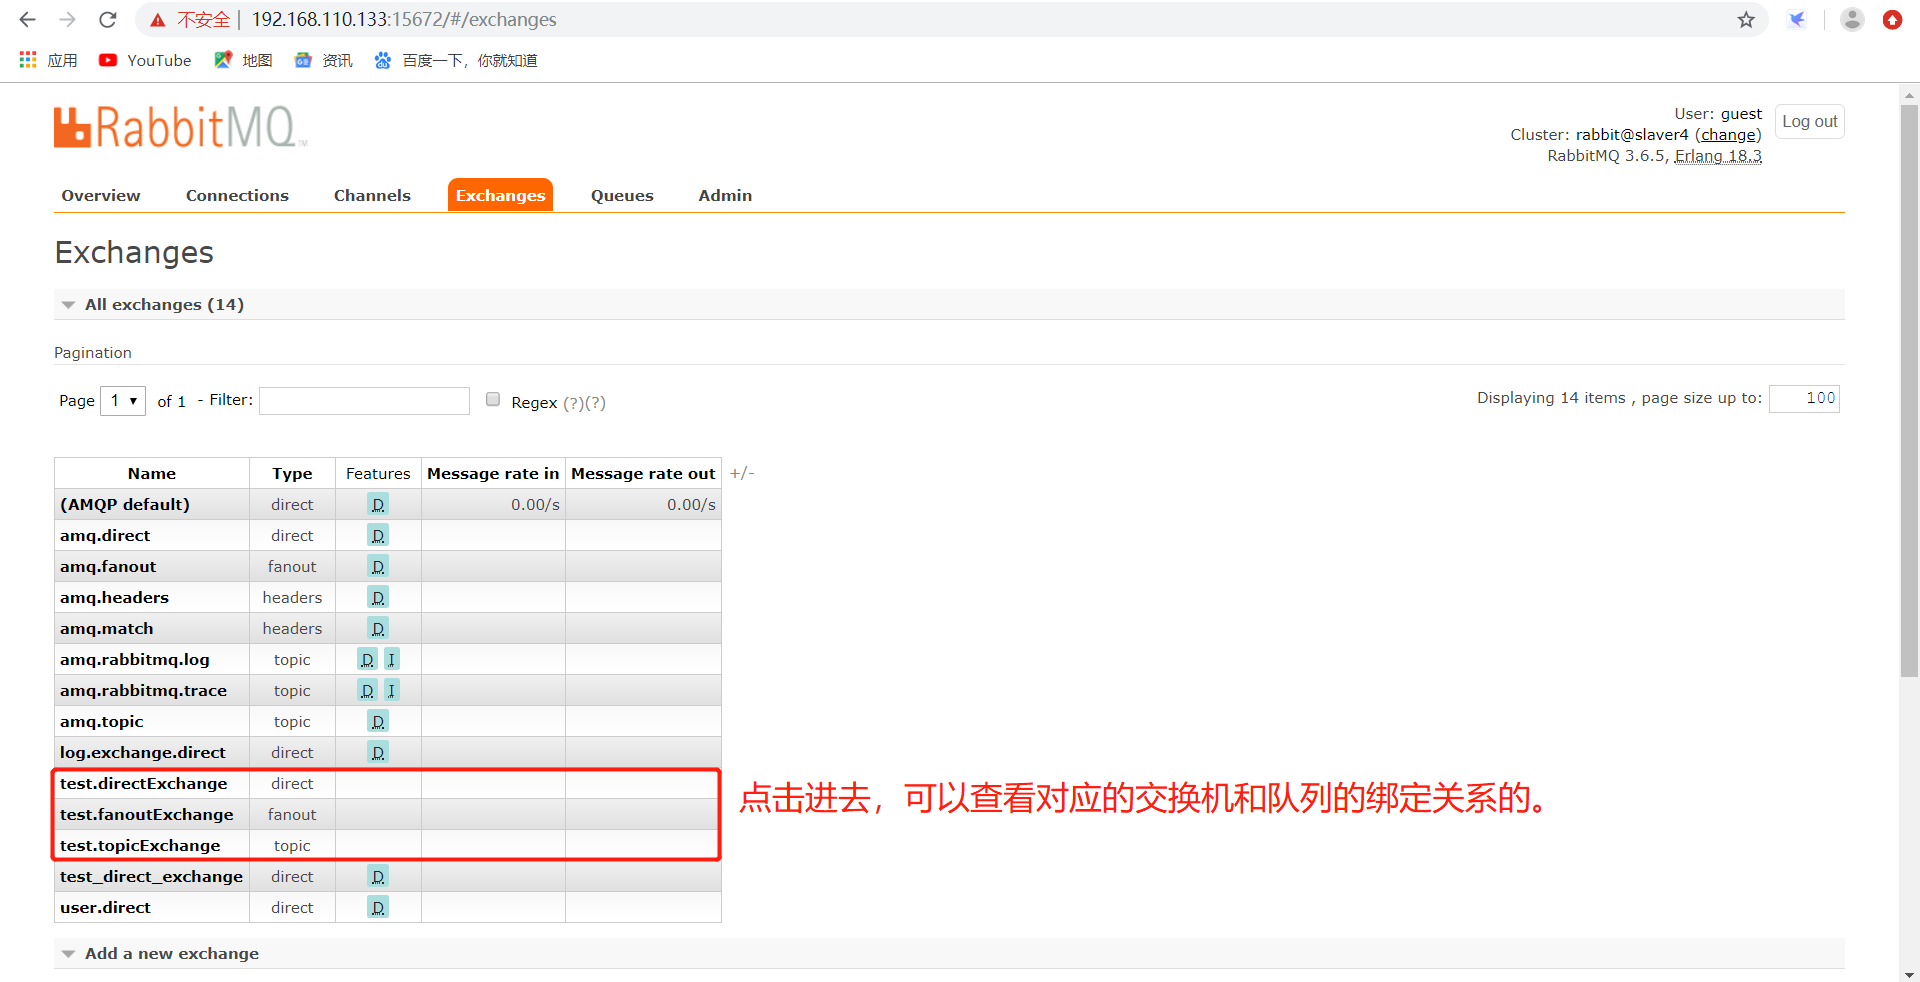
下面演示一下,Spring整合RabbitMQ,创建交换机,创建队列,将交换机和队列绑定的示例代码,如下所示:
 1 package com.bie;
 2
 3 import java.util.HashMap;
 4
 5 import org.junit.Test;
 6 import org.junit.runner.RunWith;
 7 import org.springframework.amqp.core.Binding;
 8 import org.springframework.amqp.core.BindingBuilder;
 9 import org.springframework.amqp.core.DirectExchange;
10 import org.springframework.amqp.core.FanoutExchange;
11 import org.springframework.amqp.core.Queue;
12 import org.springframework.amqp.core.TopicExchange;
13 import org.springframework.amqp.rabbit.core.RabbitAdmin;
14 import org.springframework.beans.factory.annotation.Autowired;
15 import org.springframework.boot.test.context.SpringBootTest;
16 import org.springframework.test.context.junit4.SpringRunner;
17
18 /**
19  *
20  * @author biehl
21  *
22  */
23 @SpringBootTest
24 @RunWith(SpringRunner.class)
25 public class RabbitmqSpringApplicationTests {
26
27     @Autowired
28     private RabbitAdmin rabbitAdmin;
29
30     @Test
31     public void rabbitmqAdmin() {
32         // 参数1交换机名称, 参数1是否持久化durable, 参数3是否自动删除 autoDelete
33         // 创建direct类型的交换机
34         DirectExchange directExchange = new DirectExchange("test.directExchange", false, false);
35         rabbitAdmin.declareExchange(directExchange);
36
37         // 创建topic类型的交换机
38         TopicExchange topicExchange = new TopicExchange("test.topicExchange", false, false);
39         rabbitAdmin.declareExchange(topicExchange);
40
41         // 创建fanout类型的交换机
42         FanoutExchange fanoutExchange = new FanoutExchange("test.fanoutExchange", false, false);
43         rabbitAdmin.declareExchange(fanoutExchange);
44
45         // 创建direct类型的队列
46         Queue directQueue = new Queue("test.direct.queue", false);
47         rabbitAdmin.declareQueue(directQueue);
48
49         // 创建topic类型的交队列
50         Queue topicQueue = new Queue("test.topic.queue", false);
51         rabbitAdmin.declareQueue(topicQueue);
52
53         // 创建fanout类型的队列
54         Queue fanoutQueue = new Queue("test.fanout.queue", false);
55         rabbitAdmin.declareQueue(fanoutQueue);
56
57         // 声明绑定
58         // 参数1 String destination,可以认为是具体的队列。
59         // 参数2 DestinationType destinationType,绑定的类型。
60         // 参数3 String exchange,交换机的名称。
61         // 参数4 String routingKey,路由键的名称。
62         // 参数5 Map<String, Object> arguments可以传入的参数。
63         // 将test.directExchange交换机和test.direct.queue队列进行绑定
64         rabbitAdmin.declareBinding(new Binding("test.direct.queue", Binding.DestinationType.QUEUE,
65                 "test.directExchange", "direct", new HashMap<>()));
66
67         // 将test.topicExchange交换机和test.topic.queue队列进行绑定
68         // rabbitAdmin.declareBinding(new Binding("test.topic.queue",
69         // Binding.DestinationType.QUEUE, "test.topicExchange",
70         // "topic", new HashMap<>()));
71         rabbitAdmin.declareBinding(BindingBuilder.bind(new Queue("test.topic.queue", false)) // 直接创建队列
72                 .to(new TopicExchange("test.topicExchange", false, false)) // 直接创建交换机 建立关联关系
73                 .with("user.#")); // 指定路由Key
74
75         // 将test.fanoutExchange交换机和test.fanout.queue队列进行绑定
76         // rabbitAdmin.declareBinding(new Binding("test.fanout.queue",
77         // Binding.DestinationType.QUEUE,
78         // "test.fanoutExchange", "", new HashMap<>()));
79
80         rabbitAdmin.declareBinding(BindingBuilder.bind(new Queue("test.fanout.queue", false)) // 直接创建队列
81                 .to(new FanoutExchange("test.fanoutExchange", false, false))); // 直接创建交换机 建立关联关系
82
83         // 清空队列数据
84         rabbitAdmin.purgeQueue("test.direct.queue", false);
85         rabbitAdmin.purgeQueue("test.topic.queue", false);
86         rabbitAdmin.purgeQueue("test.fanout.queue", false);
87     }
88
89 }
执行代码,完毕,可以在RabbitMQ的管控台查询效果,效果如下所示:
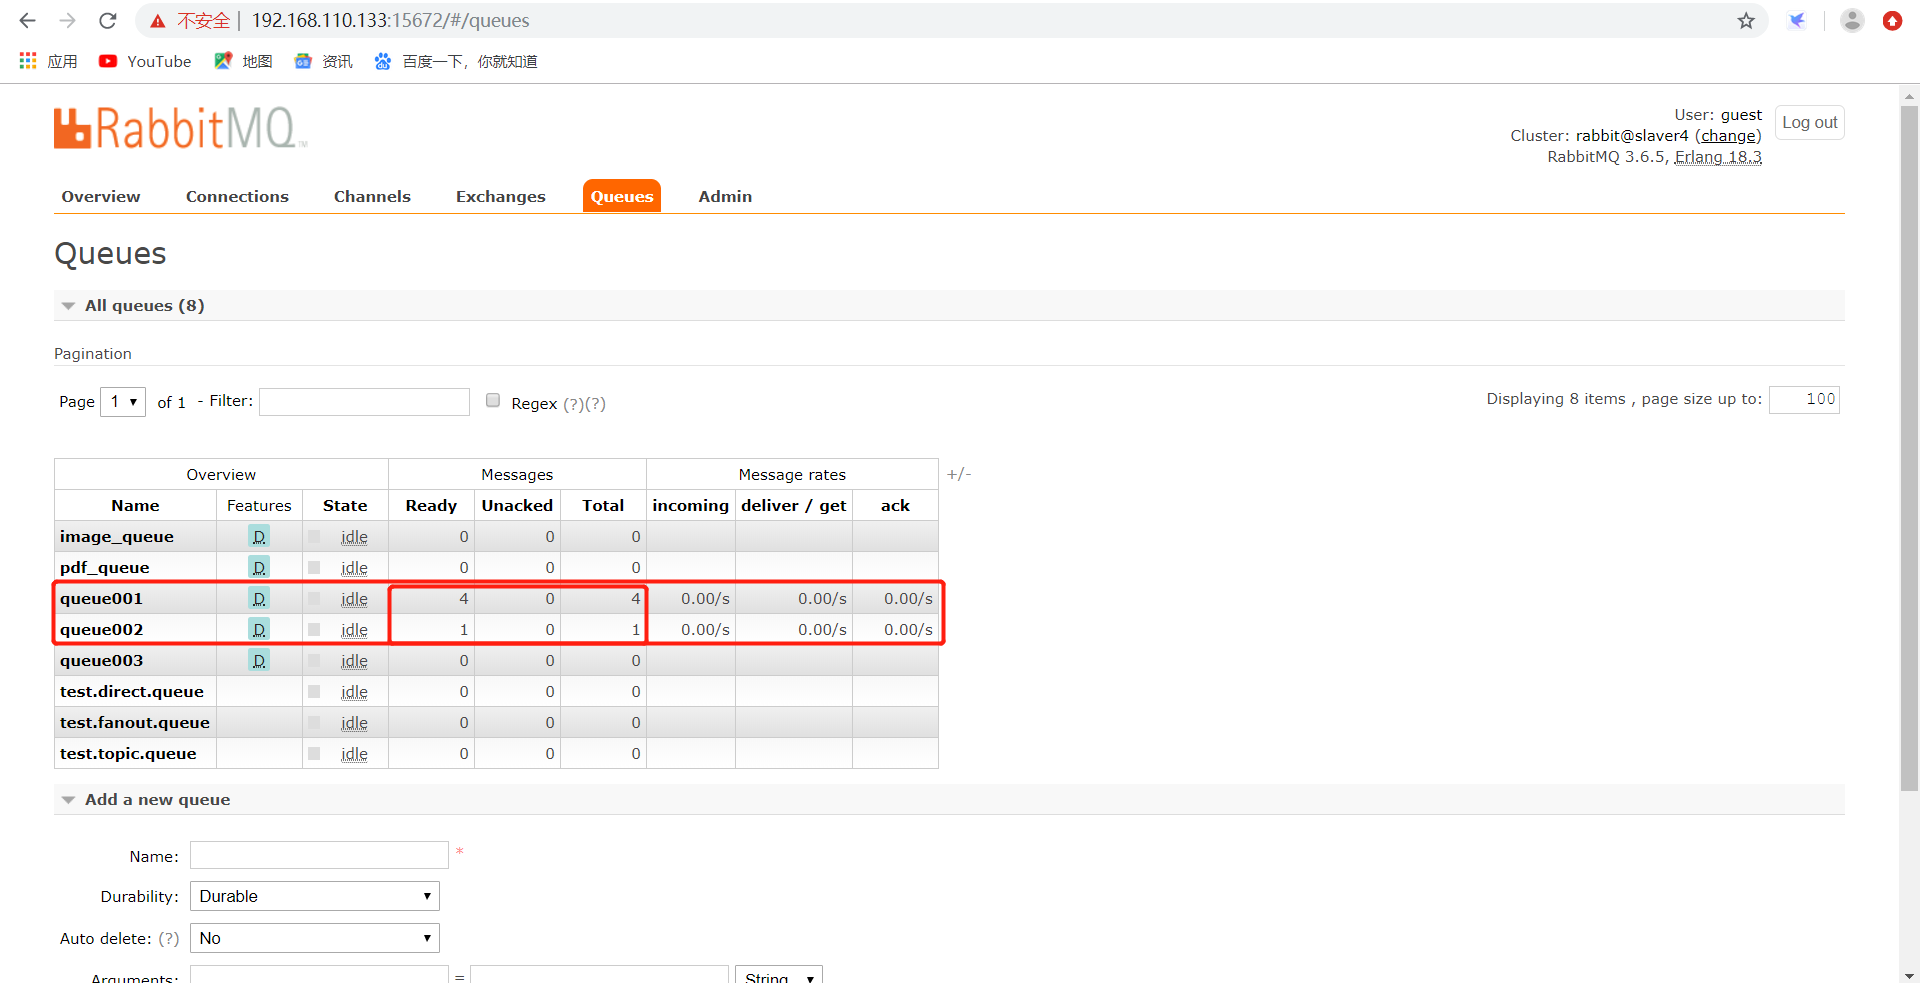
3、使用SpringAMQP去声明,就需要使用SpringAMQP的如下模式,即声明@Bean方式。SpringAMQP-RabbitMQ声明式配置使用。可以在初始化加载配置文件中创建好交换机,队列,以及交换机和队列的绑定关系,启动项目即可将交换机,队列,以及交换机和队列的绑定创建,如下所示:
  1 package com.bie;
  2
  3 import org.springframework.amqp.core.Binding;
  4 import org.springframework.amqp.core.BindingBuilder;
  5 import org.springframework.amqp.core.Queue;
  6 import org.springframework.amqp.core.TopicExchange;
  7 import org.springframework.amqp.rabbit.connection.CachingConnectionFactory;
  8 import org.springframework.amqp.rabbit.connection.ConnectionFactory;
  9 import org.springframework.amqp.rabbit.core.RabbitAdmin;
 10 import org.springframework.context.annotation.Bean;
 11 import org.springframework.context.annotation.ComponentScan;
 12 import org.springframework.context.annotation.Configuration;
 13
 14 /**
 15  *
 16  * @author biehl
 17  *
 18  */
 19 @Configuration
 20 @ComponentScan(basePackages = "com.bie")
 21 public class RabbitMQConfig {
 22
 23     /**
 24      * 将ConnectionFactory注入到bean容器中
 25      *
 26      * @return
 27      */
 28     @Bean
 29     public ConnectionFactory connectionFactory() {
 30         CachingConnectionFactory connectionFactory = new CachingConnectionFactory();
 31         connectionFactory.setAddresses("192.168.110.133:5672");
 32         connectionFactory.setUsername("guest");
 33         connectionFactory.setPassword("guest");
 34         connectionFactory.setVirtualHost("/");
 35         return connectionFactory;
 36     }
 37
 38     /**
 39      * 参数依赖上面注入的ConnectionFactory类,所以保持参数名称和注入的ConnectionFactory一致
 40      *
 41      * @param connectionFactory
 42      * @return
 43      */
 44     @Bean
 45     public RabbitAdmin rabbitAdmin(ConnectionFactory connectionFactory) {
 46         RabbitAdmin rabbitAdmin = new RabbitAdmin(connectionFactory);
 47         // 注意:autoStartup必须设置为true,否则Spring容器不会加载RabbitAdmin类。
 48         rabbitAdmin.setAutoStartup(true);
 49         return rabbitAdmin;
 50     }
 51
 52     // 使用SpringAMQP去声明,就需要使用SpringAMQP的如下模式,即声明@Bean方式。
 53     // SpringAMQP-RabbitMQ声明式配置使用
 54
 55     /**
 56      * 针对消费者配置:
 57      *
 58      * 1. 设置交换机类型。
 59      *
 60      * 2. 将队列绑定到交换机。
 61      *
 62      * FanoutExchange: 将消息分发到所有的绑定队列,无routingkey的概念。
 63      *
 64      * HeadersExchange :通过添加属性key-value匹配。
 65      *
 66      * DirectExchange:按照routingkey分发到指定队列。
 67      *
 68      * TopicExchange:多关键字匹配。
 69      */
 70     @Bean
 71     public TopicExchange topicExchange001() {
 72         return new TopicExchange("topic001", true, false);
 73     }
 74
 75     @Bean
 76     public Queue queue001() {
 77         return new Queue("queue001", true);// 队列持久化
 78     }
 79
 80     @Bean
 81     public Binding bingding001() {
 82         return BindingBuilder.bind(queue001()).to(topicExchange001()).with("spring.*");
 83     }
 84
 85     // 第二个交换机通过路由键绑定到队列上面。
 86     @Bean
 87     public TopicExchange topicExchange002() {
 88         return new TopicExchange("topic002", true, false);
 89     }
 90
 91     @Bean
 92     public Queue queue002() {
 93         return new Queue("queue002", true);// 队列持久化
 94     }
 95
 96     @Bean
 97     public Binding bingding002() {
 98         return BindingBuilder.bind(queue002()).to(topicExchange002()).with("rabbit.*");
 99     }
100
101     // 第三个,队列通过路由键绑定到第一个队列上面,即第一个交换机绑定了两个队列。
102     @Bean
103     public Queue queue003() {
104         return new Queue("queue003", true);// 队列持久化
105     }
106
107     @Bean
108     public Binding bingding003() {
109         return BindingBuilder.bind(queue003()).to(topicExchange001()).with("mq.*");
110     }
111
112     @Bean
113     public Queue queue_image() {
114         return new Queue("image_queue", true); // 队列持久
115     }
116
117     @Bean
118     public Queue queue_pdf() {
119         return new Queue("pdf_queue", true); // 队列持久
120     }
121
122 }
4、RabbitTemplate,即消息模板,我们在与SpringAMQP整合的时候进行发送消息的关键类。该类提供了丰富的发送消息方法,包括可靠性投递消息方法,回调监听消息接口ConfirmCallback,返回值确认ReturnCallBack等等。同样我们需要进行注入到Spring容器中,然后直接使用。在与Spring整合的时候需要实例化,但是在与SpringBoot整合的时候,在配置文件里面添加配置即可。
  1 package com.bie;
  2
  3 import org.springframework.amqp.core.Binding;
  4 import org.springframework.amqp.core.BindingBuilder;
  5 import org.springframework.amqp.core.Queue;
  6 import org.springframework.amqp.core.TopicExchange;
  7 import org.springframework.amqp.rabbit.connection.CachingConnectionFactory;
  8 import org.springframework.amqp.rabbit.connection.ConnectionFactory;
  9 import org.springframework.amqp.rabbit.core.RabbitAdmin;
 10 import org.springframework.amqp.rabbit.core.RabbitTemplate;
 11 import org.springframework.context.annotation.Bean;
 12 import org.springframework.context.annotation.ComponentScan;
 13 import org.springframework.context.annotation.Configuration;
 14
 15 /**
 16  *
 17  * @author biehl
 18  *
 19  */
 20 @Configuration
 21 @ComponentScan(basePackages = "com.bie")
 22 public class RabbitMQConfig {
 23
 24     /**
 25      * 将ConnectionFactory注入到bean容器中
 26      *
 27      * @return
 28      */
 29     @Bean
 30     public ConnectionFactory connectionFactory() {
 31         CachingConnectionFactory connectionFactory = new CachingConnectionFactory();
 32         connectionFactory.setAddresses("192.168.110.133:5672");
 33         connectionFactory.setUsername("guest");
 34         connectionFactory.setPassword("guest");
 35         connectionFactory.setVirtualHost("/");
 36         return connectionFactory;
 37     }
 38
 39     /**
 40      * 参数依赖上面注入的ConnectionFactory类,所以保持参数名称和注入的ConnectionFactory一致
 41      *
 42      * @param connectionFactory
 43      * @return
 44      */
 45     @Bean
 46     public RabbitAdmin rabbitAdmin(ConnectionFactory connectionFactory) {
 47         RabbitAdmin rabbitAdmin = new RabbitAdmin(connectionFactory);
 48         // 注意:autoStartup必须设置为true,否则Spring容器不会加载RabbitAdmin类。
 49         rabbitAdmin.setAutoStartup(true);
 50         return rabbitAdmin;
 51     }
 52
 53     // 使用SpringAMQP去声明,就需要使用SpringAMQP的如下模式,即声明@Bean方式。
 54     // SpringAMQP-RabbitMQ声明式配置使用
 55
 56     /**
 57      * 针对消费者配置:
 58      *
 59      * 1. 设置交换机类型。
 60      *
 61      * 2. 将队列绑定到交换机。
 62      *
 63      * FanoutExchange: 将消息分发到所有的绑定队列,无routingkey的概念。
 64      *
 65      * HeadersExchange :通过添加属性key-value匹配。
 66      *
 67      * DirectExchange:按照routingkey分发到指定队列。
 68      *
 69      * TopicExchange:多关键字匹配。
 70      */
 71     @Bean
 72     public TopicExchange topicExchange001() {
 73         return new TopicExchange("topic001", true, false);
 74     }
 75
 76     @Bean
 77     public Queue queue001() {
 78         return new Queue("queue001", true);// 队列持久化
 79     }
 80
 81     @Bean
 82     public Binding bingding001() {
 83         return BindingBuilder.bind(queue001()).to(topicExchange001()).with("spring.*");
 84     }
 85
 86     // 第二个交换机通过路由键绑定到队列上面。
 87     @Bean
 88     public TopicExchange topicExchange002() {
 89         return new TopicExchange("topic002", true, false);
 90     }
 91
 92     @Bean
 93     public Queue queue002() {
 94         return new Queue("queue002", true);// 队列持久化
 95     }
 96
 97     @Bean
 98     public Binding bingding002() {
 99         return BindingBuilder.bind(queue002()).to(topicExchange002()).with("rabbit.*");
100     }
101
102     // 第三个,队列通过路由键绑定到第一个队列上面,即第一个交换机绑定了两个队列。
103     @Bean
104     public Queue queue003() {
105         return new Queue("queue003", true);// 队列持久化
106     }
107
108     @Bean
109     public Binding bingding003() {
110         return BindingBuilder.bind(queue003()).to(topicExchange001()).with("mq.*");
111     }
112
113     @Bean
114     public Queue queue_image() {
115         return new Queue("image_queue", true); // 队列持久
116     }
117
118     @Bean
119     public Queue queue_pdf() {
120         return new Queue("pdf_queue", true); // 队列持久
121     }
122
123     // RabbitTemplate,即消息模板,我们在与SpringAMQP整合的时候进行发送消息的关键类。
124     // 该类提供了丰富的发送消息方法,包括可靠性投递消息方法,回调监听消息接口ConfirmCallback,
125     // 返回值确认ReturnCallBack等等。同样我们需要进行注入到Spring容器中,然后直接使用。
126     // 将RabbitTemplate加入到Spring容器中
127     public RabbitTemplate rabbitTemplate(ConnectionFactory connectionFactory) {
128         RabbitTemplate rabbitTemplate = new RabbitTemplate(connectionFactory);
129         return rabbitTemplate;
130     }
131
132 }
使用RabbittEmplate发送消息的案例,由于结合初始化配置文件创建的交换机,队列以及交换机和队列的绑定,将消息发送到自己创建的交换机,队列上面,所以效果请自己仔细查看,如下所示:
 1 package com.bie;
 2
 3 import java.util.HashMap;
 4
 5 import org.junit.Test;
 6 import org.junit.runner.RunWith;
 7 import org.springframework.amqp.AmqpException;
 8 import org.springframework.amqp.core.Binding;
 9 import org.springframework.amqp.core.BindingBuilder;
10 import org.springframework.amqp.core.DirectExchange;
11 import org.springframework.amqp.core.FanoutExchange;
12 import org.springframework.amqp.core.Message;
13 import org.springframework.amqp.core.MessagePostProcessor;
14 import org.springframework.amqp.core.MessageProperties;
15 import org.springframework.amqp.core.Queue;
16 import org.springframework.amqp.core.TopicExchange;
17 import org.springframework.amqp.rabbit.core.RabbitAdmin;
18 import org.springframework.amqp.rabbit.core.RabbitTemplate;
19 import org.springframework.beans.factory.annotation.Autowired;
20 import org.springframework.boot.test.context.SpringBootTest;
21 import org.springframework.test.context.junit4.SpringRunner;
22
23 /**
24  *
25  * @author biehl
26  *
27  */
28 @SpringBootTest
29 @RunWith(SpringRunner.class)
30 public class RabbitmqSpringApplicationTests {
31
32     // 发送消息
33     @Autowired
34     private RabbitTemplate rabbitTemplate;
35
36     @Test
37     public void sendMessage() {
38         // 1、创建消息
39         MessageProperties messageProperties = new MessageProperties();
40         messageProperties.getHeaders().put("desc", "消息描述");
41         messageProperties.getHeaders().put("type", "消息类型");
42         Message message = new Message("hello RabbitMQ".getBytes(), messageProperties);
43
44         // 2、发送消息
45         String exchange = "topic001";
46         String routingKey = "spring.amqp";
47         rabbitTemplate.convertAndSend(exchange, routingKey, message, new MessagePostProcessor() {
48
49             @Override
50             public Message postProcessMessage(Message message) throws AmqpException {
51                 System.out.println("======添加额外的设置======");
52                 message.getMessageProperties().getHeaders().put("desc", "额外的消息描述");
53                 message.getMessageProperties().getHeaders().put("attr", "额外的属性");
54                 return message;
55             }
56         });
57     }
58
59     @Test
60     public void sendMessage2() throws Exception {
61         // 1 创建消息
62         MessageProperties messageProperties = new MessageProperties();
63         messageProperties.setContentType("text/plain");
64         Message message = new Message("RabbitMQ的消息.......".getBytes(), messageProperties);
65
66         // 2、发送消息
67         rabbitTemplate.send("topic001", "spring.abc", message);
68
69         rabbitTemplate.convertAndSend("topic001", "spring.amqp", "hello object message send!");
70         rabbitTemplate.convertAndSend("topic002", "rabbit.abc", "hello object message send!");
71     }
72
73 }
运行效果如下所示:
5、SpringAMQP消息容器SimpleMessageListenerContainer。
1)、简单消息监听器,这个类非常的强大,我们可以对他进行很多设置,对于消费者的设置项,这个类都可以满足。可以监听队列(多个队列),自动启动,自动声明功能。可以设置事务特性、事务管理器、事务属性、事务容量(并发)、是否开启事务、回滚消息等等。可以设置消费者数量、最小最大数量、批量消费等等。可以设置消息确认和自动确认模式,是否重回队列、异常捕获handler函数。可以设置消费者标签生成策略,是否独占模式,消费者属性等等。可以设置具体的监听器、消息转换器等等。
2)、注意,SpringAMQP消息容器SimpleMessageListenerContainer可以进行动态设置,比如在运行中的应用可以动态的修改其消费者数量的大小,接收消息的模式等等。很多基于RabbitMQ的自制定化后端控制台在进行动态设置的时候,也是根据这一特性实现的。
  1 package com.bie;
  2
  3 import java.util.UUID;
  4
  5 import org.springframework.amqp.core.AcknowledgeMode;
  6 import org.springframework.amqp.core.Binding;
  7 import org.springframework.amqp.core.BindingBuilder;
  8 import org.springframework.amqp.core.Message;
  9 import org.springframework.amqp.core.Queue;
 10 import org.springframework.amqp.core.TopicExchange;
 11 import org.springframework.amqp.rabbit.connection.CachingConnectionFactory;
 12 import org.springframework.amqp.rabbit.connection.ConnectionFactory;
 13 import org.springframework.amqp.rabbit.core.RabbitAdmin;
 14 import org.springframework.amqp.rabbit.core.RabbitTemplate;
 15 import org.springframework.amqp.rabbit.listener.SimpleMessageListenerContainer;
 16 import org.springframework.amqp.rabbit.listener.adapter.MessageListenerAdapter;
 17 import org.springframework.amqp.rabbit.listener.api.ChannelAwareMessageListener;
 18 import org.springframework.amqp.support.ConsumerTagStrategy;
 19 import org.springframework.amqp.support.converter.ContentTypeDelegatingMessageConverter;
 20 import org.springframework.amqp.support.converter.Jackson2JsonMessageConverter;
 21 import org.springframework.context.annotation.Bean;
 22 import org.springframework.context.annotation.ComponentScan;
 23 import org.springframework.context.annotation.Configuration;
 24
 25 import com.bie.adapter.MessageDelegate;
 26 import com.bie.convert.ImageMessageConverter;
 27 import com.bie.convert.PDFMessageConverter;
 28 import com.bie.convert.TextMessageConverter;
 29 import com.rabbitmq.client.Channel;
 30
 31 /**
 32  *
 33  * @author biehl
 34  *
 35  */
 36 @Configuration
 37 @ComponentScan(basePackages = "com.bie")
 38 public class RabbitMQConfig {
 39
 40     /**
 41      * 将ConnectionFactory注入到bean容器中
 42      *
 43      * @return
 44      */
 45     @Bean
 46     public ConnectionFactory connectionFactory() {
 47         CachingConnectionFactory connectionFactory = new CachingConnectionFactory();
 48         connectionFactory.setAddresses("192.168.110.133:5672");
 49         connectionFactory.setUsername("guest");
 50         connectionFactory.setPassword("guest");
 51         connectionFactory.setVirtualHost("/");
 52         return connectionFactory;
 53     }
 54
 55     /**
 56      * 参数依赖上面注入的ConnectionFactory类,所以保持参数名称和注入的ConnectionFactory一致
 57      *
 58      * @param connectionFactory
 59      * @return
 60      */
 61     @Bean
 62     public RabbitAdmin rabbitAdmin(ConnectionFactory connectionFactory) {
 63         RabbitAdmin rabbitAdmin = new RabbitAdmin(connectionFactory);
 64         // 注意:autoStartup必须设置为true,否则Spring容器不会加载RabbitAdmin类。
 65         rabbitAdmin.setAutoStartup(true);
 66         return rabbitAdmin;
 67     }
 68
 69     // 使用SpringAMQP去声明,就需要使用SpringAMQP的如下模式,即声明@Bean方式。
 70     // SpringAMQP-RabbitMQ声明式配置使用
 71
 72     /**
 73      * 针对消费者配置:
 74      *
 75      * 1. 设置交换机类型。
 76      *
 77      * 2. 将队列绑定到交换机。
 78      *
 79      * FanoutExchange: 将消息分发到所有的绑定队列,无routingkey的概念。
 80      *
 81      * HeadersExchange :通过添加属性key-value匹配。
 82      *
 83      * DirectExchange:按照routingkey分发到指定队列。
 84      *
 85      * TopicExchange:多关键字匹配。
 86      */
 87     @Bean
 88     public TopicExchange topicExchange001() {
 89         return new TopicExchange("topic001", true, false);
 90     }
 91
 92     @Bean
 93     public Queue queue001() {
 94         return new Queue("queue001", true);// 队列持久化
 95     }
 96
 97     @Bean
 98     public Binding bingding001() {
 99         return BindingBuilder.bind(queue001()).to(topicExchange001()).with("spring.*");
100     }
101
102     // 第二个交换机通过路由键绑定到队列上面。
103     @Bean
104     public TopicExchange topicExchange002() {
105         return new TopicExchange("topic002", true, false);
106     }
107
108     @Bean
109     public Queue queue002() {
110         return new Queue("queue002", true);// 队列持久化
111     }
112
113     @Bean
114     public Binding bingding002() {
115         return BindingBuilder.bind(queue002()).to(topicExchange002()).with("rabbit.*");
116     }
117
118     // 第三个,队列通过路由键绑定到第一个队列上面,即第一个交换机绑定了两个队列。
119     @Bean
120     public Queue queue003() {
121         return new Queue("queue003", true);// 队列持久化
122     }
123
124     @Bean
125     public Binding bingding003() {
126         return BindingBuilder.bind(queue003()).to(topicExchange001()).with("mq.*");
127     }
128
129     @Bean
130     public Queue queue_image() {
131         return new Queue("image_queue", true); // 队列持久
132     }
133
134     @Bean
135     public Queue queue_pdf() {
136         return new Queue("pdf_queue", true); // 队列持久
137     }
138
139     // RabbitTemplate,即消息模板,我们在与SpringAMQP整合的时候进行发送消息的关键类。
140     // 该类提供了丰富的发送消息方法,包括可靠性投递消息方法,回调监听消息接口ConfirmCallback,
141     // 返回值确认ReturnCallBack等等。同样我们需要进行注入到Spring容器中,然后直接使用。
142     // 将RabbitTemplate加入到Spring容器中
143     public RabbitTemplate rabbitTemplate(ConnectionFactory connectionFactory) {
144         RabbitTemplate rabbitTemplate = new RabbitTemplate(connectionFactory);
145         return rabbitTemplate;
146     }
147
148     /**
149      *
150      * @param connectionFactory
151      * @return
152      */
153     @Bean
154     public SimpleMessageListenerContainer messageListenerContainer(ConnectionFactory connectionFactory) {
155         SimpleMessageListenerContainer container = new SimpleMessageListenerContainer(connectionFactory);
156         // 监听的队列,可变参数,可以添加多个队列。
157         container.setQueues(queue001(), queue002(), queue003(), queue_image(), queue_pdf());
158         // 设置消费者个数。
159         container.setConcurrentConsumers(1);
160         // 设置最大消费者个数。
161         container.setMaxConcurrentConsumers(5);
162         // 设置默认是否重回队列。
163         container.setDefaultRequeueRejected(false);
164         // 设置签收模式,自动签收。
165         container.setAcknowledgeMode(AcknowledgeMode.AUTO);
166         // 设置是否外露
167         container.setExposeListenerChannel(true);
168         // 设置标签策略。
169         container.setConsumerTagStrategy(new ConsumerTagStrategy() {
170             @Override
171             public String createConsumerTag(String queue) {
172                 return queue + "_" + UUID.randomUUID().toString();
173             }
174         });
175
176         // 监听消息
177         container.setMessageListener(new ChannelAwareMessageListener() {
178
179             @Override
180             public void onMessage(Message message, Channel channel) throws Exception {
181                 String msg = new String(message.getBody());
182                 System.out.println("===========================消费者消息msg : " + msg);
183             }
184         });
185
186         return container;
187     }
188
189 }
可以直接在测试类里面进行启动,直接启动测试方法sendMessage2,如下所示:
  1 package com.bie;
  2
  3 import java.util.HashMap;
  4
  5 import org.junit.Test;
  6 import org.junit.runner.RunWith;
  7 import org.springframework.amqp.AmqpException;
  8 import org.springframework.amqp.core.Binding;
  9 import org.springframework.amqp.core.BindingBuilder;
 10 import org.springframework.amqp.core.DirectExchange;
 11 import org.springframework.amqp.core.FanoutExchange;
 12 import org.springframework.amqp.core.Message;
 13 import org.springframework.amqp.core.MessagePostProcessor;
 14 import org.springframework.amqp.core.MessageProperties;
 15 import org.springframework.amqp.core.Queue;
 16 import org.springframework.amqp.core.TopicExchange;
 17 import org.springframework.amqp.rabbit.core.RabbitAdmin;
 18 import org.springframework.amqp.rabbit.core.RabbitTemplate;
 19 import org.springframework.beans.factory.annotation.Autowired;
 20 import org.springframework.boot.test.context.SpringBootTest;
 21 import org.springframework.test.context.junit4.SpringRunner;
 22
 23 /**
 24  *
 25  * @author biehl
 26  *
 27  */
 28 @SpringBootTest
 29 @RunWith(SpringRunner.class)
 30 public class RabbitmqSpringApplicationTests {
 31
 32     @Autowired
 33     private RabbitAdmin rabbitAdmin;
 34
 35     @Test
 36     public void rabbitmqAdmin() {
 37         // 参数1交换机名称, 参数1是否持久化durable, 参数3是否自动删除 autoDelete
 38         // 创建direct类型的交换机
 39         DirectExchange directExchange = new DirectExchange("test.directExchange", false, false);
 40         rabbitAdmin.declareExchange(directExchange);
 41
 42         // 创建topic类型的交换机
 43         TopicExchange topicExchange = new TopicExchange("test.topicExchange", false, false);
 44         rabbitAdmin.declareExchange(topicExchange);
 45
 46         // 创建fanout类型的交换机
 47         FanoutExchange fanoutExchange = new FanoutExchange("test.fanoutExchange", false, false);
 48         rabbitAdmin.declareExchange(fanoutExchange);
 49
 50         // 创建direct类型的队列
 51         Queue directQueue = new Queue("test.direct.queue", false);
 52         rabbitAdmin.declareQueue(directQueue);
 53
 54         // 创建topic类型的交队列
 55         Queue topicQueue = new Queue("test.topic.queue", false);
 56         rabbitAdmin.declareQueue(topicQueue);
 57
 58         // 创建fanout类型的队列
 59         Queue fanoutQueue = new Queue("test.fanout.queue", false);
 60         rabbitAdmin.declareQueue(fanoutQueue);
 61
 62         // 声明绑定
 63         // 参数1 String destination,可以认为是具体的队列。
 64         // 参数2 DestinationType destinationType,绑定的类型。
 65         // 参数3 String exchange,交换机的名称。
 66         // 参数4 String routingKey,路由键的名称。
 67         // 参数5 Map<String, Object> arguments可以传入的参数。
 68         // 将test.directExchange交换机和test.direct.queue队列进行绑定
 69         rabbitAdmin.declareBinding(new Binding("test.direct.queue", Binding.DestinationType.QUEUE,
 70                 "test.directExchange", "direct", new HashMap<>()));
 71
 72         // 将test.topicExchange交换机和test.topic.queue队列进行绑定
 73         // rabbitAdmin.declareBinding(new Binding("test.topic.queue",
 74         // Binding.DestinationType.QUEUE, "test.topicExchange",
 75         // "topic", new HashMap<>()));
 76         rabbitAdmin.declareBinding(BindingBuilder.bind(new Queue("test.topic.queue", false)) // 直接创建队列
 77                 .to(new TopicExchange("test.topicExchange", false, false)) // 直接创建交换机 建立关联关系
 78                 .with("user.#")); // 指定路由Key
 79
 80         // 将test.fanoutExchange交换机和test.fanout.queue队列进行绑定
 81         // rabbitAdmin.declareBinding(new Binding("test.fanout.queue",
 82         // Binding.DestinationType.QUEUE,
 83         // "test.fanoutExchange", "", new HashMap<>()));
 84
 85         rabbitAdmin.declareBinding(BindingBuilder.bind(new Queue("test.fanout.queue", false)) // 直接创建队列
 86                 .to(new FanoutExchange("test.fanoutExchange", false, false))); // 直接创建交换机 建立关联关系
 87
 88         // 清空队列数据
 89         rabbitAdmin.purgeQueue("test.direct.queue", false);
 90         rabbitAdmin.purgeQueue("test.topic.queue", false);
 91         rabbitAdmin.purgeQueue("test.fanout.queue", false);
 92     }
 93
 94     // 发送消息
 95     @Autowired
 96     private RabbitTemplate rabbitTemplate;
 97
 98     @Test
 99     public void sendMessage() {
100         // 1、创建消息
101         MessageProperties messageProperties = new MessageProperties();
102         messageProperties.getHeaders().put("desc", "消息描述");
103         messageProperties.getHeaders().put("type", "消息类型");
104         Message message = new Message("hello RabbitMQ".getBytes(), messageProperties);
105
106         // 2、发送消息
107         String exchange = "topic001";
108         String routingKey = "spring.amqp";
109         rabbitTemplate.convertAndSend(exchange, routingKey, message, new MessagePostProcessor() {
110
111             @Override
112             public Message postProcessMessage(Message message) throws AmqpException {
113                 System.out.println("======添加额外的设置======");
114                 message.getMessageProperties().getHeaders().put("desc", "额外的消息描述");
115                 message.getMessageProperties().getHeaders().put("attr", "额外的属性");
116                 return message;
117             }
118         });
119     }
120
121     @Test
122     public void sendMessage2() throws Exception {
123         // 1 创建消息
124         MessageProperties messageProperties = new MessageProperties();
125         messageProperties.setContentType("text/plain");
126         Message message = new Message("RabbitMQ的消息.......".getBytes(), messageProperties);
127
128         // 2、发送消息
129         rabbitTemplate.send("topic001", "spring.abc", message);
130
131         rabbitTemplate.convertAndSend("topic001", "spring.amqp", "hello object message send!");
132         rabbitTemplate.convertAndSend("topic002", "rabbit.abc", "hello object message send!");
133     }
134
135 }
SpringAMQP消息容器SimpleMessageListenerContainer,简单消息监听器,效果如下所示:

作者:别先生
博客园:https://www.cnblogs.com/biehongli/
如果您想及时得到个人撰写文章以及著作的消息推送,可以扫描上方二维码,关注个人公众号哦。


 浙公网安备 33010602011771号