Python工具 | TOPSEC-NGFW4000-批量IP封阻器(Simple-banip)
工具介绍
此工具包括主程序文件"Sinple-banip-TOPSEC-NGFW4000-UF(TG-51114)",以及“ip.txt”、“cookie.txt”两个配置文件。其中"ip.txt"负责存储封堵的IP地址,"cookie.txt"负责存储登陆过后下发的session串
具体代码
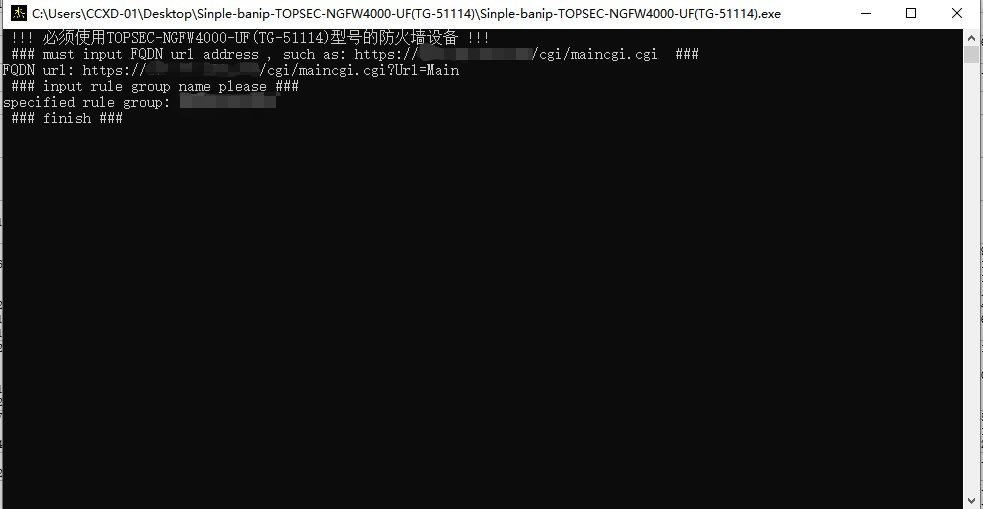
 1 import requests
 2 import time                                                 #导入模块
 3 requests.packages.urllib3.disable_warnings()                #设定默认忽略无证书告警
 4 requests = requests.session()                               #开启会话请求
 5 print(" !!! 必须使用TOPSEC-NGFW4000-UF(TG-51114)型号的防火墙设备 !!! ")
 6 print(" ### must input FQDN url address , such as: https://172.28.220.254/cgi/maincgi.cgi  ### ")
 7 url = str(input("FQDN url: "))                              #指定防火墙url地址
 8 print(" ### input rule group name please ### ")
 9 raw_rule_group = str(input("specified rule group: "))
10 rule_group = raw_rule_group.encode("gb2312")                #指定封禁规则组
11 file = open("ip.txt","r+")
12 file_content = file.read()
13 file_content = file_content.replace(" ","\n")
14 file.close()
15 file = open("ip.txt","w+")
16 file.write(file_content)
17 file.close()                                                #将ip文件中的ip地址,转化格式为每行一个换行
18 file = open("ip.txt","r")
19 file_content = file.readlines()
20 for i in range(0, len(file_content)):
21     file_content[i] = file_content[i].rstrip('\n')          #去掉文件中的换行符
22 banned_ip = list(file_content)
23 file.close()                                                #得到文件中的ip地址
24 cookie_file = open("cookie.txt","r")
25 raw_cookie = str(cookie_file.read())
26 cookie_file.close()
27 cookie = {"session_id_443":raw_cookie}                      #配置cookie
28 param = {
29     "Url":"HostObj",
30     "Act":"Edit",
31     "Name":rule_group
32     }                                                       #配置请求参数
33 for n in range(len(banned_ip)):
34     data = {
35     "def_host_edt_but":"确定",
36     "def_host_mac":"00:00:00:00:00:00",
37     "def_host_name":rule_group,
38     "name_hidden":rule_group
39     }
40     data.setdefault("def_host_ipad",[]).append(banned_ip)  #配置POST实体参数
41 r_p = requests.post(url,params=param,cookies=cookie,data=data,verify=False)      #带上参数发包
42 print(" ### finish ### ")
43 #print(r_p.text)
44 time.sleep(9)
代码解析
程序需要用到两个模块,"requests"模块和"time"模块
"requests"模块,支持HTTP连接保持和链接池,自动实现持久连接"keep-alive"。支持使用cookie保持会话、文件上传等功能。自动响应内容编码,国际化URL和POST数据自动编码。使用"requests"模块可以轻而易举的完成浏览器可有的任何操作。但是"requests"模块发送请求,得到网页后,并不会执行"JS"代码,需要自己分析目标站点后,再发起新的"requests"请求
requests.get(‘https://github.com/timeline.json’)                                  # GET请求
requests.post(“http://www.baidu.com/post”)                                        # POST请求
requests.put(“http://www.baidu.com/put”)                                          # PUT请求
requests.delete(“http://www.baidu.com/delete”)                                    # DELETE请求
requests.head(“http://www.baidu.com/get”)                                         # HEAD请求
requests.options(“http://www.baidu.com/get” )                                     # OPTIONS请求
无论哪种请求方式,他们的使用方法都是固定的,并且在发送基本的HTTP请求同时,还可以附带多种参数,来相互组合使用
requests.method(url[,parameters])
"params","cookies","headers","data","session","json","files","auth","timeout","proxies","redirects","stream"
requests.post(url,cookies={"Session":"dfsjkalnfsa=="})
"time"模块
配置好环境变量在命令提示符下,使用pip安装好所需要的模块
pip install requests
pip install time
在脚本中导入模块
import requests,time
运行效果

 浙公网安备 33010602011771号