CodeReview for Gerrit
CodeReview
代码审查(英语:Code review)是指对计算机源代码系统化地审查,常用软件同行评审的方式进行,其目的是在找出及修正在软件开发初期未发现的错误,提升软件质量及开发者的技术。代码审查常以不同的形式进行,例如结对编程、非正式的看过整个代码,或是正式的软件检查。
代码审查一般会分为三类:正式的代码审查、结对编程、以及轻量型的非正式代码审查。
正式的代码审查(例如范根检查法)有审慎及仔细的流程,由多位参与者分阶段进行。正式的代码审查是传统审查代码的方式,由软件开发者参加一连串的会议,一行一行的审查代码,一般会使用打印好的源代码。正式的代码审查可以彻底的找到程序中的缺陷,但需要投入许多的资源。
结对编程是两个程序员在一个计算机上共同工作,一个输入程序,另一个工程师审查他所输入的程序,结对编程是在极限编程中常见的开发方式。
轻量型的非正式代码审查需要投入的资源比正式的代码审查要少,一般会是在正常软件开发流程中同时进行,有时也会将结对编程视为轻量型代码审查的一种。
- Email往返:在代码登录后,源代码管理系统自动将代码邮寄给审查者。
- 配合辅助工具的代码审查:作者及审查者利用配合代码审查的软件进行审查。
书籍Best Kept Secrets of Peer Code Review中曾提到有关代码审查的案例研究,这个研究发现轻量型代码审查所找到的缺陷会比正式的代码审查要少,但其速度较快,其成本也较低。
CodeReview工具
- Crucible:Atlassian 内部代码审查工具;
- Gerrit:Google 开源的 git 代码审查工具;
- GitHub:程序员应该很熟悉了,上面的 "Pull Request" 在代码审查这里很好用;
- LGTM:可用于 GitHub 和 Bitbucket 的 PR 代码安全漏洞和代码质量审查辅助工具;
- Phabricator:Facebook 开源的 git/mercurial/svn 代码审查工具;
- PullRequest:GitHub pull requests 代码审查辅助工具;
- Pull Reminders:GitHub 上有 PR 需要你审核,该插件自动通过 Slack 提醒你;
- Reviewable:基于 GitHub pull requests 的代码审查辅助工具;
- Sider:GitHub 自动代码审查辅助工具;
- Upsource:JetBrain 内部部署的 git/mercurial/perforce/svn 代码审查工具。
Gerrit 安装
This content explains how to install a basic instance of Gerrit on a Linux machine.
|
NOTE
|
This quickstart is provided for demonstration purposes only. The Gerrit instance they install must not be used in a production environment. Instead, to install a Gerrit production environment, see Standalone Daemon Installation Guide. |
Before you start
Be sure you have:
-
A Unix-based server, including any Linux flavor, MacOS, or Berkeley Software Distribution (BSD).
-
Java SE Runtime Environment version 1.8. Gerrit is not compatible with Java 9 or newer yet.
Download Gerrit
From the Linux machine on which you want to install Gerrit:
-
Open a terminal window.
-
Download the desired Gerrit archive.
To view previous archives, see Gerrit Code Review: Releases. The steps below install Gerrit 3.0.3:
wget https://gerrit-releases.storage.googleapis.com/gerrit-3.0.3.war
|
NOTE
|
To build and install Gerrit from the source files, see Gerrit Code Review: Developer Setup. |
Install and initialize Gerrit
From the command line, enter:
export GERRIT_SITE=~/gerrit_testsite
java -jar gerrit*.war init --batch --dev -d $GERRIT_SITE
This command takes two parameters:
-
--batchassigns default values to several Gerrit configuration options. To learn more about these options, see Configuration. -
--devconfigures the Gerrit server to use the authentication option,DEVELOPMENT_BECOME_ANY_ACCOUNT, which enables you to switch between different users to explore how Gerrit works. To learn more about setting up Gerrit for development, see Gerrit Code Review: Developer Setup.
While this command executes, status messages are displayed in the terminal window. For example:
Generating SSH host key ... rsa(simple)... done
Initialized /home/gerrit/gerrit_testsite
Executing /home/gerrit/gerrit_testsite/bin/gerrit.sh start
Starting Gerrit Code Review: OK
The last message confirms that the Gerrit service is running:
Starting Gerrit Code Review: OK.
Update the listen URL
To prevent outside connections from contacting your new Gerrit instance (strongly recommended), change the URL on which Gerrit listens from * to localhost. For example:
git config --file $GERRIT_SITE/etc/gerrit.config httpd.listenUrl 'http://localhost:8080'
Restart the Gerrit service
You must restart the Gerrit service for your authentication type and listen URL changes to take effect:
$GERRIT_SITE/bin/gerrit.sh restart
Viewing Gerrit
To view your new basic installation of Gerrit, go to:
http://localhost:8080
工作案例
To understand how Gerrit works, let’s follow a change through its entire life cycle. This example uses a Gerrit server configured as follows:
-
Hostname: gerrithost
-
HTTP interface port: 80
-
SSH interface port: 29418
In this walkthrough, we’ll follow two developers, Max and Hannah, as they make and review a change to a RecipeBook project. We’ll follow the change through these stages:
-
Making the change.
-
Creating the review.
-
Reviewing the change.
-
Reworking the change.
-
Verifying the change.
-
Submitting the change.
|
NOTE
|
The project and commands used in this section are for demonstration purposes only. |
Making the Change
Our first developer, Max, has decided to make a change to the RecipeBook project he works on. His first step is to get the source code that he wants to modify. To get this code, he runs the following git clone command:
git clone ssh://gerrithost:29418/RecipeBook.git RecipeBook
After he clones the repository, he runs a couple of commands to add a Change-Id to his commits. This ID allows Gerrit to link together different versions of the same change being reviewed.
scp -p -P 29418 gerrithost:hooks/commit-msg RecipeBook/.git/hooks/
chmod u+x .git/hooks/commit-msg
|
NOTE
|
To learn more about adding a change-id and the commit message hook, see the commit-msg Hook topic. |
Creating the Review
Max’s next step is to push his change to Gerrit so other contributors can review it. He does this using the git push origin HEAD:refs/for/master command, as follows:
$ <work>
$ git commit
[master 3cc9e62] Change to a proper, yeast based pizza dough.
 1 file changed, 10 insertions(+), 5 deletions(-)
$ git push origin HEAD:refs/for/master
Counting objects: 3, done.
Delta compression using up to 8 threads.
Compressing objects: 100% (2/2), done.
Writing objects: 100% (3/3), 532 bytes | 0 bytes/s, done.
Total 3 (delta 0), reused 0 (delta 0)
remote: Processing changes: new: 1, done
remote:
remote: New Changes:
remote:   http://gerrithost/#/c/RecipeBook/+/702 Change to a proper, yeast based pizza dough.
remote:
To ssh://gerrithost:29418/RecipeBook
 * [new branch]      HEAD -> refs/for/master
Notice the reference to a refs/for/master branch. Gerrit uses this branch to create reviews for the master branch. If Max opted to push to a different branch, he would have modified his command to git push origin HEAD:refs/for/<branch_name>. Gerrit accepts pushes to refs/for/<branch_name> for every branch that it tracks.
The output of this command also contains a link to a web page Max can use to review this commit. Clicking on that link takes him to a screen similar to the following.

This is the Gerrit code review screen, where other contributors can review his change. Max can also perform tasks such as:
-
Looking at the diff of his change
-
Writing inline or summary comments to ask reviewers for advice on particular aspects of the change
-
Adding a list of people that should review the change
In this case, Max opts to manually add the senior developer on his team, Hannah, to review his change.
Reviewing the Change
Let’s now switch to Hannah, the senior developer who will review Max’s change.
As mentioned previously, Max chose to manually add Hannah as a reviewer. Gerrit offers other ways for reviewers to find changes, including:
-
Using the search feature that to find changes
-
Selecting Open from the Changes menu
-
Setting up email notifications to stay informed of changes even if you are not added as a reviewer
Because Max added Hannah as a reviewer, she receives an email telling her about his change. She opens up the Gerrit code review screen and selects Max’s change.
Notice the Label status section above:
Label Status Needs label:
             * Code-Review
             * Verified
These two lines indicate what checks must be completed before the change is accepted. The default Gerrit workflow requires two checks:
-
Code-Review. This check requires that someone look at the code and ensures that it meets project guidelines, styles, and other criteria.
-
Verified. This check means that the code actually compiles, passes any unit tests, and performs as expected.
In general, the Code-Review check requires an individual to look at the code, while the Verified check is done by an automated build server, through a mechanism such as the Gerrit Trigger Jenkins Plugin.
|
IMPORTANT
|
The Code-Review and Verified checks require different permissions in Gerrit. This requirement allows teams to separate these tasks. For example, an automated process can have the rights to verify a change, but not perform a code review. |
With the code review screen open, Hannah can begin to review Max’s change. She can choose one of two ways to review the change: unified or side-by-side. Both views allow her to perform tasks such as add inline or summary comments.
Hannah opts to view the change using Gerrit’s side-by-side view:
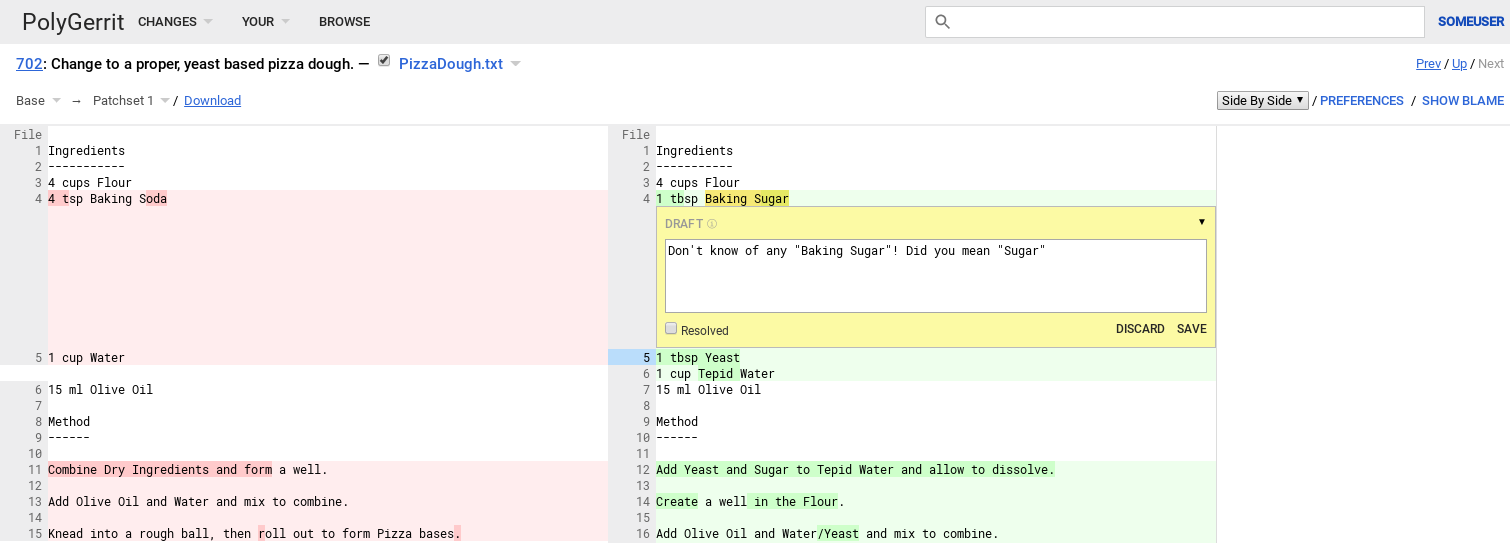
Hannah reviews the change and is ready to provide her feedback. She clicks the REPLY button on the change screen. This allows her to vote on the change.
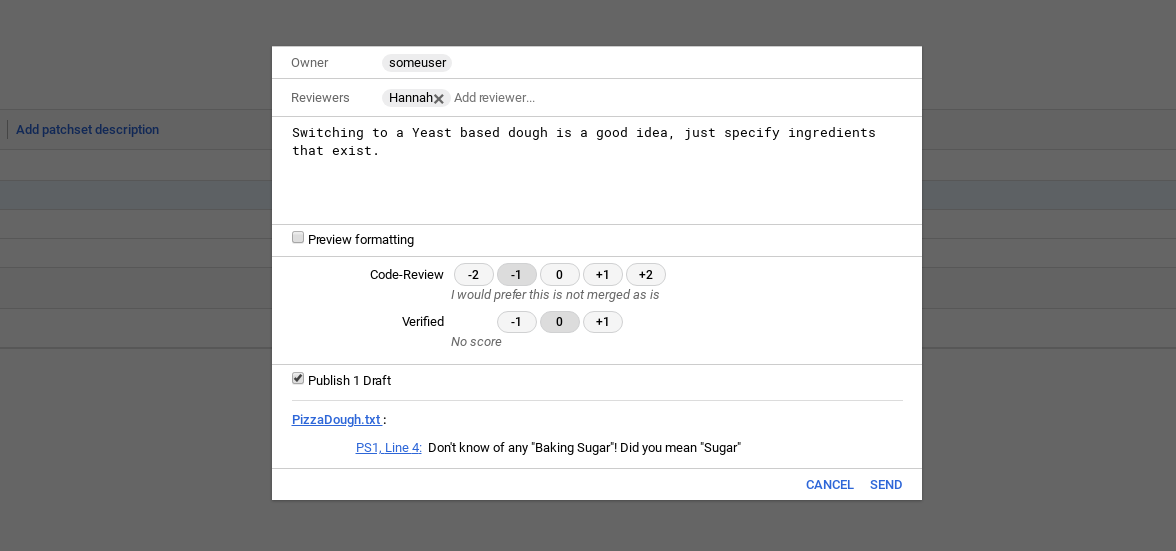
For Hannah and Max’s team, a code review vote is a numerical score between -2 and 2. The possible options are:
-
+2 Looks good to me, approved -
+1 Looks good to me, but someone else must approve -
0 No score -
-1 I would prefer that you didn’t submit this -
-2 Do not submit
In addition, a change must have at least one +2 vote and no -2 votes before it can be submitted. These numerical values do not accumulate. Two +1 votes do not equate to a +2.
|
NOTE
|
These settings are enabled by default. To learn about how to customize them for your own workflow, see the Project Configuration File Format topic. |
Hannah notices a possible issue with Max’s change, so she selects a -1 vote. She uses the Cover Message text box to provide Max with some additional feedback. When she is satisfied with her review, Hannah clicks the SEND button. At this point, her vote and cover message become visible to to all users.
Reworking the Change
Later in the day, Max decides to check on his change and notices Hannah’s feedback. He opens up the source file and incorporates her feedback. Because Max’s change includes a change-id, all he has to do is follow the typical git workflow for updating a commit:
-
Check out the commit
-
Amend the commit
-
Push the commit to Gerrit
$ <checkout first commit>
$ <rework>
$ git commit --amend
[master 30a6f44] Change to a proper, yeast based pizza dough.
 Date: Fri Jun 8 16:28:23 2018 +0200
 1 file changed, 10 insertions(+), 5 deletions(-)
$ git push origin HEAD:refs/for/master
Counting objects: 3, done.
Delta compression using up to 8 threads.
Compressing objects: 100% (2/2), done.
Writing objects: 100% (3/3), 528 bytes | 0 bytes/s, done.
Total 3 (delta 0), reused 0 (delta 0)
remote: Processing changes: updated: 1, done
remote:
remote: Updated Changes:
remote:   http://gerrithost/#/c/RecipeBook/+/702 Change to a proper, yeast based pizza dough.
remote:
To ssh://gerrithost:29418/RecipeBook
 * [new branch]      HEAD -> refs/for/master
Notice that the output of this command is slightly different from Max’s first commit. This time, the output verifies that the change was updated.
Having uploaded the reworked commit, Max can go back to the Gerrit web interface, look at his change and diff the first patch set with his rework in the second one. Once he has verified that the rework follows Hannahs recommendation he presses the DONE button to let Hannah know that she can review the changes.
When Hannah next looks at Max’s change, she sees that he incorporated her feedback. The change looks good to her, so she changes her vote to a +2.
Verifying the Change
Hannah’s +2 vote means that Max’s change satisfies the Needs Review check. It has to pass one more check before it can be accepted: the Needs Verified check.
The Verified check means that the change was confirmed to work. This type of check typically involves tasks such as checking that the code compiles, unit tests pass, and other actions. You can configure a Verified check to consist of as many or as few tasks as needed.
|
NOTE
|
Remember that this walkthrough uses Gerrit’s default workflow. Projects can add custom checks or even remove the Verified check entirely. |
Verification is typically an automated process using the Gerrit Trigger Jenkins Plugin or a similar mechanism. However, there are still times when a change requires manual verification, or a reviewer needs to check how or if a change works. To accommodate these and other similar circumstances, Gerrit exposes each change as a git branch. The Gerrit UI includes a download link in the Gerrit Code Review Screen to make it easy for reviewers to fetch a branch for a specific change. To manually verify a change, a reviewer must have the Verified permission. Then, the reviewer can fetch and checkout that branch from Gerrit. Hannah has this permission, so she is authorized to manually verify Max’s change.
|
NOTE
|
The Verifier can be the same person as the code reviewer or a different person entirely. |
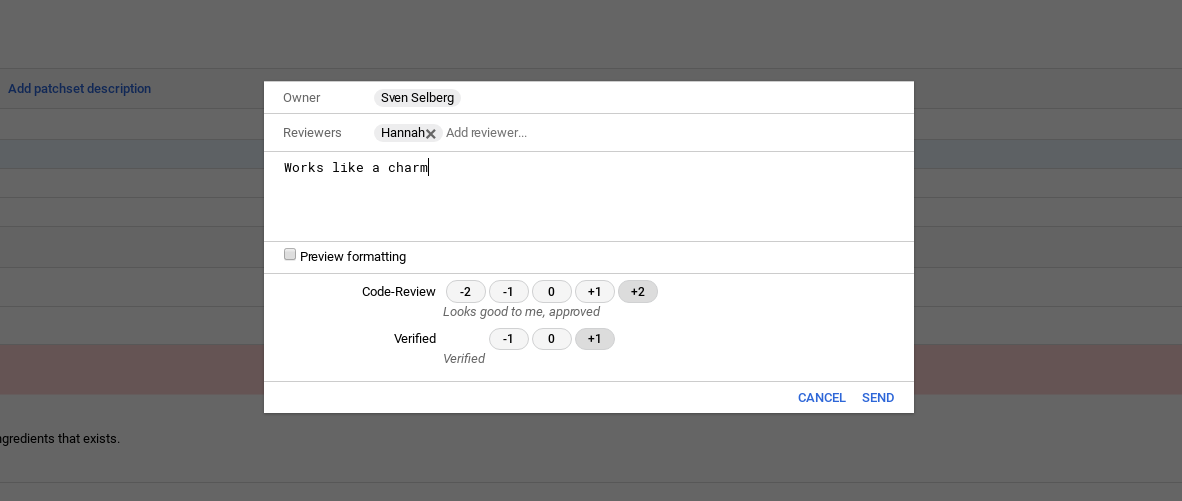
Unlike the code review check, the verify check is pass/fail. Hannah can provide a score of either +1 or -1. A change must have at least one +1 and no -1.
Hannah selects a +1 for her verified check. Max’s change is now ready to be submitted.
Submitting the Change
Max is now ready to submit his change. He opens up the change in the Code Review screen and clicks the SUBMIT button.
At this point, Max’s change is merged into the repository’s master branch and becomes an accepted part of the project.
用户指南
This is a Gerrit guide that is dedicated to Gerrit end-users. It explains the standard Gerrit workflows and how a user can adapt Gerrit to personal preferences.
It is expected that readers know about Git and that they are familiar with basic git commands and workflows.
What is Gerrit?
Gerrit is a Git server that provides access control for the hosted Git repositories and a web front-end for doing code review. Code review is a core functionality of Gerrit, but still it is optional and teams can decide to work without code review.
Tools
Gerrit uses the git protocol. This means in order to work with Gerrit you do not need to install any Gerrit client, but having a regular git client, such as the git command line or EGit in Eclipse, is sufficient.
Still there are some client-side tools for Gerrit, which can be used optionally:
-
Mylyn Gerrit Connector: Gerrit integration with Mylyn
-
Gerrit IntelliJ Plugin: Gerrit integration with the IntelliJ Platform
-
mGerrit: Android client for Gerrit
-
Gertty: Console-based interface for Gerrit
Clone Gerrit Project
Cloning a Gerrit project is done the same way as cloning any other git repository by using the git clone command.
$ git clone ssh://gerrithost:29418/RecipeBook.git RecipeBook
Cloning into RecipeBook...
The URL for cloning the project can be found in the Gerrit web UI under Projects > List > <project-name> > General.
For git operations Gerrit supports the SSH and the HTTP/HTTPS protocols.
|
NOTE
|
To use SSH you may need to configure your SSH public key in your Settings. |
Code Review Workflow
With Gerrit Code Review means to review every commit before it is accepted into the code base. The author of a code modification uploads a commit as a change to Gerrit. In Gerrit each change is stored in a staging area where it can be checked and reviewed. Only when it is approved and submitted it gets applied to the code base. If there is feedback on a change, the author can improve the code modification by amending the commit and uploading the new commit as a new patch set. This way a change is improved iteratively and it is applied to the code base only when is ready.
Upload a Change
Uploading a change to Gerrit is done by pushing a commit to Gerrit. The commit must be pushed to a ref in the refs/for/ namespace which defines the target branch: refs/for/<target-branch>. The magic refs/for/ prefix allows Gerrit to differentiate commits that are pushed for review from commits that are pushed directly into the repository, bypassing code review. For the target branch it is sufficient to specify the short name, e.g. master, but you can also specify the fully qualified branch name, e.g. refs/heads/master.
  $ git commit
  $ git push origin HEAD:refs/for/master

  // this is the same as:
  $ git commit
  $ git push origin HEAD:refs/for/refs/heads/master
  $ git commit
  $ git push origin HEAD:master

  // this is the same as:
  $ git commit
  $ git push origin HEAD:refs/heads/master
|
NOTE
|
If pushing to Gerrit fails consult the Gerrit documentation that explains the error messages. |
When a commit is pushed for review, Gerrit stores it in a staging area which is a branch in the special refs/changes/ namespace. A change ref has the format refs/changes/XX/YYYY/ZZ where YYYY is the numeric change number, ZZ is the patch set number and XX is the last two digits of the numeric change number, e.g. refs/changes/20/884120/1. Understanding the format of this ref is not required for working with Gerrit.
Using the change ref git clients can fetch the corresponding commit, e.g. for local verification.
$ git fetch https://gerrithost/myProject refs/changes/74/67374/2 && git checkout FETCH_HEAD
|
NOTE
|
The fetch command can be copied from the download commands in the change screen. |
The refs/for/ prefix is used to map the Gerrit concept of "Pushing for Review" to the git protocol. For the git client it looks like every push goes to the same branch, e.g. refs/for/master but in fact for each commit that is pushed to this ref Gerrit creates a new branch under the refs/changes/ namespace. In addition Gerrit creates an open change.
A change consists of a Change-Id, meta data (owner, project, target branch etc.), one or more patch sets, comments and votes. A patch set is a git commit. Each patch set in a change represents a new version of the change and replaces the previous patch set. Only the latest patch set is relevant. This means all failed iterations of a change will never be applied to the target branch, but only the last patch set that is approved is integrated.
The Change-Id is important for Gerrit to know whether a commit that is pushed for code review should create a new change or whether it should create a new patch set for an existing change.
The Change-Id is a SHA-1 that is prefixed with an uppercase I. It is specified as footer in the commit message (last paragraph):
  Improve foo widget by attaching a bar.

  We want a bar, because it improves the foo by providing more
  wizbangery to the dowhatimeanery.

  Bug: #42
  Change-Id: Ic8aaa0728a43936cd4c6e1ed590e01ba8f0fbf5b
  Signed-off-by: A. U. Thor <author@example.com>
If a commit that has a Change-Id in its commit message is pushed for review, Gerrit checks if a change with this Change-Id already exists for this project and target branch, and if yes, Gerrit creates a new patch set for this change. If not, a new change with the given Change-Id is created.
If a commit without Change-Id is pushed for review, Gerrit creates a new change and generates a Change-Id for it. Since in this case the Change-Id is not included in the commit message, it must be manually inserted when a new patch set should be uploaded. Most projects already require a Change-Id when pushing the very first patch set. This reduces the risk of accidentally creating a new change instead of uploading a new patch set. Any push without Change-Id then fails with missing Change-Id in commit message footer.
Amending and rebasing a commit preserves the Change-Id so that the new commit automatically becomes a new patch set of the existing change, when it is pushed for review.
  $ git commit --amend
  $ git push origin HEAD:refs/for/master
Change-Ids are unique for a branch of a project. E.g. commits that fix the same issue in different branches should have the same Change-Id, which happens automatically if a commit is cherry-picked to another branch. This way you can search by the Change-Id in the Gerrit web UI to find a fix in all branches.
Change-Ids can be created automatically by installing the commit-msg hook as described in the Change-Id documentation.
Instead of manually installing the commit-msg hook for each git repository, you can copy it into the git template directory. Then it is automatically copied to every newly cloned repository.
Review Change
After uploading a change for review reviewers can inspect it via the Gerrit web UI. Reviewers can see the code delta and comment directly in the code on code blocks or lines. They can also post summary comments and vote on review labels. The documentation of the review UI explains the screens and controls for doing code reviews.
There are several options to control how patch diffs should be rendered. Users can configure their preferences in the diff preferences.
Upload a new Patch Set
If there is feedback from code review and a change should be improved a new patch set with the reworked code should be uploaded.
This is done by amending the commit of the last patch set. If needed this commit can be fetched from Gerrit by using the fetch command from the download commands in the change screen.
It is important that the commit message contains the Change-Id of the change that should be updated as a footer (last paragraph). Normally the commit message already contains the correct Change-Id and the Change-Id is preserved when the commit is amended.
  // fetch and checkout the change
  // (checkout command copied from change screen)
  $ git fetch https://gerrithost/myProject refs/changes/74/67374/2 && git checkout FETCH_HEAD

  // rework the change
  $ git add <path-of-reworked-file>
  ...

  // amend commit
  $ git commit --amend

  // push patch set
  $ git push origin HEAD:refs/for/master
|
NOTE
|
Never amend a commit that is already part of a central branch. |
Pushing a new patch set triggers email notification to the reviewers.
Developing multiple Features in parallel
Code review takes time, which can be used by the change author to implement other features. Each feature should be implemented in its own local feature branch that is based on the current HEAD of the target branch. This way there is no dependency to open changes and new features can be reviewed and applied independently. If wanted, it is also possible to base a new feature on an open change. This will create a dependency between the changes in Gerrit and each change can only be applied if all its predecessor are applied as well. Dependencies between changes can be seen from the Related Changes tab on the change screen.
Watching Projects
To get to know about new changes you can watch the projects that you are interested in. For watched projects Gerrit sends you email notifications when a change is uploaded or modified. You can decide on which events you want to be notified and you can filter the notifications by using change search expressions. For example 'branch:master file:^.*\.txt$' would send you email notifications only for changes in the master branch that touch a 'txt' file.
It is common that the members of a project team watch their own projects and then pick the changes that are interesting to them for review.
Project owners may also configure notifications on project-level.
Adding Reviewers
In the change screen reviewers can be added explicitly to a change. The added reviewer will then be notified by email about the review request.
Mainly this functionality is used to request the review of specific person who is known to be an expert in the modified code or who is a stakeholder of the implemented feature. Normally it is not needed to explicitly add reviewers on every change, but you rather rely on the project team to watch their project and to process the incoming changes by importance, interest, time etc.
There are also plugins which can add reviewers automatically (e.g. by configuration or based on git blame annotations). If this functionality is required it should be discussed with the project owners and the Gerrit administrators.
Dashboards
Gerrit supports a wide range of query operators to search for changes by different criteria, e.g. by status, change owner, votes etc.
The page that shows the results of a change query has the change query contained in its URL. This means you can bookmark this URL in your browser to save the change query. This way it can be easily re-executed later.
Several change queries can be also combined into a dashboard. A dashboard is a screen in Gerrit that presents the results of several change queries in different sections, each section having a descriptive title.
A default dashboard is available under My > Changes. It has sections to list outgoing reviews, incoming reviews and recently closed changes.
Users can also define custom dashboards. Dashboards can be bookmarked in a browser so that they can be re-executed later.
It is also possible to customize the My menu and add menu entries for custom queries or dashboards to it.
Dashboards are very useful to define own views on changes, e.g. you can have different dashboards for own contributions, for doing reviews or for different sets of projects.
|
NOTE
|
You can use the limit and age query operators to limit the result set in a dashboard section. Clicking on the section title executes the change query without the limit and age operator so that you can inspect the full result set. |
Project owners can also define shared dashboards on project-level. The project dashboards can be seen in the web UI under Projects > List > <project-name> > Dashboards.
Submit a Change
Submitting a change means that the code modifications of the current patch set are applied to the target branch. Submit requires the Submit access right and is done on the change screen by clicking on the Submit button.
In order to be submittable changes must first be approved by voting on the review labels. By default a change can only be submitted if it has a vote with the highest value on each review label and no vote with the lowest value (veto vote). Projects can configure custom labels and custom submit rules to control when a change becomes submittable.
How the code modification is applied to the target branch when a change is submitted is controlled by the submit type which can be configured on project-level.
Submitting a change may fail with conflicts. In this case you need to rebase the change locally, resolve the conflicts and upload the commit with the conflict resolution as new patch set.
If a change cannot be merged due to path conflicts this is highlighted on the change screen by a bold red Cannot Merge label.
Rebase a Change
While a change is in review the HEAD of the target branch can evolve. In this case the change can be rebased onto the new HEAD of the target branch. When there are no conflicts the rebase can be done directly from the change screen, otherwise it must be done locally.
  // update the remote tracking branches
  $ git fetch

  // fetch and checkout the change
  // (checkout command copied from change screen)
  $ git fetch https://gerrithost/myProject refs/changes/74/67374/2 && git checkout FETCH_HEAD

  // do the rebase
  $ git rebase origin/master

  // resolve conflicts if needed and stage the conflict resolution
  ...
  $ git add <path-of-file-with-conflicts-resolved>

  // continue the rebase
  $ git rebase --continue

  // push the commit with the conflict resolution as new patch set
  $ git push origin HEAD:refs/for/master
Doing a manual rebase is only necessary when there are conflicts that cannot be resolved by Gerrit. If manual conflict resolution is needed also depends on the submit type that is configured for the project.
Generally changes shouldn’t be rebased without reason as it increases the number of patch sets and creates noise with notifications. However if a change is in review for a long time it may make sense to rebase it from time to time, so that reviewers can see the delta against the current HEAD of the target branch. It also shows that there is still an interest in this change.
|
NOTE
|
Never rebase commits that are already part of a central branch. |
Abandon/Restore a Change
Using Topics
Changes can be grouped by topics. This is useful because it allows you to easily find related changes by using the topic search operator. Also on the change screen changes with the same topic are displayed so that you can easily navigate between them.
Often changes that together implement a feature or a user story are group by a topic.
Assigning a topic to a change can be done in the change screen.
It is also possible to set a topic on push, either by appending %topic=… to the ref name or through the use of the command line flag --push-option, aliased to -o, followed by topic=….
Gerrit may be configured to submit all changes in a topic together with a single click, even when topics span multiple projects.
  $ git push origin HEAD:refs/for/master%topic=multi-master

  // this is the same as:
  $ git push origin HEAD:refs/heads/master -o topic=multi-master
Using Hashtags
Hashtags are freeform strings associated with a change, like on social media platforms. In Gerrit, you explicitly associate hashtags with changes using a dedicated area of the UI; they are not parsed from commit messages or comments.
Similar to topics, hashtags can be used to group related changes together, and to search using the hashtag: operator. Unlike topics, a change can have multiple hashtags, and they are only used for informational grouping; changes with the same hashtags are not necessarily submitted together.
The hashtag feature is only available when running under NoteDb.
  $ git push origin HEAD:refs/for/master%t=stable-bugfix

  // this is the same as:
  $ git push origin HEAD:refs/heads/master -o t=stable-bugfix
Work-in-Progress Changes
Work-in-Progress (WIP) changes are visible to anyone, but do not notify or require an action from a reviewer.
Specifically, when you mark a change as Work-in-Progress:
-
Reviewers are not notified for most operations, such as adding or removing, posting comments, and so on. See the REST API documentation tables for more information.
-
The change does not show in reviewers' dashboards.
WIP changes are useful when:
-
You have implemented only part of a change, but want to push your change to the server to run tests or perform other actions before requesting reviewer feedback.
-
During a review, you realize you need to rework your change, and you want to stop notifying reviewers of the change until you finish your update.
To set the status of a change to Work-in-Progress, you can use either the command line or the user interface. To use the command line, append %wip to your push request.
$ git push origin HEAD:refs/for/master%wip
Alternatively, click WIP from the More menu on the Change screen. The Change screen updates with a yellow header, indicating that the change is in a Work-in-Progress state.
To mark the change as ready for review, append %ready to your push request.
$ git push origin HEAD:refs/for/master%ready
Alternatively, click Start Review from the Change screen.
Change owners, project owners, site administrators and members of a group that was granted "Toggle Work In Progress state" permission can mark changes as work-in-progress and ready.
Private Changes
Private changes are changes that are only visible to their owners, reviewers and users with the View Private Changes global capability. Private changes are useful in a number of cases:
-
You want a set of collaborators to review the change before formal review starts. By creating a Private change and adding only a selected few as reviewers you can control who can see the change and get a first opinion before opening up for all reviewers.
-
You want to check what the change looks like before formal review starts. By marking the change private without reviewers, nobody can prematurely comment on your changes.
-
You want to use Gerrit to sync data between different devices. By creating a private throwaway change without reviewers, you can push from one device, and fetch to another device.
Do not use private changes for making security fixes (see pitfalls below). How to make security fixes is explained below.
To create a private change, you push it with the private option.
  $ git commit
  $ git push origin HEAD:refs/for/master%private
The change will remain private on subsequent pushes until you specify the remove-private option. Alternatively, the web UI provides buttons to mark a change private and non-private again.
When pushing a private change with a commit that is authored by another user, the other user will not be automatically added as a reviewer and must be explicitly added.
For CI systems that must verify private changes, a special permission can be granted (View Private Changes). In that case, care should be taken to prevent the CI system from exposing secret details.
Pitfalls ===
If private changes are used, be aware of the following pitfalls:
-
If a private change gets merged the corresponding commit gets visible for all users that can access the target branch and the private flag from the change is automatically removed. This makes private changes a bad choice for security fixes, as the security fix will be accessible as soon as the change was merged, but for security issues you want to keep an embargo until new releases have been made available.
-
If you push a non-private change on top of a private change the commit of the private change gets implicitly visible through the parent relationship of the follow-up change.
-
If you have a series of private changes and share one with reviewers, the reviewers can also see the commits of the predecessor private changes through the commit parent relationship.
Ignoring Or Marking Changes As 'Reviewed'
Changes can be ignored, which means they will not appear in the 'Incoming Reviews' dashboard and any related email notifications will be suppressed. This can be useful when you are added as a reviewer to a change on which you do not actively participate in the review, but do not want to completely remove yourself.
Alternatively, rather than completely ignoring the change, it can be marked as 'Reviewed'. Marking a change as 'Reviewed' means it will not be highlighted in the dashboard, until a new patch set is uploaded.
Inline Edit
It is possible to edit changes inline directly in the web UI. This is useful to make small corrections immediately and publish them as a new patch set.
It is also possible to create new changes inline.
Project Administration
Every project has a project owner that administrates the project. Project administration includes the configuration of the project access rights, but project owners have many more possibilities to customize the workflows for a project which are described in the project owner guide.
Working without Code Review
Doing code reviews with Gerrit is optional and you can use Gerrit without code review as a pure Git server.
  $ git commit
  $ git push origin HEAD:master

  // this is the same as:
  $ git commit
  $ git push origin HEAD:refs/heads/master
|
NOTE
|
Bypassing code review must be enabled in the project access rights. The project owner must allow it by assigning the Push access right on the target branch (refs/heads/<branch-name>). |
|
NOTE
|
If you bypass code review you always need to merge/rebase manually if the tip of the destination branch has moved. Please keep this in mind if you choose to not work with code review because you think it’s easier to avoid the additional complexity of the review workflow; it might actually not be easier. |
|
NOTE
|
The project owner may enable auto-merge on push to benefit from the automatic merge/rebase on server side while pushing directly into the repository. |
User Refs
User configuration data such as preferences is stored in the All-Users project under a per-user ref. The user’s ref is based on the user’s account id which is an integer. The user refs are sharded by the last two digits (nn) in the refname, leading to refs of the format refs/users/nn/accountid.
Preferences
There are several options to control the rendering in the Gerrit web UI. Users can configure their preferences under Settings > Preferences. The user’s preferences are stored in a git config style file named preferences.config under the user’s ref in the All-Users project.
The following preferences can be configured:
-
The maximum number of entries that are shown on one page, e.g. used when paging through changes, projects, branches or groups.
-
The format that should be used to render dates and timestamps.
-
This setting controls the email notifications.
-
This setting controls the email format Gerrit sends. Note that this setting has no effect if the administrator has disabled HTML emails for the Gerrit instance.
-
Plaintext Only:Email notifications contain only plaintext content.
-
HTML and Plaintext:Email notifications contain both HTML and plaintext content.
-
-
This setting controls which base should be pre-selected in the
Diff Againstdrop-down list when the change screen is opened for a merge commit.-
Auto Merge:Pre-selects
Auto Mergein theDiff Againstdrop-down list when the change screen is opened for a merge commit. -
First Parent:Pre-selects
Parent 1in theDiff Againstdrop-down list when the change screen is opened for a merge commit.
-
-
Whether the Side-by-Side diff view or the Unified diff view should be shown when clicking on a file path in the change screen.
-
Whether the site header and footer should be shown.
-
Show Relative Dates In Changes Table:Whether timestamps in change lists and dashboards should be shown as relative timestamps, e.g. '12 days ago' instead of absolute timestamps such as 'Apr 15'.
-
Show Change Sizes As Colored Bars:Whether change sizes should be visualized as colored bars. If disabled the numbers of added and deleted lines are shown as text, e.g. '+297, -63'.
-
Show Change Number In Changes Table:Whether in change lists and dashboards an
IDcolumn with the numeric change IDs should be shown. -
Mute Common Path Prefixes In File List:Whether common path prefixes in the file list on the change screen should be grayed out.
-
Insert Signed-off-by Footer For Inline Edit Changes:Whether a
Signed-off-byfooter should be automatically inserted into changes that are created from the web UI (e.g. by theCreate ChangeandEdit Configbuttons on the project screen, and theFollow-Upbutton on the change screen). -
Whether to publish any outstanding draft comments by default when pushing updates to open changes. This preference just sets the default; the behavior can still be overridden using a push option.
-
Whether the Flash clipboard widget should be used. If enabled and the Flash plugin is available, Gerrit offers a copy-to-clipboard icon next to IDs and commands that need to be copied frequently, such as the Change-Ids, commit IDs and download commands. Note that this option is only shown if the Flash plugin is available and the JavaScript Clipboard API is unavailable.
-
Set new changes work-in-progress:Whether new changes are uploaded as work-in-progress per default. This preference just sets the default; the behavior can still be overridden using a push option.
Reply by Email
Gerrit sends out email notifications to users and supports parsing back replies on some of them (when configured).
Gerrit supports replies on these notification emails:
-
Notifications about new comments
-
Notifications about new labels that were applied or removed
While Gerrit supports a wide range of email clients, the following ones have been tested and are known to work:
-
Gmail
-
Gmail Mobile
Gerrit supports parsing back all comment types that can be applied to a change via the WebUI:
-
Change messages
-
Inline comments
-
File comments
Please note that comments can only be sent in reply to a comment in the original notification email, while the change message is independent of those.
Gerrit supports parsing a user’s reply from both HTML and plaintext. Please note that some email clients extract the text from the HTML email they have received and send this back as a quoted reply if you have set the client to plaintext mode. In this case, Gerrit only supports parsing a change message. To work around this issue, consider setting a User Preference to receive only plaintext emails.
Example notification:
Some User has posted comments on this change.
(https://gerrit-review.googlesource.com/123123 )

Change subject: My new change
......................................................................


Patch Set 3:

Just a couple of smaller things I found.

https://gerrit-review.googlesource.com/#/c/123123/3/MyFile.java
File
MyFile.java:

https://gerrit-review.googlesource.com/#/c/123123/3/MyFile@420
PS3, Line 420:     someMethodCall(param);
Seems to be failing the tests.


--
To view, visit https://gerrit-review.googlesource.com/123123
To unsubscribe, visit https://gerrit-review.googlesource.com/settings

(Footers omitted for brevity, must be included in all emails)
Example response from the user:
Thanks, I'll fix it.
> Some User has posted comments on this change.
> (https://gerrit-review.googlesource.com/123123 )
>
> Change subject: My new change
> ......................................................................
>
>
> Patch Set 3:
>
> Just a couple of smaller things I found.
>
> https://gerrit-review.googlesource.com/#/c/123123/3/MyFile.java
> File
> MyFile.java:
Rename this file to File.java
>
> https://gerrit-review.googlesource.com/#/c/123123/3/MyFile@420
> PS3, Line 420:     someMethodCall(param);
> Seems to be failing the tests.
>
Yeah, I see why, let me try again.
>
> --
> To view, visit https://gerrit-review.googlesource.com/123123
> To unsubscribe, visit https://gerrit-review.googlesource.com/settings
>
> (Footers omitted for brevity, must be included in all emails)
In this case, Gerrit will persist a change message ("Thanks, I’ll fix it."), a file comment ("Rename this file to File.java") as well as a reply to an inline comment ("Yeah, I see why, let me try again.").
— Security Fixes
If a security vulnerability is discovered you normally want to have an embargo about it until fixed releases have been made available. This means you want to develop and review security fixes in private.
If your repository is public or grants broad read access it is recommended to fix security issues in a copy of your repository which has very restricted read permissions (e.g. myproject-security-fixes). You can then implement, review and submit the security fix in this repository, make and publish a new release and only then integrate the security fix back into the normal (public) repository.
Alternatively you can do the security fix in your normal repository in a branch with restricted read permissions. We don’t recommend this because there is a risk of configuring the access rights wrongly and unintentionally granting read access to the wrong people.
Using private changes for security fixes is not recommended due to the pitfalls discussed above. Especially you don’t want the fix to become visible after submit and before you had a chance to make and publish a new release.
Part of Gerrit Code Review
更多参考官网
相关资料
Gerrit官网:
https://www.gerritcodereview.com/
https://gerrit-documentation.storage.googleapis.com/Documentation/3.1.3/index.html
相关博客:

 浙公网安备 33010602011771号