

18. Spring 基于 注解 的 AOP 编程开发
之前都是配配配配配配置,现在我们用组件,刚开始的 ioc也是一样来的 包括mvc ,学吧!
步骤:
基于注解的aop开发步骤:
① 创建目标接口和目标类(内部有切点)
② 创建切面类(内部有增强方法)
③ 将目标类和切面类的对象创建权交给 spring
④ 在切面类中使用注解配置织入关系
⑤ 在配置文件中开启组件扫描和 AOP 的自动代理
⑥ 测试
这里不多说了 ,直接写就完,注意看注释:
目标方法:
package com.bihu.anno;

import org.springframework.stereotype.Component;

@Component("target")
public class Target implements TargetInterface {
    @Override
    public void method() {
        System.out.println("method Running·····");
    }
}
他的接口就是普通的一个接口,@Component 是注册 一个 Bean。
切面类:
package com.bihu.anno;


import org.aspectj.lang.annotation.Aspect;
import org.aspectj.lang.annotation.Before;
import org.springframework.stereotype.Component;

@Component("MyAspect")      //注册Bean
@Aspect         //注册切面类
public class MyAspect {

    //前置通知
    @Before("execution(* com.bihu.anno.*.*(..))")     // 配置前置通知 和 切点表达式
    public  void before() {
        System.out.println("前置代码增强");
    }

}
其中,Component 也是 注册一个 Bean,然后@Aspect是注册一个 切面 , 然后方法上面的 @Before是通知注解,他有很多中通知,这里以前置代码增强为例,它里面配置的参数是 切点表达式。
以上就是前三步 :
① 创建目标接口和目标类(内部有切点) ② 创建切面类(内部有增强方法) ③ 将目标类和切面类的对象创建权交给 spring
下面开始第 4 - 6 步:
<?xml version="1.0" encoding="UTF-8"?>
<beans xmlns="http://www.springframework.org/schema/beans"
       xmlns:aop="http://www.springframework.org/schema/aop"
       xmlns:context="http://www.springframework.org/schema/context"
       xmlns:xsi="http://www.w3.org/2001/XMLSchema-instance"
       xsi:schemaLocation="http://www.springframework.org/schema/beans http://www.springframework.org/schema/beans/spring-beans.xsd
                            http://www.springframework.org/schema/aop http://www.springframework.org/schema/aop/spring-aop.xsd
                            http://www.springframework.org/schema/context http://www.springframework.org/schema/context/spring-context.xsd">


                <!--  5.在配置文件中开启组件扫描和 AOP 的自动代理  -->

                <!--  开启组件扫描: 让Spring扫描注解 -->
                    <context:component-scan base-package="com.bihu"/>

                <!-- AOP 的自动代理 :虽然 Spring注解帮我们把那些bean加入到了容器,但是注解不知道,所以要配: -->
                    <aop:aspectj-autoproxy/>

</beans>
因为要扫描注解 所以呢 这里千万需要配置context 头部。
上面就是 4 - 5 步了,最后一步 测试:
import com.bihu.anno.TargetInterface;
import org.junit.Test;
import org.junit.runner.RunWith;
import org.springframework.beans.factory.annotation.Autowired;
import org.springframework.test.context.ContextConfiguration;
import org.springframework.test.context.junit4.SpringJUnit4ClassRunner;

@RunWith(SpringJUnit4ClassRunner.class)
@ContextConfiguration("classpath:springContext.xml")
public class AopTest {

    @Autowired
    TargetInterface target;

    @Test
    public void test1(){
        target.method();
    }


}
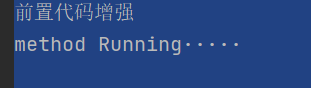
运行结果:
所以上面这几个点要慢慢看。
本文来自博客园,作者:咸瑜,转载请注明原文链接:https://www.cnblogs.com/bi-hu/p/15045057.html

 浙公网安备 33010602011771号