
Vue实战狗尾草博客后台管理系统第三章
本章节,咱们开发管理系统侧边栏及面包屑功能。
先上一张效果图
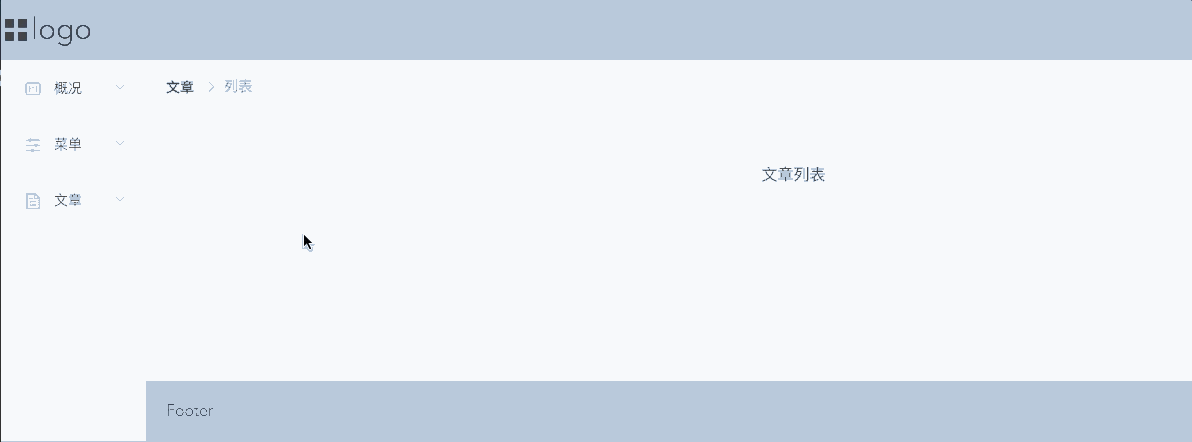
样式呢,作者前端初审,关于设计上毫无美感可言,大家可根据自己情况设计更好看的哦~
侧边栏
这里我们借助element的aslide侧边栏,直接使用。
在components>commons下新建Aslide.vue,Header.vue组件。分别作为我们的侧边栏和头部组件。
Aslide内容,我们直接使用el-menu及相关侧边栏组件。不过要仔细阅读以下官方文档,否则使用会比较费劲。
collapse 是否水平折叠收起菜单(仅在 mode 为 vertical 时可用) boolean false
default-active default-active string
default-openeds 当前打开的 sub-menu 的 index 的数组 Array
unique-opened 是否只保持一个子菜单的展开 boolean false
router 是否使用 vue-router 的模式,启用该模式会在激活导航时以 index 作为 path 进行路由跳转 boolean false
以上就是主要的属性,我们要仔细阅读加以理解。
这里的侧边栏的话,因为我们需要注意的是
-
如果当前展开菜单为2级的某一菜单,那么在页面刷新后和浏览器回退后,也依然要展开。
-
不同的角色登录后,所拥有的权限是不同的。这里我么可以做成较为简单的,前端处理,控制某些菜单显示来实现,当然。后期如果有时间,后端也是需要对接口做权限校验的!
那么,我么开始吧~
首先,我们可以复制elementui的代码过来,直接放到Aslide.vue文件中,然后引用,都是没有问题的。
下来我们就要开始改造了。
因为要做权限的管理,我们这里要控制菜单的显示,所以这里,我们不再页面中写死,这里给提供两种解决方案:
-
在static中配置静态的menu.json文件,将我们的菜单栏加以不同的角色进行配置,然后在页面中根据登录后的权限,进行动态控制显示对应角色的菜单栏。
-
将菜单栏放到store中管理。getters直接解构取值获得并使用。(这里之所以放在store中,是因为后面如果后端配合使用权限控制,那么我们就需要后端返回菜单栏信息,并格式化转换为我们的路由信息。实现动态路由的使用~),当然,因为是自己的管理平台,MD还是懒~
这里,我们先一起采用store的方式来存储menu.json文件吧
大家先按照如图所示补全目录。
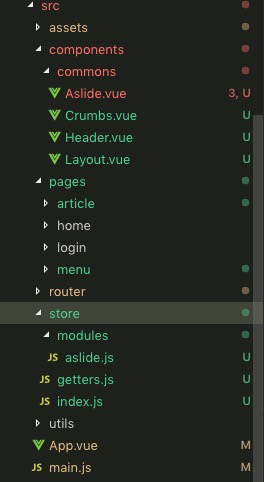
我们,将menu文件存储在store>modules>aslide.js文件中:
/**
 * @description 侧边栏状态库
 * @author chaizhiyang
 */
const aslide = {
  state: {
    isCollapse: false,
    menuList: [
      {
        "text": "概况",
        "path": "",
        "icon": "el-icon-c-scale-to-original",
        "itemGroup": [
          {
            "text": "概况数据",
            "path": "/index"
          }
        ]
      },
      {
        "text": "菜单",
        "path": "menu",
        "icon": "el-icon-s-operation",
        "itemGroup": [
          {
            "text": "菜单列表",
            "path": "/menu_list"
          }
        ]
      },
      {
        "text": "文章",
        "path": "article",
        "icon": "el-icon-document",
        "itemGroup": [
          {
            "text": "文章列表",
            "path": "/article_list"
          },
          {
            "text": "详情",
            "path": "/article_detail"
          }
        ]
      }
    ]
  },
  mutations: {
    changeCollapse(state) {
      state.isCollapse = state.isCollapse == false ? true : false
    },
  }
}

export default aslide
除了,菜单信息外,后面所涉及的header中控制菜单的展开折叠的方法,我们也一并放置在状态中进行管理。
const getters = {
  isCollapse: state => state.aslide.isCollapse,
  menuList: state => state.aslide.menuList,
}

export default getters;
简单说就是为了后期mapGetters的使用,方便我们去取state中的数据,使用更加方便~
index.js文件:
/**
 * @description vuex主入口文件
 * @author chaizhiyang
 */
import Vue      from 'vue'
import Vuex     from 'vuex'
import aslide   from './modules/aslide'
import getters  from './getters'
Vue.use(Vuex);
const store = new Vuex.Store({
  modules: {
    aslide,
  },
  getters
})

 export default store;
store文件基本的配置也就算是完成了,下来我们需要在main.js中引入
// The Vue build version to load with the `import` command
// (runtime-only or standalone) has been set in webpack.base.conf with an alias.
import Vue from 'vue'
import App from './App'
import router from './router/permission'
import store from './store';
import ElementUI from 'element-ui';
import 'element-ui/lib/theme-chalk/index.css'
import Utils from './utils';
import './assets/styles/index.css';

Vue.config.productionTip = false
Vue.use(ElementUI);
Vue.use(Utils);
/* eslint-disable no-new */
new Vue({
  el: '#app',
  router,
  store,
  components: { App },
  template: '<App/>'
})
侧边栏的配置已经好了,但是还没有使用。下来我们补全一些其他的页面信息。
内容可以随便写成标志性的内容,这都不是重点。
重点是Aslide.vue文件中的引用:
<template>
  <div class="menu">
    <el-menu
      class="el-menu-admin"
      :default-active="active"
      :default-openeds="openeds"
      :unique-opened="true"
      :router="true"
      :collapse="isCollapse"
      ref="menuchild">
      <!-- 菜单栏包含单个选项 -->
      <el-menu-item
        v-for="(item, pindex) in menuList"
        :key="+new Date() + pindex"
        :index="item.path"
        v-if="!item.itemGroup">
        <i :class="item.icon"></i>
        <span slot="title">{{item.text}}</span>
      </el-menu-item>
      <!-- 菜单栏包含多个选项 -->
      <el-submenu
        v-for="(item, pindex) in menuList"
        :key="pindex"
        :index="item.path">
        <template slot="title">
          <i :class="item.icon"></i>
          <span>{{item.text}}</span>
        </template>
          <!-- 菜单栏只有二级菜单 -->
          <el-menu-item
            v-for="(subitem, subindex) in item.itemGroup"
            :key="subindex"
            :route="subitem.path"
            :index="subitem.path"
            v-if="!subitem.items"
          >{{subitem.text}}</el-menu-item>
          <!-- 菜单栏有三级菜单 -->
          <el-submenu
            v-for="(subitem, subindex) in item.itemGroup"
            :key="subindex"
            :index="subitem.path"
            v-if="subitem.items">
            <!-- 第三项分组标题 -->
            <template slot="title">{{subitem.text}}</template>
            <!-- 第三项分组的items -->
            <el-menu-item
              v-for="(s_subitem, s_subindex) in subitem.items"
              :key="s_subindex"
              :route="s_subitem.path"
              :index="s_subitem.path"
            >{{s_subitem.text}}</el-menu-item>
          </el-submenu>
      </el-submenu>
    </el-menu>
  </div>
</template>
<script>
import { mapGetters } from 'vuex';
export default {
  data() {
    return {
      openeds: [],
    }
  },
  watch: {
    // 监听路由变化
    $route(to, from) {
      this.setMenulist(to);
    }
  },
  computed: {
    ...mapGetters([
      'menuList','isCollapse'
    ])
  },
  created() {
    this.setMenulist(this.$route);
  },
  methods: {
    // 设置菜单栏
    setMenulist(route) {
      let _this = this;
      if (route.matched[0].path != "") {
        // 多页面菜单栏
        this.openeds = [route.matched[0].path];
        this.active = route.fullPath.split("?")[0]; //携带参数时,只匹配"?"前的路径
      } else if (route.matched[1].path != "") {
        // 单页面菜单栏
        this.openeds = [route.matched[0].path];
        this.active = route.fullPath.split("?")[0]; //携带参数时,只匹配"?"前的路径
      } else {
        this.$nextTick(() => {
          _this.active = "";
          _this.openeds = [""];
          _this.$refs.menuchild.close(_this.active);
        });
      }
    }
  }
}
</script>
<style lang="less" scoped>
.menu {
  height: 100%;
  .el-menu {
    height: 100%;
    border: 0;
  }
  .el-menu-vertical-demo {
    color: #303133;
  }
  .el-menu-item {
    box-sizing: border-box;
    border-left: 5px solid transparent;
  }
  .el-menu-item.is-active {
    border-left: 5px solid #409EFF;
  }
  .el-menu-admin:not(.el-menu--collapse) {
    width: 145px;
    max-height: 400px;
  }
}
</style>
-
之所以要写watch监听,是因为上面我们说到过的页面刷新后,也依然要保持菜单栏的点击和展开状态。当然也可以使用本地缓存区实现,不过就有点小题大做了。
-
另外,这里之所以不惜消耗性能的去循环的时候去判断,是因为我们可能有单个的一级菜单。这个时候他是不需要展开的,所以种种状态我们都需要去做判断。
-
具体的实现思路:
active要求为字符串,且:router="true"这个属性的开关直接控制了是否将index作为路由进行跳转。
第一种:我们可以给给个菜单配置单独的下标,我们可以写死,比如:'1','1-1','1-2','2','2-1','2-2',采用这种方式去标记,去区别。(这种方式的使用,我们需要将router设置为false,否则话跳转到1-1.。。根本不是我们想要的。)。
第二种::router="true"。设置为true后,下标就会作为路由进行跳转。我们就需要将下标设置为路由的路径。
当然两种方法的区别就是,一个是写死的下标。一个是路径作为下标。都要求我们在配置json文件的时候主要需要的参数。
Next,下来我们就要去Layout布局组件中引入我们的侧边栏啦
Layout:
<template>
  <el-container>
  <el-header>
    <adminHeader />
  </el-header>
  <el-container>
    <el-aside>
      <adminAslide />
    </el-aside>
    <el-container class="loading-area">
      <el-main>
        <adminCrumbs />
        <keep-alive>
          <router-view v-if="this.$route.meta.isAlive"></router-view>
        </keep-alive>
        <router-view v-if="!this.$route.meta.isAlive"></router-view>
      </el-main>
      <el-footer>Footer</el-footer>
    </el-container>
  </el-container>
</el-container>
</template>
<script>
import adminHeader from './Header.vue';
import adminAslide from './Aslide.vue';
import adminCrumbs from './Crumbs.vue';
export default {
  components: {
    adminHeader,
    adminAslide,
    adminCrumbs
  },
}
</script>

<style lang="less" scoped>
  .el-container {
    width: 100%;
    height: 100%;
  }
  .el-header, .el-footer {
    background-color: #B3C0D1;
    color: #333;
    line-height: 60px;
  }
  .el-header {
    padding: 0!important;
  }
  .el-aside {
    // background-color: #D3DCE6;
    width: auto!important;
    color: #333;
    text-align: left;
    overflow: hidden;
    // line-height: 200px;
  }

  .el-main {
    background-color: #E9EEF3;
    color: #333;
    text-align: center;
    line-height: 160px;
  }
</style>
需要注意的是:这里引入的时候没有用Header代表头部组件和Aslide代表侧边栏组件,是因为这些组件在原生的h5中含有相同的标签,难免造成混淆。作者曾经在使用MpVue开发小程序的过程中,就因为没有区别,所以报了一个error,让我头疼了好久~
大家可以暂时先把上面的面包屑和header引入先关掉,这里不是还没配置嘛。不关闭的话,会报错哦。
Next,非常重要的一个环节。侧边栏我们已经配置好了,我们要对路由进行配置。不过这里。我们需要先将我们原来设置的登录拦截给管理。
在路由中设置auth为false
meta: {
  auth: false,
  isAlive: true,
  title: '文章列表'
}
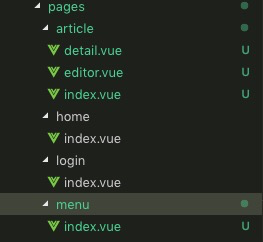
接着,我们只需要按照刚才创建的文件的目录去补全路由:
router/index.js
import Vue from 'vue'
import Router from 'vue-router'
// import HelloWorld from '@/components/HelloWorld'
Vue.use(Router)

const _import = file => () => import('@/pages/' + file + '.vue');
const _import_ = file => () => import('@/components/' + file + '.vue');

const asyncRouterMap = [];

const constantRouterMap = [
  {
    path: '/login',
    name: 'login',
    component: _import('login/index'),
  },
  {
    path: '/',
    name: '概况',
    component: _import_('commons/Layout'),
    redirect: '/index',
    children: [
      {
        path: '/index',
        name: '总览',
        component: _import('home/index'),
        meta: {
          isAlive: true,
          auth: false,
          title: '概况数据'
        }
      }
    ]
  },
  {
    path: 'menu',
    name: "菜单",
    component: _import_('commons/Layout'),
    redirect: '/menu_list',
    children: [
      {
        path: '/menu_list',
        name: '列表',
        component: _import('menu/index'),
        meta: {
          auth: false,
          isAlive: true,
          title: '菜单列表'
        }
      },
    ]
  },
  {
    path: 'article',
    name: '文章',
    component: _import_('commons/Layout'),
    redirect: '/article_list',
    children: [
      {
        path: '/article_list',
        name: '列表',
        component: _import('article/index'),
        meta: {
          auth: false,
          isAlive: true,
          title: '文章列表'
        }
      },
      {
        path: '/article_detail',
        name: '详情',
        component: _import('article/detail'),
        meta: {
          auth: false,
          isAlive: true,
          title: '文章详情'
        },
      }
    ]
  },
  {
    path: '/404',
    name: '404',
    component: _import('error/index'),
    meta: {
      title: "请求页面未找到",
      auth: false
    },
  },
  {
    path: '*',
    meta: {
      title: "请求页面未找到",
      auth: false
    },
    redirect: '/404'
  }
];

const router = new Router({
  mode: 'history',
  routes: constantRouterMap,
  linkActiveClass: "router-link-active",
});

export default router
这里,我们新增了404路由和通配符。在匹配不到路由时,就会跳转到404页面,当然我们也需要在pages中创建error文件 pages>error>index.vue
细心的同学会发现路由我也都配置了name。这个name就是配置面包屑而准备哒。需要值得注意的是,路由中name的配置,不能有相同项,虽然不影响使用不会报错,但是控制台会出现一个warn告诉我们避免相同的name。
嘿嘿嘿~下来我们就可以配置我们的BreadCrumbs了。
BreadCrumbs配置
BreadCrumbs面包屑导航 什么事面包屑导航呢?
可以理解为当前路由信息的导航提示,并随着路由的改变而改变。
elemnt-ui面包屑组件的使用:
一个数组,里头有很多对象,对象为路由的信息。如果有路径就是可以跳转,如果没有就不能通过面包屑挑战。
eg:
[{ path:'/',name:"主页"
},{ name:"标签"
}]
这里的最终显示效果就为: 主页 > 标签
主页是可以点击的。标签页则不可以点击。
知道了组件需要什么我们就好整理数据啦。
这里我们实现的思路为:
使用路由的this.$route.matched来实现
matched可以返回一个数组,该数组汇总含有当前路由的所有parent信息。
我们定义的name和path也都有。我们就只需要在路由变化的时候去改变传给面包屑的数组即可。
在components>commons>Crumbs.vue文件
上菜Crumbs.vue:
<template>
  <div class="crumbs">
    <el-breadcrumb separator-class="el-icon-arrow-right">
      <el-breadcrumb-item
        v-for="(item,index) in crumbsList"
        :key="+new Date() + index"
        :to="item.redirect?item.redirect:item.path">
          {{item.name}}
      </el-breadcrumb-item>
    </el-breadcrumb>
  </div>
</template>
<script>
export default {
  data() {
    return {
      crumbsList: []
    }
  },
  watch: {
    $route() {
      this.getCrumbs();
    }
  },
  methods: {
    getCrumbs() {
      this.crumbsList = this.$route.matched;
    }
  },
  created() {
    this.getCrumbs();
  }
}
</script>
<style lang="less" scoped>

</style>
这面包屑配置就ok啦。当然,menu,router和面包屑三者有一个有问题都会造成问题。所以还是挺复杂的。面包屑组件写好了。我们就在layout中将面包屑打开即可。
Header,菜单栏的收缩
我们因为已经在store中配置好了collapse所以下来要实现按钮控制收缩,我们就需要调用store方法即可.
直接上Header.vue码:
<template>
  <div class="header df">
    <div class="logo df">
      <i class="el-icon-menu" @click="handleChangeCollapse"></i>logo</div>
  </div>
</template>
<script>
export default {
  data() {
    return {
    }
  },
  methods: {
    handleChangeCollapse() {
      this.$store.commit('changeCollapse');
    }
  },
  created() {
  },
}
</script>
<style lang="less" scoped>
.header {
  height: 100%;
  .logo {
    width: 145px;
    height: 100%;
    cursor: pointer;
    font-size: 30px;
  }
}
</style>
第二章的内容就完成了,在开发完成后记得推送到仓库哦!
git add .
git commit -m "菜单栏,面包屑"
git push origin master
总结
信心的你,或许发现了。我在元素便利的时候key给的是这样的+new Date() + index;
学到了么?这样写的话,不会造成index重复造成的error。
另外以上所有内容中用到的图标都是element-ui自带的图标。
下一章
-
-
页面开发~
-------------------------------------------
个性签名:海到无边天作岸,山登绝顶人为峰!
如果觉得这篇文章对你有小小的帮助的话,记得在右下角点个“推荐”哦,博主在此感谢!

 浙公网安备 33010602011771号