前端MVC Vue2学习总结(八)——Vue Router路由、Vuex状态管理、Element-UI
一、Vue Router路由
二、Vuex状态管理
三、Element-UI
Element-UI是饿了么前端团队推出的一款基于Vue.js 2.0 的桌面端UI框架,手机端有对应框架是 Mint UI 。
Element UI 是一套采用 Vue 2.0 作为基础框架实现的组件库,它面向企业级的后台应用,能够帮助你快速地搭建网站,极大地减少研发的人力与时间成本。
Element,一套为开发者、设计师和产品经理准备的基于 Vue 2.0 的桌面端组件库
官网:http://element.eleme.io/#/zh-CN(含帮助文档)
GitHub:https://github.com/ElemeFE/element

3.1、特点
一致性 Consistency
与现实生活一致:与现实生活的流程、逻辑保持一致,遵循用户习惯的语言和概念;
在界面中一致:所有的元素和结构需保持一致,比如:设计样式、图标和文本、元素的位置等。
反馈 Feedback
控制反馈:通过界面样式和交互动效让用户可以清晰的感知自己的操作;
页面反馈:操作后,通过页面元素的变化清晰地展现当前状态。
效率 Efficiency
简化流程:设计简洁直观的操作流程;
清晰明确:语言表达清晰且表意明确,让用户快速理解进而作出决策;
帮助用户识别:界面简单直白,让用户快速识别而非回忆,减少用户记忆负担。
可控 Controllability
用户决策:根据场景可给予用户操作建议或安全提示,但不能代替用户进行决策;
结果可控:用户可以自由的进行操作,包括撤销、回退和终止当前操作等。
3.2、 安装
3.2.1、npm安装
推荐使用 npm 的方式安装,它能更好地和 webpack 打包工具配合使用。
npm i element-ui -S
3.2.2、CDN
目前可以通过 unpkg.com/element-ui 获取到最新版本的资源,在页面上引入 js 和 css 文件即可开始使用。
<!-- 引入样式 -->
<link rel="stylesheet" href="https://unpkg.com/element-ui/lib/theme-chalk/index.css">
<!-- 引入组件库 -->
<script src="https://unpkg.com/element-ui/lib/index.js"></script>
我们建议使用 CDN 引入 Element 的用户在链接地址上锁定版本,以免将来 Element 升级时受到非兼容性更新的影响。锁定版本的方法请查看 unpkg.com。
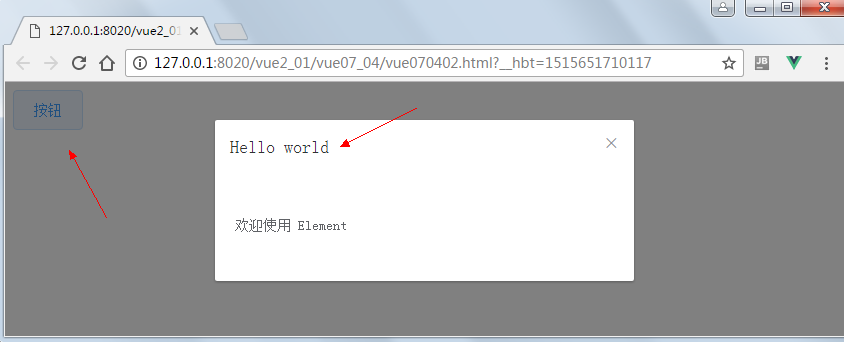
3.2.3、Hello world
通过 CDN 的方式我们可以很容易地使用 Element 写出一个 Hello world 页面。
<!DOCTYPE html>
<html>

    <head>
        <meta charset="UTF-8">
        <!-- 引入样式 -->
        <link rel="stylesheet" href="https://unpkg.com/element-ui/lib/theme-chalk/index.css">
    </head>

    <body>
        <div id="app">
            <el-button @click="visible = true">按钮</el-button>
            <el-dialog :visible.sync="visible" title="Hello world">
                <p>欢迎使用 Element</p>
            </el-dialog>
        </div>
    </body>
    <!-- 先引入 Vue -->
    <script src="https://unpkg.com/vue/dist/vue.js"></script>
    <!-- 引入组件库 -->
    <script src="https://unpkg.com/element-ui/lib/index.js"></script>
    <script>
        new Vue({
            el: '#app',
            data: function() {
                return {
                    visible: false
                }
            }
        })
    </script>

</html>
运行结果:
在线测试:https://jsfiddle.net/hzfpyvg6/14/
3.3、快速上手
本节将介绍如何在项目中使用 Element。
3.3.1、使用 Starter Kit
我们提供了通用的项目模板,你可以直接使用。对于 Laravel 用户,我们也准备了相应的模板,同样可以直接下载使用。
如果不希望使用我们提供的模板,请继续阅读。
3.3.2、使用 vue-cli
我们还可以使用 vue-cli 初始化项目,命令如下:
> npm i -g vue-cli
> mkdir my-project && cd my-project
> vue init webpack
> npm i && npm i element-ui
3.3.3、引入 Element
你可以引入整个 Element,或是根据需要仅引入部分组件。我们先介绍如何引入完整的 Element。
完整引入
在 main.js 中写入以下内容:
import Vue from 'vue'
import ElementUI from 'element-ui'
import 'element-ui/lib/theme-chalk/index.css'
import App from './App.vue'

Vue.use(ElementUI)

new Vue({
  el: '#app',
  render: h => h(App)
})
以上代码便完成了 Element 的引入。需要注意的是,样式文件需要单独引入。
按需引入
借助 babel-plugin-component,我们可以只引入需要的组件,以达到减小项目体积的目的。
首先,安装 babel-plugin-component:
npm install babel-plugin-component -D
然后,将 .babelrc 修改为:
{
  "presets": [
    ["es2015", { "modules": false }]
  ],
  "plugins": [["component", [
    {
      "libraryName": "element-ui",
      "styleLibraryName": "theme-chalk"
    }
  ]]]
}
接下来,如果你只希望引入部分组件,比如 Button 和 Select,那么需要在 main.js 中写入以下内容:
import Vue from 'vue'
import { Button, Select } from 'element-ui'
import App from './App.vue'

Vue.component(Button.name, Button)
Vue.component(Select.name, Select)
/* 或写为
 * Vue.use(Button)
 * Vue.use(Select)
 */

new Vue({
  el: '#app',
  render: h => h(App)
})
完整组件列表和引入方式(完整组件列表以 components.json 为准)


import Vue from 'vue'
import {
  Pagination,
  Dialog,
  Autocomplete,
  Dropdown,
  DropdownMenu,
  DropdownItem,
  Menu,
  Submenu,
  MenuItem,
  MenuItemGroup,
  Input,
  InputNumber,
  Radio,
  RadioGroup,
  RadioButton,
  Checkbox,
  CheckboxButton,
  CheckboxGroup,
  Switch,
  Select,
  Option,
  OptionGroup,
  Button,
  ButtonGroup,
  Table,
  TableColumn,
  DatePicker,
  TimeSelect,
  TimePicker,
  Popover,
  Tooltip,
  Breadcrumb,
  BreadcrumbItem,
  Form,
  FormItem,
  Tabs,
  TabPane,
  Tag,
  Tree,
  Alert,
  Slider,
  Icon,
  Row,
  Col,
  Upload,
  Progress,
  Badge,
  Card,
  Rate,
  Steps,
  Step,
  Carousel,
  CarouselItem,
  Collapse,
  CollapseItem,
  Cascader,
  ColorPicker,
  Transfer,
  Container,
  Header,
  Aside,
  Main,
  Footer,
  Loading,
  MessageBox,
  Message,
  Notification
} from 'element-ui'

Vue.use(Pagination)
Vue.use(Dialog)
Vue.use(Autocomplete)
Vue.use(Dropdown)
Vue.use(DropdownMenu)
Vue.use(DropdownItem)
Vue.use(Menu)
Vue.use(Submenu)
Vue.use(MenuItem)
Vue.use(MenuItemGroup)
Vue.use(Input)
Vue.use(InputNumber)
Vue.use(Radio)
Vue.use(RadioGroup)
Vue.use(RadioButton)
Vue.use(Checkbox)
Vue.use(CheckboxButton)
Vue.use(CheckboxGroup)
Vue.use(Switch)
Vue.use(Select)
Vue.use(Option)
Vue.use(OptionGroup)
Vue.use(Button)
Vue.use(ButtonGroup)
Vue.use(Table)
Vue.use(TableColumn)
Vue.use(DatePicker)
Vue.use(TimeSelect)
Vue.use(TimePicker)
Vue.use(Popover)
Vue.use(Tooltip)
Vue.use(Breadcrumb)
Vue.use(BreadcrumbItem)
Vue.use(Form)
Vue.use(FormItem)
Vue.use(Tabs)
Vue.use(TabPane)
Vue.use(Tag)
Vue.use(Tree)
Vue.use(Alert)
Vue.use(Slider)
Vue.use(Icon)
Vue.use(Row)
Vue.use(Col)
Vue.use(Upload)
Vue.use(Progress)
Vue.use(Badge)
Vue.use(Card)
Vue.use(Rate)
Vue.use(Steps)
Vue.use(Step)
Vue.use(Carousel)
Vue.use(CarouselItem)
Vue.use(Collapse)
Vue.use(CollapseItem)
Vue.use(Cascader)
Vue.use(ColorPicker)
Vue.use(Container)
Vue.use(Header)
Vue.use(Aside)
Vue.use(Main)
Vue.use(Footer)

Vue.use(Loading.directive)

Vue.prototype.$loading = Loading.service
Vue.prototype.$msgbox = MessageBox
Vue.prototype.$alert = MessageBox.alert
Vue.prototype.$confirm = MessageBox.confirm
Vue.prototype.$prompt = MessageBox.prompt
Vue.prototype.$notify = Notification
Vue.prototype.$message = Message
3.3.4、全局配置
在引入 Element 时,可以传入一个全局配置对象。该对象目前仅支持 size 字段,用于改变组件的默认尺寸。按照引入 Element 的方式,具体操作如下:
完整引入 Element:
import Vue from 'vue'
import Element from 'element-ui'
Vue.use(Element, { size: 'small' })
按需引入 Element:
import Vue from 'vue'
import { Button } from 'element-ui'

Vue.prototype.$ELEMENT = { size: 'small' }
Vue.use(Button)
按照以上设置,项目中所有拥有 size 属性的组件的默认尺寸均为 'small'。
3.3.5、开始使用
至此,一个基于 Vue 和 Element 的开发环境已经搭建完毕,现在就可以编写代码了。启动开发模式:
# 执行如下命令后访问 localhost:8086
npm run dev
编译:
npm run build
各个组件的使用方法请参阅它们各自的文档。
3.3.6、示例
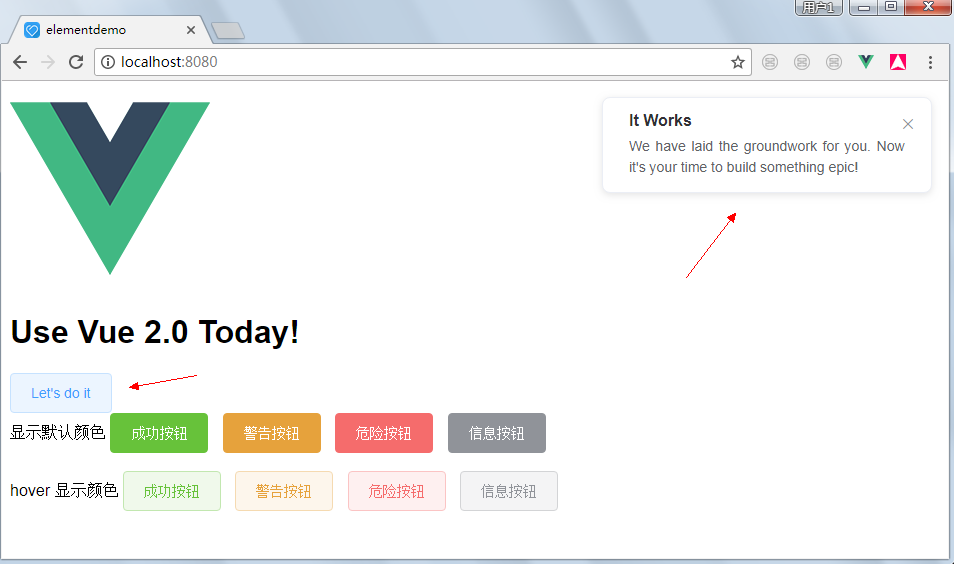
修改app.vue组件:
<template>
  <div id="app">
    <img src="./assets/logo.png">
    <h1>{{ msg }}</h1>
    <el-button @click.native="startHacking">Let's do it</el-button>
    <div class="block">
    <span class="demonstration">显示默认颜色</span>
    <span class="wrapper">
    <el-button type="success">成功按钮</el-button>
    <el-button type="warning">警告按钮</el-button>
    <el-button type="danger">危险按钮</el-button>
    <el-button type="info">信息按钮</el-button>
    </span>
    </div>
    <br/>
    <div class="block">
      <span class="demonstration">hover 显示颜色</span>
    <span class="wrapper">
    <el-button :plain="true" type="success">成功按钮</el-button>
    <el-button :plain="true" type="warning">警告按钮</el-button>
    <el-button :plain="true" type="danger">危险按钮</el-button>
    <el-button :plain="true" type="info">信息按钮</el-button>
    </span>
    </div>
  </div>
</template>
<script>
export default {
  data () {
    return {
      msg: 'Use Vue 2.0 Today!'
    }
  },
  methods: {
    startHacking () {
      this.$notify({
        title: 'It Works',
        message: 'We have laid the groundwork for you. Now it\'s your time to build something epic!',
        duration: 6000
      })
    }
  }
}
</script>

<style>
body {
  font-family: Helvetica, sans-serif;
}
</style>
main.js如下:
// The Vue build version to load with the `import` command
// (runtime-only or standalone) has been set in webpack.base.conf with an alias.
import Vue from 'vue'
import ElementUI from 'element-ui'
import 'element-ui/lib/theme-chalk/index.css'
import App from './App'

Vue.config.productionTip = false

Vue.use(ElementUI)

/* eslint-disable no-new */
new Vue({
  el: '#app',
  template: '<App/>',
  components: { App }
})
运行:
如果出现乱码则修改app.vue为utf-8的编码格式
四、Vue2常用资源
4.1、Mint UI(vue2移动端)
项目主页:http://mint-ui.github.io/#!/zh-cn
demo:http://elemefe.github.io/mint-ui/#/
github地址:https://github.com/ElemeFE/mint-ui
中文文档地址:http://mint-ui.github.io/docs/#!/zh-cn
4.2、iview
iView 配套的工作流:https://github.com/icarusion/vue-vueRouter-webpack
github地址:https://github.com/iview/iview
官网:https://www.iviewui.com/
4.3、vue-mui
官网:http://mui.yaobieting.com/
github地址:https://github.com/creatshare/vue-mui
4.4、radon-ui
中文文档:https://luojilab.github.io/radon-ui/#!/
github:https://github.com/luojilab/radon-ui
4.5、antd vue
中文文档:http://okoala.github.io/vue-antd/#!/components
github:https://github.com/okoala/vue-antd
4.6、weex
社区:http://www.weex.help/
官网:http://weex-project.io/cn/
github:https://github.com/alibaba/weex
中文文档:http://www.weex.help/topic/57792770eb60516a48db5485
4.7、element(饿了么后台)
官网:http://element.eleme.io/#/zh-CN
饿了么github:http://github.com/elemefe
4.8、N3
官网:https://n3-components.github.io/N3-components/
中文文档:https://n3-components.github.io/N3-components/component.html
英文文档:https://github.com/N3-components/N3-components
4.9、vuikit
github:https://github.com/vuikit/vuikit
英文文档:https://vuikit.js.org/#/

 浙公网安备 33010602011771号