Vue3学习笔记(四)——组件、插槽、生命周期、Hooks
一、组件
1.0、SPA
SPA指的是Single Page Application,就是只有一张Web页面的应用。单页应用程序 (SPA) 是加载单个HTML 页面并在用户与应用程序交互时动态更新该页面的Web应用程序。 浏览器一开始会加载必需的HTML、CSS和JavaScript,所有的操作都在这张页面上完成,都由JavaScript来控制。因此,对单页应用来说模块化的开发和设计显得相当重要。
单页Web应用,顾名思义,就是只有一张Web页面的应用。浏览器一开始会加载必需的HTML、CSS和JavaScript,之后所有的操作都在这张页面上完成,这一切都由JavaScript来控制。因此,单页Web应用会包含大量的JavaScript代码,复杂度可想而知,模块化开发和设计的重要性不言而喻。
速度:更好的用户体验,让用户在web app感受native app的速度和流畅
MVVM:经典MVVM开发模式,前后端各负其责
ajax:重前端,业务逻辑全部在本地操作,数据都需要通过AJAX同步、提交
路由:在URL中采用#号来作为当前视图的地址,改变#号后的参数,页面并不会重载
优点:
1.分离前后端关注点,前端负责View,后端负责Model,各司其职;
2.服务器只接口提供数据,不用展示逻辑和页面合成,提高性能;
3.同一套后端程序代码,不用修改兼容Web界面、手机;
4.用户体验好、快,内容的改变不需要重新加载整个页面
5.可以缓存较多数据,减少服务器压力
6.单页应用像网络一样,几乎随处可以访问—不像大多数的桌面应用,用户可以通过任务网络连接和适当的浏览器访问单页应用。如今,这一名单包括智能手机、平板电脑、电视、笔记本电脑和台式计算机。
缺点:
1.SEO问题
2.刚开始的时候加载可能慢很多
3.用户操作需要写逻辑,前进、后退等
4.页面复杂度提高很多,复杂逻辑难度成倍
1.1、什么是组件?
组件(Component)是 Vue.js 最强大的功能之一。组件可以扩展 HTML 元素,封装可重用的代码。在较高层面上,组件是自定义元素, Vue.js 的编译器为它添加特殊功能。在有些情况下,组件也可以是原生 HTML 元素的形式,以 is 特性扩展。
组件系统是 Vue 的另一个重要概念,因为它是一种抽象,允许我们使用小型、独立和通常可复用的组件构建大型应用。仔细想想,几乎任意类型的应用界面都可以抽象为一个组件树:
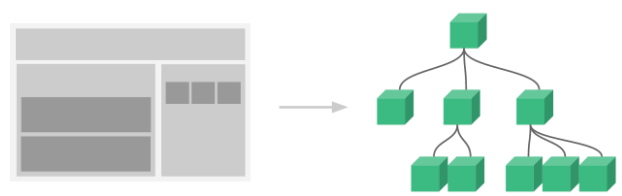
组件允许我们将 UI 划分为独立的、可重用的部分,并且可以对每个部分进行单独的思考。在实际应用中,组件常常被组织成层层嵌套的树状结构:

这和我们嵌套 HTML 元素的方式类似,Vue 实现了自己的组件模型,使我们可以在每个组件内封装自定义内容与逻辑。Vue 同样也能很好地配合原生 Web Component。如果你想知道 Vue 组件与原生 Web Components 之间的关系,可以阅读此章节。
1.2、定义一个组件
1.2.1、不使用语法糖
定义一个组件含一个按钮,点击时值增加,显示当前值。
components/Counter.vue
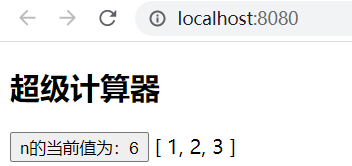
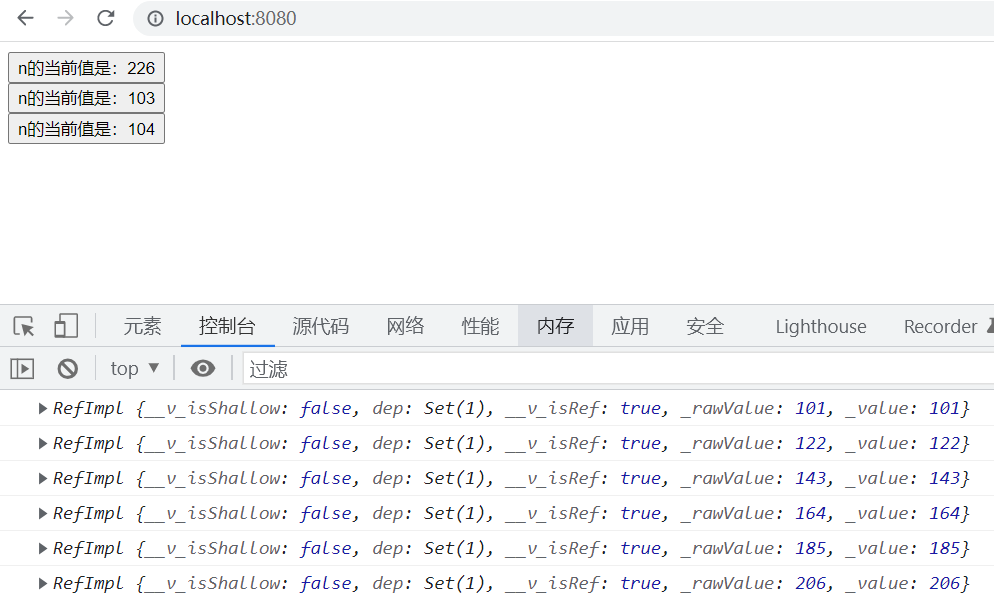
<template>
  <div>
    <button @click="n++">n的当前值为:{{ n }}</button>
  </div>
</template>
<script lang="ts">
import { defineComponent, ref } from "vue";

export default defineComponent({
  name: "Counter", //名称
  setup() {
    let n = ref(0);
    return { n };
  },
});
</script>
<style></style>
App.vue
在components中注册并改名:
<template>
  <cnt />
  <cnt />
  <cnt />
</template>

<script lang="ts">
import Counter from "./components/Counter.vue";
export default {
  setup() {},
  components: {
    cnt: Counter,
  },
};
</script>
不注册不改名称
<template>
  <Counter />
  <Counter />
  <Counter />
</template>

<script lang="ts">
import Counter from "./components/Counter.vue";
export default {};
</script>
1.2.2、使用语法糖定义与使用组件
Counter.vue
<template>
  <div>
    <button @click="n++">n的当前值是:{{ n }}</button>
  </div>
</template>
<script lang="ts" setup>
import { ref } from "vue";
let n = ref(0);
</script>
App.vue
<template>
  <Counter />
  <Counter />
  <Counter />
</template>
<script lang="ts" setup>
import Counter from "./components/Counter.vue";
</script>
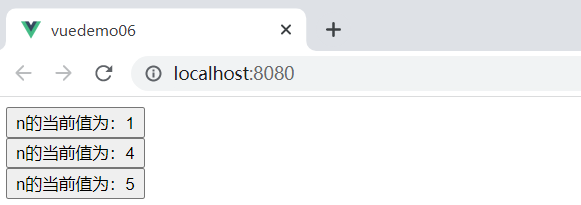
运行效果:
当使用构建步骤时,我们一般会将 Vue 组件定义在一个单独的 .vue 文件中,这被叫做单文件组件 (简称 SFC):
<script setup>
import { ref } from 'vue'

const count = ref(0)
</script>

<template>
  <button @click="count++">You clicked me {{ count }} times.</button>
</template>
当不使用构建步骤时,一个 Vue 组件以一个包含 Vue 特定选项的 JavaScript 对象来定义:
import { ref } from 'vue'

export default {
  setup() {
    const count = ref(0)
    return { count }
  },
  template: `
    <button @click="count++">
      You clicked me {{ count }} times.
    </button>`
  // 或者 `template: '#my-template-element'`
}
这里的模板是一个内联的 JavaScript 字符串,Vue 将会在运行时编译它。你也可以使用 ID 选择器来指向一个元素 (通常是原生的 <template> 元素),Vue 将会使用其内容作为模板来源。
上面的例子中定义了一个组件,并在一个 .js 文件里默认导出了它自己,但你也可以通过具名导出在一个文件中导出多个组件。
1.3、使用组件
我们会在接下来的指引中使用 SFC 语法,无论你是否使用构建步骤,组件相关的概念都是相同的。示例一节中展示了两种场景中的组件使用情况。
要使用一个子组件,我们需要在父组件中导入它。假设我们把计数器组件放在了一个叫做 ButtonCounter.vue 的文件中,这个组件将会以默认导出的形式被暴露给外部。
<script setup>
import ButtonCounter from './ButtonCounter.vue'
</script>

<template>
  <h1>Here is a child component!</h1>
  <ButtonCounter />
</template>
通过 <script setup>,导入的组件都在模板中直接可用。
当然,你也可以全局地注册一个组件,使得它在当前应用中的任何组件上都可以使用,而不需要额外再导入。关于组件的全局注册和局部注册两种方式的利弊,我们放在了组件注册这一章节中专门讨论。
组件可以被重用任意多次:
<h1>Here is a child component!</h1>
<ButtonCounter />
<ButtonCounter />
<ButtonCounter />
你会注意到,每当点击这些按钮时,每一个组件都维护着自己的状态,是不同的 count。这是因为每当你使用一个组件,就创建了一个新的实例。
在单文件组件中,推荐为子组件使用 PascalCase 的标签名,以此来和原生的 HTML 元素作区分。虽然原生 HTML 标签名是不区分大小写的,但 Vue 单文件组件是可以在编译中区分大小写的。我们也可以使用 /> 来关闭一个标签。
如果你是直接在 DOM 中书写模板 (例如原生 <template> 元素的内容),模板的编译需要遵从浏览器中 HTML 的解析行为。在这种情况下,你应该需要使用 kebab-case 形式并显式地关闭这些组件的标签。
<!-- 如果是在 DOM 中书写该模板 -->
<button-counter></button-counter>
<button-counter></button-counter>
<button-counter></button-counter>
请看 DOM 模板解析注意事项了解更多细节。
1.4、传递 props
1.4.1、不使用语法糖
不使用setup语法糖的方式可以在对象中指定props对象或数组声明属性。
父组件App.vue:
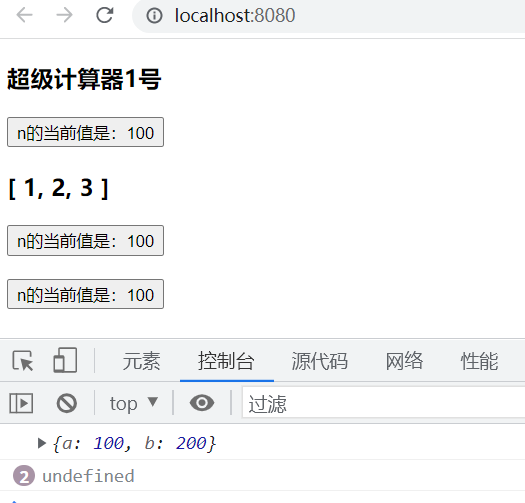
<template>
  <Counter :data="data" title="超级计算器" />
</template>

<script lang="ts">
import { reactive } from "vue";
import Counter from "./components/Counter.vue";
export default {
  setup() {
    let data = reactive([1, 2, 3]);
    return { data };
  },
  components: {
    Counter,
  },
};
</script>
子组件Counter.vue:
<template>
  <div>
    <h2>{{ title }}</h2>
    <button @click="n++">n的当前值为:{{ n }}</button>
    {{ data }}
  </div>
</template>

<script lang="ts">
import { defineComponent, ref } from "vue";

export default defineComponent({
  name: "Counter",
  setup() {
    let n = ref(0);
    return { n };
  },
  props: ["title", "data"],
});
</script>

<style></style>
      // 使用 props
      const useProps = () => {
        console.log(props.title) // 默认值
    }
XCounter
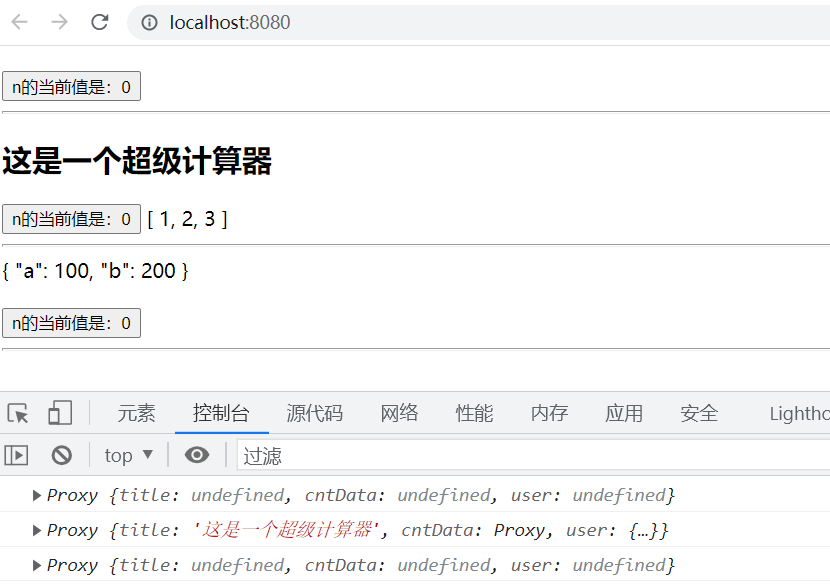
<template>
  <div>
    <h3 v-if="title">{{ title }}</h3>
    <button @click="n++">n的当前值是:{{ n }}</button>
    <h3>{{ cntData }}</h3>
  </div>
</template>
<script lang="ts">
import { ref, defineComponent } from "vue";

export default defineComponent({
  name: "XCounter",
  setup(props) {
    let n = ref(100);
    console.log(props.user);
    return { n };
  },
  props: ["title", "cntData", "user"],
});
</script>
XApp.vue
<template>
  <XCounter title="超级计算器1号" :cntData="data" :user="{ a: 100, b: 200 }" />
  <XCounter />
  <XCounter />
</template>
<script lang="ts">
import { reactive } from "vue";
import XCounter from "./components/XCounter.vue";
export default {
  setup() {
    let data = reactive([1, 2, 3]);
    return { data };
  },
};
</script>
1.4.2、使用语法糖
在声明了setup语法糖的setup块中定义属性,子组件接受值,通过defineProps 来接受, defineProps是无须引入的直接使用即可。
父组件App.vue
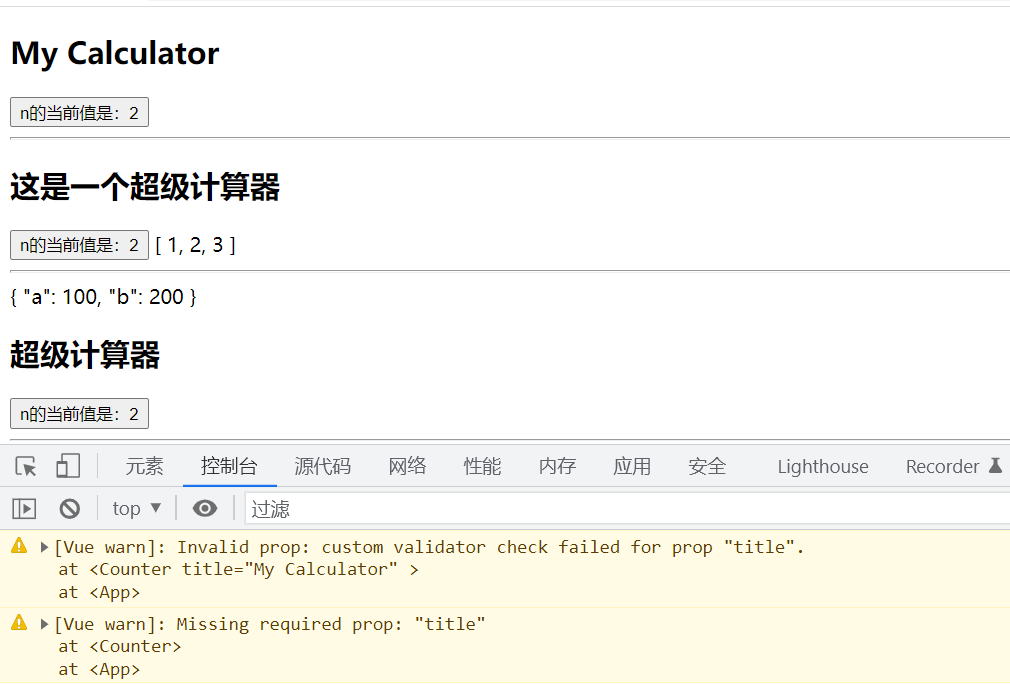
<template>
  <Counter />
  <Counter
    title="这是一个超级计算器"
    :cntData="data"
    :user="{ a: 100, b: 200 }"
  />
  <Counter />
</template>
<script lang="ts" setup>
import { reactive } from "vue";
import Counter from "./components/Counter.vue";
let data = reactive([1, 2, 3]);
</script>
子组件Counter.vue
数组写法:
<template>
  <div>
    <h2>{{ title }}</h2>
    <button @click="n++">n的当前值是:{{ n }}</button>
    {{ cntData }}
    <hr />
    {{ user }}
  </div>
</template>
<script lang="ts" setup>
import { ref } from "vue";
let n = ref(0);

//2、使用数组定义
let props = defineProps(["title", "cntData", "user"]);
console.log(props);
</script>
ts写法:
<template>
  <div>
    <h2>{{ title }}</h2>
    <button @click="n++">n的当前值是:{{ n }}</button>
    {{ cntData }}
    <hr />
    {{ user }}
  </div>
</template>
<script lang="ts" setup>
import { ref } from "vue";
let n = ref(0);

//使用ts语言环境下声明属性
//定义属性类型
type PropType = {
  title?: string;
  cntData?: number[];
  user?: object;
};
//定义属性并返回属性值
let props = defineProps<PropType>();
console.log(props);


</script>
非ts写法
<template>
  <div>
    <h2>{{ title }}</h2>
    <button @click="n++">n的当前值是:{{ n }}</button>
    {{ cntData }}
    <hr />
    {{ user }}
  </div>
</template>
<script setup>
import { ref } from "vue";
let n = ref(0);

/*
//1、使用ts语言环境下声明属性
//定义属性类型
type PropType = {
  title?: string;
  cntData?: number[];
  user?: object;
};
//定义属性并返回属性值
let props = defineProps<PropType>();
console.log(props);
*/

/*
//2、使用数组定义属性
let props = defineProps(["title", "cntData", "user"]);
console.log(props);
*/

//3、使用对象定义属性
let props = defineProps({
  title: {
    type: String, //类型
    required: false, //是否是必填属性
  },
  cntData: { type: Array },
  user: { type: Object },
});
console.log(props);
</script>
如果我们正在构建一个博客,我们可能需要一个表示博客文章的组件。我们希望所有的博客文章分享相同的视觉布局,但有不同的内容。要实现这样的效果自然必须向组件中传递数据,例如每篇文章标题和内容,这就会使用到 props。
Props 是一种特别的 attributes,你可以在组件上声明注册。要传递给博客文章组件一个标题,我们必须在组件的 props 列表上声明它。这里要用到 defineProps 宏:
<!-- BlogPost.vue -->
<script setup>
defineProps(['title'])
</script>

<template>
  <h4>{{ title }}</h4>
</template>
defineProps 是一个仅 <script setup> 中可用的编译宏命令,并不需要显式地导入。声明的 props 会自动暴露给模板。defineProps 会返回一个对象,其中包含了可以传递给组件的所有 props:
const props = defineProps(['title'])
console.log(props.title)
TypeScript 用户请参考:为组件 props 标注类型
如果你没有使用 <script setup>,props 必须以 props 选项的方式声明,props 对象会作为 setup() 函数的第一个参数被传入:
export default {
  props: ['title'],
  setup(props) {
    console.log(props.title)
  }
}
一个组件可以有任意多的 props,默认情况下,所有 prop 都接受任意类型的值。
当一个 prop 被注册后,可以像这样以自定义 attribute 的形式传递数据给它:
<BlogPost title="My journey with Vue" />
<BlogPost title="Blogging with Vue" />
<BlogPost title="Why Vue is so fun" />
在实际应用中,我们可能在父组件中会有如下的一个博客文章数组:
const posts = ref([
  { id: 1, title: 'My journey with Vue' },
  { id: 2, title: 'Blogging with Vue' },
  { id: 3, title: 'Why Vue is so fun' }
])
这种情况下,我们可以使用 v-for 来渲染它们:
<BlogPost
  v-for="post in posts"
  :key="post.id"
  :title="post.title"
 />
留意我们是如何使用 v-bind 来传递动态 prop 值的。当事先不知道要渲染的确切内容时,这一点特别有用。
以上就是目前你需要了解的关于 props 的全部了。如果你看完本章节后还想知道更多细节,我们推荐你深入阅读关于 props 的完整指引。
1.4.3、默认值与验证
(1)、不使用setup语法糖的形式
XCounter.vue<template> <div> <h3 v-if="title">{{ title }}</h3> <button @click="n++">n的当前值是:{{ n }}</button> <h3>{{ cntData }}</h3> </div> </template> <script lang="ts"> import { ref, defineComponent } from "vue"; export default defineComponent({ name: "XCounter", setup(props) { let n = ref(100); console.log(props.user); return { n }; }, props: { title: { type: String, //类型 required: true, //是否必填 default: "计算器", //默认值 validator: (v: string) => v.length <= 5, //验证 }, cntData: { type: Array }, user: { type: Object }, }, }); </script>
XApp.vue
<template>
  <XCounter title="超级计算器1号" :cntData="data" :user="{ a: 100, b: 200 }" />
  <XCounter />
  <XCounter />
</template>
<script lang="ts">
import { reactive } from "vue";
import XCounter from "./components/XCounter.vue";
export default {
  setup() {
    let data = reactive([1, 2, 3]);
    return { data };
  },
};
</script>
运行结果:
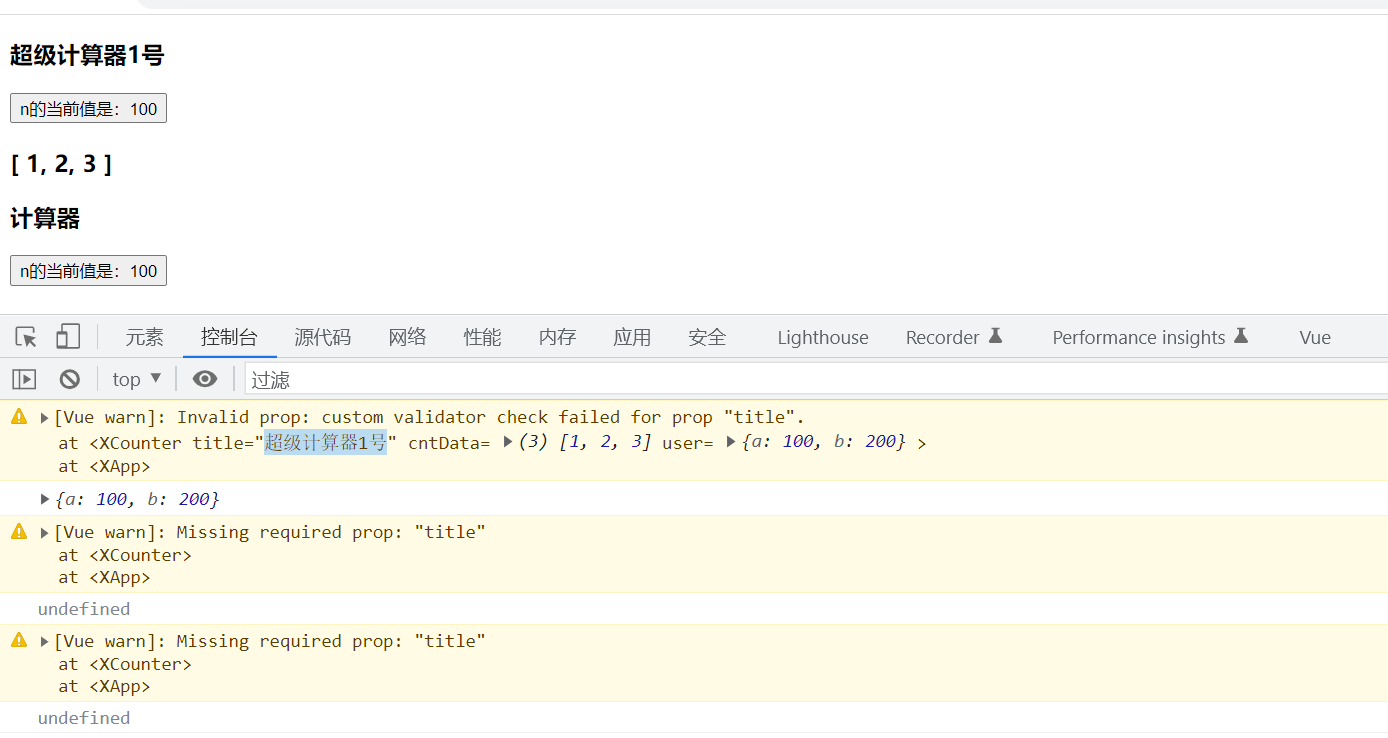
从运行结果可以看出因为缺少title属性而报了警告,因为第一个counter的title太长而报了警告,默认值也起作用了。
 props: {
    // 基础类型检测 (`null` 意思是任何类型都可以)
    propA: Number,
    // 多种类型
    propB: [String, Number],
    // 必传且是字符串
    propC: {
      type: String,
      required: true
    },
    // 数字,有默认值
    propD: {
      type: Number,
      default: 100
    },
    // 数组/对象的默认值应当由一个工厂函数返回
    propE: {
      type: Object,
      default: function () {
        return { message: 'hello' }
      }
    },
    // 自定义验证函数
    propF: {
      validator: function (value) {
        return value > 10
      }
    }
  }
<template>
  <div>
    <h2>{{ title }}</h2>
    <button @click="n++">n的当前值为:{{ n }}</button>
    {{ data }}
  </div>
</template>
<script lang="ts">
import { defineComponent, ref } from "vue";

export default defineComponent({
  name: "Counter", //名称
  setup() {
    let n = ref(0);
    return { n };
  },
  props: {
    title: {
      type: String,
      required: false,
      default: "普通计算器",
    },
    data: {
      type: Array,
      validator: (value: Array<number>) => {
        return value.length === 3;
      },
      required: false,
      default: [1, 2, 3],
    },
  },
});
</script>
<style></style>
type表示属性的类型,required表示是否为必要属性,default表示默认值,validator表示验证属性的值是否合理。
(2)、非ts语言版本
Counter.vue<template> <div> <h2>{{ title }}</h2> <button @click="n++">n的当前值是:{{ n }}</button> {{ cntData }} <hr /> {{ user }} </div> </template> <script setup> import { ref } from "vue"; let n = ref(0); //3、使用对象定义属性,并约束属性 let props = defineProps({ title: { type: String, //类型 required: true, //是否是必填属性 default: "超级计算器", //默认值 validator: (v) => v.indexOf("计算器") >= 0, //约束名称中必须含计算器 }, cntData: { type: Array }, user: { type: Object }, }); </script>
App.vue
<template>
  <Counter title="My Calculator" />
  <Counter
    title="这是一个超级计算器"
    :cntData="data"
    :user="{ a: 100, b: 200 }"
  />
  <Counter />
</template>
<script lang="ts" setup>
import { reactive } from "vue";
import Counter from "./components/Counter.vue";
let data = reactive([1, 2, 3]);
</script>
(3)、使用setup语法糖的形式
ts模式:
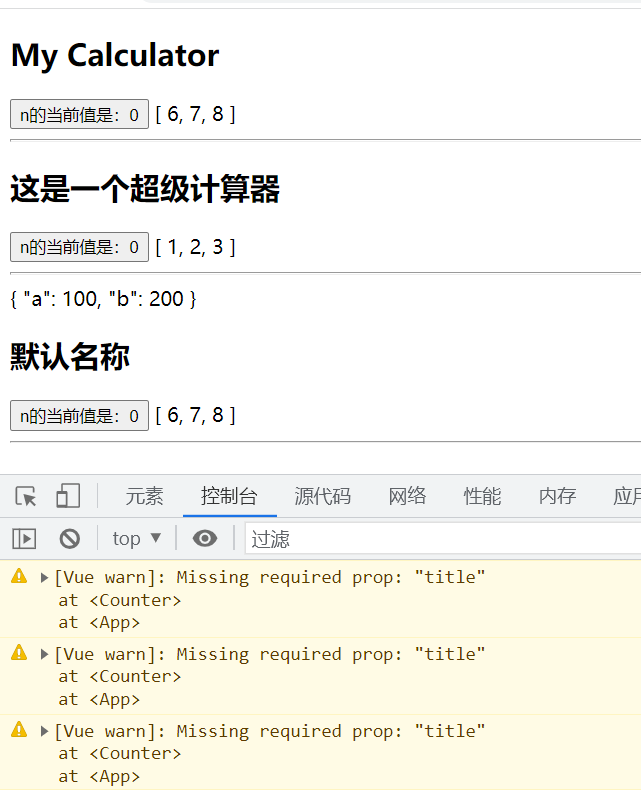
Counter.vue<template> <div> <h2>{{ title }}</h2> <button @click="n++">n的当前值是:{{ n }}</button> {{ cntData }} <hr /> {{ user }} </div> </template> <script lang="ts" setup> import { ref } from "vue"; let n = ref(0); //定义属性类型 type PropType = { title: string; //必填属性 cntData?: number[]; //选填属性 user: object; }; //定义属性并返回属性值 withDefaults(defineProps<PropType>(), { title: "默认名称", cntData: () => [6, 7, 8], }); </script>
App.vue
<template>
  <Counter title="My Calculator" />
  <Counter
    title="这是一个超级计算器"
    :cntData="data"
    :user="{ a: 100, b: 200 }"
  />
  <Counter />
</template>
<script lang="ts" setup>
import { reactive } from "vue";
import Counter from "./components/Counter.vue";
let data = reactive([1, 2, 3]);
</script>
1.4.4、vetur插件在vue3中报错
vetur是vue2支持的插件,volar(vue language features)可以支持vue3。
可以直接搜索安装

然后禁用vetur,重启vscode即可。
如果不想禁用vetur,又想启用volar,可以在当前项目中的.vscode文件夹的settings.json文件中配置禁用如下:
{
    "vetur.validation.template": false,
    "vetur.validation.script": false,
    "vetur.validation.style": false,
}
1.5、监听事件
让我们继续关注我们的 <BlogPost> 组件。我们会发现有时候它需要与父组件进行交互。例如,要在此处实现 A11y 的需求,将博客文章的文字能够放大,而页面的其余部分仍使用默认字号。
在父组件中,我们可以添加一个 postFontSize ref 来实现这个效果:
const posts = ref([
  /* ... */
])

const postFontSize = ref(1)
在模板中用它来控制所有博客文章的字体大小:
<div :style="{ fontSize: postFontSize + 'em' }">
  <BlogPost
    v-for="post in posts"
    :key="post.id"
    :title="post.title"
   />
</div>
然后,给 <BlogPost> 组件添加一个按钮:
<!-- BlogPost.vue, 省略了 <script> -->
<template>
  <div class="blog-post">
    <h4>{{ title }}</h4>
    <button>Enlarge text</button>
  </div>
</template>
这个按钮目前还没有做任何事情,我们想要点击这个按钮来告诉父组件它应该放大所有博客文章的文字。要解决这个问题,组件实例提供了一个自定义事件系统。父组件可以通过 v-on 或 @ 来选择性地监听子组件上抛的事件,就像监听原生 DOM 事件那样:
<BlogPost
  ...
  @enlarge-text="postFontSize += 0.1"
 />
子组件可以通过调用内置的 $emit 方法,通过传入事件名称来抛出一个事件:
<!-- BlogPost.vue, 省略了 <script> -->
<template>
  <div class="blog-post">
    <h4>{{ title }}</h4>
    <button @click="$emit('enlarge-text')">Enlarge text</button>
  </div>
</template>
因为有了 @enlarge-text="postFontSize += 0.1" 的监听,父组件会接收这一事件,从而更新 postFontSize 的值。
我们可以通过 defineEmits 宏来声明需要抛出的事件:
<!-- BlogPost.vue -->
<script setup>
defineProps(['title'])
defineEmits(['enlarge-text'])
</script>
这声明了一个组件可能触发的所有事件,还可以对事件的参数进行验证。同时,这还可以让 Vue 避免将它们作为原生事件监听器隐式地应用于子组件的根元素。
和 defineProps 类似,defineEmits 仅可用于 <script setup> 之中,并且不需要导入,它返回一个等同于 $emit 方法的 emit 函数。它可以被用于在组件的 <script setup> 中抛出事件,因为此处无法直接访问 $emit:
<script setup>
const emit = defineEmits(['enlarge-text'])

emit('enlarge-text')
</script>
TypeScript 用户请参考:为组件 emits 标注类型
如果你没有在使用 <script setup>,你可以通过 emits 选项定义组件会抛出的事件。你可以从 setup() 函数的第二个参数,即 setup 上下文对象上访问到 emit 函数:
export default {
  emits: ['enlarge-text'],
  setup(props, ctx) {
    ctx.emit('enlarge-text')
  }
}
以上就是目前你需要了解的关于组件自定义事件的所有知识了。如果你看完本章节后还想知道更多细节,请深入阅读组件事件章节。
1.5.1、自定义事件—使用语法糖
Counter.vue
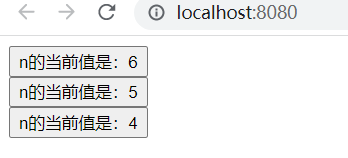
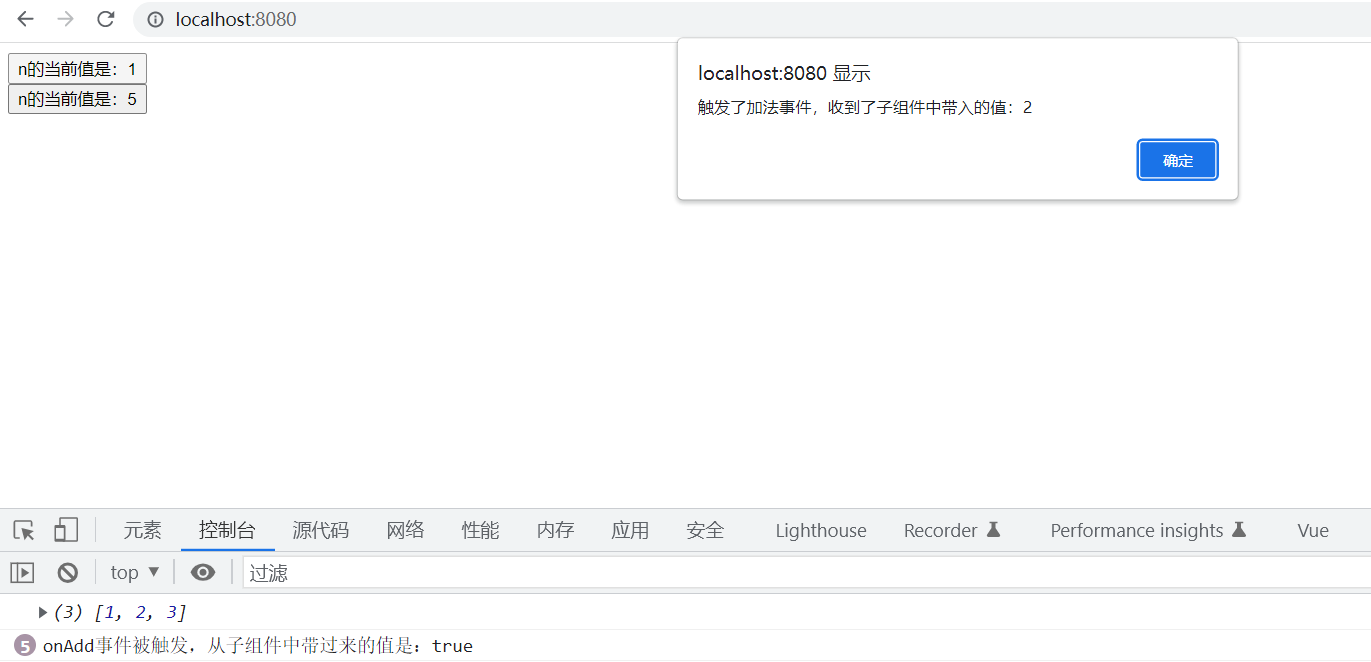
<template>
  <div>
    <button @click="clickHandle">n的当前值是:{{ n }}</button>
  </div>
</template>
<script lang="ts" setup>
import { ref } from "vue";
let n = ref(0);

//定义事件
let emit = defineEmits(["onCount", "onAdd"]);

function clickHandle() {
  n.value++;
  //向父组件派发事件onCount并将参数带入
  emit("onCount", n.value, [1, 2, 3]);
  emit("onAdd", true);
}
</script>
App.Vue
<template>
  <Counter @onCount="countHandle" />
  <Counter @onAdd="addHandle" />
</template>
<script lang="ts" setup>
import Counter from "./components/Counter.vue";
function countHandle(n, arr) {
  alert("触发了加法事件,收到了子组件中带入的值:" + n);
  console.log(arr);
}
function addHandle(value) {
  console.log("onAdd事件被触发,从子组件中带过来的值是:" + value);
}
</script>
1.5.2、自定义事件—不使用语法糖
XCounter.vue
<template>
  <div>
    <button @click="addHandler">n的当前值是:{{ n }}</button>
  </div>
</template>
<script lang="ts">
import { ref, defineComponent } from "vue";

export default defineComponent({
  name: "XCounter",
  setup(props, context) {
    let n = ref(100);

    function addHandler() {
      n.value++;
      //子组件向父组件派发事件,并传递参数n
      context.emit("onAdd", n);
    }

    return { n, addHandler };
  },
});
</script>
XApp.vue
<template>
  <XCounter @onAdd="addHandler" />
  <XCounter />
  <XCounter />
</template>
<script lang="ts">
import XCounter from "./components/XCounter.vue";
export default {
  setup() {
    function addHandler(n) {
      console.log(n);
      n.value += 20;
    }
    return { addHandler };
  },
};
</script>
1.5.3、子组件暴露成员给父组件
子组件暴露给父组件内部属性通过defineExpose,我们从父组件获取子组件实例通过ref。
Counter.vue暴露数据组父组件:
defineExpose({ c: 300, d: 400 });
接收子组件暴露的数据:
<template>
  <Counter />
  <Counter
    title="这是一个超级计算器"
    :cntData="data"
    :user="{ a: 100, b: 200 }"
  />
  <Counter ref="counter3" />

  <button @click="getData">counter3暴露的值</button>
</template>
<script lang="ts" setup>
import { functions } from "lodash";
import { reactive, ref } from "vue";
import Counter from "./components/Counter.vue";
let data = reactive([1, 2, 3]);

let counter3 = ref();

function getData() {
  console.log(counter3);
  console.log(counter3.value.c, counter3.value.d);
}
</script>
Counter.vue
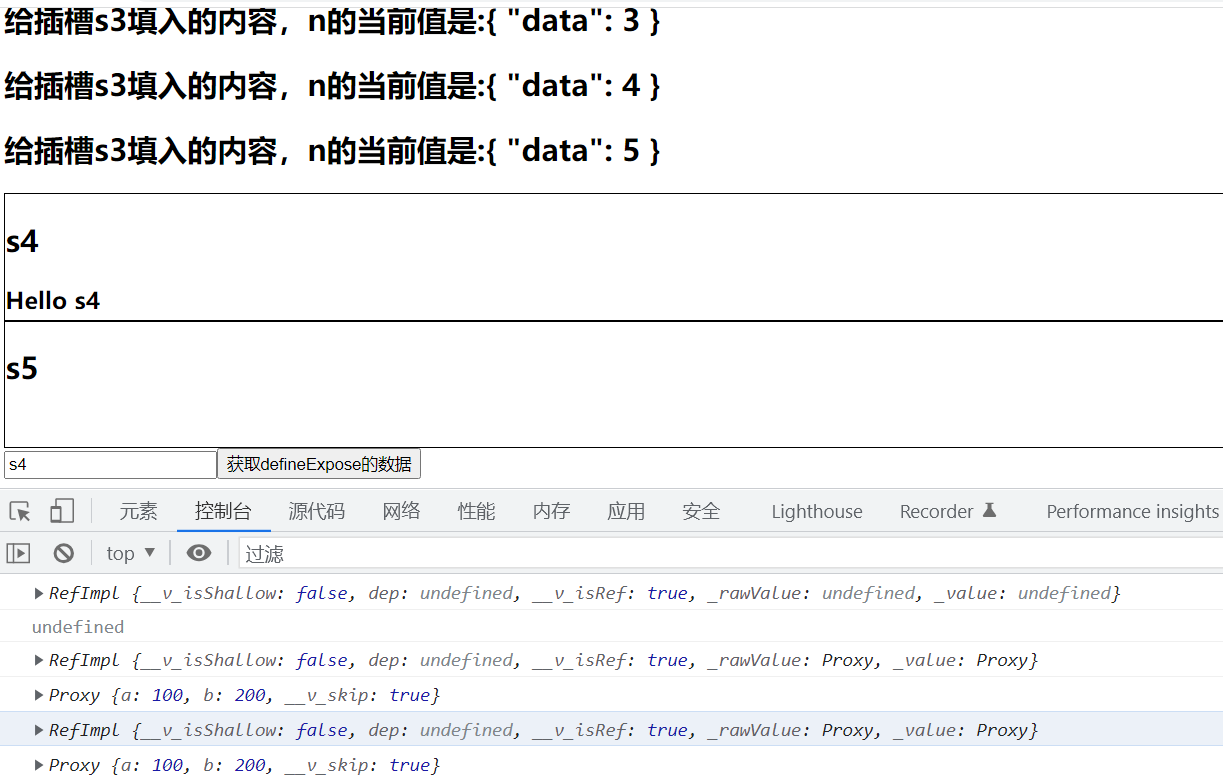
<template>
  <h1>setup语法糖组件</h1>
  <div>
    <slot :data="{ a: 100, b: 200 }"></slot>
  </div>
  <div>
    <slot name="s1"></slot>
  </div>
  <div>
    <slot name="s2"></slot>
  </div>
  <hr />
  <div>
    <slot name="s3" v-for="n in 5" :data="n"></slot>
  </div>
  <div class="cls4">
    <h2>s4</h2>
    <slot name="s4"></slot>
  </div>
  <div class="cls5">
    <h2>s5</h2>
    <slot name="s5"></slot>
  </div>
</template>
<script lang="ts" setup>
defineExpose({ a: 100, b: 200 });
</script>

<style scoped>
.cls4,
.cls5 {
  height: 100px;
  border: 1px solid #000;
}
</style>
App.vue
<template>
  <Counter ref="counter1">
    <template v-slot="{ data }">
      <h2>给匿名插槽填入的内容!a={{ data.a }}</h2>
      <h2>给匿名插槽填入的内容!b={{ data.b }}</h2>
      <h2>给匿名插槽填入的内容!</h2>
    </template>
    <template #s1>
      <h2>给插槽s1填入的内容!</h2>
      <h2>给插槽s1填入的内容!</h2>
      <h2>给插槽s1填入的内容!</h2>
    </template>
    <template v-slot:s2>
      <h2>给插槽s2填入的内容!</h2>
      <h2>给插槽s2填入的内容!</h2>
      <h2>给插槽s2填入的内容!</h2>
    </template>
    <template v-slot:s3="n">
      <h2>给插槽s3填入的内容,n的当前值是:{{ n }}</h2>
    </template>
    <template #[slotname]>
      <h3>Hello {{ slotname }}</h3>
    </template>
  </Counter>
  <input v-model="slotname" />
  <button @click="getData">获取defineExpose的数据</button>
</template>
<script lang="ts" setup>
import { onMounted, ref } from "vue";
import Counter from "./components/Counter.vue";
let slotname = ref("s4");
let counter1 = ref();

console.log(counter1); //_value为空
console.log(counter1.value); //undefined

onMounted(() => {
  console.log(counter1); //有值
  console.log(counter1.value); //{a:100,b:200}
});

function getData() {
  console.log(counter1); //有值
  console.log(counter1.value); //{a:100,b:200}
}
</script>
1.6、插槽
一些情况下我们会希望能和 HTML 元素一样向组件中传递内容:
<AlertBox>
  Something bad happened.
</AlertBox>
我们期望能渲染成这样:
This is an Error for Demo Purposes
Something bad happened.
这可以通过 Vue 的自定义 <slot> 元素来实现:
<template>
  <div class="alert-box">
    <strong>This is an Error for Demo Purposes</strong>
    <slot />
  </div>
</template>

<style scoped>
.alert-box {
  /* ... */
}
</style>
如上所示,我们使用 <slot> 作为一个占位符,父组件传递进来的内容就会渲染在这里。
以上就是目前你需要了解的关于插槽的所有知识了。如果你看完本章节后还想知道更多细节,请深入阅读组件插槽章节。
App.vue
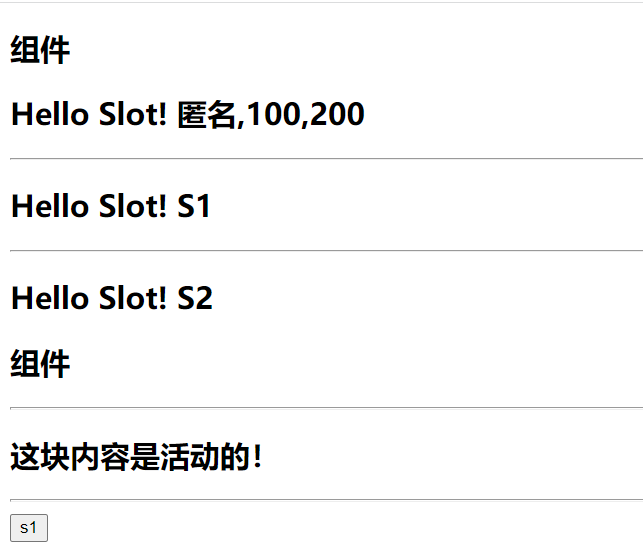
<template>
  <Counter>
    <template v-slot="{ a1, a2 }">
      <h2>Hello Slot! 匿名,{{ a1 }},{{ a2 }}</h2>
    </template>
    <template v-slot:s1>
      <h2>Hello Slot! S1</h2>
    </template>
    <template #s2>
      <h2>Hello Slot! S2</h2>
    </template>
  </Counter>

  <Counter>
    <template #[slotname]>
      <h2>这块内容是活动的!</h2>
    </template>
  </Counter>

  <button @click="changeSlotName">{{ slotname }}</button>
</template>
<script lang="ts" setup>
import { reactive, ref } from "vue";
import Counter from "./components/Counter.vue";

let slotname = ref("s1");
function changeSlotName() {
  slotname.value = slotname.value === "s1" ? "s2" : "s1";
}
</script>
Counter.vue
<template>
  <div>
    <h2>组件</h2>
  </div>
  <div>
    <slot :a1="100" :a2="200"></slot>
  </div>
  <hr />
  <slot name="s1"></slot>
  <hr />
  <slot name="s2"></slot>
</template>
<script lang="ts" setup></script>
1.6.1.匿名插槽
在组件中预留一个空位,在使用组件中传入内容。
组件中留位置:
<template>
  <div class="head">
    <slot></slot>
  </div>
</template>

使用组件时插入:
<headerVue>
        <template v-slot>
          <div>我被插入了hhh</div>
        </template>
 </headerVue>
Counter.vue
<template>
  <div class="cls1"></div>
  <div class="cls2"><slot></slot></div>
  <div class="cls3"></div>
</template>
<script lang="ts" setup></script>

<style scoped>
.cls1 {
  height: 100px;
  background: #fde;
}
.cls2 {
  height: 100px;
  background: #dfe;
}
.cls3 {
  height: 100px;
  background: #def;
}
</style>
App.vue
<template>
  <Counter>
    <h2>这是插槽传入的内容A</h2>
  </Counter>

  <Counter>
    <template v-slot>
      <h2>这是插槽传入的内容B</h2>
    </template>
  </Counter>
</template>
<script lang="ts" setup>
import Counter from "./components/Counter.vue";
</script>

1.6.2.具名插槽
给插槽指定名称
<template>
  <div class="head">
    <slot name="header"></slot>
    <slot name="also"></slot>
  </div>
</template>

给插槽按名称指定内容
     <headerVue>
        <template v-slot:header>
          <div>我被插入了hhh</div>
        </template>
        <template v-slot:also>
          <div>
            我也被插入了
          </div>
        </template>
      </headerVue>
Counter.vue
<template>
  <div class="cls1">
    <slot name="s1"></slot>
  </div>
  <div class="cls2">
    <slot name="s2"></slot>
  </div>
  <div class="cls3">
    <slot name="s3"></slot>
  </div>
  <h2>
    <slot></slot>
  </h2>
</template>
<script lang="ts" setup></script>

<style scoped>
.cls1 {
  height: 100px;
  background: #fde;
}
.cls2 {
  height: 100px;
  background: #dfe;
}
.cls3 {
  height: 100px;
  background: #def;
}
</style>
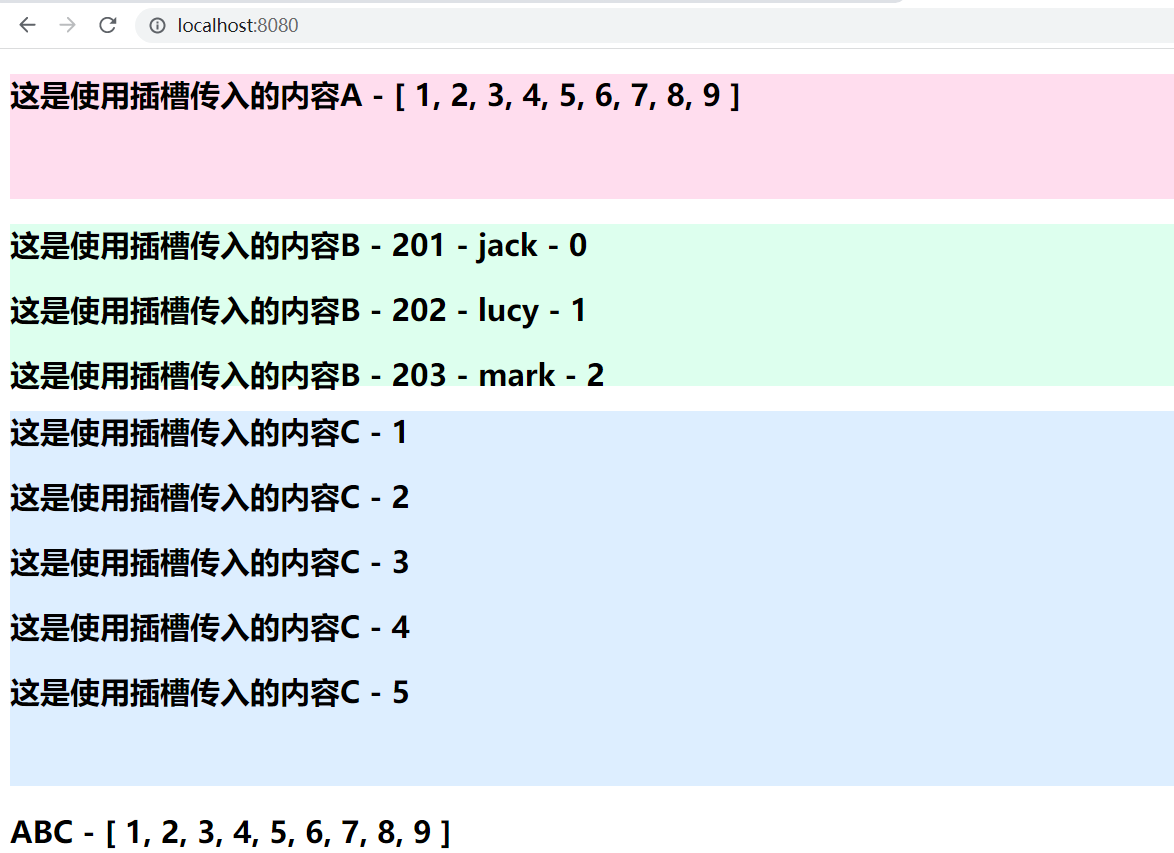
s1,s2,s3为3个命名的插槽,使用是可以向不同的插槽中填入内容。
App.vue
<template>
  <Counter>
    <template v-slot:s1>
      <h2>这是使用插槽传入的内容A</h2>
    </template>
    <template #s2>
      <h2>这是使用插槽传入的内容B</h2>
    </template>
    <template #s3>
      <h2>这是使用插槽传入的内容C</h2>
    </template>
    ABC
  </Counter>
</template>
<script lang="ts" setup>
import Counter from "./components/Counter.vue";
</script>

1.6.3.作用域插槽
子对父:
1.子组件类型确定,子组件传值确定
type names={
  name:string,
  age:number
}

const data=reactive<names[]>([
    {
      name:'小王',
      age:15
    },
    {
      name:'小李',
      age:16,
    },
    {
      name:'小赵',
      age:17,
    }
  ])
2.循环遍历,依次绑定数值
<div v-for="(item,i) in data" :key="i">
<slot :data="item"></slot>
</div>
3.父组件接收数据,并解构出值,依次插入
<template v-slot="{data}">
{{data.name}}
</template>
Counter.vue
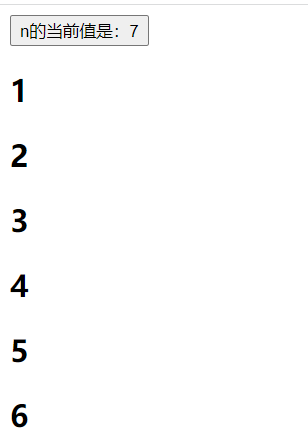
<template>
  <div>
    <button @click="n++">n的当前值是:{{ n }}</button>
    <div v-for="n in 10">
      <slot :data="n"></slot>
    </div>
  </div>
</template>
<script lang="ts" setup>
import { ref } from "vue";
let n = ref(0);
</script>
App.vue
<template>
  <Counter>
    <template v-slot="{ data }">
      <h2>{{ data }}</h2>
    </template>
  </Counter>
</template>
<script lang="ts" setup>
import Counter from "./components/Counter.vue";
</script>
Counter.vue
<template>
  <div class="cls1">
    <slot name="s1" :data="arr"></slot>
  </div>
  <div class="cls2">
    <div v-for="(item, index) in users" :key="item.id">
      <slot name="s2" :data="{ item, index }"></slot>
    </div>
  </div>
  <div class="cls3">
    <div v-for="n in 5">
      <slot name="s3" :data="n"></slot>
    </div>
  </div>
  <h2>
    <slot :data="arr"></slot>
  </h2>
</template>
<script lang="ts" setup>
let arr = [1, 2, 3, 4, 5, 6, 7, 8, 9];
interface User {
  id: number;
  name: string;
}
let users: Array<User> = [
  { id: 201, name: "jack" },
  { id: 202, name: "lucy" },
  { id: 203, name: "mark" },
];
</script>

<style scoped>
.cls1 {
  height: 100px;
  background: #fde;
}
.cls2 {
  height: 130px;
  background: #dfe;
}
.cls3 {
  height: 300px;
  background: #def;
}
</style>
App.vue
<template>
  <Counter>
    <template v-slot:s1="{ data }">
      <h2>这是使用插槽传入的内容A - {{ data }}</h2>
    </template>
    <template #s2="{ data }">
      <h2>
        这是使用插槽传入的内容B - {{ data.item.id }} - {{ data.item.name }} -
        {{ data.index }}
      </h2>
    </template>
    <template #s3="{ data }">
      <h2>这是使用插槽传入的内容C - {{ data }}</h2>
    </template>
    <template v-slot="{ data }"> ABC - {{ data }} </template>
  </Counter>
</template>
<script lang="ts" setup>
import Counter from "./components/Counter.vue";
</script>
结果
1.6.4.动态插槽
插槽的父组件传递值data
<template #[data]>
<div>
这是动态插槽
</div>
</template>
let data=ref('footer')
被插入的子组件里有footer

<slot name="footer"></slot>
作用:可通过改变data来改变插入的位置
Counter.vue
<template>
  <div class="cls1">
    <slot name="s1"></slot>
  </div>
  <div class="cls2">
    <slot name="s2"></slot>
  </div>
  <div class="cls3">
    <slot name="s3"></slot>
  </div>
</template>
<script lang="ts" setup></script>

<style scoped>
.cls1 {
  height: 100px;
  background: #fde;
}
.cls2 {
  height: 100px;
  background: #dfe;
}
.cls3 {
  height: 100px;
  background: #def;
}
</style>
App.vue
<template>
  <Counter>
    <template #[slotname]>
      <h2>这是使用插槽传入的内容</h2>
    </template>
  </Counter>

  <input v-model="slotname" /> {{ slotname }}
</template>
<script lang="ts" setup>
import { ref } from "vue";
import Counter from "./components/Counter.vue";
let slotname = ref("s2");
</script>
小知识:
1."v-slot:"可简写为#
2.解构赋值时" v-slot="可简写为#default=
1.7、setup的参数
1.7.1、props
props:值为对象,包含:组件外部传递过来,且组件内部声明接收了的属性。
1.7.2、Setup 上下文
context:上下文对象
attrs: 值为对象,包含:组件外部传递过来,但没有在props配置中声明的属性, 相当于 this.$attrs。
slots: 收到的插槽内容, 相当于 this.$slots。
emit: 分发自定义事件的函数, 相当于 this.$emit。
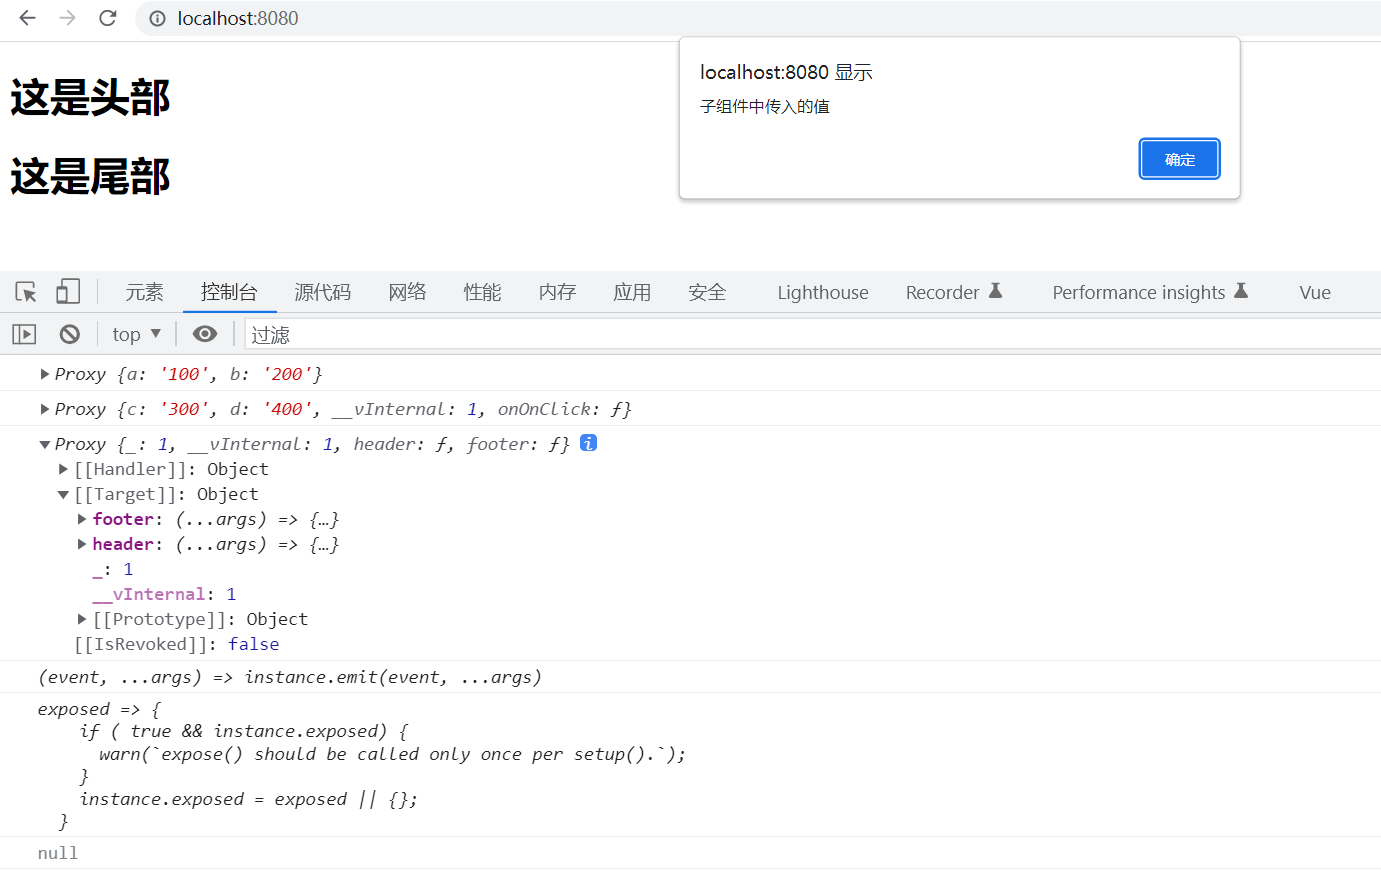
XCounter.vue
<template>
  <div @click="clickHandle">
    <slot name="header"></slot>
    <slot name="footer"></slot>
  </div>
</template>
<script lang="ts">
import { ref, defineComponent } from "vue";

export default defineComponent({
  name: "XCounter",
  //props为已声明的属性
  setup(props, { attrs, slots, emit, expose }) {
    console.log(props);
    // 未声明的属性
    console.log(attrs);

    // 插槽(非响应式的对象,等价于 $slots)
    console.log(slots);

    // 触发事件(函数,等价于 $emit)
    console.log(emit);
    function clickHandle() {
      emit("on-click", "子组件中传入的值");
    }

    // 暴露公共属性(函数)
    console.log(expose);
    expose({ e: 500 });

    return { clickHandle };
  },
  props: ["a", "b"],
});
</script>
XApp.vue
<template>
  <XCounter a="100" b="200" c="300" d="400" @on-click="clickHandle" ref="c1">
    <template #header>
      <h1>这是头部</h1>
    </template>
    <template #footer>
      <h1>这是尾部</h1>
    </template>
  </XCounter>
</template>
<script lang="ts">
import { ref } from "vue";
import XCounter from "./components/XCounter.vue";
export default {
  setup() {
    let c1 = ref(null);
    function clickHandle(msg) {
      console.log(c1.value);
      alert(msg);
    }

    return { clickHandle };
  },
};
</script>
传入 setup 函数的第二个参数是一个 Setup 上下文对象。上下文对象暴露了其他一些在 setup 中可能会用到的值:
export default {
  setup(props, context) {
    // 透传 Attributes(非响应式的对象,等价于 $attrs)
    console.log(context.attrs)

    // 插槽(非响应式的对象,等价于 $slots)
    console.log(context.slots)

    // 触发事件(函数,等价于 $emit)
    console.log(context.emit)

    // 暴露公共属性(函数)
    console.log(context.expose)
  }
}
该上下文对象是非响应式的,可以安全地解构:
export default {
  setup(props, { attrs, slots, emit, expose }) {
    ...
  }
}
attrs 和 slots 都是有状态的对象,它们总是会随着组件自身的更新而更新。这意味着你应当避免解构它们,并始终通过 attrs.x 或 slots.x 的形式使用其中的属性。此外还需注意,和 props 不同,attrs 和 slots 的属性都不是响应式的。如果你想要基于 attrs 或 slots 的改变来执行副作用,那么你应该在 onBeforeUpdate 生命周期钩子中编写相关逻辑。
1.7.3、暴露公共属性
expose 函数用于显式地限制该组件暴露出的属性,当父组件通过模板引用访问该组件的实例时,将仅能访问 expose 函数暴露出的内容:
export default {
  setup(props, { expose }) {
    // 让组件实例处于 “关闭状态”
    // 即不向父组件暴露任何东西
    expose()

    const publicCount = ref(0)
    const privateCount = ref(0)
    // 有选择地暴露局部状态
    expose({ count: publicCount })
  }
}
1.7.4、与渲染函数一起使用
setup 也可以返回一个渲染函数,此时在渲染函数中可以直接使用在同一作用域下声明的响应式状态:
import { h, ref } from 'vue'

export default {
  setup() {
    const count = ref(0)
    return () => h('div', count.value)
  }
}
返回一个渲染函数将会阻止我们返回其他东西。对于组件内部来说,这样没有问题,但如果我们想通过模板引用将这个组件的方法暴露给父组件,那就有问题了。
我们可以通过调用 expose() 解决这个问题:
import { h, ref } from 'vue'

export default {
  setup(props, { expose }) {
    const count = ref(0)
    const increment = () => ++count.value

    expose({
      increment
    })

    return () => h('div', count.value)
  }
}
此时父组件可以通过模板引用来访问这个 increment 方法。
1.8、动态组件
有些场景会需要在两个组件间来回切换,比如 Tab 界面:
上面的例子是通过 Vue 的 <component> 元素和特殊的 is attribute 实现的:
<!-- currentTab 改变时组件也改变 -->
<component :is="tabs[currentTab]"></component>
在上面的例子中,被传给 :is 的值可以是以下几种:
- 被注册的组件名
- 导入的组件对象
你也可以使用 is attribute 来创建一般的 HTML 元素。
当使用 <component :is="..."> 来在多个组件间作切换时,被切换掉的组件会被卸载。我们可以通过 <KeepAlive> 组件强制被切换掉的组件仍然保持“存活”的状态。
<template>
  <component :is="components[componentId]"></component>
  <input v-model="componentId" />
</template>
<script lang="ts" setup>
import { ref, computed } from "vue";
import A from "./components/A.vue";
import B from "./components/B.vue";
let components = {
  A: A,
  B: B,
};
let componentId = ref("A");
</script>
1.9、DOM 模板解析注意事项
如果你想在 DOM 中直接书写 Vue 模板,Vue 则必须从 DOM 中获取模板字符串。由于浏览器的原生 HTML 解析行为限制,有一些需要注意的事项。
TIP
请注意下面讨论只适用于直接在 DOM 中编写模板的情况。如果你使用来自以下来源的字符串模板,就不需要顾虑这些限制了:
- 单文件组件
- 内联模板字符串 (例如
template: '...') <script type="text/x-template">
1.9.1、大小写区分
HTML 标签和属性名称是不分大小写的,所以浏览器会把任何大写的字符解释为小写。这意味着当你使用 DOM 内的模板时,无论是 PascalCase 形式的组件名称、camelCase 形式的 prop 名称还是 v-on 的事件名称,都需要转换为相应等价的 kebab-case (短横线连字符) 形式:
// JavaScript 中的 camelCase
const BlogPost = {
  props: ['postTitle'],
  emits: ['updatePost'],
  template: `
    <h3>{{ postTitle }}</h3>
  `
}
<!-- HTML 中的 kebab-case -->
<blog-post post-title="hello!" @update-post="onUpdatePost"></blog-post>
1.9.2、闭合标签
我们在上面的例子中已经使用过了闭合标签 (self-closing tag):
<MyComponent />
这是因为 Vue 的模板解析器支持任意标签使用 /> 作为标签关闭的标志。
然而在 DOM 模板中,我们必须显式地写出关闭标签:
<my-component></my-component>
这是由于 HTML 只允许一小部分特殊的元素省略其关闭标签,最常见的就是 <input> 和 <img>。对于其他的元素来说,如果你省略了关闭标签,原生的 HTML 解析器会认为开启的标签永远没有结束,用下面这个代码片段举例来说:
<my-component /> <!-- 我们想要在这里关闭标签... -->
<span>hello</span>
将被解析为:
<my-component>
  <span>hello</span>
</my-component> <!-- 但浏览器会在这里关闭标签 -->
1.9.3、元素位置限制
某些 HTML 元素对于放在其中的元素类型有限制,例如 <ul>,<ol>,<table> 和 <select>,相应的,某些元素仅在放置于特定元素中时才会显示,例如 <li>,<tr> 和 <option>。
这将导致在使用带有此类限制元素的组件时出现问题。例如:
<table>
  <blog-post-row></blog-post-row>
</table>
自定义的组件 <blog-post-row> 将作为无效的内容被忽略,因而在最终呈现的输出中造成错误。我们可以使用特殊的 is attribute 作为一种解决方案:
<table>
  <tr is="vue:blog-post-row"></tr>
</table>
当使用在原生 HTML 元素上时,is 的值必须加上前缀 vue: 才可以被解析为一个 Vue 组件。这一点是必要的,为了避免和原生的自定义内置元素相混淆。
以上就是你需要了解的关于 DOM 模板解析的所有注意事项,同时也是 Vue 基础部分的所有内容。祝贺你!虽然还有很多需要学习的,但你可以先暂停一下,去用 Vue 做一些有趣的东西,或者研究一些示例。
完成了本页的阅读后,回顾一下你刚才所学到的知识,如果还想知道更多细节,我们推荐你继续阅读关于组件的完整指引。
1.10、新组件
1.10.1、 Fragment
- 在Vue2中: 组件必须有一个根标签
- 在Vue3中: 组件可以没有根标签, 内部会将多个标签包含在一个Fragment虚拟元素中
- 好处: 减少标签层级, 减小内存占用
1.10.2、Teleport
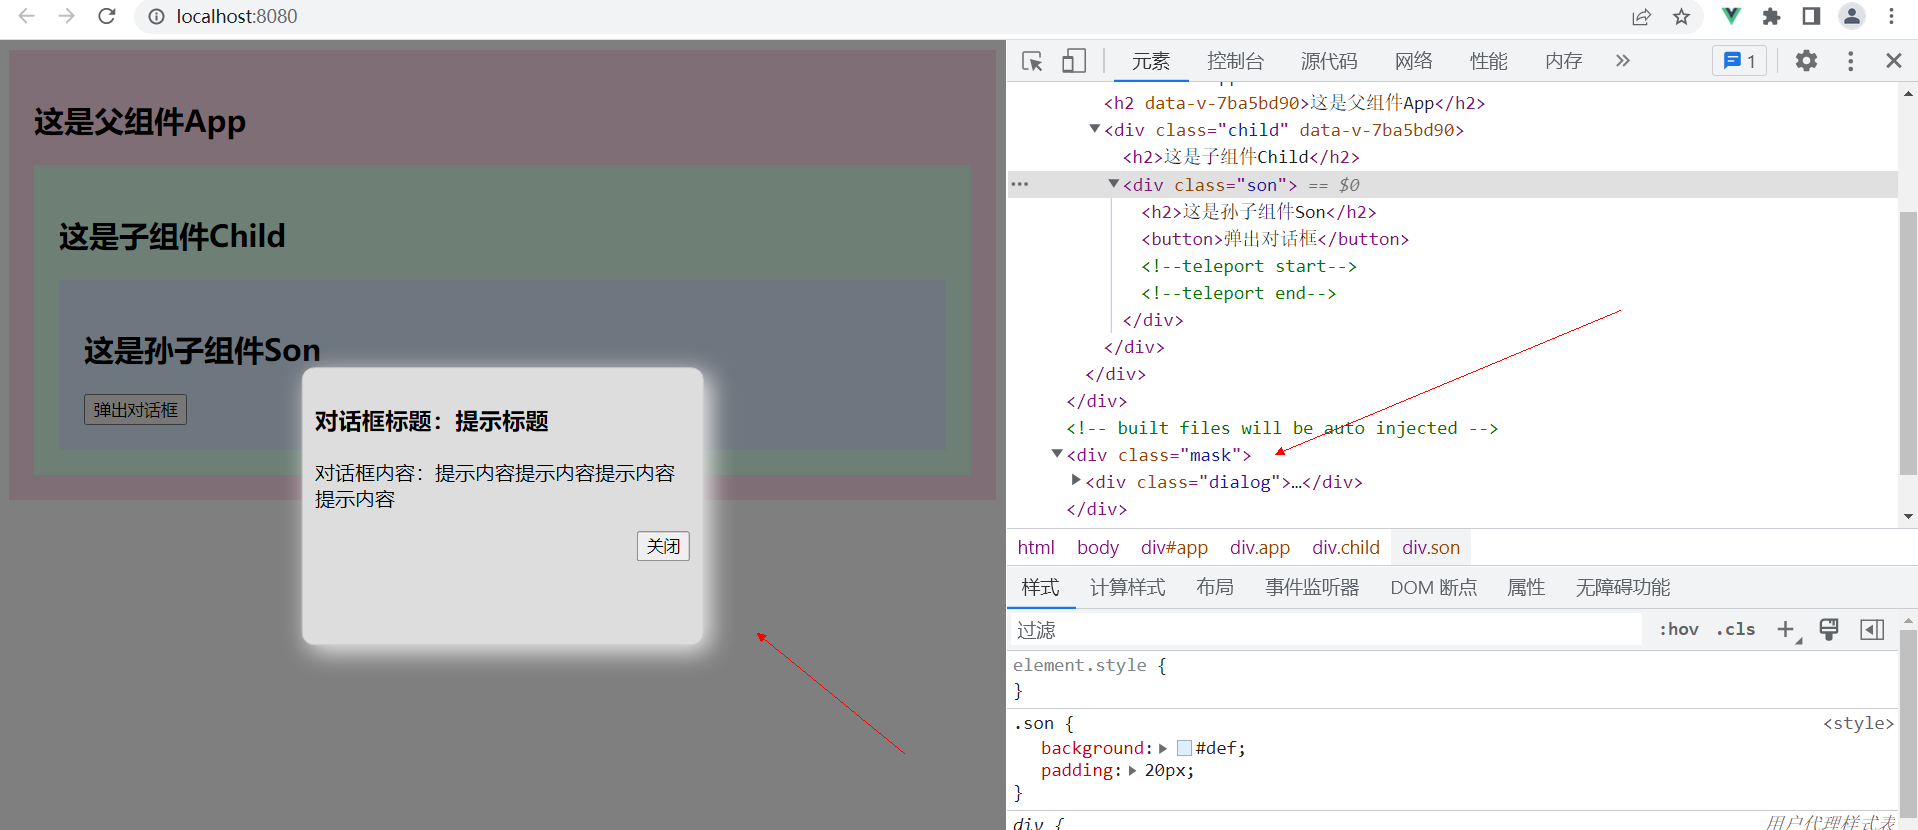
- 什么是Teleport?—— `Teleport` 是一种能够将我们的组件html结构移动到指定位置的技术。
<teleport to="移动位置">
    <div v-if="isShow" class="mask">
        <div class="dialog">
            <h3>我是一个弹窗</h3>
            <button @click="isShow = false">关闭弹窗</button>
        </div>
    </div>
</teleport>
Son.vue
<template>
  <div class="son">
    <h2>这是孙子组件Son</h2>
    <button @click="isShow = true">弹出对话框</button>
    <teleport to="body">
      <div class="mask" v-if="isShow">
        <div class="dialog">
          <h3>对话框标题:提示标题</h3>
          <p>对话框内容:提示内容提示内容提示内容提示内容</p>
          <p class="close">
            <button @click="isShow = false">关闭</button>
          </p>
        </div>
      </div>
    </teleport>
  </div>
</template>
<script lang="ts" setup>
import { ref } from "vue";

let isShow = ref(false);
</script>
<style>
.son {
  background: #def;
  padding: 20px;
}
.mask {
  position: absolute;
  top: 0;
  right: 0;
  bottom: 0;
  left: 0;
  background-color: rgba(0, 0, 0, 0.5);
}
.dialog {
  width: 300px;
  height: 200px;
  border: 1px solid #ccc;
  box-shadow: 5px 5px 20px #eee;
  border-radius: 10px;
  background: #ddd;
  padding: 10px;
  position: absolute;
  top: 50%;
  left: 50%;
  transform: translate(-50%, -50%);
}
.dialog .close {
  text-align: right;
}
</style>
Child.vue
<template>
  <div class="child">
    <h2>这是子组件Child</h2>
    <Son />
  </div>
</template>
<script lang="ts" setup>
import Son from "./Son.vue";
</script>
<style>
.child {
  background: #dfe;
  padding: 20px;
}
</style>
App.vue
<template>
  <div class="app">
    <h2>这是父组件App</h2>
    <Child />
  </div>
</template>
<script lang="ts" setup>
import Child from "./components/Child.vue";
</script>
<style scoped>
.app {
  background: #fde;
  padding: 20px;
}
</style>
效果
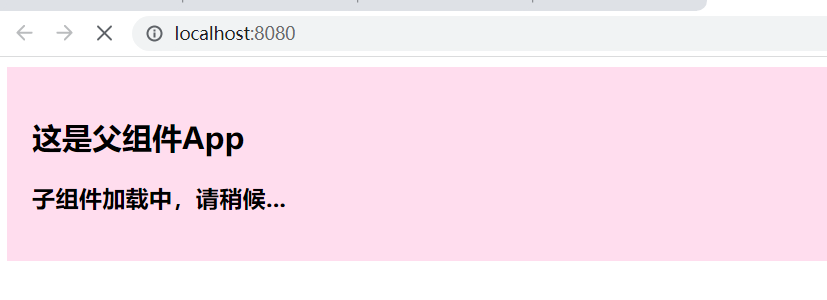
1.10.3、Suspense与异步组件
等待异步组件时渲染一些额外内容,让应用有更好的用户体验
使用步骤:
异步引入组件
import {defineAsyncComponent} from 'vue'
const Child = defineAsyncComponent(()=>import('./components/Child.vue'))
使用```Suspense```包裹组件,并配置好```default``` 与 ```fallback```
<template>
    <div class="app">
        <h3>我是App组件</h3>
        <Suspense>
            <template v-slot:default>
                <Child/>
            </template>
            <template v-slot:fallback>
                <h3>加载中.....</h3>
            </template>
        </Suspense>
    </div>
</template>
App.vue
<template>
  <div class="app">
    <h2>这是父组件App</h2>
    <Suspense>
      <template v-slot:default>
        <Child />
      </template>
      <template v-slot:fallback>
        <h3>子组件加载中,请稍候...</h3>
      </template>
    </Suspense>
  </div>
</template>
<script lang="ts" setup>
// import Child from "./components/Child.vue";
import { defineAsyncComponent } from "vue";
const Child = defineAsyncComponent(() => import("./components/Child.vue"));
</script>
<style scoped>
.app {
  background: #fde;
  padding: 20px;
}
</style>
Child.vue
<template>
  <div class="child">
    <h2>这是子组件Child</h2>
    <h2>{{ sum }}</h2>
  </div>
</template>
<script lang="ts">
import { ref } from "vue";

export default {
  async setup() {
    let sum = ref(1000);
    let p = new Promise((resolve, reject) => {
      setTimeout(() => {
        resolve({ sum });
      }, 3000);
    });
    return await p;
  },
};
</script>
<style>
.child {
  background: #dfe;
  padding: 20px;
}
</style>
1.10.4、KeepAlive
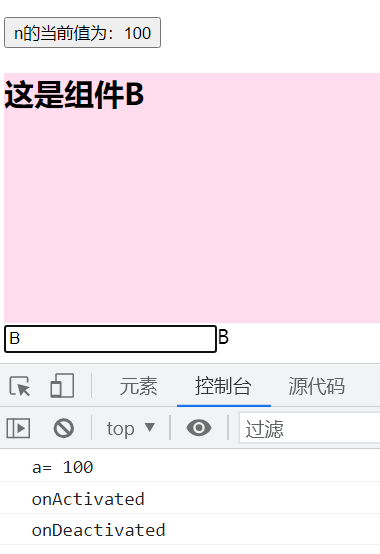
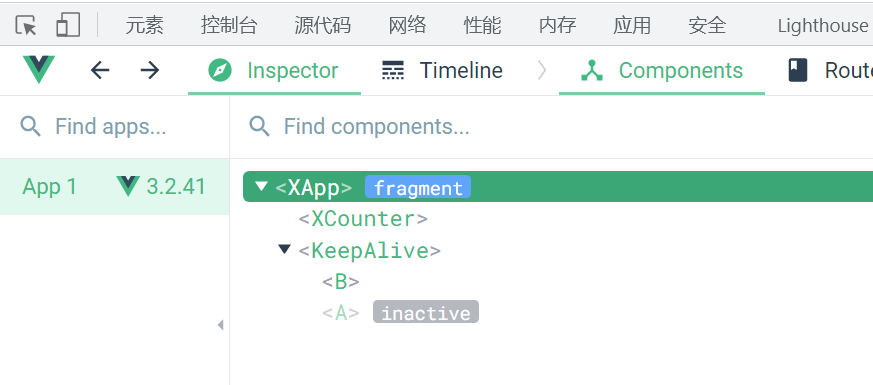
<KeepAlive> 是一个内置组件,它的功能是在多个组件间动态切换时缓存被移除的组件实例。
A.vue
<template>
  <div class="cls1">
    <h2>这是组件A</h2>
  </div>
</template>
<script lang="ts" setup>
import { onActivated, onDeactivated } from "vue";

onActivated(() => {
  // 调用时机为首次挂载
  // 以及每次从缓存中被重新插入时
  console.log("onActivated");
});

onDeactivated(() => {
  // 在从 DOM 上移除、进入缓存
  // 以及组件卸载时调用
  console.log("onDeactivated");
});
</script>
<style scoped>
.cls1 {
  height: 200px;
  background: #def;
}
</style>
B.vue
<template>
  <div class="cls1">
    <h2>这是组件B</h2>
  </div>
</template>
<script lang="ts" setup></script>
<style scoped>
.cls1 {
  height: 200px;
  background: #fde;
}
</style>
XApp.vue
<template>
  <XCounter a="100" @onAdd="addHandle" />
  <KeepAlive>
    <component :is="components[componentName]"></component>
  </KeepAlive>
  <input v-model="componentName" />{{ componentName }}
</template>

<script lang="ts">
import XCounter from "./components/XCounter.vue";
import A from "./components/A.vue";
import B from "./components/B.vue";
import { ref } from "vue";
export default {
  setup() {
    function addHandle(n) {
      console.log(n);
      n.value += 10;
    }

    let components = { A, B };
    let componentName = ref();

    return { addHandle, components, componentName };
  },
  components: {
    XCounter,
  },
};
</script>
基本使用
在组件基础章节中,我们已经介绍了通过特殊的 <component> 元素来实现动态组件的用法:
<component :is="activeComponent" />
默认情况下,一个组件实例在被替换掉后会被销毁。这会导致它丢失其中所有已变化的状态 —— 当这个组件再一次被显示时,会创建一个只带有初始状态的新实例。
在下面的例子中,你会看到两个有状态的组件——A 有一个计数器,而 B 有一个通过 v-model 同步 input 框输入内容的文字展示。尝试先更改一下任意一个组件的状态,然后切走,再切回来:
Current component: A
count: 0你会发现在切回来之后,之前已更改的状态都被重置了。
在切换时创建新的组件实例通常是有意义的,但在这个例子中,我们的确想要组件能在被“切走”的时候保留它们的状态。要解决这个问题,我们可以用 <KeepAlive> 内置组件将这些动态组件包装起来:
<!-- 非活跃的组件将会被缓存! -->
<KeepAlive>
  <component :is="activeComponent" />
</KeepAlive>
现在,在组件切换时状态也能被保留了:
Current component: A
count: 0<KeepAlive> 默认会缓存内部的所有组件实例,但我们可以通过 include 和 exclude prop 来定制该行为。这两个 prop 的值都可以是一个以英文逗号分隔的字符串、一个正则表达式,或是包含这两种类型的一个数组:
<!-- 以英文逗号分隔的字符串 -->
<KeepAlive include="a,b">
  <component :is="view" />
</KeepAlive>

<!-- 正则表达式 (需使用 `v-bind`) -->
<KeepAlive :include="/a|b/">
  <component :is="view" />
</KeepAlive>

<!-- 数组 (需使用 `v-bind`) -->
<KeepAlive :include="['a', 'b']">
  <component :is="view" />
</KeepAlive>
它会根据组件的 name 选项进行匹配,所以组件如果想要条件性地被 KeepAlive 缓存,就必须显式声明一个 name 选项。
TIP
在 3.2.34 或以上的版本中,使用 <script setup> 的单文件组件会自动根据文件名生成对应的 name 选项,无需再手动声明。
最大缓存实例数
我们可以通过传入 max prop 来限制可被缓存的最大组件实例数。<KeepAlive> 的行为在指定了 max 后类似一个 LRU 缓存:如果缓存的实例数量即将超过指定的那个最大数量,则最久没有被访问的缓存实例将被销毁,以便为新的实例腾出空间。
<KeepAlive :max="10">
  <component :is="activeComponent" />
</KeepAlive>
缓存实例的生命周期
当一个组件实例从 DOM 上移除但因为被 <KeepAlive> 缓存而仍作为组件树的一部分时,它将变为不活跃状态而不是被卸载。当一个组件实例作为缓存树的一部分插入到 DOM 中时,它将重新被激活。
一个持续存在的组件可以通过 onActivated() 和 onDeactivated() 注册相应的两个状态的生命周期钩子:
<script setup>
import { onActivated, onDeactivated } from 'vue'

onActivated(() => {
  // 调用时机为首次挂载
  // 以及每次从缓存中被重新插入时
})

onDeactivated(() => {
  // 在从 DOM 上移除、进入缓存
  // 以及组件卸载时调用
})
</script>
请注意:
-
onActivated在组件挂载时也会调用,并且onDeactivated在组件卸载时也会调用。 -
这两个钩子不仅适用于
<KeepAlive>缓存的根组件,也适用于缓存树中的后代组件。
1.11、provide与inject
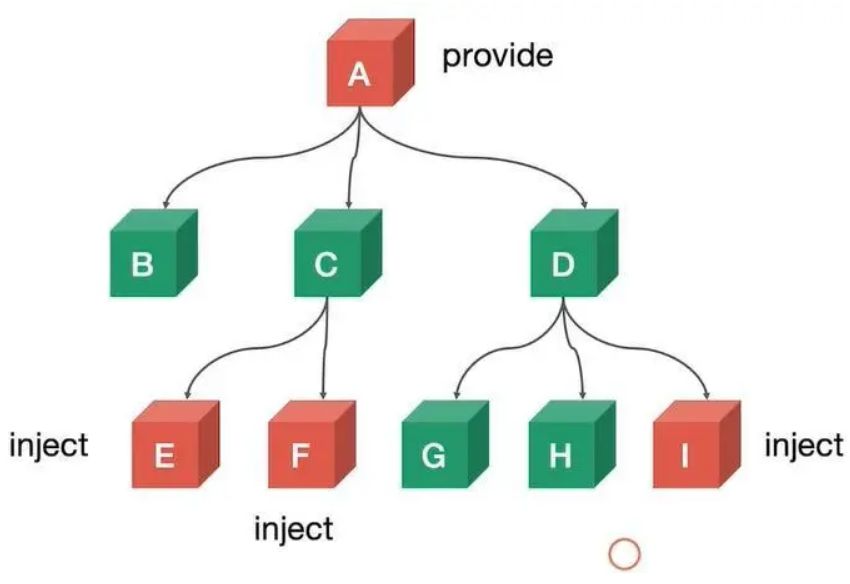
-
-
套路:父组件有一个
provide选项来提供数据,后代组件有一个inject选项来开始使用这些数据 -
具体写法:
-
setup(){
    ......
    let car = reactive({name:'奔驰',price:'40万'})
    provide('car',car)
    ......
}
- 后代组件中:
setup(props,context){
    ......
    const car = inject('car')
    return {car}
    ......
}
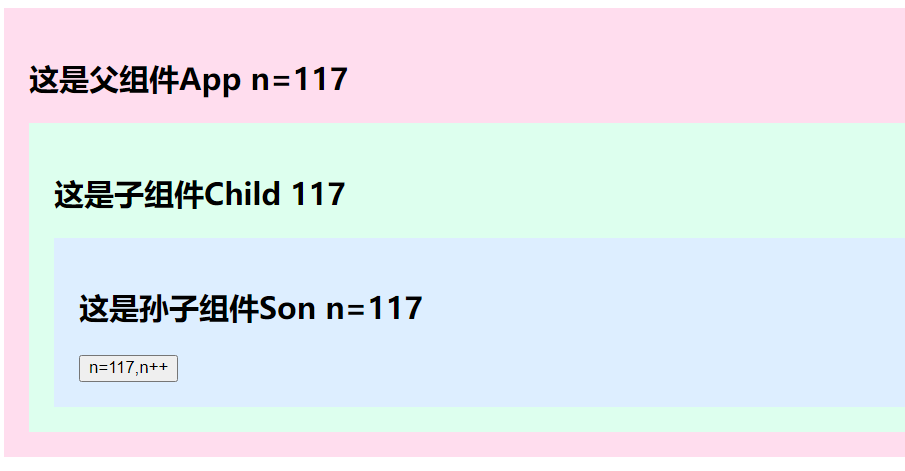
Son.vue
<template>
  <div class="son">
    <h2>这是孙子组件Son n={{ n }}</h2>
    <button @click="n++">n={{ n }},n++</button>
  </div>
</template>
<script lang="ts" setup>
import { inject } from "vue";

//从上级组件中注入数据n
let n = inject("n");
</script>
<style>
.son {
  background: #def;
  padding: 20px;
}
</style>
Child.vue
<template>
  <div class="child">
    <h2>这是子组件Child {{ sum }}</h2>
    <Son />
  </div>
</template>
<script lang="ts" setup>
import { inject } from "vue";
import Son from "./Son.vue";
let sum = inject("n");
</script>
<style>
.child {
  background: #dfe;
  padding: 20px;
}
</style>
App.vue
<template>
  <div class="parent">
    <h2>这是父组件App n={{ n }}</h2>
    <Child />
  </div>
</template>
<script lang="ts" setup>
import { provide, ref } from "vue";
import Child from "./components/Child.vue";
let n = ref(100);
//向后代组件提供数据n
provide("n", n);
</script>
<style>
.parent {
  background: #fde;
  padding: 20px;
}
</style>
-
二、生命周期
每个 Vue 组件实例在创建时都需要经历一系列的初始化步骤,比如设置好数据侦听,编译模板,挂载实例到 DOM,以及在数据改变时更新 DOM。在此过程中,它也会运行被称为生命周期钩子的函数,让开发者有机会在特定阶段运行自己的代码。
2.1、注册周期钩子
2.1.1、组合式API式(写在setup里面)
生命周期钩子两种写法:
举例来说,onMounted 钩子可以用来在组件完成初始渲染并创建 DOM 节点后运行代码:
<script setup>
import { onMounted } from 'vue'

onMounted(() => {
  console.log(`the component is now mounted.`)
})
</script>
还有其他一些钩子,会在实例生命周期的不同阶段被调用,最常用的是 onMounted、onUpdated 和 onUnmounted。所有生命周期钩子的完整参考及其用法请参考 API 索引。
当调用 onMounted 时,Vue 会自动将回调函数注册到当前正被初始化的组件实例上。这意味着这些钩子应当在组件初始化时被同步注册。例如,请不要这样做:
setTimeout(() => {
  onMounted(() => {
    // 异步注册时当前组件实例已丢失
    // 这将不会正常工作
  })
}, 100)
注意这并不意味着对 onMounted 的调用必须放在 setup() 或 <script setup> 内的词法上下文中。onMounted() 也可以在一个外部函数中调用,只要调用栈是同步的,且最终起源自 setup() 就可以。
2.1.2、配置项式(与setup平级)
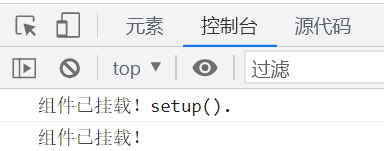
<template></template>
<script lang="ts">
import { onMounted, ref } from "vue";
export default {
  setup() {
    onMounted(() => {
      console.log(`组件已挂载!setup().`);
    });
  },
  mounted() {
    console.log(`组件已挂载!`);
  },
};
</script>
2.2、生命周期图示
2.2.1、Vue2生命周期
2.2.2、Vue3生命周期
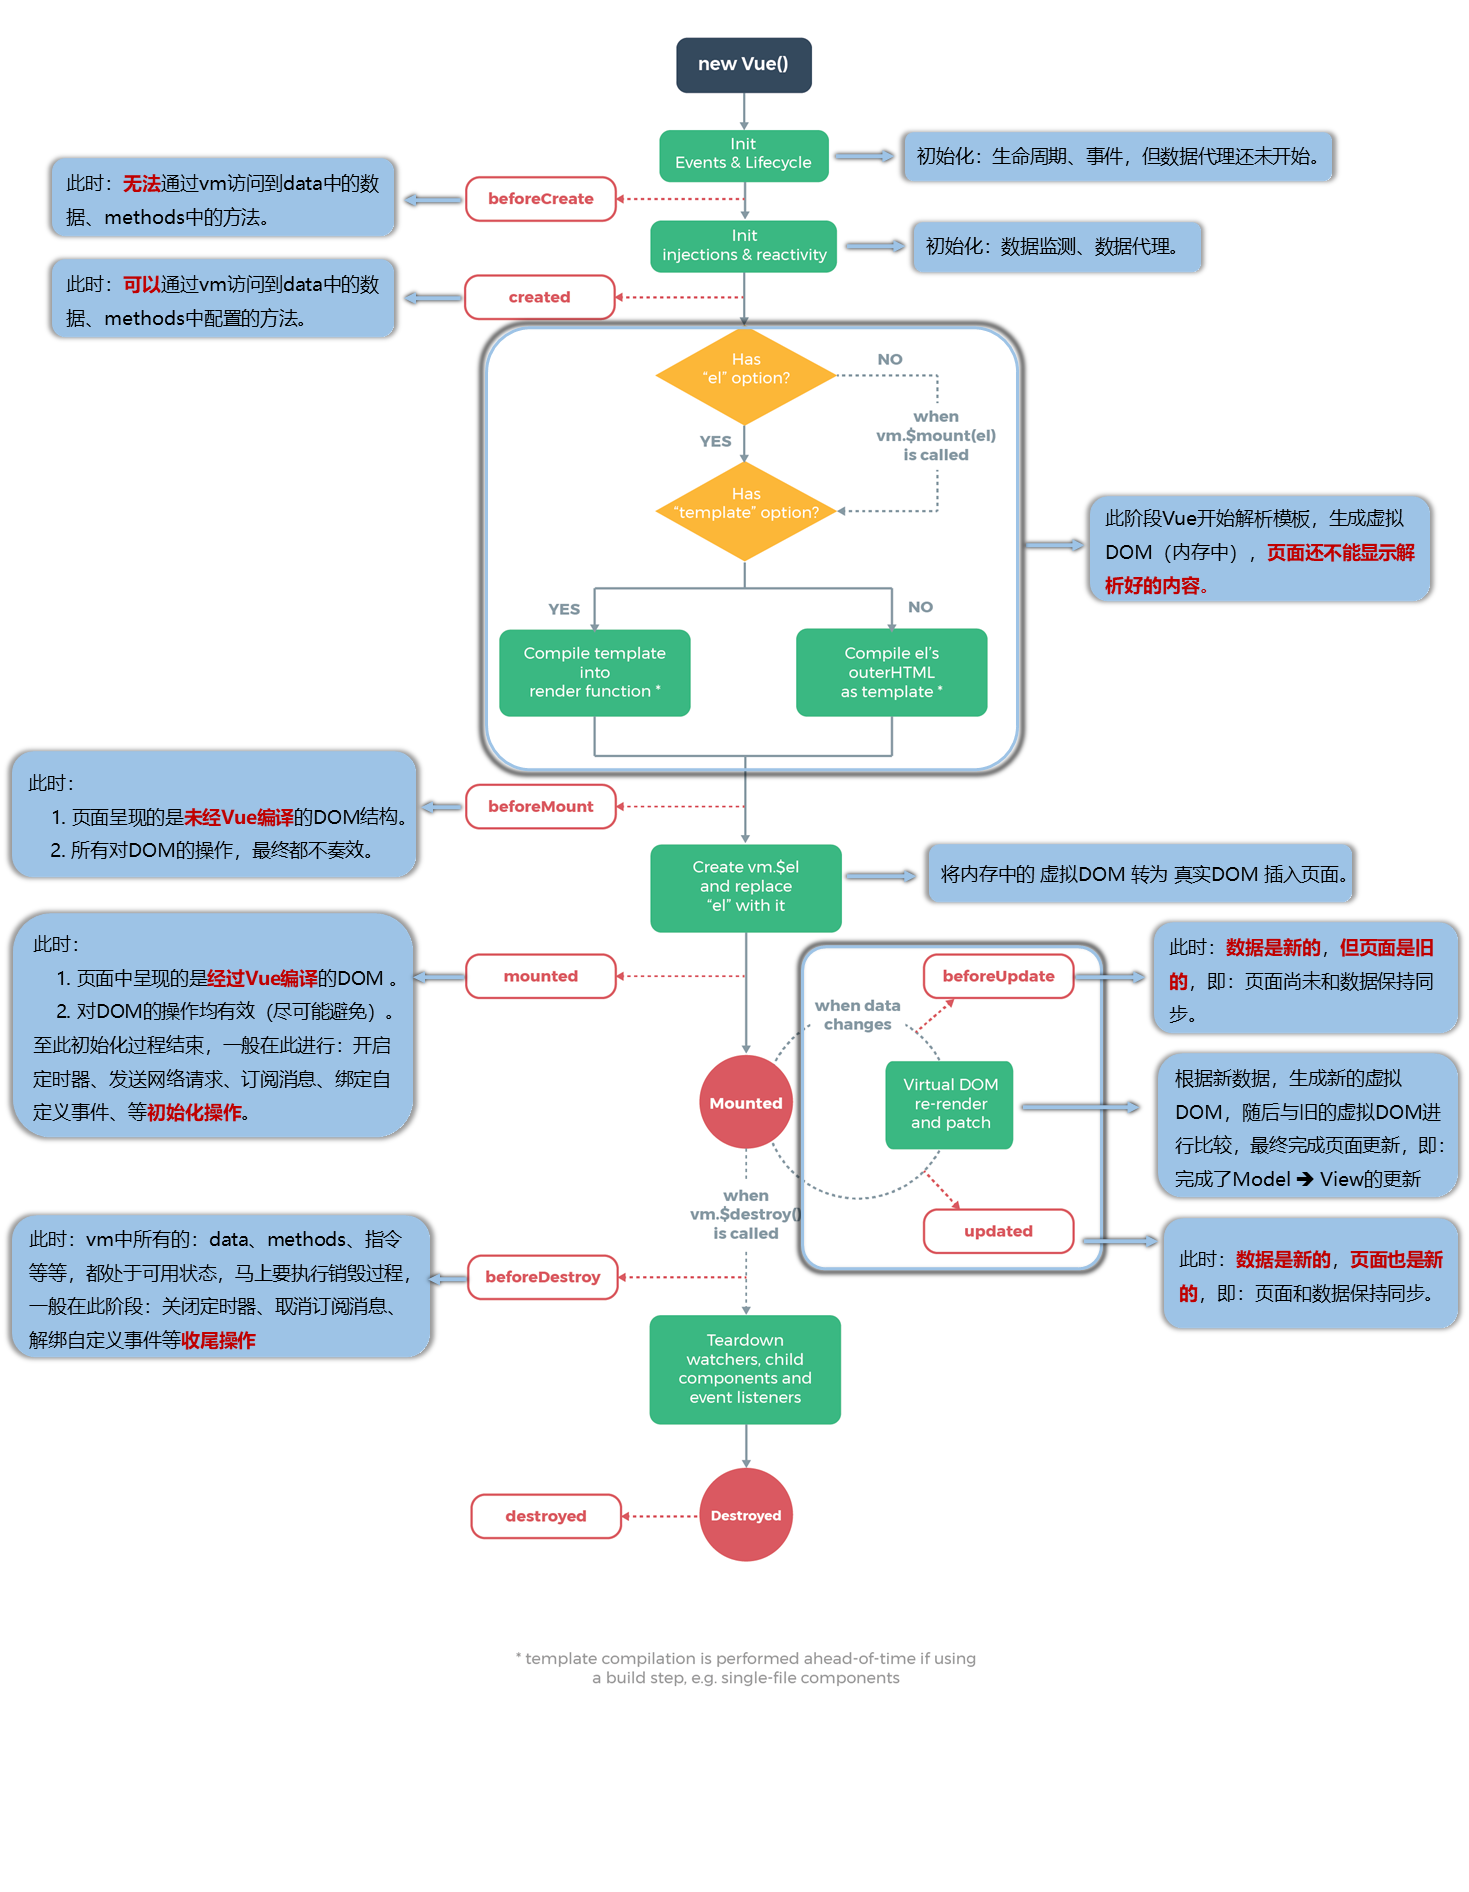
下面是实例生命周期的图表。你现在并不需要完全理解图中的所有内容,但以后它将是一个有用的参考。
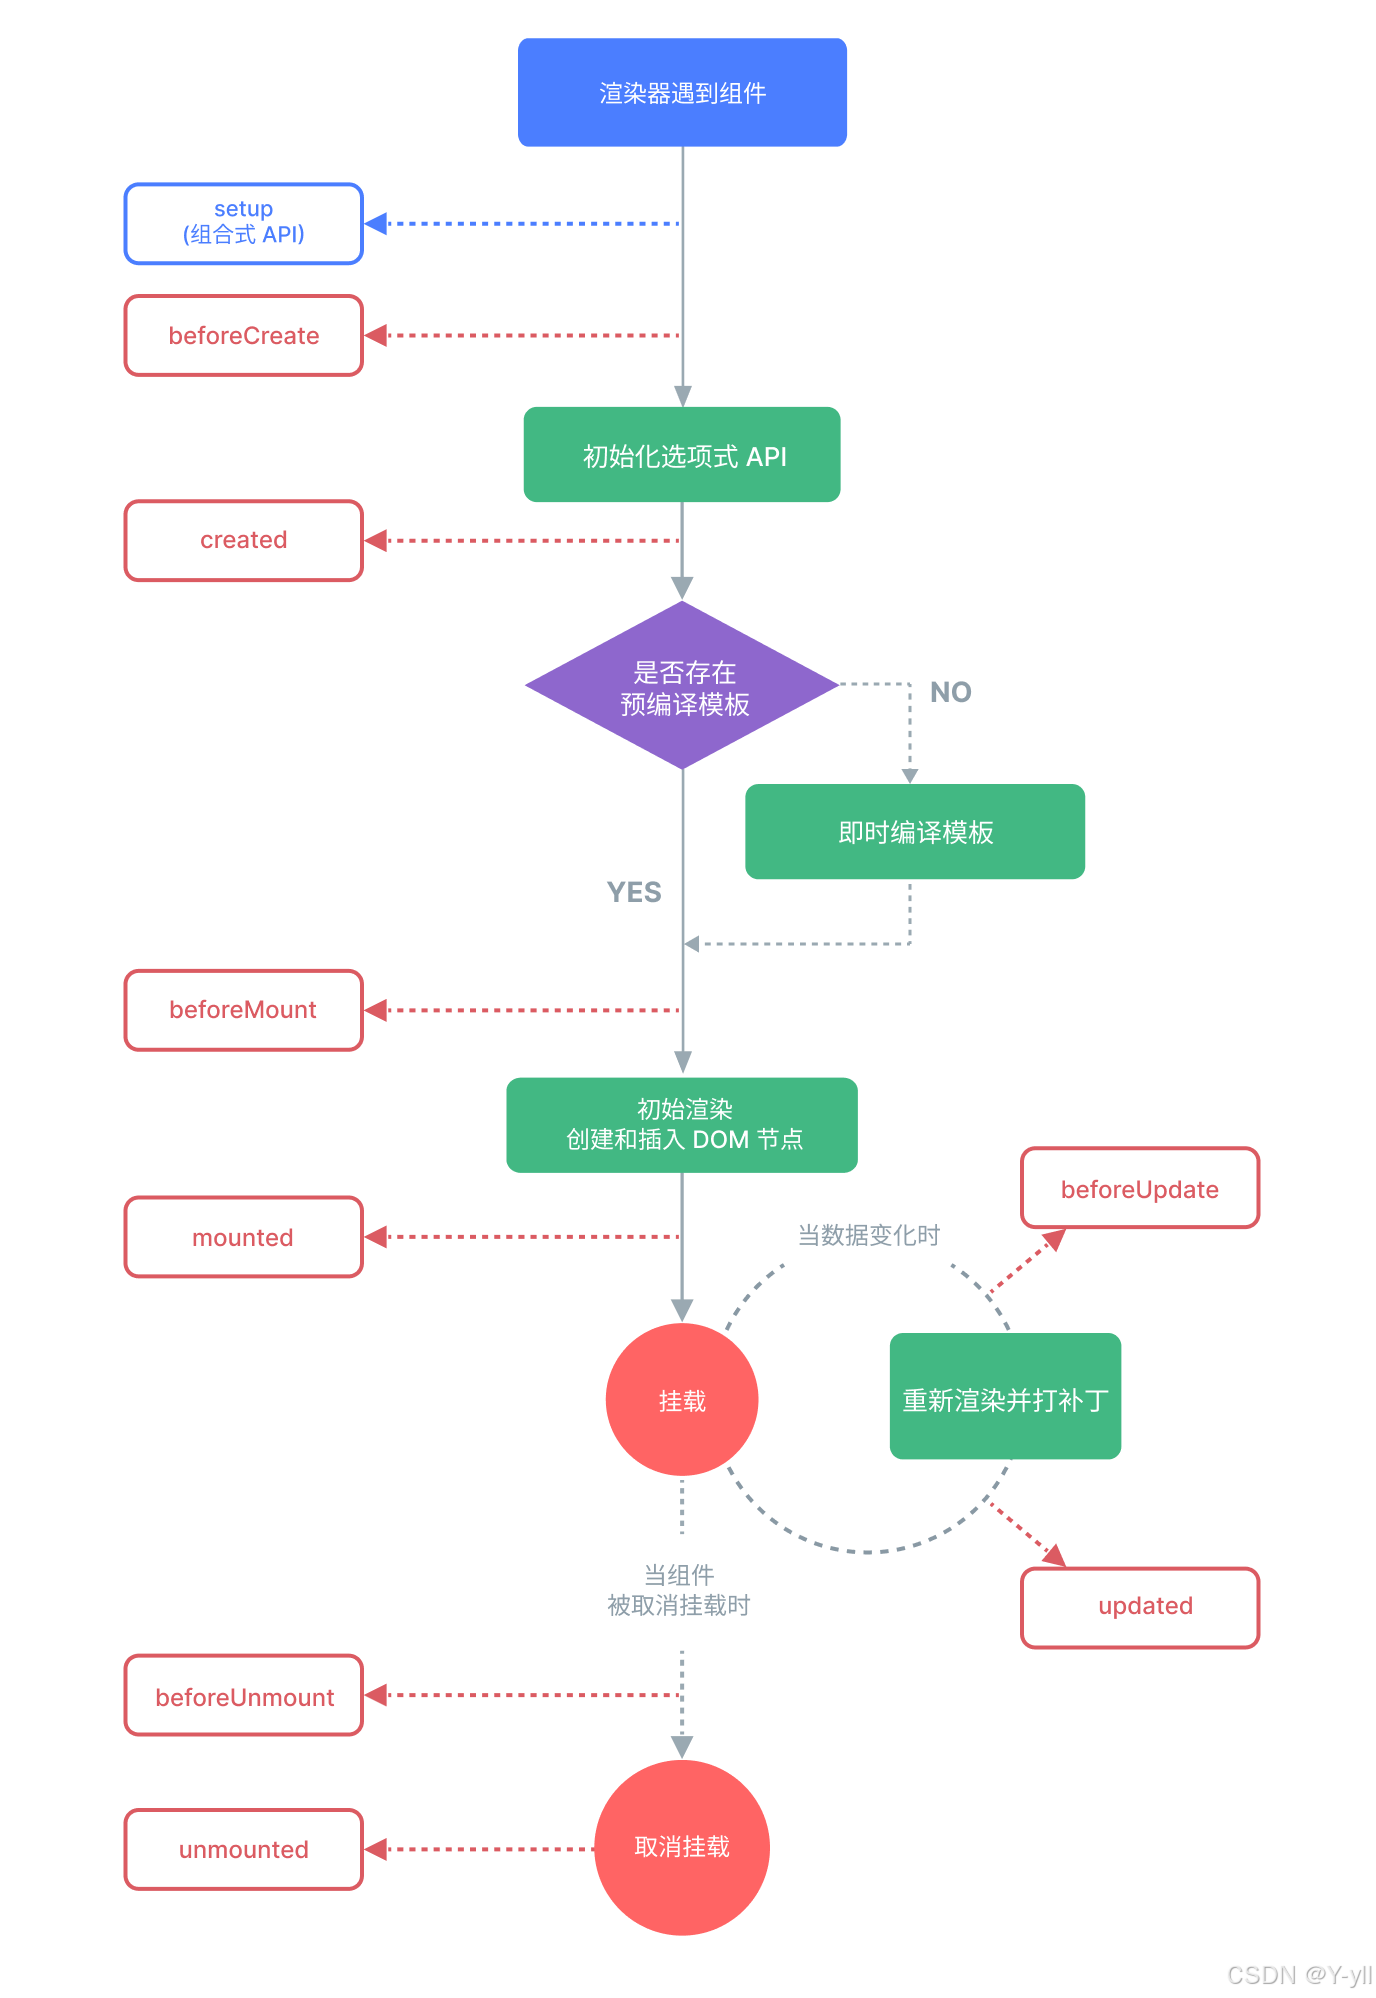
有关所有生命周期钩子及其各自用例的详细信息,请参考生命周期钩子 API 索引。
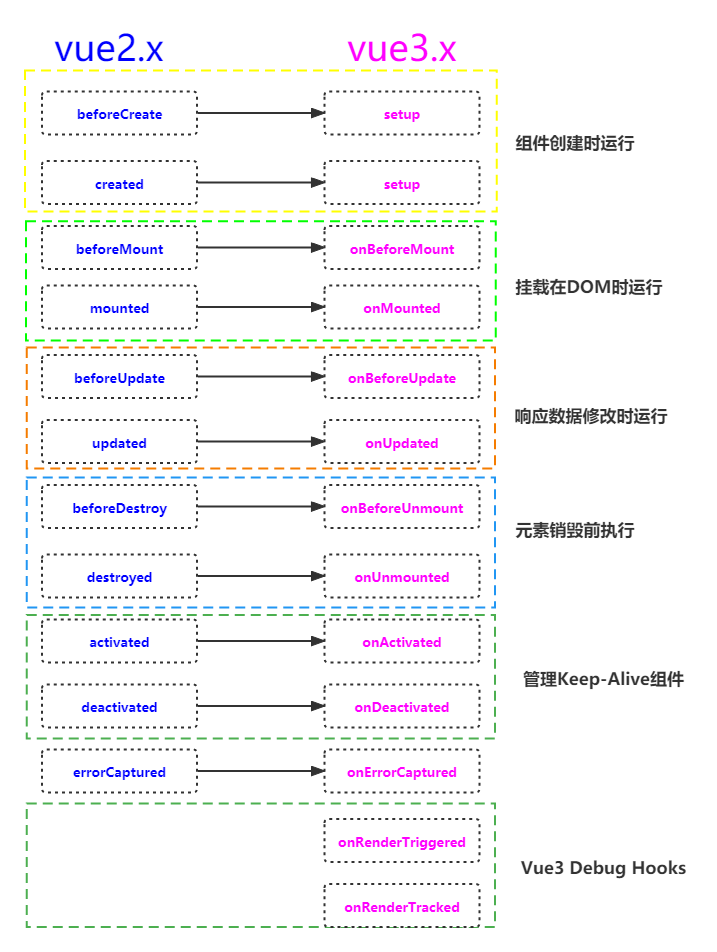
setup() :开始创建组件之前,在beforeCreate和created之前执行。创建的是data和method
onBeforeMount() : 组件挂载到节点上之前执行的函数。
onMounted() : 组件挂载完成后执行的函数。
onBeforeUpdate(): 组件更新之前执行的函数。
onUpdated(): 组件更新完成之后执行的函数。
onBeforeUnmount(): 组件卸载之前执行的函数。
onUnmounted(): 组件卸载完成后执行的函数
onActivated(): 被包含在中的组件,会多出两个生命周期钩子函数。被激活时执行。
onDeactivated(): 比如从 A 组件,切换到 B 组件,A 组件消失时执行。
onErrorCaptured(): 当捕获一个来自子孙组件的异常时激活钩子函数。
(1)、非setup语法糖形式,与setup齐平
Child.vue
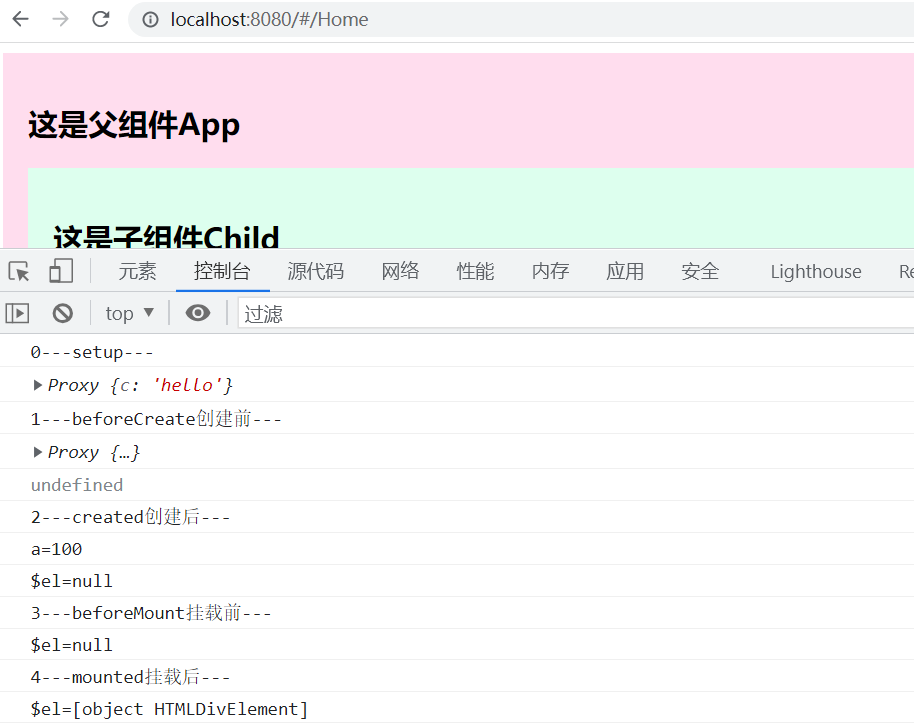
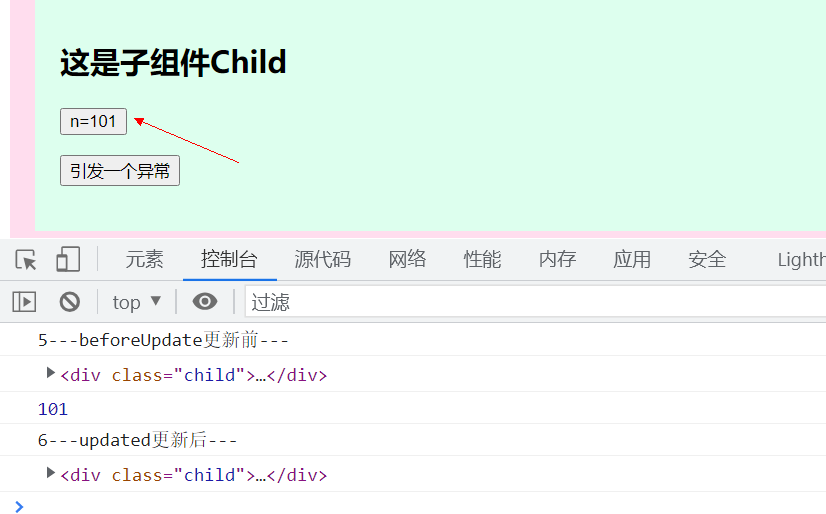
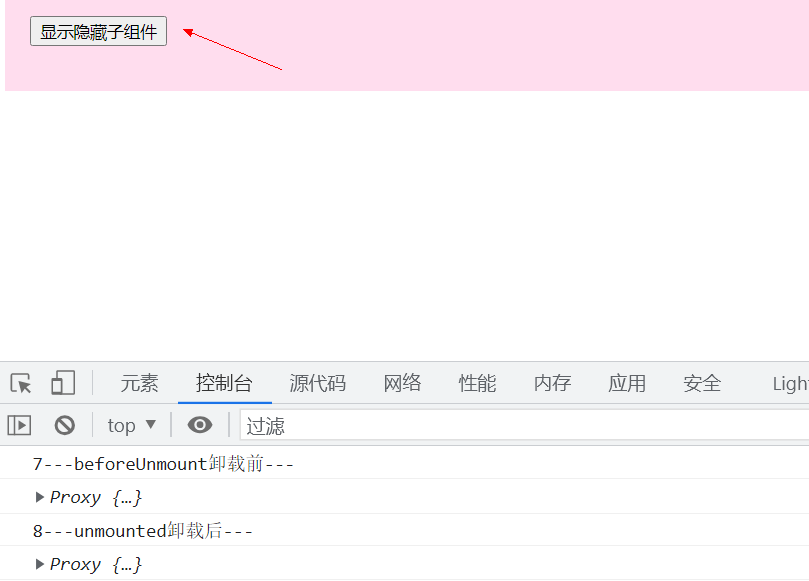
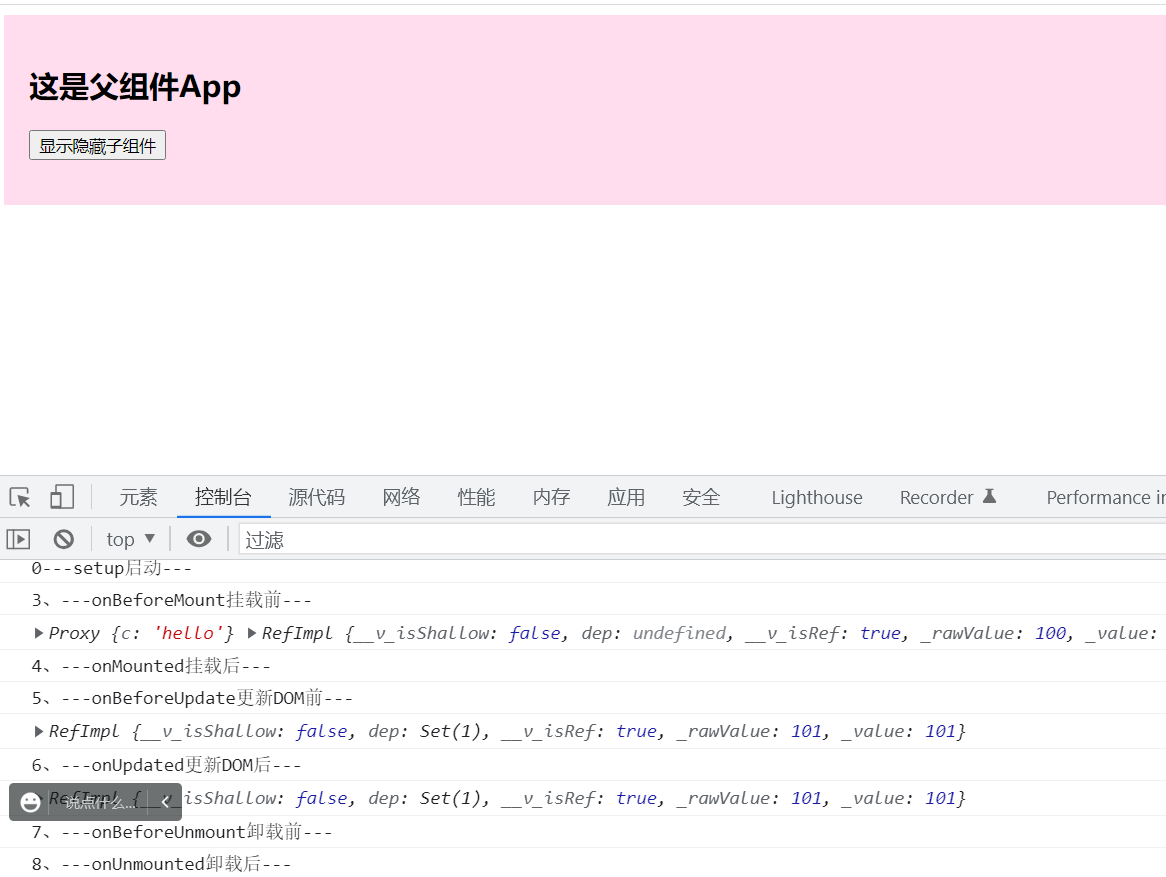
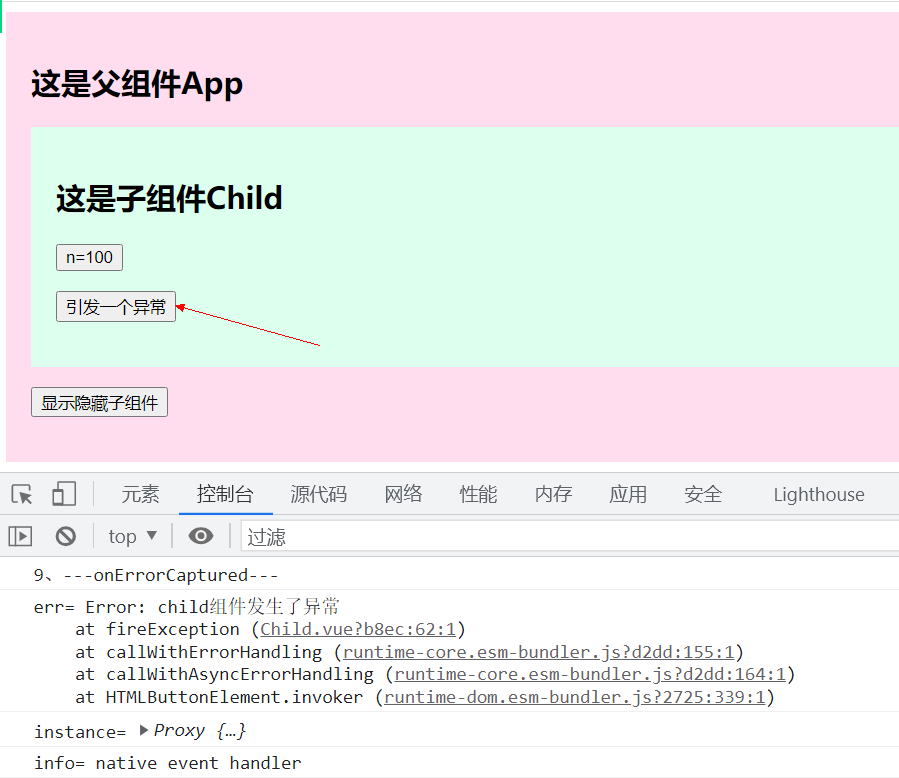
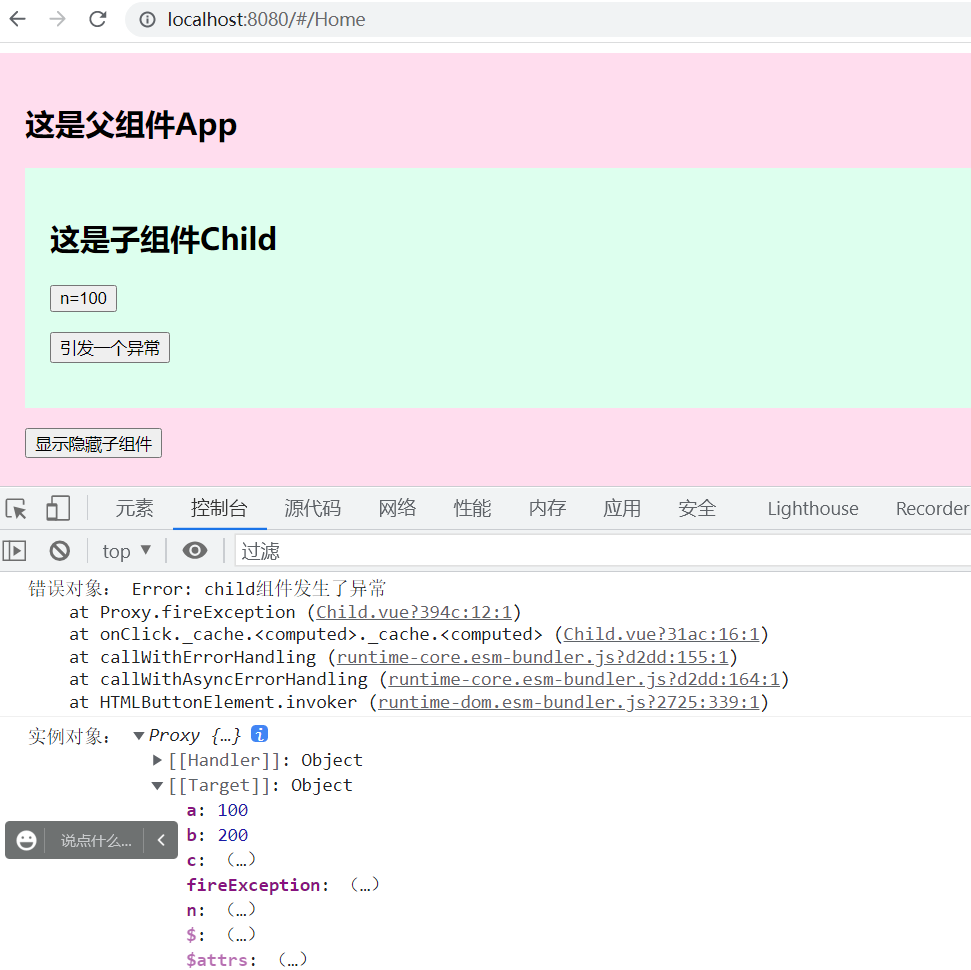
<template>
  <div class="child">
    <h2>这是子组件Child</h2>
    <button @click="n++">n={{ n }}</button>
    <p>
      <button @click="fireException">引发一个异常</button>
    </p>
  </div>
</template>
<script lang="ts">
import { ref } from "vue";

export default {
  //在所有钩子函数执行前执行,会在实例初始化完成、props 解析之后
  setup(props) {
    let n = ref(100);
    console.log("0---setup---");
    console.log(props);

    function fireException() {
      throw new Error("child组件发生了异常");
    }

    return { n, fireException };
  },

  //1、会在实例初始化完成、props 解析之后、data() 和 computed 等选项处理之前立即调用。
  beforeCreate(this: any) {
    console.log("1---beforeCreate创建前---");
    console.log(this);
    console.log(this.a);
  },

  //2、在组件实例处理完所有与状态相关的选项后调用。
  //当这个钩子被调用时,以下内容已经设置完成:响应式数据、计算属性、方法和侦听器。然而,此时挂载阶段还未开始,因此 $el 属性仍不可用。
  created() {
    console.log("2---created创建后---");
    console.log("a=" + this.a);
    console.log("$el=" + this.$el);
  },

  //3、当这个钩子被调用时,组件已经完成了其响应式状态的设置,但还没有创建 DOM 节点。它即将首次执行 DOM 渲染过程。
  beforeMount() {
    console.log("3---beforeMount挂载前---");
    console.log("$el=" + this.$el);
  },

  //4、所有同步子组件都已经被挂载。(不包含异步组件或 <Suspense> 树内的组件)
  //其自身的 DOM 树已经创建完成并插入了父容器中。
  mounted() {
    console.log("4---mounted挂载后---");
    console.log("$el=" + this.$el);
  },

  //5、在组件即将因为一个响应式状态变更而更新其 DOM 树之前调用。
  //这个钩子可以用来在 Vue 更新 DOM 之前访问 DOM 状态。在这个钩子中更改状态也是安全的。
  beforeUpdate() {
    console.log("5---beforeUpdate更新前---");
    console.log(this.$el);
    console.log(this.n); //此时的n已修改成要显示的数据,但页面还没有更新
    //debugger;
  },
  //6、在组件因为一个响应式状态变更而更新其 DOM 树之后调用。
  updated() {
    console.log("6---updated更新后---");
    console.log(this.$el);
    //debugger;
  },
  //7、在一个组件实例被卸载之前调用。
  //当这个钩子被调用时,组件实例依然还保有全部的功能。
  beforeUnmount() {
    console.log("7---beforeUnmount卸载前---");
    console.log(this);
    //debugger;
  },
  //8、在一个组件实例被卸载之后调用。
  //可以在这个钩子中手动清理一些副作用,例如计时器、DOM 事件监听器或者与服务器的连接。
  unmounted() {
    console.log("8---unmounted卸载后---");
    console.log(this);
    //debugger;
  },
  props: ["c"],
  data() {
    return { a: 100, b: 200 };
  },
};
</script>
<style>
.child {
  background: #dfe;
  padding: 20px;
}
</style>
App.vue
<template>
  <div class="parent">
    <h2>这是父组件App</h2>
    <Child v-if="isShowChild" c="hello" />
    <p>
      <button @click="isShowChild = !isShowChild">显示隐藏子组件</button>
    </p>
  </div>
</template>
<script lang="ts">
import { ref } from "vue";
import Child from "./components/Child.vue";
export default {
  setup() {
    let isShowChild = ref(true);

    return { isShowChild };
  },
  //9、在捕获了后代组件传递的错误时调用。
  errorCaptured(err, instance, info) {
    console.log("错误对象:", err);
    console.log("实例对象:", instance);
    console.log("错误信息:", info);
    return true;
  },
  components: { Child },
};
</script>
<style>
.parent {
  background: #fde;
  padding: 20px;
}
</style>
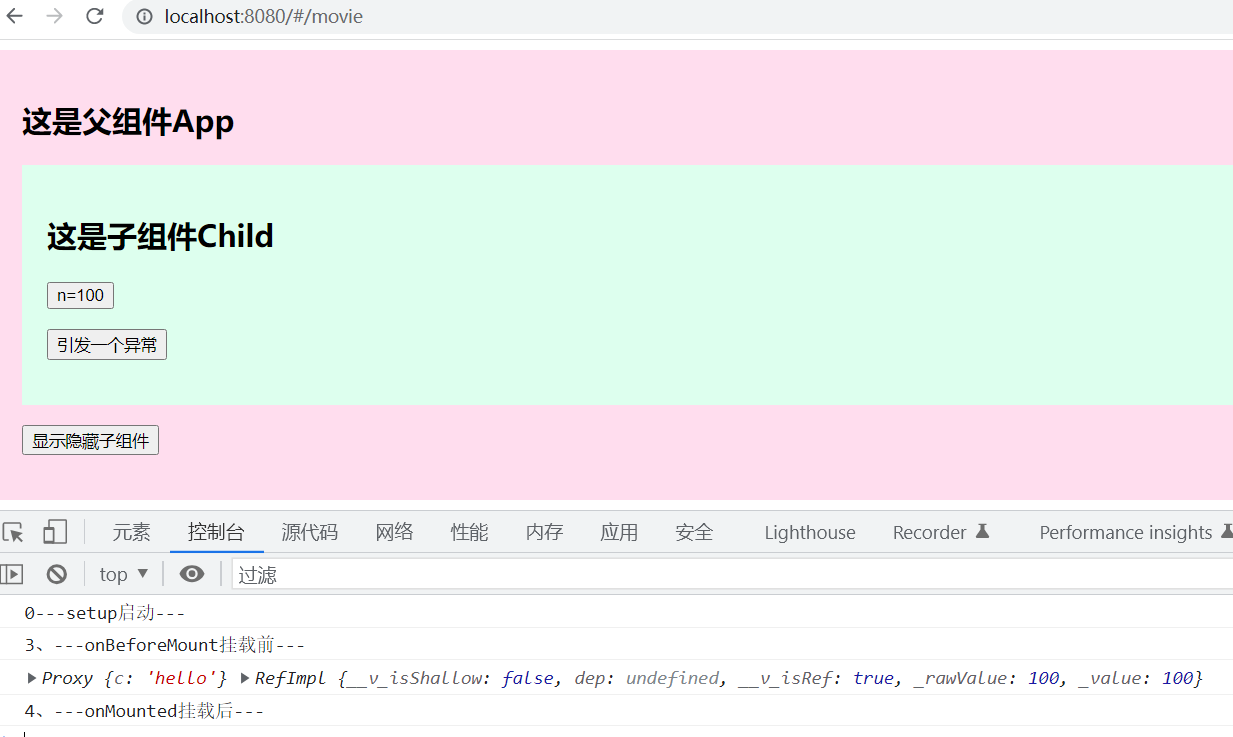
(2)、setup语法糖式写法
Child.vue
<template>
  <div class="child">
    <h2>这是子组件Child</h2>
    <button @click="n++">n={{ n }}</button>
    <p>
      <button @click="fireException">引发一个异常</button>
    </p>
  </div>
</template>
<script lang="ts" setup>
import {
  onBeforeMount,
  onMounted,
  onBeforeUpdate,
  ref,
  onUpdated,
  onBeforeUnmount,
  onUnmounted,
} from "vue";

let n = ref(100);
//0、在组合式API中没有beforeCreate与created钩子,用setup替代
console.log("0---setup启动---");

let props = defineProps(["c"]);
//3、当这个钩子被调用时,组件已经完成了其响应式状态的设置,但还没有创建 DOM 节点。它即将首次执行 DOM 渲染过程。
onBeforeMount(() => {
  console.log("3、---onBeforeMount挂载前---");
  console.log(props, n);
});
//4、在组件被挂载之后调用
//所有同步子组件都已经被挂载。(不包含异步组件或 <Suspense> 树内的组件)
//其自身的 DOM 树已经创建完成并插入了父容器中。注意仅当根容器在文档中时,才可以保证组件 DOM 树也在文档中。
onMounted(() => {
  console.log("4、---onMounted挂载后---");
});

//5、在组件即将因为一个响应式状态变更而更新其 DOM 树之前调用。
onBeforeUpdate(() => {
  console.log("5、---onBeforeUpdate更新DOM前---");
  console.log(n);
});

//6、在组件即将因为一个响应式状态变更而更新其 DOM 树之后调用。
onUpdated(() => {
  console.log("6、---onUpdated更新DOM后---");
  console.log(n);
});

//7、在一个组件实例被卸载之前调用。
//当这个钩子被调用时,组件实例依然还保有全部的功能。
onBeforeUnmount(() => {
  console.log("7、---onBeforeUnmount卸载前---");
});

//8、在一个组件实例被卸载之后调用。
onUnmounted(() => {
  console.log("8、---onUnmounted卸载后---");
});

function fireException() {
  throw new Error("child组件发生了异常");
}
</script>
<style>
.child {
  background: #dfe;
  padding: 20px;
}
</style>
App.vue
<template>
  <div class="parent">
    <h2>这是父组件App</h2>
    <Child v-if="isShowChild" c="hello" />
    <p>
      <button @click="isShowChild = !isShowChild">显示隐藏子组件</button>
    </p>
  </div>
</template>
<script lang="ts" setup>
import { ref, onErrorCaptured } from "vue";
import Child from "./components/Child.vue";
let isShowChild = ref(true);

//9、在捕获了后代组件传递的错误时调用。
onErrorCaptured((err, instance, info) => {
  console.log("9、---onErrorCaptured---");
  console.log("err=", err);
  console.log("instance=", instance);
  console.log("info=", info);
  //这个钩子可以通过返回 false 来阻止错误继续向上传递。
  //app.config.errorHandler将捕获不到异常
  return false;
});
</script>
<style>
.parent {
  background: #fde;
  padding: 20px;
}
</style>

(3)、混合式写法
Child.vue
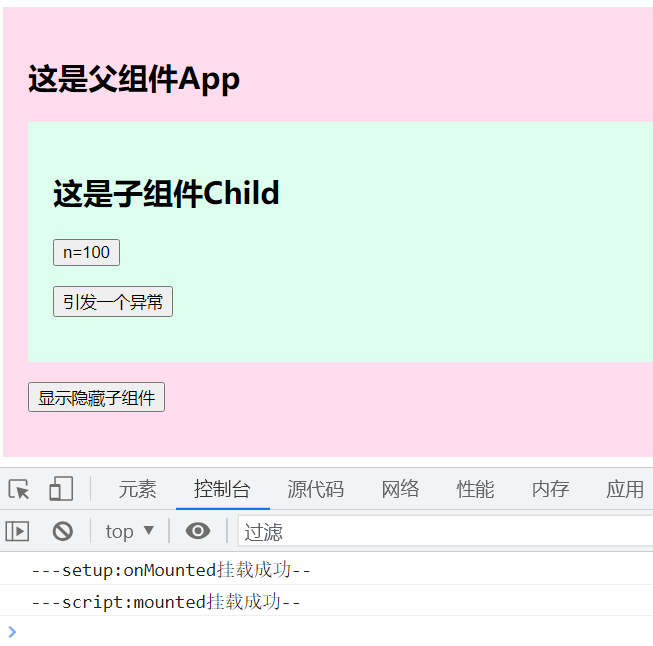
<template>
  <div class="child">
    <h2>这是子组件Child</h2>
    <button @click="n++">n={{ n }}</button>
    <p>
      <button @click="fireException">引发一个异常</button>
    </p>
  </div>
</template>
<script lang="ts">
import { onMounted, ref } from "vue";

export default {
  setup() {
    let n = ref(100);
    function fireException() {
      throw new Error("child组件发生了异常");
    }

    onMounted(() => {
      console.log("---setup:onMounted挂载成功--");
    });

    return { n, fireException };
  },
  mounted() {
    console.log("---script:mounted挂载成功--");
  },
};
</script>
<style>
.child {
  background: #dfe;
  padding: 20px;
}
</style>
2.3、生命周期各阶段意义
2.3.1、beforeCreate
在组件实例初始化完成之后立即调用。
会在实例初始化完成、props 解析之后、data() 和 computed 等选项处理之前立即调用。
注意,组合式 API 中的 setup() 钩子会在所有选项式 API 钩子之前调用,beforeCreate() 也不例外。
2.3.2、created
在组件实例处理完所有与状态相关的选项后调用。
当这个钩子被调用时,以下内容已经设置完成:响应式数据、计算属性、方法和侦听器。然而,此时挂载阶段还未开始,因此 $el 属性仍不可用。
2.3.3、beforeMount
在组件被挂载之前调用。
当这个钩子被调用时,组件已经完成了其响应式状态的设置,但还没有创建 DOM 节点。它即将首次执行 DOM 渲染过程。
这个钩子在服务端渲染时不会被调用。
2.3.4、mounted
在组件被挂载之后调用。
组件在以下情况下被视为已挂载:
所有同步子组件都已经被挂载。(不包含异步组件或 <Suspense> 树内的组件)
其自身的 DOM 树已经创建完成并插入了父容器中。注意仅当根容器在文档中时,才可以保证组件 DOM 树也在文档中。
这个钩子通常用于执行需要访问组件所渲染的 DOM 树相关的副作用,或是在服务端渲染应用中用于确保 DOM 相关代码仅在客户端被调用。
这个钩子在服务端渲染时不会被调用。
2.3.5、beforeUpdate
在组件即将因为一个响应式状态变更而更新其 DOM 树之前调用。
这个钩子可以用来在 Vue 更新 DOM 之前访问 DOM 状态。在这个钩子中更改状态也是安全的。
这个钩子在服务端渲染时不会被调用。
2.3.6、updated
在组件因为一个响应式状态变更而更新其 DOM 树之后调用。
父组件的更新钩子将在其子组件的更新钩子之后调用。
这个钩子会在组件的任意 DOM 更新后被调用,这些更新可能是由不同的状态变更导致的。如果你需要在某个特定的状态更改后访问更新后的 DOM,请使用 nextTick() 作为替代。
这个钩子在服务端渲染时不会被调用。
警告:不要在 updated 钩子中更改组件的状态,这可能会导致无限的更新循环!
2.3.7、beforeUnmount
在一个组件实例被卸载之前调用。
当这个钩子被调用时,组件实例依然还保有全部的功能。
这个钩子在服务端渲染时不会被调用。
2.3.8、unmounted
在一个组件实例被卸载之后调用。
一个组件在以下情况下被视为已卸载:
其所有子组件都已经被卸载。
所有相关的响应式作用 (渲染作用以及 setup() 时创建的计算属性和侦听器) 都已经停止。
可以在这个钩子中手动清理一些副作用,例如计时器、DOM 事件监听器或者与服务器的连接。
这个钩子在服务端渲染时不会被调用。
2.3.9、errorCaptured
在捕获了后代组件传递的错误时调用。
interface ComponentOptions {
errorCaptured?(
this: ComponentPublicInstance,
err: unknown,
instance: ComponentPublicInstance | null,
info: string
): boolean | void
}
    /**
     * 收到三个参数:
     * 错误对象、发生错误的组件实例
     * 以及一个包含错误来源信息的字符串。
     * 此钩子可以返回 false 以阻止该错误继续向上传播。
     */
    errorCaptured (err, vm, info) {
      console.log(err)
      // -> ReferenceError: consle is not defined ...
      console.log(vm)
      // -> {_uid: 1, _isVue: true, $options: {…}, _renderProxy: o, _self: o,…}
      console.log(info)
      // -> `mounted hook`
      // 告诉我们这个错误是在 vm 组件中的 mounted 钩子中发生的      // 阻止该错误继续向上传播
      return false
    }
错误可以从以下几个来源中捕获:
组件渲染
事件处理器
生命周期钩子
setup() 函数
侦听器
自定义指令钩子
过渡钩子
这个钩子带有三个实参:错误对象、触发该错误的组件实例,以及一个说明错误来源类型的信息字符串。
你可以在 errorCaptured() 中更改组件状态来为用户显示一个错误状态。然而重要的是,不要让错误状态渲染为导致本次错误的内容,否则组件就会进入无限的渲染循环中。
这个钩子可以通过返回 false 来阻止错误继续向上传递。请看下方的传递细节介绍。
Child.vue
<template>
  <div class="child">
    <h2>这是子组件Child</h2>
    <button @click="n++">n={{ n }}</button>
    <p>
      <button @click="fireException">引发一个异常</button>
    </p>
  </div>
</template>
<script lang="ts">
import { ref } from "vue";

export default {
  //在所有钩子函数执行前执行,会在实例初始化完成、props 解析之后
  setup(props) {
    let n = ref(100);
    console.log("0---setup---");
    console.log(props);

    function fireException() {
      throw new Error("child组件发生了异常");
    }

    return { n, fireException };
  },

  //1、会在实例初始化完成、props 解析之后、data() 和 computed 等选项处理之前立即调用。
  beforeCreate(this: any) {
    console.log("1---beforeCreate创建前---");
    console.log(this);
    console.log(this.a);
  },

  //2、在组件实例处理完所有与状态相关的选项后调用。
  //当这个钩子被调用时,以下内容已经设置完成:响应式数据、计算属性、方法和侦听器。然而,此时挂载阶段还未开始,因此 $el 属性仍不可用。
  created() {
    console.log("2---created创建后---");
    console.log("a=" + this.a);
    console.log("$el=" + this.$el);
  },

  //3、当这个钩子被调用时,组件已经完成了其响应式状态的设置,但还没有创建 DOM 节点。它即将首次执行 DOM 渲染过程。
  beforeMount() {
    console.log("3---beforeMount挂载前---");
    console.log("$el=" + this.$el);
  },

  //4、所有同步子组件都已经被挂载。(不包含异步组件或 <Suspense> 树内的组件)
  //其自身的 DOM 树已经创建完成并插入了父容器中。
  mounted() {
    console.log("4---mounted挂载后---");
    console.log("$el=" + this.$el);
  },

  //5、在组件即将因为一个响应式状态变更而更新其 DOM 树之前调用。
  //这个钩子可以用来在 Vue 更新 DOM 之前访问 DOM 状态。在这个钩子中更改状态也是安全的。
  beforeUpdate() {
    console.log("5---beforeUpdate更新前---");
    console.log(this.$el);
    console.log(this.n); //此时的n已修改成要显示的数据,但页面还没有更新
    //debugger;
  },
  //6、在组件因为一个响应式状态变更而更新其 DOM 树之后调用。
  updated() {
    console.log("6---updated更新后---");
    console.log(this.$el);
    //debugger;
  },
  //7、在一个组件实例被卸载之前调用。
  //当这个钩子被调用时,组件实例依然还保有全部的功能。
  beforeUnmount() {
    console.log("7---beforeUnmount卸载前---");
    console.log(this);
    //debugger;
  },
  //8、在一个组件实例被卸载之后调用。
  //可以在这个钩子中手动清理一些副作用,例如计时器、DOM 事件监听器或者与服务器的连接。
  unmounted() {
    console.log("8---unmounted卸载后---");
    console.log(this);
    //debugger;
  },
  props: ["c"],
  data() {
    return { a: 100, b: 200 };
  },
};
</script>
<style>
.child {
  background: #dfe;
  padding: 20px;
}
</style>
App.vue
<template>
  <div class="parent">
    <h2>这是父组件App</h2>
    <Child v-if="isShowChild" c="hello" />
    <p>
      <button @click="isShowChild = !isShowChild">显示隐藏子组件</button>
    </p>
  </div>
</template>
<script lang="ts">
import { ref } from "vue";
import Child from "./components/Child.vue";
export default {
  setup() {
    let isShowChild = ref(true);

    return { isShowChild };
  },
  //9、在捕获了后代组件传递的错误时调用。
  errorCaptured(err, instance, info) {
    console.log("错误对象:", err);
    console.log("实例对象:", instance);
    console.log("错误信息:", info);
    return false;
  },
  components: { Child },
};
</script>
<style>
.parent {
  background: #fde;
  padding: 20px;
}
</style>
运行效果:
错误传递规则
默认情况下,所有的错误都会被发送到应用级的 app.config.errorHandler (前提是这个函数已经定义),这样这些错误都能在一个统一的地方报告给分析服务。
如果组件的继承链或组件链上存在多个 errorCaptured 钩子,对于同一个错误,这些钩子会被按从底至上的顺序一一调用。这个过程被称为“向上传递”,类似于原生 DOM 事件的冒泡机制。
如果 errorCaptured 钩子本身抛出了一个错误,那么这个错误和原来捕获到的错误都将被发送到 app.config.errorHandler。
app.config.errorHandler=(err,app,info)=>{
    console.log(err);
    console.log(app);
    console.log(info);
};
errorCaptured 钩子可以通过返回 false 来阻止错误继续向上传递。即表示“这个错误已经被处理了,应当被忽略”,它将阻止其他的 errorCaptured 钩子或 app.config.errorHandler 因这个错误而被调用。
import { createApp } from 'vue'
import App from './App.vue'
import router from './router'

let app=createApp(App)

//全局错误处理
//用于为应用内抛出的未捕获错误指定一个全局处理函数。
app.config.errorHandler=(err,instance,info)=>{
    console.log("---错误对象:",err);
    console.log("---app实例:",instance);
    console.log("---错误消息:",info);
}

app.use(router).mount('#app');
2.3.10、renderTracked
在一个响应式依赖被组件的渲染作用追踪后调用。
这个钩子仅在开发模式下可用,且在服务器端渲染期间不会被调用。
2.3.11、renderTriggered
在一个响应式依赖被组件触发了重新渲染之后调用。
这个钩子仅在开发模式下可用,且在服务器端渲染期间不会被调用。
2.3.12、activated
若组件实例是 <KeepAlive> 缓存树的一部分,当组件被插入到 DOM 中时调用。
这个钩子在服务端渲染时不会被调用。
2.3.13、deactivated
若组件实例是 <KeepAlive> 缓存树的一部分,当组件从 DOM 中被移除时调用。
这个钩子在服务端渲染时不会被调用。
2.3.14、serverPrefetch
当组件实例在服务器上被渲染之前要完成的异步函数。
如果这个钩子返回了一个 Promise,服务端渲染会在渲染该组件前等待该 Promise 完成。
这个钩子仅会在服务端渲染中执行,可以用于执行一些仅在服务端才有的数据抓取过程。
2.4、getCurrentInstance
setup的执行时组件对象还没有创建,此时不能使用this来访问data/computed/methods/props
我们可以通过 getCurrentInstance这个函数来返回当前组件的实例对象,也就是当前vue这个实例对象
import { ref, getCurrentInstance } from "vue";
let proxy: any = getCurrentInstance();
console.log(proxy);
三、Hooks
什么是hook?—— 本质是一个函数,把setup函数中使用的Composition API进行了封装。
类似于vue2.x中的mixin。
自定义hook的优势: 复用代码, 让setup中的逻辑更清楚易懂。
Counter.vue
<template>
  <h2>Counter组件</h2>
  <h2>当前鼠标的X={{ point.x }},Y={{ point.y }}</h2>
</template>
<script lang="ts" setup>
import usePoint from "../hooks/usePoint.js";
let point = usePoint();
</script>

<style scoped></style>
hooks/usePoint.js
import { onMounted, onUnmounted, reactive } from "vue";
export default function(){
let point = reactive({ x: 0, y: 0 });

function savePoint(event) {
  point.x = event.pageX;
  point.y = event.pageY;
  console.log(point.x, point.y);
}

onMounted(() => {
  window.addEventListener("click", savePoint);
});

onUnmounted(() => {
  window.removeEventListener("click", savePoint);
});
return point;
}
App.vue
<template>
  <Counter v-if="isShow" />

  <button @click="isShow = !isShow">切换显示与隐藏</button>
</template>
<script lang="ts" setup>
import { ref } from "vue";
import Counter from "./components/Counter.vue";
let isShow = ref(true);
</script>

三、示例下载
https://gitee.com/zhangguo5/vue3_-chapter1.git
四、视频
【Vue3 + Vuex + Pinia + TypeScript + Router】 https://www.bilibili.com/video/BV1at4y1F75D?share_source=copy_web&vd_source=475a31f3c5d6353a782007cd4c638a8a
三、作业
3.1、请完成课程中的所有示例。
3.2、请定义一个vue分页组件,可以实现客户端分页功能,接收参数


参考代码:


<!DOCTYPE html>
<html lang="en">

<head>
  <meta charset="UTF-8">
  <meta name="viewport" content="width=device-width, initial-scale=1.0">
  <meta http-equiv="X-UA-Compatible" content="ie=edge">
  <title>vue分页组件</title>
  <style>
    .page {
      font-weight: 900;
      height: 40px;
      text-align: center;
      color: #888;
      margin: 20px auto 0;
      background: #f2f2f2;
    }

    .pagelist {
      font-size: 0;
      background: #fff;
      height: 50px;
      line-height: 50px;
    }

    .pagelist span {
      font-size: 14px;
    }

    .pagelist .jump {
      border: 1px solid #ccc;
      padding: 5px 8px;
      -webkit-border-radius: 4px;
      -moz-border-radius: 4px;
      border-radius: 4px;
      cursor: pointer;
      margin-left: 5px;
    }

    .pagelist .bgprimary {
      cursor: default;
      color: #fff;
      background: #337ab7;
      border-color: #337ab7;
    }

    .jumpinp input {
      width: 55px;
      height: 26px;
      font-size: 13px;
      border: 1px solid #ccc;
      -webkit-border-radius: 4px;
      -moz-border-radius: 4px;
      border-radius: 4px;
      text-align: center;
    }

    .ellipsis {
      padding: 0px 8px;
    }

    .jumppoint {
      margin-left: 30px;
    }

    .pagelist .gobtn {
      font-size: 12px;
    }

    .bgprimary {
      cursor: default;
      color: #fff;
      background: #337ab7;
      border-color: #337ab7;
    }
    .pagelist .jump.disabled{
      pointer-events: none;
      background: #ddd;
    }
  </style>
</head>

<body>
  <div id="app">
    <div>
      <div class="page"  v-show="show">
        <div class="pagelist">
          <span class="jump" :class="{disabled:pstart}" @click="{current_page--}">上一页</span>
          <span v-show="current_page>5" class="jump" @click="jumpPage(1)">1</span>
          <span class="ellipsis"  v-show="efont">...</span>
          <span class="jump" v-for="num in indexs" :class="{bgprimary:current_page==num}" @click="jumpPage(num)">{{num}}</span>
          <span class="ellipsis"  v-show="ebehind">...</span>

          <span :class="{disabled:pend}" class="jump" @click="{current_page++}">下一页</span>
          <span v-show="current_page<pages-4" class="jump" @click="jumpPage(pages)">{{pages}}</span>

          <span class="jumppoint">跳转到:</span>
          <span class="jumpinp"><input type="text" v-model="changePage"></span>
          <span class="jump gobtn" @click="jumpPage(changePage)">GO</span>
        </div>
      </div>
    </div>
  </div>

  <script src="http://www.jq22.com/jquery/vue.min.js"></script>
  <script>
    var newlist = new Vue({
      el: '#app',
      data: {
        current_page: 1, //当前页
        pages: 50, //总页数
        changePage:'',//跳转页
        nowIndex:0
      },
      computed:{
         show:function(){
             return this.pages && this.pages !=1
         },
         pstart: function() {
           return this.current_page == 1;
         },
         pend: function() {
           return this.current_page == this.pages;
         },
         efont: function() {
           if (this.pages <= 7) return false;
           return this.current_page > 5
         },
         ebehind: function() {
           if (this.pages <= 7) return false;
           var nowAy = this.indexs;
           return nowAy[nowAy.length - 1] != this.pages;
         },
         indexs: function() {

           var left = 1,
             right = this.pages,
             ar = [];
           if (this.pages >= 7) {
             if (this.current_page > 5 && this.current_page < this.pages - 4) {
               left = Number(this.current_page) - 3;
               right = Number(this.current_page) + 3;
             } else {
               if (this.current_page <= 5) {
                 left = 1;
                 right = 7;
               } else {
                 right = this.pages;

                 left = this.pages - 6;
               }
             }
           }
           while (left <= right) {
             ar.push(left);
             left++;
           }
           return ar;
         },
       },
      methods: {
        jumpPage: function(id) {
          this.current_page = id;
        },
      },

    })
  </script>

</body>

</html>
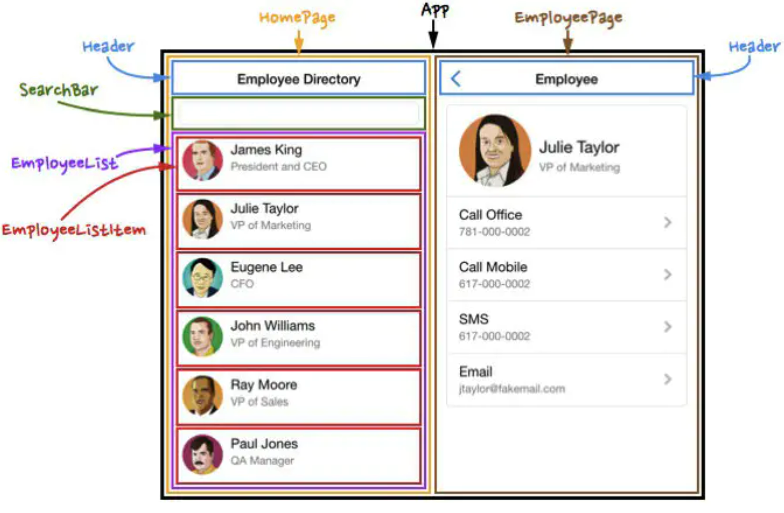
3.3、请完使用vue3实现图书列表与详细展示功能,效果如下:


3.4、使用Vue 组件(component)完成一个精美的日历,要求IOS , 安卓, PC 的IE9+都能运行,如下图所示:

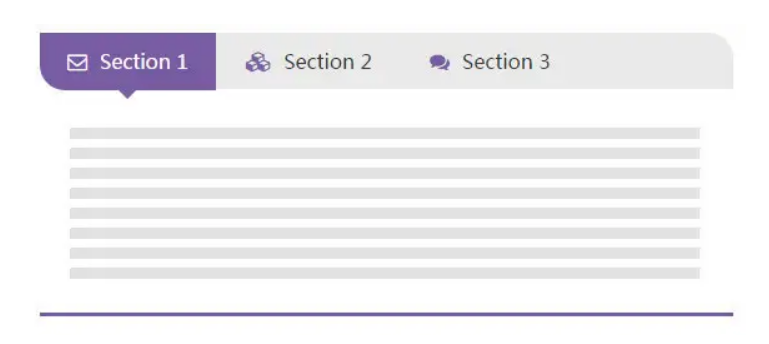
3.6、使用动态组件完成一个选项卡,定义3个不同的组件,点击卡片名称时动态切换。
3.7、定义一个对话框组件,要求显示在body标签内

 浙公网安备 33010602011771号