Celery-分布式任务队列
一、介绍
官方文档:http://docs.celeryproject.org/en/latest/index.html
pip3 install celery
Celery是一个专注于实时处理和任务调度的分布式任务队列,通过它可以轻松的实现任务的异步处理。
使用Celery的常见场景:
- Web应用。当用户触发的一个操作需要较长时间才能执行完成时,可以把它作为任务交给Celery去异步执行,执行完再返回给用户。这段时间用户不需要等待,提高了网站的整体吞吐量和响应时间。
- 定时任务。生产环境经常会跑一些定时任务。假如你有上千台的服务器、上千种任务,定时任务的管理很困难,Celery可以帮助我们快速在不同的机器设定不同种任务。
- 同步完成的附加工作都可以异步完成。比如发送短信/邮件、推送消息、清理/设置缓存等。
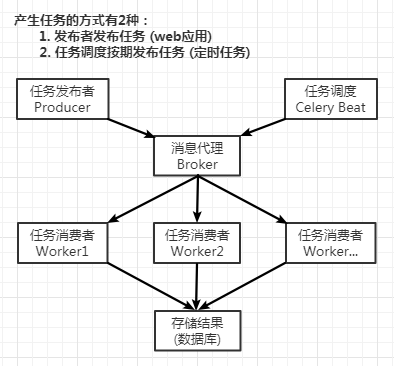
Celery包含如下组件:
- Celery Beat:任务调度器,Beat进程会读取配置文件的内容,周期性地将配置中到期需要执行的任务发送给任务队列。
- Celery Worker:执行任务的消费者,通常会在多台服务器运行多个消费者来提高执行效率。
- Broker:消息代理,或者叫作消息中间件,接受任务生产者发送过来的任务消息,存进队列再按序分发给任务消费方(通常是消息队列或者数据库)。
- Producer:调用了Celery提供的API、函数或者装饰器而产生任务并交给任务队列处理的都是任务生产者。
- Result Backend:任务处理完后保存状态信息和结果,以供查询。
二、简单示例
创建一个tasks.py:
from celery import Celery

app = Celery(
    "tasks",
    broker="amqp://pd:123456@localhost:5672//",
    backend="redis://:123456@localhost:6379/0")

@app.task
def add(x, y):
    return x+y
启动Celery Worker来开始监听并执行任务:
celery -A tasks worker -l info
更多有关命令:
celery worker --help
再打开一个终端, 进行命令行模式,调用任务:
>>> from tasks import add
>>> relt = add.delay(10, 10)
>>> relt.ready()  # 检查任务是否已经完成
True
>>> relt.get()    # 获取任务结果,可设置timeout超时
20
>>> relt
<AsyncResult: 470d5f45-42eb-4b0c-bd38-06b85fa5599b>
>>> relt.id
'470d5f45-42eb-4b0c-bd38-06b85fa5599b'
>>> relt.result
20
>>> relt.status
'SUCCESS'


from celery import Celery
from celery.result import AsyncResult

app = Celery(
    "tasks",
    broker="amqp://pd:123456@localhost:5672/pdvhost",
    backend="redis://:123456@localhost:6379/0")

result = AsyncResult(id="470d5f45-42eb-4b0c-bd38-06b85fa5599b", app=app)
print(result.get())  # 20
三、配置
官方文档,配置:http://docs.celeryproject.org/en/latest/userguide/configuration.html#configuration
像上面简单示例中,要想添加配置,则可以直接在应用程序设置配置:
app.conf.task_serializer = "json"
如果您一次配置多个设置,则:
app.conf.update(
    task_serializer="json",
    accept_content=["json"],
    result_serializer="json",
    timezone="Europe/Oslo",
    enable_utc=True,
)
对于大型项目,建议使用专用配置模块。因为项目复杂,最好做到程序的解耦,所以将配置保存在集中位置是一个非常好的选择,一般默认 celeryconfig.py 模块是用来保存配置的,你也可以使用自己定义的名字,然后通过调用 app.config_from_object() 方法告诉 Celery 实例使用配置模块:
app.config_from_object("celeryconfig")
# 或者
from . import celeryconfig
app.config_from_object(celeryconfig)
四、在项目中使用Celery
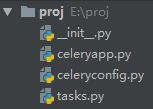
项目布局:
方案选择:
- RabbitMQ作为消息代理。不选Redis是因为如果Redis发生意外,会造成数据丢失等后果。
- Msgpack做序列化。Msgpack是一个二进制的类json的序列化方案,它比json的数据结构更小,传输更快。
- Redis做结果存储。
pip3 install msgpack
########## celeryapp.py ##########
from celery import Celery
from . import celeryconfig

app = Celery("proj.celeryapp", include=["proj.tasks"])
app.config_from_object(celeryconfig)

if __name__ == "__main__":
    app.start()

########## tasks.py ##########
from .celeryapp import app

@app.task
def add(x, y):
    return x+y

@app.task
def mul(x, y):
    return x*y

########## celeryconfig.py ##########
# 使用RabbitMQ作为消息代理
broker_url = "amqp://pd:123456@114.116.50.214:5672//"
# # 把任务结果存在了Redis
result_backend = "redis://:123456@114.116.50.214:6379/0"
# 任务序列化和反序列化使用msgpack方案
task_serializer = "msgpack"
# 读取任务结果一般性能要求不高,所以使用了可读性更好的json
result_serializer = "json"
# 任务过期时间
result_expires = 60*60*24
# 指定接受的内容类型
accept_content = ["json", "msgpack"]
五、在后台运行worker
在生产中,我们需要在后台运行worker,官方文档daemonization教程中有详细描述。
守护程序脚本使用celery multi命令在后台启动一个或多个worker:
# 启动worker后台运行
celery multi start w1 -A proj.celeryapp -l info
celery multi start w2 -A proj.celeryapp -l info
PS:如果使用的是默认的celery.py,那么直接proj即可

# 重启
celery multi restart w1 -A proj -l info

# 停止
celery multi stop w1 -A proj -l info

# 确保退出之前完成所有当前正在执行的任务
celery multi stopwait w1 -A proj -l info
默认情况下,它会在当前目录下创建的pid和日志文件,为了防止多个worker在彼此之上启动,最好将这些文件放在专用目录中:
mkdir /var/run/celery
mkdir /var/log/celery
celery multi start w1 -A proj -l info --pidfile=/var/run/celery/%n.pid --logfile=/var/log/celery/%n%I.log
六、指定队列传送任务
官方文档:https://celery.readthedocs.io/en/latest/userguide/routing.html#guide-routing
在 celeryconfig.py 中加入以下配置:
# 路由键以 task. 开头的消息都进default队列
# 路由键以 web. 开头的消息都进web_tasks队列
task_queues = (
    Queue("default", routing_key="task.#"),
    Queue("web_tasks", routing_key="web.#"),
)
# 默认的交换机名字为tasks
task_default_exchange = "tasks"
# 设置默认交换类型为topic
task_default_exchange_type = "topic"
# 默认的路由键是 task.default
task_default_routing_key = "task.default"
# 要将任务路由到web_tasks队列,可以在task_routes设置中添加条目
task_routes = {
    # tasks.add的消息会进入web_tasks队列
    "proj.tasks.add": {
        "queue": "web_tasks",
        "routing_key": "web.add",
    },
}
其他代码与上面 四 中的相同。
启动worker,指定该worker工作于哪个队列:
# 该worker只会执行web_tasks队列中的任务
celery -A proj.celeryapp worker -Q web_tasks -l info
七、定时任务
官方文档:https://celery.readthedocs.io/en/latest/userguide/periodic-tasks.html
Celery支持定时任务,设定好任务的执行时间,Celery就会定时自动帮你执行, 这个定时任务模块叫 celery beat。
函数版tasks.py:
from celery import Celery
from celery.schedules import crontab

app = Celery("tasks", broker="amqp://pd:123456@localhost:5672//", backend="redis://:123456@localhost:6379/0")
app.conf.timezone = "Asia/Shanghai"

@app.on_after_configure.connect
def setup_periodic_tasks(sender, **kwargs):
    # 每5秒执行一次 test("Hello")
    sender.add_periodic_task(5.0, test.s("Hello"), name="every-5s")
    # 每10秒执行一次 test("World")
    sender.add_periodic_task(10.0, test.s("World"), name="every-10s", expires=5)
    # 每周一早上 7:30 执行一次 test("Happy Mondays!")
    sender.add_periodic_task(
        crontab(hour=7, minute=30, day_of_week=1),
        test.s("Happy Mondays!"),
    )

@app.task
def test(arg):
    print(arg)
celery -A tasks worker -l info
celery -A tasks beat -l info
配置版:
########## celeryapp.py ##########
from celery import Celery
from . import celeryconfig

app = Celery("proj.celeryapp", include=["proj.tasks"])
app.config_from_object(celeryconfig)

if __name__ == "__main__":
    app.start()

########## celeryconfig.py ##########
broker_url = "amqp://pd:123456@114.116.50.214:5672//"
result_backend = "redis://:123456@114.116.50.214:6379/0"
task_serializer = "msgpack"
result_serializer = "json"
result_expires = 60*60*24
accept_content = ["json", "msgpack"]
timezone = "Asia/Shanghai"

from celery.schedules import crontab
beat_schedule = {
    "every-10s": {
        "task": "proj.tasks.add",
        "schedule": 10.0,
        "args": (10, 10)
    },
    "every-monday-morning-7:30": {
        "task": "proj.tasks.mul",
        "schedule": crontab(hour=7, minute=30, day_of_week=1),
        "args": (10, 10)
    }
}

########## tasks.py ##########
from .celeryapp import app

@app.task
def add(x, y):
    return x+y

@app.task
def mul(x, y):
    return x*y
celery -A proj.celeryapp worker -l info
celery -A proj.celeryapp beat -l info
八、在Django中使用celery
发布任务
https://celery.readthedocs.io/en/latest/django/first-steps-with-django.html#extensions
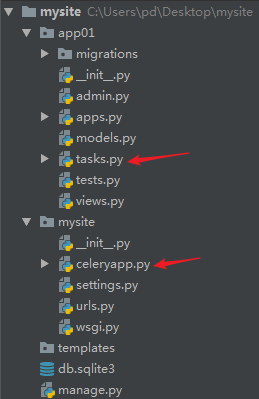
项目布局:
import os
from celery import Celery

os.environ.setdefault("DJANGO_SETTINGS_MODULE", "mysite.settings")
app = Celery("mysite")
app.config_from_object("django.conf:settings", namespace="CELERY")
app.autodiscover_tasks()

@app.task(bind=True)
def debug_task(self):
    print("Request: {0!r}".format(self.request))
from .celeryapp import app as celery_app
__all__ = ["celery_app"]
settings.py,更多设置参考:https://celery.readthedocs.io/en/latest/userguide/configuration.html
#for celery
CELERY_BROKER_URL = "amqp://pd:123456@114.116.50.214:5672//"
CELERY_RESULT_BACKEND = "redis://:123456@114.116.50.214:6379/0"
在app里的tasks.py里编写任务:
from celery import shared_task

@shared_task
def add(x, y):
    return x+y

@shared_task
def mul(x, y):
    return x*y
在views里调用celery task:
from django.shortcuts import HttpResponse
from app01 import tasks

def test(request):
    result = tasks.add.delay(100, 100)
    return HttpResponse(result.get())
定时任务
https://celery.readthedocs.io/en/latest/userguide/periodic-tasks.html#using-custom-scheduler-classes
1、安装 django-celery-beat
pip3 install django-celery-beat
2、在settings.py中设置
INSTALLED_APPS = [
    ...,
    'django_celery_beat',
]
3、进行数据库迁移,以便创建定时任务所需的表
python3 manage.py migrate
4、开始监测定时任务
celery -A mysite.celeryapp beat -l info -S django
5、在django-admin界面设置定时任务

 浙公网安备 33010602011771号