
开机SystemServer到ActivityManagerService启动过程分析
开机SystemServer到ActivityManagerService启动过程
一 从Systemserver到AMS
zygote-> systemserver:java入层口:
/**
 * The main entry point from zygote.
 */
public static void main(String[] args) {
    new SystemServer().run();
}
接下来继续看SystemServer run函数执行过程:
private void run() {

    // 准备SystemServer运行环境:设置线程优先级,创建主线层Looper,ActivityThread和SystemContext
    android.os.Process.setThreadPriority();
    Looper.prepareMainLooper();

    // 创建systemserver上进程的ActivityThread和SystemContext
    createSystemContext();

    // 增加SystemServiceManager:统一管理system services的创建,启动和生命周期,多用户切换
    mSystemServiceManager = new SystemServiceManager(mSystemContext);

    // Start services.

    // 1.创建AMS
    mActivityManagerService = mSystemServiceManager.startService(
            ActivityManagerService.Lifecycle.class).getService();


    // Start the Power Manager service
    mPowerManagerService = mSystemServiceManager.startService(PowerManagerService.class);


    // Start the package manager service
    mPackageManagerService = PackageManagerService.main();


    // 2.将SystemServer进程可加到AMS中调度管理
    mActivityManagerService.setSystemProcess();

    // 3.将相关provider运行在systemserver进程中:SettingsProvider
    mActivityManagerService.installSystemProviders();

    //
    final Watchdog watchdog = Watchdog.getInstance();
    watchdog.init(context, mActivityManagerService);

    // Start Window Manager
    wm = WindowManagerService.main();

    // 4.直接保存wms对象,与WMS交互
    mActivityManagerService.setWindowManager(wm);

    // 5.通过WMS 弹出“正在启动应用”框
    // R.string.android_upgrading_starting_apps
    ActivityManagerNative.getDefault().showBootMessage();

    // 6. AMS作为Framework核心,做好准备就绪后就开始启动应用层,和对AMS有依赖的服务
    mActivityManagerService.systemReady(new Runnable(){
        //启动SystemUI
        startSystemUi(context);

        //启动WatchDog监控核心服务状态
        Watchdog.getInstance().start();

        //
        mmsServiceF.systemRunning();
    });

    // Loop forever.
    Looper.loop();
}
以上6个步骤是SystemServer中关于AMS的调用,完成AMS的创建和系统的初始化,下面按照这步骤继续升入分析。
- 这里有个疑问:
AMS保存对象,本身就在同一个进程,WMS与WMS之间的交互式直接调用速度会更快,其他服务为何不这样,是因为耦合太强,还是实时性要求更高?
弹出“正在启动应用”框,这里为何不直接调用AMS的showBootMessage而是通过binder方式调用,其他接口都是直接调用,为何?直接调用有何不可吗?
二 ActivityManagerService 创建过程
接上面SystemServer.run中:
mActivityManagerService = mSystemServiceManager.startService(
ActivityManagerService.Lifecycle.class).getService();
这是通过SystemServiceManager这样一个模板类来创建运行在SystemServer中的Framework服务;
并将创建的服务统一保存在队列管理,会涉及到多用户切换。
  // Note: This method is invoked on the main thread but may need to attach various
    // handlers to other threads.  So take care to be explicit about the looper.
    public ActivityManagerService(Context systemContext) {

       // 1.系统Context 和 ActivityThread (将systemserver进程作为应用进程管理)
        mContext = systemContext;
        mFactoryTest = FactoryTest.getMode();
        mSystemThread = ActivityThread.currentActivityThread();

        // 2.AMS工作的线程和Handler,处理显示相关的UiHandler  ---》知识点HandlerThread和Handler
        mHandlerThread = new ServiceThread(TAG,
            android.os.Process.THREAD_PRIORITY_FOREGROUND, false /*allowIo*/);
        mHandlerThread.start();
        mHandler = new MainHandler(mHandlerThread.getLooper());
        mUiHandler = new UiHandler();

        // 3. 广播队列BroadcastQueue初始化:前台广播队列和后台广播队列
        mFgBroadcastQueue = new BroadcastQueue(this, mHandler,"foreground", BROADCAST_FG_TIMEOUT, false);
        mBgBroadcastQueue = new BroadcastQueue(this, mHandler,"background", BROADCAST_BG_TIMEOUT, true);
        mBroadcastQueues[0] = mFgBroadcastQueue;
        mBroadcastQueues[1] = mBgBroadcastQueue;

        // 4. Service 和 Provider 管理
        mServices = new ActiveServices(this);
        mProviderMap = new ProviderMap(this);

        // 5.系统数据存放目录:/data/system/
        File dataDir = Environment.getDataDirectory();
        File systemDir = new File(dataDir, "system");
        systemDir.mkdirs();


        // 电池状态信息,进程状态 和 应用权限管理
        mBatteryStatsService = new BatteryStatsService(systemDir, mHandler);
        mProcessStats = new ProcessStatsService(this, new File(systemDir, "procstats"));
        mAppOpsService = new AppOpsService(new File(systemDir, "appops.xml"), mHandler);

        // 6.多用户管理
        mStartedUsers.put(UserHandle.USER_OWNER, new UserState(UserHandle.OWNER, true));
        mUserLru.add(UserHandle.USER_OWNER);
        updateStartedUserArrayLocked();

        // 7.最近任务,Activity,Task管理
        mRecentTasks = new RecentTasks(this);
        mStackSupervisor = new ActivityStackSupervisor(this, mRecentTasks);
        mTaskPersister = new TaskPersister(systemDir, mStackSupervisor, mRecentTasks);

        // 创建一个新线程,用于监控和定时更新系统CPU信息,30分钟更新一次CPU和电池信息
        mProcessCpuTracker.init();
        mProcessCpuThread = new Thread("CpuTracker") {}

        // 加入Watchdog监控起来
        Watchdog.getInstance().addMonitor(this);
        Watchdog.getInstance().addThread(mHandler);
    }
- 以上 AMS创建过程 涉及到Android 四大组件管理的初始化:
Broadcast --》BroadcastQueue
Provider --》ProviderMap
Service --》ActiveServices
Activity --》ActivityStackSupervisor
备注1:Android6.0上加入多用户功能,增加了一些涉及多用户的管理。
拓展知识点:HandlerThread,Handle,Looper
二 将SystemServer进程可加到AMS中调度管理
接上面systemserver.run中:
mActivityManagerService.setSystemProcess();
public void setSystemProcess() {
        // 将服务加入到ServiceManager中
        ServiceManager.addService(Context.ACTIVITY_SERVICE, this, true);
        ServiceManager.addService(ProcessStats.SERVICE_NAME, mProcessStats);
        ServiceManager.addService("meminfo", new MemBinder(this));
        ServiceManager.addService("gfxinfo", new GraphicsBinder(this));
        ServiceManager.addService("dbinfo", new DbBinder(this));

        // 设置application info LoadedApkinfo 有关 framework-res.apk
        ApplicationInfo info = mContext.getPackageManager().getApplicationInfo(
                    "android", STOCK_PM_FLAGS);
        mSystemThread.installSystemApplicationInfo(info, getClass().getClassLoader());

        //给SystemServer进程创建ProcessRecord,adj值,就是将SystemServer进程加入到AMS进程管理机制中,跟应用进程一致
        synchronized (this) {
            ProcessRecord app = newProcessRecordLocked(info, info.processName, false, 0);
            app.persistent = true;
            app.pid = MY_PID;
            app.maxAdj = ProcessList.SYSTEM_ADJ;
            app.makeActive(mSystemThread.getApplicationThread(), mProcessStats);
            synchronized (mPidsSelfLocked) {
                mPidsSelfLocked.put(app.pid, app);
            }
            updateLruProcessLocked(app, false, null);
            updateOomAdjLocked();
        }
    }
- setSystemProcess意义:
这一步就是给SystemServer进程创建ProcessRecord,adj值,就是将SystemServer进程加入到AMS进程管理机制中,跟应用进程一致;
进程调度更新优先级oomadj值,个人感觉SystemServer进程跟应用进程就不一样,却加入AMS来调度管理,这样做的意义何在?
四 创建运行在SystemServer进程中Provider
接上面SystemServer.run中:
mActivityManagerService.installSystemProviders();
备注2: 将相关provider运行在systemserver进程中:SettingsProvider
具体安装过程这里暂不详述,在应用启动过程中具体分析。
五 AMS systemReady过程
接上面SystemServer.run中:
mActivityManagerService.systemReady();
public void systemReady(final Runnable goingCallback) {
        synchronized(this) {
            if (mSystemReady) {
                goingCallback.run();
            }
            ……

            // 1.升级相关处理:发送PRE_BOOT_COMPLETED广播 等待升级处理完成才能继续
            // Check to see if there are any update receivers to run.
            if (!mDidUpdate) {
                // 等待升级完成,否则直接返回
                if (mWaitingUpdate) {
                    return;
                }
                // 发送PRE_BOOT_COMPLETED广播
                final ArrayList<ComponentName> doneReceivers = new ArrayList<ComponentName>();
                mWaitingUpdate = deliverPreBootCompleted(new Runnable() {
                    // 等待所有接收PRE_BOOT_COMPLETED广播者处理完毕
                    public void run() {
                        synchronized (ActivityManagerService.this) {
                            mDidUpdate = true;
                        }
                        showBootMessage(mContext.getText(
                                R.string.android_upgrading_complete),
                                false);

                        // 将系统版本号和处理过的广播写入文件:/data/system/called_pre_boots.dat文件
                        writeLastDonePreBootReceivers(doneReceivers);

                        // 继续systemReady流程
                        systemReady(goingCallback);
                    }
                }, doneReceivers, UserHandle.USER_OWNER);

                if (mWaitingUpdate) {
                    return;
                }
                mDidUpdate = true;
            }

            mSystemReady = true;
        }

        // 2. 收集已经启动的进程并杀死,除过persistent常驻进程
        ArrayList<ProcessRecord> procsToKill = null;
        synchronized(mPidsSelfLocked) {
            for (int i=mPidsSelfLocked.size()-1; i>=0; i--) {
                ProcessRecord proc = mPidsSelfLocked.valueAt(i);
                if (!isAllowedWhileBooting(proc.info)){
                    if (procsToKill == null) {
                        procsToKill = new ArrayList<ProcessRecord>();
                    }
                    procsToKill.add(proc);
                }
            }
        }

        synchronized(this) {
            if (procsToKill != null) {
                for (int i=procsToKill.size()-1; i>=0; i--) {
                    ProcessRecord proc = procsToKill.get(i);
                    Slog.i(TAG, "Removing system update proc: " + proc);
                    removeProcessLocked(proc, true, false, "system update done");
                }
            }

            // Now that we have cleaned up any update processes, we
            // are ready to start launching real processes and know that
            // we won't trample on them any more.
            mProcessesReady = true;
        }

        // 3.系统准备好后回调传入的Runnable:
        if (goingCallback != null) goingCallback.run();
// 4. 发送账户启动的广播,涉及多用户
long ident = Binder.clearCallingIdentity();
Intent intent = new Intent(Intent.ACTION_USER_STARTED);
broadcastIntentLocked(intent);
intent = new Intent(Intent.ACTION_USER_STARTING);
broadcastIntentLocked(intent);
Binder.restoreCallingIdentity(ident);
        // 5. 启动桌面Home Activity
        mBooting = true;
        startHomeActivityLocked(mCurrentUserId, "systemReady");
        mStackSupervisor.resumeTopActivitiesLocked();
  }
- 下面看下AMS systemReady的过程:
1. 升级相关处理:发送PRE_BOOT_COMPLETED广播
顾名思义:只有系统做OTA升级 和 手机初次开机的时候,应当才会走此广播,下面看看这个函数具体的处理。
接上面:
deliverPreBootCompleted(new Runnable() {
        // 向PMS查询,所有接收ACTION_PRE_BOOT_COMPLETED广播的Receiver
        Intent intent = new Intent(Intent.ACTION_PRE_BOOT_COMPLETED);
        List<ResolveInfo> ris = null;
        ris = AppGlobals.getPackageManager().queryIntentReceivers(
                    intent, null, 0, userId);

        // 只有系统广播才能接收该广播,去掉非系统应用
        for (int i=ris.size()-1; i>=0; i--) {
            if ((ris.get(i).activityInfo.applicationInfo.flags
                &ApplicationInfo.FLAG_SYSTEM) == 0) {
            ris.remove(i);
            }
        }

        // 给Intent设置flag:FLAG_RECEIVER_BOOT_UPGRADE,很关键这个看看flag的作用:
        // 只有设置这个标志,才能让应用在系统没有ready的情况下启动,见下文原始注释
        intent.addFlags(Intent.FLAG_RECEIVER_BOOT_UPGRADE);

        // 将已经处理过ACTION_PRE_BOOT_COMPLETED广播的Receiver去掉
        // 已经处理该广播的Receiver记录 和 对应的系统版本号 都记录在:/data/system/called_pre_boots.dat文件中,
        // 通过与系统当前版本号比对,确认是否已处理过。考虑处理过程异常中断的情况:比如断电
        ArrayList<ComponentName> lastDoneReceivers = readLastDonePreBootReceivers();

        // 将已经处理过的广播去除,同时记录已处理过保存在 doneReceivers数组中
        for (int i=0; i<ris.size(); i++) {
            ActivityInfo ai = ris.get(i).activityInfo;
            ComponentName comp = new ComponentName(ai.packageName, ai.name);
            if (lastDoneReceivers.contains(comp)) {
                // We already did the pre boot receiver for this app with the current
                // platform version, so don't do it again...
                ris.remove(i);
                i--;
                // ...however, do keep it as one that has been done, so we don't
                // forget about it when rewriting the file of last done receivers.
                doneReceivers.add(comp);
            }
        }

        // 内部类专门用来ACTION_PRE_BOOT_COMPLETED广播的发送,要看看这个PreBootContinuation类
        // 这块逻辑一直在变,Android5.0, 6.0 , 以及看到在7.0上又变了,基本思路不变,本文代码基于Android6.0
        PreBootContinuation cont = new PreBootContinuation(intent, onFinishCallback, doneReceivers,
                ris, users);
        cont.go();
        return true;
    }
给intent设置的广播意义:
/**
* Set when this broadcast is for a boot upgrade, a special mode that
* allows the broadcast to be sent before the system is ready and launches
* the app process with no providers running in it.
* @hide
*/
public static final int FLAG_RECEIVER_BOOT_UPGRADE = 0x02000000;
- 继续接着上面PreBootContinuation类:从继承关系看到可以跨进程的
final class PreBootContinuation extends IIntentReceiver.Stub {
        void go() {
            //判断是不是最后一个接收者
            if (lastRi != curRi) {

                // 疑问:如果不是最后一个接收者,则发给一个指定接收者ComponentName
                // 为什么要在这里指定接收者,一个个发送,而不是交给广播自己去处理?
                ActivityInfo ai = ris.get(curRi).activityInfo;
                ComponentName comp = new ComponentName(ai.packageName, ai.name);
                intent.setComponent(comp);
                doneReceivers.add(comp);
                lastRi = curRi;

                // 界面显示正在处理的广播,上面的指定接收者,就是为了这里能显示正在处理的广播名称?
                CharSequence label = ai.loadLabel(mContext.getPackageManager());
                showBootMessage(mContext.getString(R.string.android_preparing_apk, label), false);
            }

            // 发送广播,指定接收者处理完毕,会resultTo回来--》this
            Slog.i(TAG, "Pre-boot of " + intent.getComponent().toShortString()
                    + " for user " + users[curUser]);
            broadcastIntentLocked(null, null, intent, null, this,
                    0, null, null, null, AppOpsManager.OP_NONE,
                    null, true, false, MY_PID, Process.SYSTEM_UID, users[curUser]);
        }


        public void performReceive(Intent intent, int resultCode,
                String data, Bundle extras, boolean ordered,
                boolean sticky, int sendingUser) {

            // 指定接收者广播处理完毕回调resultTo回来,继续处理下一个,如果所有处理完,则post消息执行onFinishCallback
            curUser++;
            if (curUser >= users.length) {
                curUser = 0;
                curRi++;
                if (curRi >= ris.size()) {
                    // All done sending broadcasts!
                    if (onFinishCallback != null) {
                        // The raw IIntentReceiver interface is called
                        // with the AM lock held, so redispatch to
                        // execute our code without the lock.
                        mHandler.post(onFinishCallback);
                    }
                    return;
                }
            }
            go();
        }
    }
备注1:
在Android L版本上:是直接发送广播,通过action:PRE_BOOT_COMPLETED,AMS会去发给各个接收者。处理完毕回调resultTo回来;
在Android M版本上:这里就直接指定接收者,一个个发送出去,处理完毕回调resultTo回来,继续下一个。界面上可以看到在变化:显示正在处理的广播;
这样做的好处界面体验更好,木有看出有什么其他特别的用意。
备注2:
系统都有哪些地方接收PRE_BOOT_COMPLETED,以及什么情况下应该接收该广播?
从目前看到的主要应用在数据库应用升级方面,数据库升级涉及到数据字段变化,数据的增加等会比较耗时,
为了加快应用启动和提供数据,需要在开机过程中做升级操作,避免使用时耗时。
备注3:
这里其实存在一个隐患:从上面的流程看到,系统发送广播给接收者处理,只有等所有接收者处理完毕,才会继续系统的启动流程。
试想:如果某个接收者的操作处理耗时较长,甚至被阻塞 或其他异常导致广播处理无法完成,不能回调回来怎么办?
结果:开机时间需要的更长了,或无法开机,一直就卡在这里无法开机。
很不幸,这种情况被我遇到过,大概是这样的:
某次Hota升级某应用A注册PRE_BOOT_COMPLETED广播,处理该广播时,由于某种情况需要访问应用B的数据库,等待应用B启动,
由于系统没有ready和应用B非persisit进程,系统不让启动B,结果系统就被阻塞在这里,始终无法开机。
这其实是系统不合理的地方,没有相应的超时控制的安全机制,所幸这里只允许系统应用接收该广播,如果允许第三方接收,后果可想而知。
2. 收集已经启动的进程并杀死除过persistent进程
比如接收PRE_BOOT_COMPLETED启动的应用
到此系统准备完毕,可以开始启动应用进程,并置变量:mProcessesReady = true;
疑问:系统还没准备之前不允许启动非persistent进程,这之前的接收PRE_BOOT_COMPLETED广播的应用是如何启动的?
--》见应用启动部分分析。
3. 系统准备好后回调传入的Runnable
启动应用和服务:{
startSystemUi(context);
connectivityF.systemReady();
……
Watchdog.getInstance().start();
mmsServiceF.systemRunning();
}
4. 发送账户启动的广播,涉及多用户
多用户的问题这里不讨论。
注意发送该广播前有如下操作:成对出现
//操作前 clear
long ident = Binder.clearCallingIdentity();
//do相关操作
……
//操作后restore
Binder.restoreCallingIdentity(ident);
通常这俩都是成对出现,具体的作用简单说下:这涉及到权限管理后面会讨论。
Binder.clearCallingIdentity():
通过IPC binder调用来远端进程,当前进程会记录调用者的PID和UID,即通常使用的getCallingPid和getCallingUid,
而会clearCallingIdentity把调用者PID和UID清除,将其设置为当前进程的PID和UID,并将原来的PID和UID作为返回值;
PID和UID是保存在一个long型数中,通过移位计算。
Binder.restoreCallingIdentity(ident):恢复刚才清除的远端调用者的PID和UID。
这样做有什么作用?
这涉及到权限管理,clearCallingIdentity接口注释,举了incoming call例子,看下原注释:
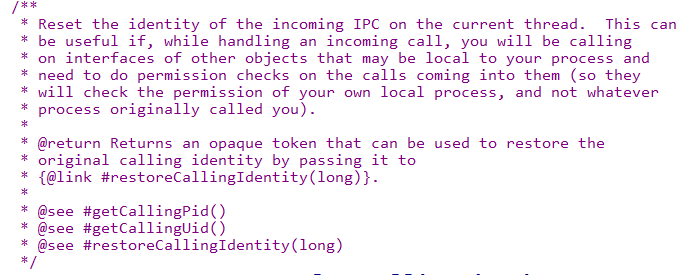
大概的意思可以理解成这样:
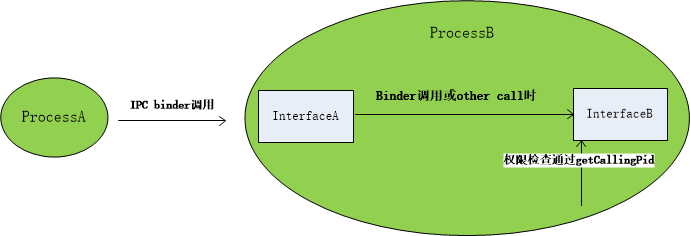
在ProcessB中,InterfaceA调用InterfaceB时,InterfaceB中要做权限检查,通过getCallingPid,
这时拿到的PID是ProcessA的,权限不够肿么办。ProcessB的权限是够可以的:就可以如下面
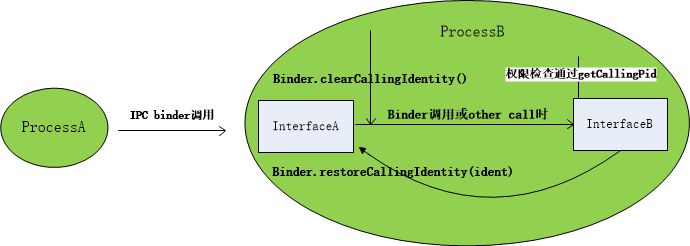
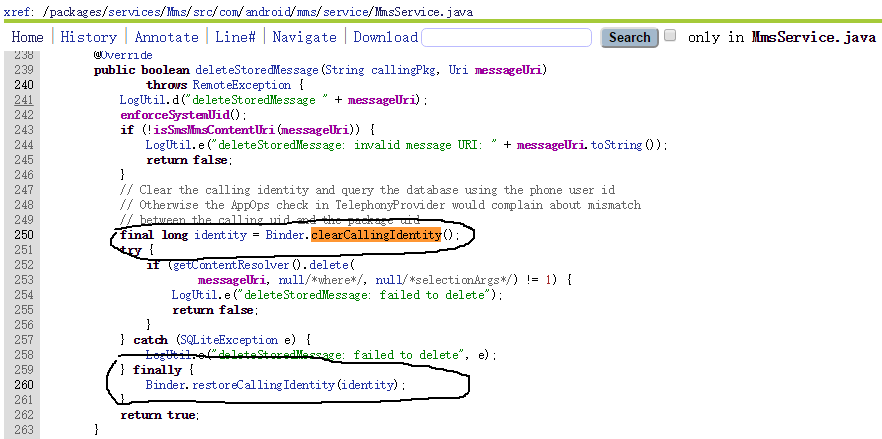
代码里面很多这样的例子,具体原因请自行体会,贴一段源代码看看
5. 启动桌面Home Activity
接上面systemReady最后部分:
    // Start up initial activity.
    mBooting = true;
    startHomeActivityLocked(mCurrentUserId, "systemReady");
    mStackSupervisor.resumeTopActivitiesLocked();
一张图说明AMS启动如上整个过程:

AMS的systemready过程基本如上,整个系统准备OK,下面就将开始启动桌面流程,进入到应用启动过程分析,应用和组件的启动将在下一篇分析。

 浙公网安备 33010602011771号