Kotlin 朱涛-20 协程 Flow 数据流
目录
20 | Flow:为什么说Flow是冷的?
Flow 是在 Kotlin 协程中自成体系的知识点。Flow 极其强大、极其灵活,在它出现之前,业界还有很多质疑 Kotlin 协程的声音,认为 Kotlin 的挂起函数、结构化并发,并不足以形成核心竞争力,在异步、并发任务的领域,RxJava 可以做得更好。
但是,随着 2019 年 Kotlin 推出 Flow 以后,这样的质疑声就渐渐没有了。有了 Flow 以后,Kotlin 的协程已经没有明显的短板了。简单的异步场景,我们可以直接使用挂起函数、launch、async;至于复杂的异步场景,我们就可以使用 Flow。
实际上,在很多技术领域,Flow 已经开始占领 RxJava 原本的领地,在 Android 领域,Flow 甚至还要取代原本 LiveData 的地位。
Flow 就是数据流
Flow 在 Kotlin 协程当中,其实就是 数据流 的意思。因为 Flow 当中 流淌 的,都是数据。
Cash Flow 现金流
Traffic Flow 车流
Flow 和 Channel 不一样,Flow 并不是只有 发送 + 接收 两个行为,它当中流淌的数据是可以在中途改变的。
Flow 的数据发送方,我们称之为 上游 ;数据接收方称之为 下游。跟现实生活中一样,上下游其实也是相对的概念。
另外,在发送方、接收方的中间,是可以有多个 中转站 的。在这些中转站里,我们就可以对数据进行一些处理了。
创建 Flow
flow
fun main() = runBlocking {
    flow {      // 上游,创建了一个数据流
        emit(1) // 挂起函数,往下游发送数据
        emit(2)
        emit(3)
        emit(4)
        emit(5)
    }.filter { it > 2 } // 中转站1
        .map { it * 2 } // 中转站2
        .take(2)        // 中转站3
        .collect { println(it) }  // 下游,终止并接收数据
}
collect{} 也被称为终止操作符或者末端操作符,它的作用就是终止 Flow 数据流,并且接收这些数据。
flowOf
Flow 最大的优势,就是它的操作符跟集合操作符高度一致。
flowOf(1, 2, 3, 4, 5)        // 创建 Flow
    .filter { it > 2 }
    .map { it * 2 }
    .take(2)
    .collect { println(it) } // 遍历 Flow

listOf(1, 2, 3, 4, 5)        // 创建 List
    .filter { it > 2 }
    .map { it * 2 }
    .take(2)
    .forEach { println(it) } // 遍历 List
Flow 和 List 互转
在某些场景下,我们可以把 Flow 当做集合来使用,或者反过来,把集合当做 Flow 来用。
val list: List<Int> = flowOf(1, 2, 3, 4, 5).toList()
val flow: Flow<Int> = listOf(1, 2, 3, 4, 5).asFlow()
中间操作符
中间操作符(Intermediate Operators),除了之前提到的 map、filter、take 这种从集合那边 抄 来的操作符之外,还有一些特殊的操作符需要我们特别注意。这些操作符跟 Kotlin 集合 API 是没关系的,它们是专门为 Flow 设计的。我们一个个来看。
Flow 生命周期监听
操作符 onStart、onCompletion 可以监听 Flow 的生命周期回调。
fun main() = runBlocking {
    flowOf(1, 2, 3, 4, 5)
        .filter { println("filter: $it"); it > 2 }
        .onCompletion { println("onCompletion") } // 在数据流执行完毕后回调
        .map { println("map: $it"); it * 2 }
        .onStart { println("onStart") }           // 在 flow 启动后回调
        .take(2)
        .collect { println("collect: ${it}\n") }
}
onStart
filter: 1
filter: 2
filter: 3
map: 3
collect: 6

filter: 4
map: 4
collect: 8

onCompletion
- onStart、onCompletion 的执行顺序,并不是按照上下游来执行的
- filter、map、take 这类操作符的执行顺序,跟它们的位置是相关的
onCompletion 回调时机
和第 16 讲里的 Job.invokeOnCompletion{} 这个生命周期回调类似,Flow.onCompletion{} 在面对以下三种情况时都会进行回调:
- Flow 正常执行完毕
- Flow 当中出现异常
- Flow 被取消
flowOf(1, 2, 3)
    .onCompletion { println("onCompletion: $it") }
    .collect {
        println("collect: $it")
        // throw IllegalStateException()
        if (it == 2) {
            cancel() // 取消 Flow,导致 flow 中剩下的代码将不会再被执行
            println("------ cancel ------")
        }
    }
collect: 1
collect: 2
------ cancel ------
collect: 3
onCompletion: null
Exception in thread "main" JobCancellationException: BlockingCoroutine was cancelled
Flow 异常处理
Flow 当中的异常,需要根据异常发生的位置,分类进行处理。
更多协程异常处理的话题,会在第 23 讲深入介绍。
catch 操作符
发生在上游、中间操作这两个阶段的异常,可以使用 catch 操作符进行捕获和处理。
flow {
    emit(1)
    emit(2 / 0)
    emit(3)
}.map { println("map: $it"); it * 2 }
    .catch { println("catch: $it") }
    .collect { println("collect: $it") }
map: 1
collect: 2
catch: java.lang.ArithmeticException: / by zero
catch 操作符的作用域
catch 的作用域,仅限于 catch 的上游。
fun main() = runBlocking {
    flowOf(1, 2, 3)
        .catch { println("catch: $it") } // catch 的作用域,仅限于 catch 的上游
        .map { println("map: $it"); it / 0 }
        .collect { println("collect: $it") }
}
map: 1
Exception in thread "main" java.lang.ArithmeticException: / by zero
捕获末端操作符中的异常
末端操作符 collect{} 中的异常,需要使用 try-catch 这种传统的方式进行捕获和处理。
flowOf(1, 2)
    .onCompletion { println("onCompletion: $it") }
    .collect {
        try {
            println("collect: $it")
            throw IllegalStateException()
        } catch (e: Exception) {
            println("Catch $e")
        }
    }
collect: 1
Catch java.lang.IllegalStateException
collect: 2
Catch java.lang.IllegalStateException
onCompletion: null
flowOn 指定上游线程
在异步任务中,我们经常需要频繁切换工作的线程。在 Flow 中,借助 flowOn 操作符,可以灵活实现以上的需求。
案例一
flow { log("emit"); emit(1) }
    .filter { log("filter"); it > 0 }
    .flowOn(Dispatchers.IO) // 指定上游的工作线程
    .collect { log("collect") }
DefaultDispatcher-worker-1 @coroutine#2 emit
DefaultDispatcher-worker-1 @coroutine#2 filter
main @coroutine#1 collect
在上面的代码中,flowOn 的上游是 flow{}、filter{},所以,它们的代码全都运行在线程池 DefaultDispatcher 中。只有 collect{} 中的代码是运行在 main 线程中。
案例二
flow { log("emit"); emit(1) }
    .flowOn(Dispatchers.IO) // 指定上游的工作线程
    .filter { log("filter"); it > 0 }
    .collect { log("collect") }
DefaultDispatcher-worker-1 @coroutine#2 emit
main @coroutine#1 filter
main @coroutine#1 collect
因为 flowOn 的作用域仅限于上游,所以它只会让 flow{} 中的代码运行在 DefaultDispatcher 中,剩下的代码则执行在 main 线程。
指定末端操作符中的线程
这里,我们就会遇到一个类似 catch 的困境:如果想要指定 collect 当中的 Context,该怎么办呢?
使用 withContext
用前面学过的 withContext{} 可以实现此效果。但是,在 Flow 中直接使用 withContext 很容易引发其他问题,因此,这种方式是不被推荐的。
flow { log("emit"); emit(1) }
    .flowOn(Dispatchers.IO)
    .filter { log("filter"); it > 0 }
    .collect {
        withContext(Dispatchers.IO) { log("collect") } // 不推荐
    }
DefaultDispatcher-worker-1 @coroutine#2 emit
main @coroutine#1 filter
DefaultDispatcher-worker-1 @coroutine#1 collect
withContext 扩大范围
如果我们想要改变除了 flowOn 以外所有代码的 Context。比如,我们希望 filter{}、collect{} 都运行在 IO 线程。这时候,我们可以使用 withContext{} 进一步扩大包裹的范围。
和上面一样,这种方式也是不被推荐的。
fun main() = runBlocking {
    val dispatcher = Executors.newSingleThreadExecutor { Thread(it, "bqt") }.asCoroutineDispatcher()
    withContext(dispatcher) { // 不推荐
        flow { log("emit"); emit(1) }
            .flowOn(Dispatchers.IO) // 上游执行在 IO 线程,下游执行在 dispatcher 线程
            .filter { log("filter"); it > 0 }
            .collect { log("collect") }
    }
}
DefaultDispatcher-worker-1 @coroutine#2 emit
bqt @coroutine#1 filter
bqt @coroutine#1 collect
withContext 存在的问题
fun main() = runBlocking {
    flow {
        withContext(Dispatchers.IO) {
            emit(1)
        }
    }.map { it * 2 }
        .collect()
}
Exception in thread "main" java.lang.IllegalStateException: Flow invariant is violated:
    Flow was collected in [CoroutineId(1), "coroutine#1":BlockingCoroutine{Active}@5e0c1b73, BlockingEventLoop@163c8ef8],
    but emission happened in [CoroutineId(1), "coroutine#1":DispatchedCoroutine{Active}@21674c14, Dispatchers.IO].
    Please refer to 'flow' documentation or use 'flowOn' instead
具体的原因,会在第 32 讲介绍 Flow 源码的时候解释。
使用操作符 launchIn
上面这种写法有些丑陋,而且也不推荐。因此,Kotlin 官方为我们提供了另一个操作符 launchIn。
val dispatcher = Executors.newSingleThreadExecutor { Thread(it, "bqt") }.asCoroutineDispatcher()
val scope = CoroutineScope(dispatcher)

fun main() = runBlocking {
    flow { log("emit"); emit(1) }
        .flowOn(Dispatchers.IO)
        .filter { log("filter"); it > 0 }
        .onEach { log("onEach") } //.collect { log("collect") }
        .launchIn(scope)          // 把它上游的代码都分发到指定的线程当中
    delay(10)
}
打印 log 和上面的基本一致
在这段代码中,我们不再使用 collect{},而是借助了 onEach{} 来实现类似 collect{} 的功能。同时我们在最后使用了 launchIn(scope),把它上游的代码都分发到指定的线程当中。
launchIn 的原理
launchIn 的定义极其简单:
public fun <T> Flow<T>.launchIn(scope: CoroutineScope): Job = scope.launch {
    collect() // tail-call
}
由此可见,launchIn 从严格意义来讲,应该算是一个下游的终止操作符,因为它本质上是调用了 collect() 方法。
因此,上面的代码段等价于下面的写法:
fun main() = runBlocking {
    val flow: Flow<Int> = flow { log("emit"); emit(1) }
        .flowOn(Dispatchers.IO)
        .filter { log("filter"); it > 0 }
        .onEach { log("onEach") }  //.collect { log("collect") }
    scope.launch { flow.collect(); log("collect") }
    delay(10)
}
DefaultDispatcher-worker-1 @coroutine#3 emit
bqt @coroutine#2 filter
bqt @coroutine#2 onEach
bqt @coroutine#2 collect
Flow 的终止操作符
终止操作符:Terminal Operators
Terminal:终止、末尾、终点、终端
Flow 中,终止操作符的作用就是,终止整个 Flow 流程。这里的 终止,其实是跟前面的 中间 操作符对应的。
其实从 collect 的定义上也能看出来
- filter、map 等中间操作符的返回值是 Flow,所以后面可以继续添加其他操作符
- 终止操作符
collect的返回值是 Unit,所以当然不能再继续添加其他操作符了
public suspend fun Flow<*>.collect(): Unit = collect(NopCollector)
public inline fun <T> Flow<T>.filter(crossinline predicate: suspend (T) -> Boolean): Flow<T> = {}
Flow 中的的终止操作符除了 collect 之外,还有一些从集合当中 抄 过来的操作符,比如 first()、single()、fold{}、reduce{}。
另外,当我们通过调用 toList() 尝试将 Flow 转换成集合的时候,也意味着 Flow 数据流的终止。
为什么说 Flow 是【冷】的
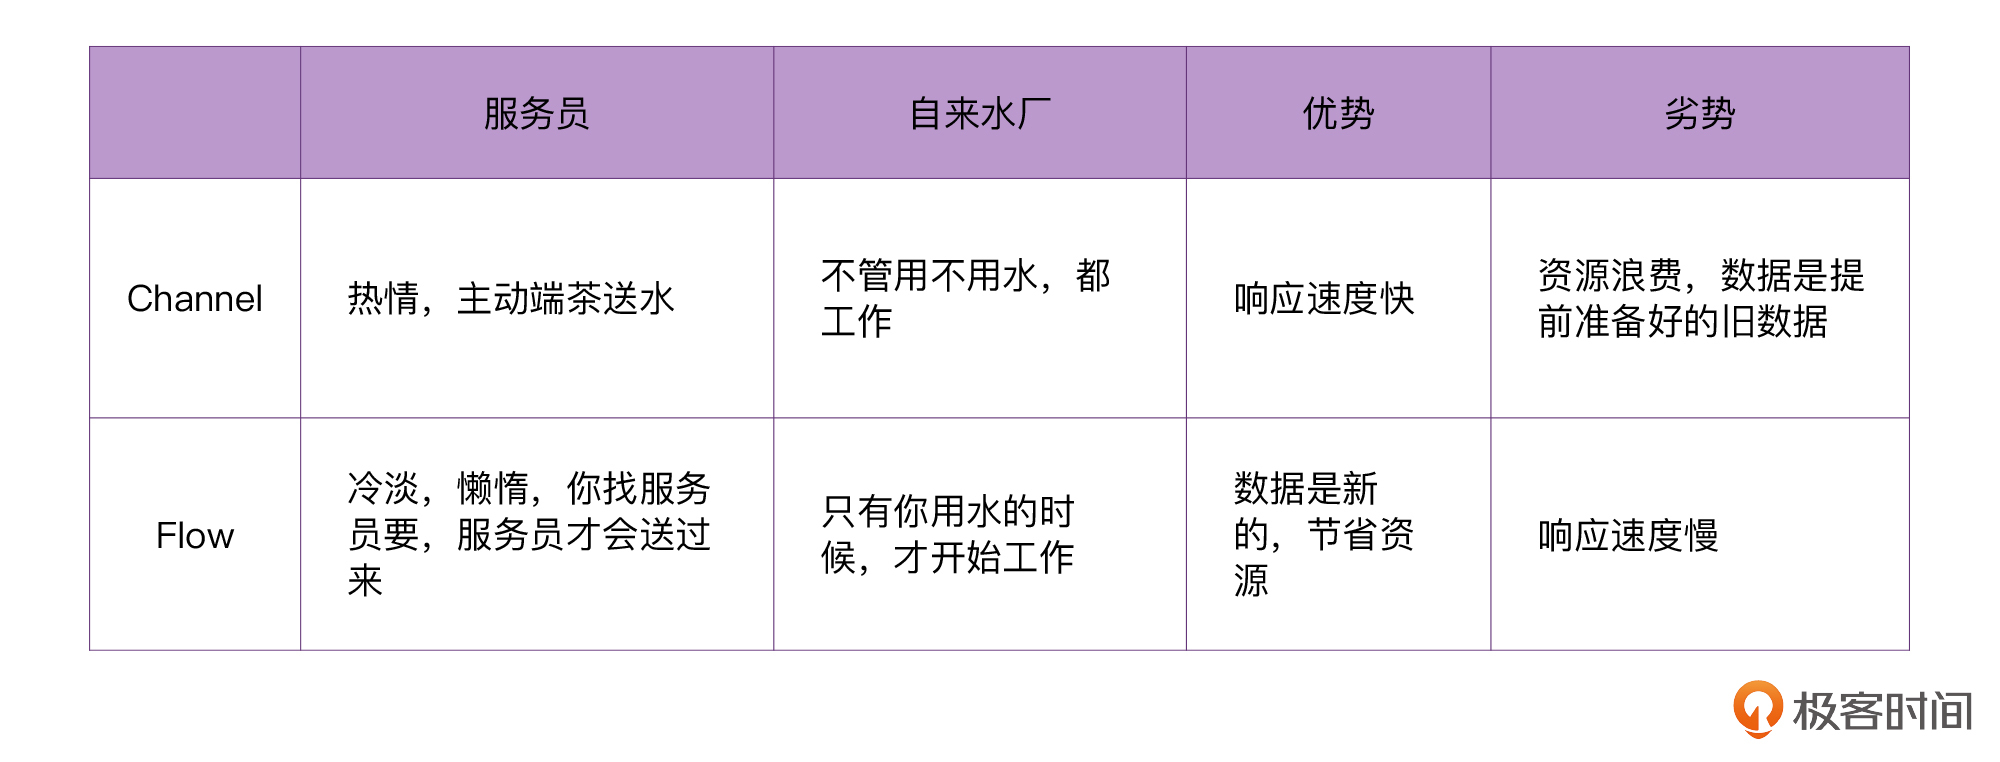
- Channel 之所以被认为是
热的,是因为:不管有没有接收方,发送方都会工作 - Flow 被认为是
冷的,是因为:只有调用终止操作符之后,Flow 才会开始工作
示例代码
fun main() = runBlocking {
    flow {
        (1..3).forEach {
            println("Before flow send $it")
            emit(it)
            println("After flow send $it")
        }
    }

    produce(capacity = 2) {
        (1..3).forEach {
            println("Before chennel send $it")
            send(it)
            println("After chennel send $it")
        }
    }

    println("end")
}
end
Before chennel send 1
After chennel send 1
Before chennel send 2
After chennel send 2
Before chennel send 3
// Flow 中的代码并未执行
Flow 还是【懒】的
Flow 不仅是 冷 的,它还是 懒 的。
fun main() = runBlocking {
    flow {
        println("emit: 1");emit(1)
        println("emit: 2"); emit(2)
        println("emit: 3"); emit(3)
    }.filter { println("filter: $it"); it > 0 }
        .map { println("map: $it"); it * 2 }
        .collect { println("collect: ${it}\n") }
}
emit: 1
filter: 1
map: 1
collect: 2

emit: 2
filter: 2
map: 2
collect: 4

emit: 3
filter: 3
map: 3
collect: 6
通过上面的运行结果,我们可以发现,Flow 一次只会处理一条数据。虽然它也是 Flow 冷 的一种表现,但这个特性准确来说是 懒 。
PS:Flow 默认情况下是
懒惰的,但也可以通过配置让它勤快起来。
Flow 和 Channel 对比
Android 异步任务实战
Flow 非常适合复杂的异步任务场景。借助它的 flowOn、launchIn,我们可以写出非常灵活的代码。比如说,在 Android、Swing 之类的 UI 平台之上,我们可以这样写:
fun main() = runBlocking {
    loadData()
        .onStart { showLoading("onStart") } // 显示加载弹窗
        .map { it * 2 }
        .flowOn(Dispatchers.IO)  // 让耗时任务在 IO 线程池执行
        .catch { throwable ->
            println(throwable)
            hideLoading("catch") // 隐藏加载弹窗
            emit(-1)             // 发生异常以后,指定默认值
        }
        .onEach { updateUI(it) } // 更新界面
        .onCompletion { hideLoading("onCompletion") } // 隐藏加载弹窗
        .launchIn(uiScope)       // 让更新 UI 任务在 ui 线程执行
    delay(5000L)
}

val dispatcher = Executors.newSingleThreadExecutor { Thread(it, "ui") }.asCoroutineDispatcher()
val uiScope = CoroutineScope(dispatcher) // 模拟 Android 的 UI

fun loadData(): Flow<Int> = flow {
    (1..2).forEach {
        log("emit $it");
        emit(it)
        delay(100) // 模拟耗时任务
    }
}

fun updateUI(text: Any) = println("updateUI: $text")
fun showLoading(text: Any) = println("showLoading: $text")
fun hideLoading(text: Any) = println("hideLoading: $text\n")
showLoading: onStart
DefaultDispatcher-worker-1 @coroutine#3 emit 1
updateUI: 2
DefaultDispatcher-worker-1 @coroutine#3 emit 2
updateUI: 4
hideLoading: onCompletion
疑问:为何上面的代码执行完不会正常结束。
小结
- Flow,就是数据流。整个 Flow 的 API 设计,可以大致分为三个部分,上游的源头、中间操作符、下游终止操作符。
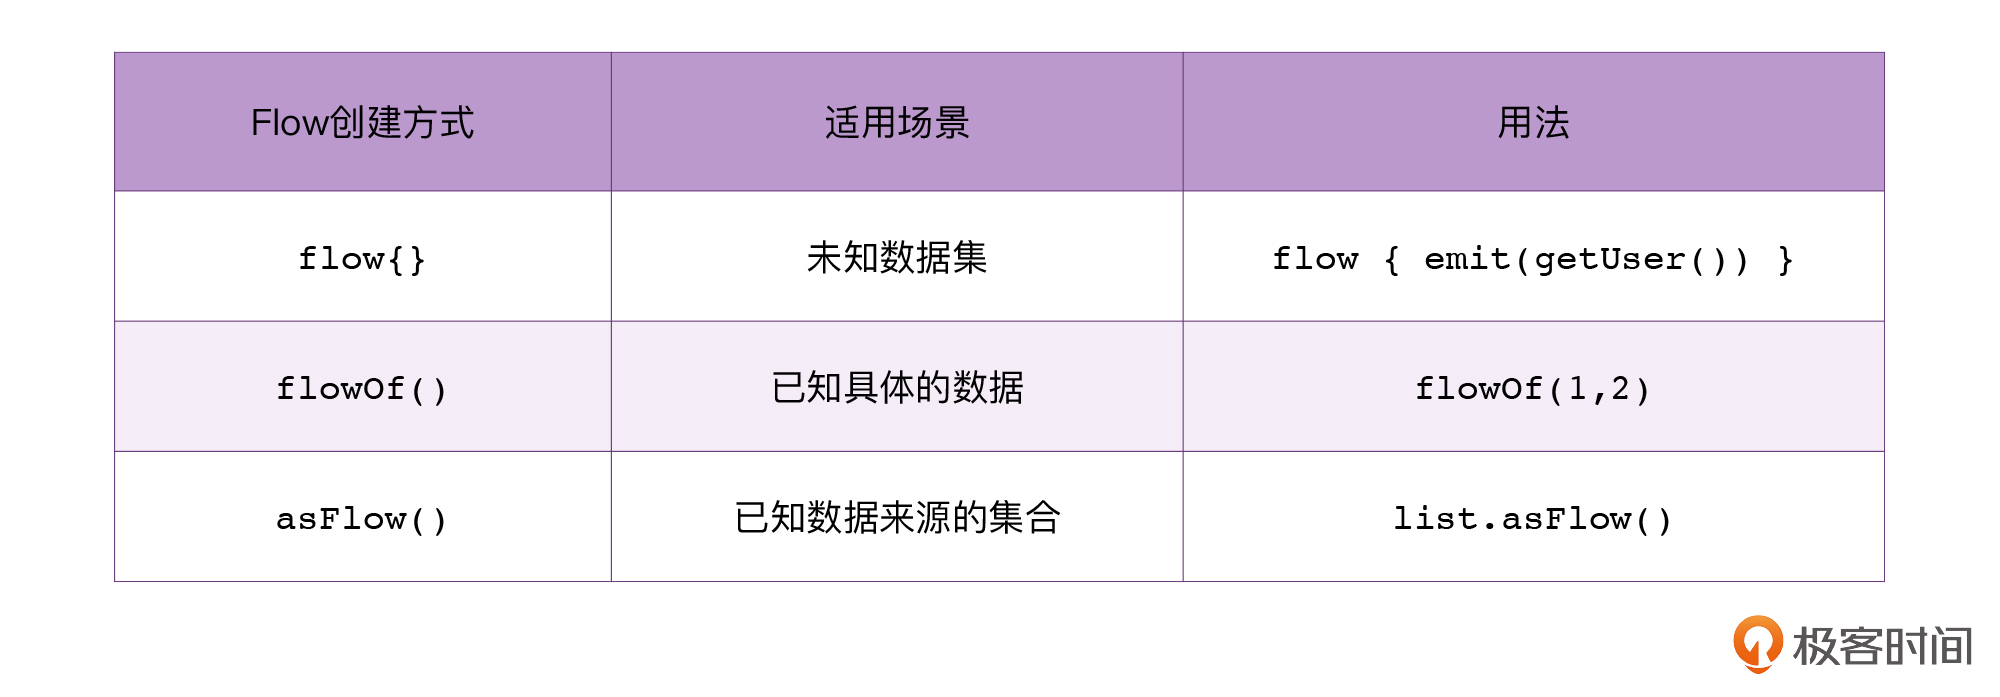
- 上游源头主要负责创建 Flow,并且产生数据。创建 Flow 主要有三种方式:
flow{}、flowOf()、asFlow()。 - 中间操作符分为三大类:
- 从集合 API 抄过来的操作符,比如 map、filter
- 生命周期回调,比如 onStart、onCompletion
- 功能型 API,比如 flowOn、catch
- 下游的终止操作符也分为三大类
- 最基础的终止操作符 collect
- 从集合 API 抄过来的操作符,比如 fold、reduce
- 由 Flow 转换成集合的 API,比如 flow.toList()
Flow 是一个非常大的话题,知识点也非常多,更多 Flow 的高阶用法,等学完协程篇、源码篇之后再讲解。
2017-07-06
本文来自博客园,作者:白乾涛,转载请注明原文链接:https://www.cnblogs.com/baiqiantao/p/7128548.html

 浙公网安备 33010602011771号