Xposed 框架 hook 简介 原理 案例
目录
Xposed
- 官方教程
- Xposed框架中文站
- Xposed插件官方网站
- FAQ,建议开发前仔细阅读一遍
- framework下载地址
- xposed依赖的maven地址 , 在jcenter上的下载地址
- 作者rovo89的GitHub主页,里面有5个项目,包括XposedInstaller、Xposed、XposedBridge、XposedTools、android_art。
由于Android 5.0以上采用ART,而5.0以下默认采用Dalvik,所以是有两个版本的Xposed,一些下载链接:
- Android 4.0.3-4.4官网地址 , Android 5.0以上官网地址(访问非常慢)
- Xposed_installer_3.1.4百度网盘下载地址 , Xposed_installer_3.1.5官网下载地址
Xposed 是什么
Xposed 是一款可以在不修改APK的情况下影响程序运行(修改系统)的框架服务。基于它可以制作出许多功能强大的模块,且在功能不冲突的情况下同时运作。比如:直接把APP的界面改成自己想要的样子(比如修改文字、背景),去掉界面里不喜欢的东西(比如广告、弹窗),自动抢红包,消息防撤回,步数修改、修改定位等等,简直酷得不行,网上有很多插件作者开发出来的优秀插件。
Xposed 理论上能够hook到系统任意一个Java进程,可以说Xposed真的可以为所欲为,任何事情都可以做!
重要提醒:使用Xposed是需要Root权限的!
PS:由于Xposed是从底层hook,所以需要root权限,并且每次更新都要重新启动设备。
背景介绍
Xposed并不是什么新东西了,好几年前就有了,以前看到搞机(基)的人都觉得很牛逼哄哄,刷系统,root下,改下系统UI,用各种各样的插件模块改什么什么,屌得不行。
真正开始学的时候,其实Xposed并没有想象中那么复杂,原理和相关的API都很简单,难的是逆向,怎么去实现你要Hook的功能:反编译,调试输出,堆栈跟踪,抓包等等,在这个过程中你需要去分析很多很多东西,猜测调试,有时候折腾几天可能毫无进展,不过也会收获更多,比如你自己开发APP的时候也会慢慢开始考虑安全相关的东西。
The most important thing is finding good methods to hook
插件用起来是挺爽的,不过呢,因为Xposed拥有最高权限,如果不法分子在插件里植入了恶意代码,比如登录劫持,偷偷采集你的账号密码发送到他们的手里,如果涉及到了金钱,就很恐怖啦,所以在使用Xposed插件的时候,尽量选那些开源的,并进行代码review,看是否存在恶意代码,再进行安装体验。
Xposed 的原理
白话总结
Android基于Linux,第一个启动的进程自然是init进程,该进程会启动所有Android进程的父进程——Zygote(孵化)进程,该进程的启动配置在/init.rc脚本中,而Zygote进程对应的执行文件是/system/bin/app_process,该文件完成类库的加载以及一些函数的调用工作。在Zygote进程创建后,再fork出SystemServer进程和其他进程。而Xposed Framework呢,就是用自己实现的app_process替换掉了系统原本提供的app_process,加载一个额外的jar包,然后入口从原来的com.android.internal.osZygoteInit.main()被替换成了de.robv.android.xposed.XposedBridge.main(),然后创建的Zygote进程就变成Hook的Zygote进程了,而后面Fork出来的进程也是被Hook过的。这个Jar包在/data/data/de.rbov.android.xposed.installer/bin/XposedBridge.jar。
官方教程:How Xposed works
Before beginning with your modification, you should get a rough idea how Xposed works (you might skip this section though if you feel too bored).
在开始修改之前,你应该大致了解Xposed如何工作(如果你觉得太无聊,你可以跳过这一部分)
There is a process that is called "Zygote". This is the heart of the Android runtime. Every application is started as a copy ("fork") of it. This process is started by an /init.rc script when the phone is booted. The process start is done with /system/bin/app_process, which loads the needed classes and invokes the initialization methods.
有一个叫做“Zygote”的进程。这是Android运行时的核心。每个应用程序都作为它的副本(“fork”)启动。启动手机时,此进程由
/init.rc脚本启动。进程启动是使用/system/bin/app_process完成的,它会加载所需的类并调用初始化方法。
This is where Xposed comes into play. When you install the framework, an extended app_process executable is copied to /system/bin. This extended startup process adds an additional jar to the classpath and calls methods from there at certain places. For instance, just after the VM has been created, even before the main method of Zygote has been called. And inside that method, we are part of Zygote and can act in its context.
这就是Xposed发挥作用的地方。安装框架时,会将扩展的
app_process可执行文件复制到/system/bin。这个扩展的启动过程在类路径中添加了一个额外的jar,并在某些地方从那里调用方法。例如,就在创建VM之后,甚至在调用Zygote的main方法之前。在该方法中,我们是Zygote的一部分,可以在其context下行动。
The jar is located at /data/data/de.robv.android.xposed.installer/bin/XposedBridge.jar and its source code can be found here. Looking at the class XposedBridge, you can see the main method. This is what I wrote about above, this gets called in the very beginning of the process. Some initializations are done there and also the modules are loaded (I will come back to module loading later).
jar位于,其源代码可在此处找到。查看类
XposedBridge,您可以看到main方法。这就是我上面写的内容,这个在进程一开始就被调用了。在那里进行了一些初始化,并且还加载了模块(稍后我将回到模块加载)。
Method hooking/replacing
What really creates the power of Xposed is the possibility to "hook" method calls. When you do a modification by decompiling an APK, you can insert/change commands directly wherever you want. However, you will need to recompile/sign the APK afterwards and you can only distribute the whole package.
我们创造Xposed真正具有的力量是"hook"方法调用具有无限可能性。通过反编译APK进行修改时,可以直接在任意位置插入/更改命令。但是,您需要在之后重新编译/签署APK,并且您只能分发整个包。
With the hooks you can place with Xposed, you can't modify the code inside methods (it would be impossible to define clearly what kind of changes you want to do in which place). Instead, you can inject your own code before and after methods, which are the smallest unit in Java that can be addressed clearly.
使用可以放置在Xposed的hooks,你并不能修改
方法内的代码(因为你无法清楚地定义你想在哪个地方做什么样的改变)。相反,您可以在方法之前和方法之后注入自己的代码,这是Java中可以清楚解决的最小单元。
XposedBridge has a private, native method hookMethodNative. This method is implemented in the extended app_process as well. It will change the method type to "native" and link the method implementation to its own native, generic method. That means that every time the hooked method is called, the generic method will be called instead without the caller knowing about it.
XposedBridge有一个私有的本地方法
hookMethodNative。此方法也在扩展的app_process中实现。它会将方法类型更改为“native”,并将方法实现link到其自己的native、generic(泛型)方法。这意味着每次调用hooked方法时,都会调用generic方法,而不会让调用者知道它。
In this method, the method handleHookedMethod in XposedBridge is called, passing over the arguments to the method call, the this reference etc. And this method then takes care of invoking callbacks that have been registered for this method call. Those can change the arguments for the call, change instance/static variables, invoke other methods, do something with the result... or skip anything of that. It is very flexible.
在此方法中,XposedBridge中的
handleHookedMethod方法会被调用,将参数传递给方法调用,this引用等。然后,此方法负责调用已为此方法调用注册的回调。这些可以更改调用的参数,更改实例/静态变量,调用其他方法,对结果执行某些操作...或者跳过任何内容。它非常灵活。
Ok, enough theory.
好的,上面的理论已经足够了。
官方简介
Xposed is a framework for modules that can change the behavior of the system and apps without touching any APKs.
Xposed是一个可以在不触及任何APK的情况下改变系统和应用程序的行为的模块框架。
That's great because it means that modules can work for different versions and even ROMs without any changes (as long as the original code was not changed too much). It's also easy to undo. As all changes are done in the memory, you just need to deactivate the module and reboot to get your original system back.
这很好,因为它意味着模块可以在不做任何更改的情况下为不同的版本甚至ROM工作(只要原始代码没有太多改变)。 撤消也很容易。 由于所有更改都在内存中完成,您只需要停用模块并重新启动即可恢复原始系统。
There are many other advantages, but here is just one more: Multiple modules can do changes to the same part of the system or app. With modified APKs, you to decide for one. No way to combine them, unless the author builds multiple APKs with different combinations.
还有许多其他优点,但这里只有一个:多个模块可以对系统或应用程序的同一部分进行更改。 使用经过修改的APK,您可以选择一个。 除非作者使用不同的组合构建多个APK,否则无法组合它们。
Note that this only works with root access on Android 4.0.3 up to Android 4.4.
请注意,这仅适用于Android 4.0.3到Android 4.4 的具有root访问权限的设备。
最新版本支持到 8.1(27)
目前最新版本来到3.1.5,支持Android7.0、7.1、Android8.x框架安装。
新版本的主要的功能更新是它带来了适配于当前设备的Xposed框架直接下载安装的选项,当然也包括卸载选项,这样就不用自己再去针对CPU和系统版本手动筛选需要刷入的框架版本了,减少了出错的几率,方便新手用户。
新版本的xposed框架主程序增加一些检查步骤,能够在出错的时候给出更多的提示,所以强烈推荐更新,并且作者也鼓励大家更新到新版本,各方面都会比旧版本要好一些。
第一个 xposed 项目
参考了 官方教程 和 WrBug的简书 和 慢啄网的文章 和 coder-pig的文章
简单来说就是,需要以下几个基本步骤:
- 1、安装framework,重启
- 2、安装XposedInstaller,重启
- 3、添加依赖,添加三个
meta-data - 4、编写Hook逻辑,配置
完整类名 - 5、安装APP,重启
模拟器系统环境配置
下面是模拟器下的配置,和实体机的重要区别为
- 模拟器为 x86 架构,实体机一般为 ARM 结构,其所需安装的 Xposed framework 是不一样的
- 模拟器一般具有 root 权限,实体机一般没有 root 权限,且很难使用工具对手机 root,这是一个很棘手的问题
- 在模拟器上你可以肆无忌惮的随意折腾,但是在实体机上就要顾忌很多,因为使用 Xposed 有可能让你的手机变砖
- 模拟器上安装第三方插件不用担心隐式泄露、资金安全,但是在实体机上你可就要悠着点了
1、根据Android设备系统版本到 framework官网 下载对应的框架,选择.zip结尾的文件,例如 sdk22 系统 x86 环境最新版本下载地址为 xposed-v89-sdk22-x86.zip,下载完成后运行模拟器,将 zip 包拖到模拟器界面即可刷入,完成后重启模拟器。
2、到 installer官网 下载安装XposedInstaller应用(可能比较慢),例如最新的 XposedInstaller_3.1.5.apk,也可百度搜索后下载安装。安装完毕后打开此app,会提示你没有激活,再次重启后进入刚刚安装的app,会提示已激活,即安装成功。
我们可以通过Xposed installer右上角菜单中的"软重启"来重启设备,当然此APP还提供了一切常用的其他功能。
实体机系统环境配置
重要提示:刷机前为了以防万一,最好先备份数据,以免刷入后手机无法启动等问题。
基本条件:手机已经root并且已经刷入第三方recovery
步骤和上面基本一样,首先下载并安装好XposedInstaller
然后下载和手机cpu对应的Framework,并放在手机存储卡上
然后重启到recovery模式,刷入Framework
再重启即可
由于Xposed项目每次安装都要重新启动,在真机上是非常耗时间的,建议选择
Genymotion模拟器。
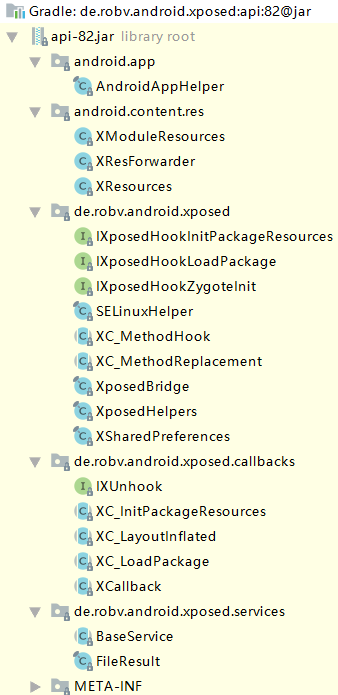
引用 API
在模块中添加依赖:
compileOnly 'de.robv.android.xposed:api:82' //xposed依赖,注意这个版本号和framework版本号并不是一致的
compileOnly 'de.robv.android.xposed:api:82:sources' //非必须
Every Xposed modules needs to reference the API.
The Xposed Framework API is published on Bintray/jCenter,maven 地址在这里
It is very important that you use compileOnly instead of compile! The latter would include the API classes in your APK, which can cause issues especially on Android 4.x. Using compileOnly just makes the API classes usable from your module, but there will only be references to them in the APK. The actual implementation will be provided when the user installs the Xposed Framework.
使用
compileOnly而不是compile是非常重要的! 后者将在您的APK中包含API类,这可能会导致问题,特别是在Android 4.x上。 使用compileOnly只是使API类可以从您的模块中使用,但在APK中只会引用它们。当用户安装 Xposed Framework 时,将提供实际的实现。
Please make sure to disable Instant Run (File -> Settings -> Build, Execution, Deployment -> Instant Run), otherwise your classes aren't included directly in the APK, but loaded via a stub application which Xposed can't handle.
请确保禁用Instant Run,否则您的类不会直接包含在APK中,而是通过Xposed无法处理的stub应用程序加载。
API versions
Generally, the API version equals the Xposed version that it was built on. However, only some framework changes actually result in API changes, as you can see in the change log. I only publish a new API version when there were API changes, and I try to keep them compatible with existing modules as good as possible. So when you build a module with API version 82, it will most likely also work with Xposed version 90.
通常。但是,只有个别一些 framework 更改实际上会导致API更改,您可以在更改日志中看到。我只在API更改时发布了新的API版本,并尝试尽可能地使它们与现有模块兼容。因此,当您使用API版本82构建模块时,它很可能也适用于Xposed版本90。
I always recommend that end-users use the latest Xposed version, so there's nothing wrong with using the highest API version that's available. You should usually set the xposedminversion in your AndroidManifest.xml to the API version that you use. If you depend on a framework change that didn't cause an API change (e.g. because a certain bug has been fixed), feel free to set you xposedminversion to the least Xposed version that your module requires.
我总是建议终端用户使用最新的Xposed版本,因此使用可用的最高API版本没有任何问题。您通常应该将AndroidManifest.xml中的xposedminversion设置为您使用的API版本。如果您依赖于不会导致API更改的framework更改(例如,因为已修复某个错误),请随意将xposedminversion设置为模块所需的最少Xposed版本。
If you want to support ROMs before Lollipop, you can only use API version 53, as the latest Xposed version for Android 4.x was 54. Note that the sources jar provided for this version doesn't match the actual implementation, it only makes the documentation available.
如果你想在Lollipop之前支持ROM,你只能使用API版本53,因为Android 4.x的最新Xposed版本是54.请注意,为此版本提供的源jar与实际实现不匹配,它只会使可用的文件。
配置 meta-data
在AndroidManifest.xml中添加如下配置:
<meta-data
    android:name="xposedmodule"
    android:value="true"/>
<meta-data
    android:name="xposeddescription"
    android:value="这是对你使用xposed能完成功能的简要描述"/>
<meta-data
    android:name="xposedminversion"
    android:value="89"/>
xposedmodule:是否是一个xpose模块(是否启用)
xposeddescription:a very short description of your module
xposedminversion:the API version from the previous step,注意这里的版本号要和安装的framework版本号一致
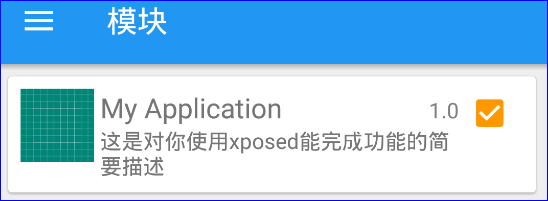
配置完成后,安装到模拟器,状态栏弹出如下提示:

我们点击软重启即可。
需求分析
例如我们有这么一个简单的Activity
public class XposedActivity extends Activity {
    TextView textView;

    @Override
    protected void onCreate(Bundle savedInstanceState) {
        super.onCreate(savedInstanceState);
        textView = new TextView(this);
        setContentView(textView);
    }
}
下面通过 xposed 给 textView 设置文本 Hello Xposed。
思路:Xposed hook onCreate方法,在该方法执行完后获取TextView的实例,通过setText方法设置文本。
A module can have a few entry points. Which one(s) you choose depends on the what you want to modify. You can have Xposed call a function in your module when the Android system boots, when a new app is about to be loaded, when the resources for an app are initialised and so on.
一个模块可以有几个入口点。 您选择哪一个取决于您要修改的内容。 当Android系统启动,即将加载新应用程序,应用程序的资源等初始化时,您可以让Xposed调用模块中的方法。
Keep in mind that you can "only" hook methods. So you have to find a place where you can insert some code to do the magic either before, after or replacing a method. You should hook methods that are as specific as possible, not ones that are called thousands of times to avoid performance issues and unintended side-effects.
请记住,您“仅”可以hook方法。因此,您必须找到一个位置,以便您可以在方法之前、之后或替换方法时在其中插入一些代码执行magic。您应该hook尽可能具体的方法,而不是那些被调用数千次的方法,以避免性能问题和意外的副作用。
编写 Xposed 代码
Using reflection to find and hook a method
新建一个类XposedInit实现IXposedHookLoadPackage:
public class XposedInit implements IXposedHookLoadPackage {

    private static String HOOK_PACKAGE_NAME = "com.my.bqt";
    private static String HOOK_CLASS_NAME = "com.my.bqt.xposed.XposedActivity";

    @Override
    public void handleLoadPackage(final XC_LoadPackage.LoadPackageParam lpparam) {
        Log.i("bqt", "【handleLoadPackage】" + lpparam.packageName);//任何一个app启动时都会调用
        if (lpparam.packageName.equals(HOOK_PACKAGE_NAME)) { //匹配指定的包名
            //参数:String className, ClassLoader classLoader, String methodName, Object... parameterTypesAndCallback
            XposedHelpers.findAndHookMethod(lpparam.packageName, lpparam.classLoader, "onCreate", Bundle.class, new XC_MethodHook() {
                @Override
                protected void afterHookedMethod(MethodHookParam param) throws Throwable {
                    Log.i("bqt", "【afterHookedMethod】" + param.method.getName()); //当Hook成功后回调
                    Class c = lpparam.classLoader.loadClass(HOOK_CLASS_NAME);//不能通过Class.forName()来获取Class,在跨应用时会失效
                    Field field = c.getDeclaredField("textView");
                    field.setAccessible(true);
                    TextView textView = (TextView) field.get(param.thisObject);//param.thisObject为执行该方法的对象,在这里指Activity
                    textView.setText("Hello Xposed");
                    //可以调用param.setResult()设置方法的返回值!
                }
            });
        }
    }
}
官方文档相关介绍
XposedHelpers.findAndHookMethod is a helper function. This method looks up the class_A using the ClassLoader_B for the package_C. Then it looks for the method_D in it. If there were any parameters_E to this method, you would have to list the types (classes) of these parameters afterwards. As the last argument, you need to provide an implementation of the XC_MethodHook_F class. For smaller modifications, you can use a anonymous class. If you have much code, it's better to create a normal class and only create the instance here. The helper will then do everything necessary to hook the method as described above.
XposedHelpers.findAndHookMethod是一个helper 函数。 这个方法使用classLoader_B为package_C查找class_A。 然后它在其中查找method_D。 如果此方法有任何parameters_E,则必须在之后列出这些参数的类型(classes)。 作为最后一个参数,您需要提供XC_MethodHook_F类的实现。 对于较小的修改,您可以使用匿名类。 如果你有很多代码,最好创建一个普通的类,只在这里创建实例。 然后,帮助程序将执行hook方法所需的所有操作,如上所述。
There are two methods in XC_MethodHook that you can override. You can override both or even none, but the latter makes absolutely no sense These methods are beforeHookedMethod and afterHookedMethod. It's not too hard to guess that the are executed before/after the original method.
XC_MethodHook中有两种方法可以覆盖。 你可以覆盖两者,甚至没有,但如果两个方法都不重写那没任何意义。 这些方法是beforeHookedMethod和afterHookedMethod。 猜测在原始方法之前/之后执行并不是很难。
You can use the "before" method to evaluate/manipulate the parameters of the method call (via param.args) and even prevent the call to the original method (sending your own result). The "after" method can be used to do something based on the result of the original method. You can also manipulate the result at this point. And of course, you can add your own code which should be executed exactly before/after the method call.
您可以使用“before”方法评估/操作方法调用的参数(通过
param.args),甚至阻止调用原始方法(发送您自己的结果)。 “after”方法可用于根据原始方法的结果执行某些操作。 您也可以在此处操纵结果。 当然,您可以添加自己的代码,这些代码应该在方法调用之前/之后执行。
If you want to replace a method completely, have a look at the subclass XC_MethodReplacementinstead, where you just need to override replaceHookedMethod.
如果你想完全替换方法,使请用子类
XC_MethodReplacement代替,你只需要覆盖replaceHookedMethod。
XposedBridge keeps a list of registered callbacks for each hooked method. Those with highest priority (as defined in hookMethod) are called first. The original method has always the lowest priority. So if you have hooked a method with callbacks A (prio high) and B (prio default), then whenever the hooked method is called, the control flow will be this: A.before -> B.before -> original method -> B.after -> A.after. So A could influence the arguments B gets to see, which could further change them before passing them on. The result of the original method can be processed by B first, but A has the final word what the original caller gets.
XposedBridge为每个挂钩方法保留一个已注册的回调列表。 优先级最高的那些(在hookMethod中定义)首先被调用。 原始方法始终具有最低优先级。 因此,如果您使用回调A(高优先级)和B(默认优先级)hook了一个方法,那么每当调用hooked方法时,控制流将是:
A.before -> B.before -> original method -> B.after -> A.after。 所以A可以影响B看到的参数,这可以在传递它们之前进一步改变它们。原始方法的结果由B首先处理,但A具有原始调用者所能获得结果的最终话语权。
为什么不能用 Class.forName 方法
在上面的案例中,我们没有用Class.forName()来获取class,是什么原因呢?我们先来看看Class.forName()的源码:
public static Class<?> forName(String className) throws ClassNotFoundException {
    return forName(className, true, VMStack.getCallingClassLoader()); //注意ClassLoader的获取方式
}
public static Class<?> forName(String name, boolean initialize, ClassLoader loader) throws ClassNotFoundException {
    if (loader == null) {
        loader = BootClassLoader.getInstance();
    }
    Class<?> result;
    try {
        result = classForName(name, initialize, loader);
    } catch (ClassNotFoundException e) {
        Throwable cause = e.getCause();
        if (cause instanceof LinkageError) {
            throw (LinkageError) cause;
        }
        throw e;
    }
    return result;
}
static native Class<?> classForName(String className, boolean shouldInitialize, ClassLoader classLoader) throws ClassNotFoundException;
在一个参数的方法中,ClassLoader是通过VMStack.getCallingClassLoader()获取的。VMStack是一个虚拟机栈,在Android系统中,每个应用都有一个独立的虚拟机,所以VMStack.getCallingClassLoader()是获取当前应用的ClassLoader,即xposed项目的ClassLoader,所以,如果使用Class.forName("xxx.xxx.xxxActivity")获取不同应用的类会提示找不到,这就是需要通过lpparam.classLoader.loadClass()获取的原因。
配置完整类名
Provide a hint for XposedBridge which classes contain such entry points.
新建assets文件夹,文件夹下新建xposed_init文件(文件名固定),在文件中填写 XposedInit 的 fully qualified class name:
com.my.bqt.xposed.XposedInit
XposedBridge会从assets目录中的xposed_init文件中获取入口点
然后安装到模拟器上,然后重启模拟器,重启后打开app,这时textView将显示Hello Xposed
Save your files. Then run your project as Android application. As this is the first time you install it, you need to enable it before you can use it. Open the Xposed Installer app and make sure you have installed the framework. Then go to the "Modules" tab. You should find your app in there. Check the box to enable it. Then reboot.
保存文件。 然后将您的项目作为Android应用程序运行 由于这是您第一次安装它,因此您需要启用它才能使用它。 打开Xposed Installer应用程序并确保已安装框架。 然后转到“模块”选项卡。 你应该在那里找到你的应用程序。 选中此框以启用它。 然后重启。
一个基本的、也是Xposed最主要的功能已经演示完成了。
Xposed Framework API
类结构:
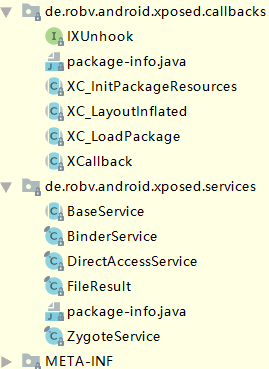
IXposedMod
//Marker interface for Xposed modules. Cannot be implemented directly
interface IXposedMod {}
IXposedMod 接口有四个子接口,我们可以使用的有三个,常用的也就两个,具体如下:
- IXposedHookLoadPackage:Get notified when an app ("Android package") is loaded.
- IXposedHookInitPackageResources:Get notified when the resources for an app are initialized.
- IXposedHookZygoteInit:Hook the initialization of Zygote process(es), from which all the apps are forked.
- IXposedHookCmdInit :【不可用】Hook the initialization of Java-based command-line tools (like pm).
IXposedHookZygoteInit:在Zygote启动时调用,用于系统服务的Hook回调方法initZygote()
IXposedHookLoadPackage 和 XC_LoadPackage.LoadPackageParam
- IXposedHookLoadPackage是在加载包时开始hook。
handleLoadPackage方法会在执行Application.onCreate()方法前调用,并且携带一个XC_LoadPackage.LoadPackageParam类型的参数返回过来。- LoadPackageParam中包含了hook到的应用的一些信息,包括应用包名、应用加载后的进程名、应用的classloader以及一个
android.content.pm.ApplicationInfo对象。
IXposedHookLoadPackage的定义
//Get notified when an app ("Android package") is loaded.
//This is especially useful to hook some app-specific methods.
//This interface should be implemented by the module's main class. Xposed will take care of registering it as a callback automatically.
public interface IXposedHookLoadPackage extends IXposedMod {
    //This method is called when an app is loaded. It's called very early, even before Application#onCreate is called.
    //Modules can set up their app-specific hooks here.
    //@param lpparam Information about the app.
    //@throws Throwable Everything the callback throws is caught and logged.
    void handleLoadPackage(LoadPackageParam lpparam) throws Throwable;
}
XC_LoadPackage.LoadPackageParam的定义
//This class is only used for internal purposes, except for the LoadPackageParam subclass.
public abstract class XC_LoadPackage extends XCallback implements IXposedHookLoadPackage {

    /Wraps information about the app being loaded.
    public static final class LoadPackageParam extends XCallback.Param {
        public String packageName; //The name of the package being loaded
        public String processName; // The process in which the package is executed
        public ClassLoader classLoader; //The ClassLoader used for this package
        public ApplicationInfo appInfo; //More information about the application being loaded
        public boolean isFirstApplication; //Set to true if this is the first (and main) application for this process
    }
}
XC_MethodHook.MethodHookParam
//Callback class for method hooks.
//Usually, anonymous subclasses of this class are created which override beforeHookedMethod and/or afterHookedMethod.
public abstract class XC_MethodHook extends XCallback {
    //Creates a new callback with default priority.
    public XC_MethodHook() {
        super();
    }

    //Creates a new callback with a specific priority.
    public XC_MethodHook(int priority) {
        super(priority);
    }

    //Called before the invocation of the method.
    //You can use MethodHookParam#setResult and MethodHookParam#setThrowable to prevent the original method from being called.
    //Note that implementations shouldn't call super(param), it's not necessary.
    //@param param Information about the method call.
    //@throws Throwable Everything the callback throws is caught and logged.
    protected void beforeHookedMethod(MethodHookParam param) throws Throwable {}

    //Called after the invocation of the method.
    protected void afterHookedMethod(MethodHookParam param) throws Throwable {}

    //Wraps information about the method call and allows to influence it.
    public static final class MethodHookParam extends XCallback.Param {
        public Member method; //The hooked method/constructor
        public Object thisObject; //The 【this】 reference for an instance method, or null for static methods
        public Object[] args; //Arguments to the method call
        private Object result = null; //the result of the method call。 通过 get/set 方法访问
        private Throwable throwable = null; //the exception thrown of the method call, 通过 get/set/has 方法访问
        boolean returnEarly = false;

        //Returns the result of the method call, or throws the Throwable caused by it.
        public Object getResultOrThrowable() throws Throwable {
            if (throwable != null) throw throwable;
            return result;
        }
    }

    //An object with which the method/constructor can be unhooked.
    public class Unhook implements IXUnhook<XC_MethodHook> {
        private final Member hookMethod; // the method/constructor that has been hooked

        @Override
        public XC_MethodHook getCallback() {
            return XC_MethodHook.this;
        }

        @Override
        public void unhook() {
            XposedBridge.unhookMethod(hookMethod, XC_MethodHook.this);
        }
    }
}
MethodHookParam中包含与调用方法有关的信息,比较关注的是这个thisObject,代表调用该方法的对象实例,如果是静态方法的话,返回一个Null,比如调用onCreate()方法的是MainActivity,获得的自然是MainActivity的实例。
IXposedHookInitPackageResources 和 XC_InitPackageResources.InitPackageResourcesParam
这个是在资源布局初始化时进行hook,需要实现handleInitPackageResources() 方法,在初始化时调用,resparam有两个字段,一个是应用包名,另一个是资源相关的android.content.res.XResources,XResources继承自Resources,里面包含了很多资源的信息。
IXposedHookInitPackageResources的定义
//Get notified when the resources for an app are initialized.
//In handleInitPackageResources(), resource replacements can be created.
//This interface should be implemented by the module's main class. Xposed will take care of registering it as a callback automatically.
public interface IXposedHookInitPackageResources extends IXposedMod {
    //This method is called when resources for an app are being initialized.
    //Modules can call special methods of the XResources class in order to replace resources.
    //@param resparam Information about the resources.
    //@throws Throwable Everything the callback throws is caught and logged.
    void handleInitPackageResources(InitPackageResourcesParam resparam) throws Throwable;
}
XC_InitPackageResources.InitPackageResourcesParam的定义
//This class is only used for internal purposes, except for the InitPackageResourcesParam subclass.
public abstract class XC_InitPackageResources extends XCallback implements IXposedHookInitPackageResources {
    //Wraps information about the resources being initialized.
    public static final class InitPackageResourcesParam extends XCallback.Param {
        public String packageName; //The name of the package for which resources are being loaded
        public XResources res; //Reference to the resources that can be used for calls to XResources#setReplacement(String, String, String, Object)
    }
}
有了这个XResource对象,就可以拿到布局资源树了,你可以拿到遍历,拿到某个特定控件,然后做一些骚操作。
XC_LayoutInflated.LayoutInflatedParam
//Callback for hooking layouts. Such callbacks can be passed to {@link XResources#hookLayout} and its variants.
public abstract class XC_LayoutInflated extends XCallback {
    //Creates a new callback with default priority.
    public XC_LayoutInflated() {
        super();
    }

    //Creates a new callback with a specific priority. See XCallback#priority.
    public XC_LayoutInflated(int priority) {
        super(priority);
    }

    //Wraps information about the inflated layout.
    public static final class LayoutInflatedParam extends XCallback.Param {
        public View view; //The view that has been created from the layout.
        public ResourceNames resNames; //Container with the ID and name of the underlying resource.
        public String variant; //Directory from which the layout was actually loaded (e.g. "layout-sw600dp").
        public XResources res; //Resources containing the layout.
    }

    //This method is called when the hooked layout has been inflated.
    //@param liparam Information about the layout and the inflated view.
    public abstract void handleLayoutInflated(LayoutInflatedParam liparam) throws Throwable;

    //An object with which the callback can be removed.
    public class Unhook implements IXUnhook<XC_LayoutInflated> {
        private final String resDir;
        private final int id; //the resource ID of the hooked layout

        @Override
        public XC_LayoutInflated getCallback() {
            return XC_LayoutInflated.this;
        }

        @Override
        public void unhook() {
            XResources.unhookLayout(resDir, id, XC_LayoutInflated.this);
        }
    }
}
XposedBridge 和 XposedHelpers
There are many helper methods in Xposed that can make developing a module much easier.
XposedBridge
This class contains most of Xposed's central logic, such as initialization and callbacks used by the native side. It also includes methods to add new hooks.
log方法:
The log method is an easy way of logging debug output to the standard logcat and a file called /data/xposed/debug.log. It can take the log message or a Throwable. In the latter case, it will print the stack trace.
XposedBridge.log(“日志内容”):输入日志和写入到/data/xposed/debug.log,Xposed Installer的日志那里可以看到!
hookAllMethods、hookAllConstructors方法:
You can use these methods if you want to hook all methods with a specific name or all constructors in a class. This is useful if there are different variants, but you want to execute some code before/after any of them has been called. Keep in mind that other ROMs might have additional variants that will also be hooked by this. Especially, be careful about the args you get in the callback.
如果要hook具有特定名称的所有方法或类中的所有构造函数,则可以使用这两种方法。 如果存在不同的变量,但是您希望在调用任何代码之前/之后执行某些代码,这将非常有用。 请记住,其他ROM可能还有其他变量,也会被hook。 特别是要小心你在回调中得到的args
XposedHelpers
Helpers that simplify hooking and calling methods/constructors, getting and settings fields, ...
XposeHelpers提供了一些辅助方法
- callMethod、callStaticMethod、newInstance
- findMethod、findConstructor、findField:获取类实例
- findMethodExact、findConstructorExact:通过反射查找类的成员方法
- findAndHookXXX:查找并Hook
- getXXXField、setXXXField、getStaticXXXField、setStaticXXXField:通过反射设置或获取对象数据成员、静态变量的值
- getAdditionalXXXField、setAdditionalXXXField
- assetAsByteArray
- getMD5Sum
- getProcessPid
第二个 Xposed 案例
要hook的代码
我们再创建一个Activity测试在资源布局初始化时进行hook的效果:
public class XposedActivity2 extends Activity {

    @Override
    protected void onCreate(Bundle savedInstanceState) {
        super.onCreate(savedInstanceState);
        Log.i("bqt", "【setContentView前】");
        setContentView(R.layout.activity_main);
        Log.i("bqt", "【setContentView后】");

        Log.i("bqt", "【inflate前】");
        getLayoutInflater().inflate(R.layout.fragment_tab, null);
        Log.i("bqt", "【inflate后】");
    }
}
具体的hook逻辑
接下来在XposenInit里面实现IXposedHookInitPackageResources接口,并且实现handleInitPackageResources方法,代码如下:
public class XposedInit implements IXposedHookInitPackageResources {

    private static String HOOK_PACKAGE_NAME = "com.my.bqt";
    private static String HOOK_LAYOUT_NAME = "activity_main";
    private static String HOOK_LAYOUT_NAME2 = "fragment_tab";

    @Override
    public void handleInitPackageResources(XC_InitPackageResources.InitPackageResourcesParam resparam) {
        Log.i("bqt", "【handleInitPackageResources】" + resparam.packageName);//任何一个app的包资源初始化时都会调用
        if (resparam.packageName.equals(HOOK_PACKAGE_NAME)) {
            resparam.res.hookLayout(resparam.packageName, "layout", HOOK_LAYOUT_NAME, new XC_LayoutInflated() {
                @Override
                public void handleLayoutInflated(LayoutInflatedParam liparam) {
                    Log.i("bqt", "【handleLayoutInflated】" + liparam.variant + "," + liparam.resNames.fullName);
                    printView((ViewGroup) liparam.view, 1);
                    TextView textView = liparam.view.findViewById(R.id.tv_title);
                    textView.setText("Hello Xposed");
                }
            });
            resparam.res.hookLayout(resparam.packageName, "layout", HOOK_LAYOUT_NAME2, new XC_LayoutInflated() {
                @Override
                public void handleLayoutInflated(LayoutInflatedParam liparam) {
                    Log.i("bqt", "【handleLayoutInflated2】" + liparam.variant + "," + liparam.resNames.fullName);
                }
            });
        }
    }

    //遍历资源布局树,并打印出来
    private void printView(ViewGroup view, int deep) {
        StringBuilder builder = new StringBuilder();
        String viewDeepFormat;
        for (int i = 0; i < deep - 1; i++) {
            builder.append("\t");
        }
        viewDeepFormat = builder + "\t";
        Log.i("bqt", "【printView】" + builder.toString() + view.toString());

        int count = view.getChildCount();
        for (int i = 0; i < count; i++) {
            if (view.getChildAt(i) instanceof ViewGroup) {
                printView((ViewGroup) view.getChildAt(i), deep + 1);
            } else {
                Log.i("bqt", "【printView】" + viewDeepFormat + view.getChildAt(i).toString());
            }
        }
    }
}
日志分析
安装重启后,打开demo,查看打印的日志:
【handleInitPackageResources】com.my.bqt

【setContentView前】
【handleLayoutInflated】layout,com.my.bqt:activity_main/layout
【printView】android.widget.FrameLayout{2077e3cd V.E..... ......I. 0,0-0,0 #1020002 android:id/content}
【printView】    android.widget.LinearLayout{1802a482 V.E..... ......I. 0,0-0,0}
【printView】        android.widget.TextView{5cbd793 V.ED.... ......ID 0,0-0,0 #7f07009f app:id/tv_title}
【printView】        android.view.View{222bc3d0 V.ED.... ......ID 0,0-0,0}
【printView】        android.widget.FrameLayout{252befc9 V.E..... ......I. 0,0-0,0 #7f070044 app:id/id_container}
【printView】        android.view.View{353a86ce V.ED.... ......ID 0,0-0,0}
【printView】        android.widget.LinearLayout{105259ef V.E..... ......I. 0,0-0,0 #7f07005a app:id/ly_main_tab_bottom}
【printView】            android.widget.TextView{8514cfc V.ED.... ......ID 0,0-0,0 #7f07009e app:id/tv_tab_bottom_weixin}
【printView】            android.widget.TextView{16fabf85 V.ED.... ......ID 0,0-0,0 #7f07009c app:id/tv_tab_bottom_friend}
【printView】            android.widget.TextView{14fc41da V.ED.... ......ID 0,0-0,0 #7f07009b app:id/tv_tab_bottom_contact}
【printView】            android.widget.TextView{1414a60b V.ED.... ......ID 0,0-0,0 #7f07009d app:id/tv_tab_bottom_setting}
【setContentView后】

【inflate前】
【handleLayoutInflated2】layout,com.my.bqt:fragment_tab/layout
【inflate后】
Tips:
- 日志可以看出
handleInitPackageResources会在setContentView和getLayoutInflater().inflate时调用。 - 对setContentView有了解的都明白,setContentView也会调用inflate方法,所以,也可以看成是hook了
inflate方法。 - 在返回的数据InitPackageResourcesParam中,有一个
liparam.view的字段,通过日志可以看出setContentView方法的是一个FrameLayout,下面包含了LinearLayout,这个LinearLayout也就是我们activity_main布局最外层的view,获取到这个view以后就可以进行一系列的操作了。
2019-4-13
本文来自博客园,作者:白乾涛,转载请注明原文链接:https://www.cnblogs.com/baiqiantao/p/10699552.html

 浙公网安备 33010602011771号