


.NET9 中不一样的OpenAPI
在.NET9的第4个预览版里,微软带来了OpenAPI,需要引用Microsoft.AspNetCore.OpenApi,如果想生成本地的API描述文件,需要引用Microsoft.Extensions.ApiDescription.Server。
下面是项目文件:
<Project Sdk="Microsoft.NET.Sdk.Web">

  <PropertyGroup>
    <TargetFramework>net9.0</TargetFramework>
    <Nullable>enable</Nullable>
    <ImplicitUsings>enable</ImplicitUsings>
  </PropertyGroup>

  <ItemGroup>
    <PackageReference Include="Microsoft.AspNetCore.OpenApi" Version="9.0.0-preview.4.24267.6" />
    <PackageReference Include="Microsoft.Extensions.ApiDescription.Server" Version="9.0.0-preview.4.24267.6">
      <PrivateAssets>all</PrivateAssets>
      <IncludeAssets>runtime; build; native; contentfiles; analyzers; buildtransitive</IncludeAssets>
    </PackageReference>
  </ItemGroup>
  <PropertyGroup>
    <OpenApiDocumentsDirectory>$(MSBuildProjectDirectory)</OpenApiDocumentsDirectory>
    <OpenApiGenerateDocuments>true</OpenApiGenerateDocuments>
  </PropertyGroup>
</Project>
使用OpenApi只需要在用Services.AddOpenApi()和app.MapOpenApi(),即可。也可以通过AddOpenApi的参数Action,来改变或完善API配置信息,具体代码如下:
using Microsoft.AspNetCore.Http.HttpResults;
using Microsoft.AspNetCore.Mvc;
using Microsoft.Extensions.Logging.Configuration;
using Microsoft.OpenApi.Extensions;
using Microsoft.OpenApi.Interfaces;
using Microsoft.OpenApi.Models;

var builder = WebApplication.CreateBuilder(args);

builder.Services.AddOpenApi("myapi", opt =>
{
    opt.UseTransformer((oper, context, c) =>
    {
        oper.Info = new OpenApiInfo
        {
            Version = "v1",
            Title = "My API",
            Description = "My API Description",
            Contact = new OpenApiContact
            {
                Name = "My Name",
                Email = "aaa@aa.com"
            },
            License = new OpenApiLicense
            {
                Name = "MIT",
                Url = new Uri("https://opensource.org/licenses/MIT")
            },
            TermsOfService = new Uri("https://www.google.com"),
        };
        return Task.CompletedTask;
    });
    opt.ShouldInclude = (o) =>
    {
        Console.WriteLine("-----HttpMethod------" + o.HttpMethod);
        Console.WriteLine("-----GroupName------" + o.GroupName);
        Console.WriteLine("------RelativePath-----" + o.RelativePath);
        Console.WriteLine("------ActionDescriptor-----" + o.ActionDescriptor.DisplayName);
        return true;
    };
    opt.UseOperationTransformer((oper, context, c) =>
    {
        Console.WriteLine("======summary=======" + oper.Summary);
        oper.Summary = "gui su wei test summary";
        oper.Tags = new OpenApiTag[]
        {
            new OpenApiTag
            {
                Name = "tag1", Description = "tag1 description",
            },
            new OpenApiTag
            {
                Name = "tag2", Description = "tag2 description",
            }
        };
        return Task.CompletedTask;
    });

});
var app = builder.Build();
app.MapOpenApi("/openapi/{documentName}.json");

app.MapGet("/order", () =>
{
    return new Order()
    {
        OrderNo = "20210901",
        Amount = 100,
        OrderDate = DateTime.Now
    };
});
app.MapPost("/order", (Order order) =>
{
    return new OkResult();
});
app.Run();

/// <summary>
/// 订单
/// </summary>
public class Order
{
    /// <summary>
    /// 订单编号
    /// </summary>
    public string OrderNo { get; set; }
    /// <summary>
    /// 订单金额
    /// </summary>
    public decimal Amount { get; set; }
    /// <summary>
    /// 订单日期
    /// </summary>
    public DateTime OrderDate { get; set; }

}
下面是运行的结果:
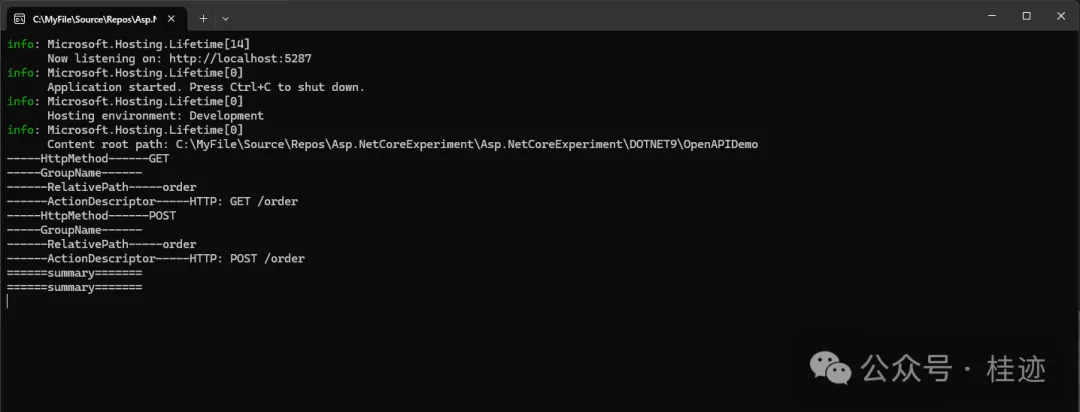
可以通过访问http://localhost:5287/openapi/myapi.json,来查看api的json信息,同时,也可以查看生成的api.json文件,因为我们配置了api文件的生成,结果都一样,如下:
{
  "openapi": "3.0.1",
  "info": {
    "title": "My API",
    "description": "My API Description",
    "termsOfService": "https://www.google.com",
    "contact": {
      "name": "My Name",
      "email": "aaa@aa.com"
    },
    "license": {
      "name": "MIT",
      "url": "https://opensource.org/licenses/MIT"
    },
    "version": "v1"
  },
  "paths": {
    "/order": {
      "get": {
        "tags": [
          "tag1",
          "tag2"
        ],
        "summary": "gui su wei test summary",
        "responses": {
          "200": {
            "description": "OK",
            "content": {
              "application/json": {
                "schema": {
                  "type": "object",
                  "properties": {
                    "orderNo": {
                      "type": "string"
                    },
                    "amount": {
                      "type": "number",
                      "format": "double"
                    },
                    "orderDate": {
                      "type": "string",
                      "format": "date-time"
                    }
                  }
                }
              }
            }
          }
        },
        "x-aspnetcore-id": "e8ba784f-bc44-4d62-9132-2e0ec46472ea"
      },
      "post": {
        "tags": [
          "tag1",
          "tag2"
        ],
        "summary": "gui su wei test summary",
        "requestBody": {
          "content": {
            "application/json": {
              "schema": {
                "type": "object",
                "properties": {
                  "orderNo": {
                    "type": "string"
                  },
                  "amount": {
                    "type": "number",
                    "format": "double"
                  },
                  "orderDate": {
                    "type": "string",
                    "format": "date-time"
                  }
                }
              }
            }
          },
          "required": true
        },
        "responses": {
          "200": {
            "description": "OK",
            "content": {
              "application/json": {
                "schema": {
                  "type": "object",
                  "properties": {
                    "statusCode": {
                      "type": "integer",
                      "format": "int32"
                    }
                  }
                }
              }
            }
          }
        },
        "x-aspnetcore-id": "ddb8949d-07dc-414a-99b0-a298aab0ecb8"
      }
    }
  },
  "tags": [
    {
      "name": "OpenAPIDemo"
    }
  ]
}
文章来源微信公众号
想要更快更方便的了解相关知识,可以关注微信公众号

****欢迎关注我的asp.net core系统课程****
《asp.net core精要讲解》 https://ke.qq.com/course/265696
《asp.net core 3.0》 https://ke.qq.com/course/437517
《asp.net core项目实战》 https://ke.qq.com/course/291868
《基于.net core微服务》 https://ke.qq.com/course/299524
《asp.net core精要讲解》 https://ke.qq.com/course/265696
《asp.net core 3.0》 https://ke.qq.com/course/437517
《asp.net core项目实战》 https://ke.qq.com/course/291868
《基于.net core微服务》 https://ke.qq.com/course/299524

 浙公网安备 33010602011771号