Junit5 单元测试
一、Junit5的架构
JUnit 5由三个不同子项目中的几个不同模块组成。JUnit 5 = JUnit Platform + JUnit Jupiter + JUnit Vintage,如下:
- JUnit platform:为了能够启动 junit 测试,IDE、构建工具或者插件需要包含和扩展平台 API。它定义了用于开发在平台上运行的新测试框架的“TestEngine”API。它还提供了一个控制台启动器来从命令行启动平台并为 Gradle 和 Maven 构建插件。
- JUnit Jupiter:它包括用于编写测试的新编程和扩展模型。它具有所有新的 junit 注释和
TestEngine实现来运行使用这些注释编写的测试。 - JUnit Vintage:它的主要目的是支持在 JUnit 5 平台上运行 JUnit 3 和 JUnit 4 书面测试。它有向后兼容性。
参考网站如下:
官网地址:https://junit.org/junit5/
官方入门文档:https://junit.org/junit5/docs/current/user-guide/#overview
官方例子:https://github.com/junit-team/junit5-samples
官方github:https://github.com/junit-team
二、安装
可以在 maven 或者 gradle 项目中使用 JUnit 5,下面展示在Maven中使用:
<dependencies>
        <!--配置和加载测试计划的公共API – 典型的使用场景是IDE和构建工具-->
        <dependency>
            <groupId>org.junit.platform</groupId>
            <artifactId>junit-platform-launcher</artifactId>
            <version>1.7.0</version>
            <scope>test</scope>
        </dependency>

        <!--JUnit Jupiter测试引擎的实现,仅仅在运行时需要。-->
        <dependency>
            <groupId>org.junit.jupiter</groupId>
            <artifactId>junit-jupiter-engine</artifactId>
            <version>5.7.0</version>
            <scope>test</scope>
        </dependency>

        <!--JUnit Vintage测试引擎实现,允许在新的JUnit Platform上运行低版本的JUnit测试,即那些以JUnit 3或JUnit 4风格编写的测试。
        非必须
        -->
        <dependency>
            <groupId>org.junit.vintage</groupId>
            <artifactId>junit-vintage-engine</artifactId>
            <version>5.7.0</version>
            <scope>test</scope>
        </dependency>
        <!--编写测试 和 扩展 的JUnit Jupiter API。-->
        <dependency>
            <groupId>org.junit.jupiter</groupId>
            <artifactId>junit-jupiter-api</artifactId>
            <version>5.7.0</version>
        </dependency>

    </dependencies>
三、JUnit 5 注释
JUnit 5 提供以下注释来编写测试:
| Annotation | 描述 |
|---|---|
@BeforeEach |
带注释的方法将在测试类中的每个测试方法之前运行。 |
@AfterEach |
带注释的方法将在测试类中的每个测试方法之后运行。 |
@BeforeAll |
带注释的方法将在测试类中的所有测试方法之前运行。这个方法必须是静态的。 |
@AfterAll |
带注释的方法将在测试类中的所有测试方法之后运行。这个方法必须是静态的。 |
@Test |
它用于将方法标记为junit测试 |
@DisplayName |
用于为测试类或者测试方法提供任何自定义显示名称 |
@Disable |
它用于禁用或者忽略测试套件中的测试类或者方法。 |
@Nested |
用于创建嵌套测试类 |
@Tag |
用标签标记测试方法或者测试类以进行测试发现和过滤 |
@TestFactory |
标记方法是动态测试的测试工厂 |
@ParameterizedTest |
表示方法是参数化测试 |
| @RepeatedTest | 表示方法是重复测试模板 |
| @ExtendWith | 用于注册自定义扩展,该注解可以继承 |
| @FixMethodOrder(MethodSorters.NAME_ASCENDING) | 控制测试类中方法执行的顺序,这种测试方式将按方法名称的进行排序,由于是按字符的字典顺序,所以以这种方式指定执行顺序会始终保持一致;不过这种方式需要对测试方法有一定的命名规则,如 测试方法均以testNNN开头(NNN表示测试方法序列号 001-999) |
四、案例演示
4.1.测试:Hello World
创建Maven项目,导入Junit5依赖后,创建包 com.easybuy.method,在下面创建 类 Calculator(模拟我们需要测试的功能):
public class Calculator {

    public int add(int num1, int num2){
        return num1+num2;
    }

    public int sub(int num1, int num2){
        return num1-num2;
    }
}
创建com.easybuy.test包,在下面编写测试用例,创建 HelloWorld,代码如下:
public class HelloWorld {
    @Test
    public void testSub(){
        Calculator calculator = new Calculator();
        //调用减法
        int num = calculator.sub(10, 12);
        //分别传入预期结果和实际结果
        Assertions.assertEquals(-12,num);
    }

    @Test
    public void testAdd(){
        Calculator calculator = new Calculator();
        //调用减法
        int num = calculator.add(10, 12);
        //分别传入预期结果和实际结果
        Assertions.assertEquals(22,num);
    }
}
点击 类名或者方法名左边的按钮即可执行用例如下:

@Test注解在方法上标记方法为测试方法,以便构建工具和 IDE 能够识别并执行它们。
注意的用例在idea中执行的时候一直报错缺少:org.junit.jupiter.api,这个问题很奇怪,需要再idea中勾选如下配置,其他的项目不用勾选

4.2.给用例添加上前置和后置
添加上前置和后置后,完成的案例代码如下:
public class AppTest {
    @BeforeAll
    static void setup(){
        System.out.println("@BeforeAll 将在测试类中的所有测试方法之前运行。这个方法必须是静态的");
    }

    @BeforeEach
    void setupThis(){
        System.out.println("@BeforeEach 将在测试类中的每个测试方法之前运行");
    }


    @Test
    public void testSub(){
        Calculator calculator = new Calculator();
        //调用减法
        int num = calculator.sub(10, 12);
        //分别传入预期结果和实际结果
        Assertions.assertEquals(-2,num);
        System.out.println("我是testSub");
    }

    @Test
    public void testAdd(){
        Calculator calculator = new Calculator();
        //调用减法
        int num = calculator.add(10, 12);
        //分别传入预期结果和实际结果
        Assertions.assertEquals(22,num);
        System.out.println("我是testAdd");
    }

    @AfterEach
    void tearThis(){
        System.out.println("@AfterEach 将在测试类中的每个测试方法之后运行。");
    }

    @AfterAll
    static void tear(){
        System.out.println("@AfterAll 将在测试类中的所有测试方法之后运行。这个方法必须是静态的");
    }
}
执行后结果如:

4.3.禁用执行某条用例
@Disabled注解可以添加给某个用例方法,或者类上,添加后面该类或者该方法不会在执行

五、断言测试
断言有助于使用测试用例的实际输出来验证预期输出。为了简单起见,所有 JUnit Jupiter 断言都是 org.junit.jupiter.Assertions 类中的静态方法,例如
assertEquals断言预期值和实际值相等- assertNotEquals 断言预期值和实际值不相等,则测试通过
assertAll分组断言,执行其中包含的所有断言assertArrayEquals断言预期数组和实际数组相等assertFalse断言条件为假assertNotNull断言不为空assertSame断言两个对象相等assertTimeout断言超时fail使单元测试失败
案例代码如下:
public class AssertionsTest {

    @Test
    public void test1(){
        //Test will pass
        Assertions.assertEquals(3,3);
    }

    @Test
    public void test2(){
        //Test will fail
        Assertions.assertEquals(4, 4);
    }

    @Test
    public void test3(){
        int[] ints1 = new int[1024];
        int[] ints2 = new int[1024];

        //Test will fail 断言预期数组和实际数组相等
        Assertions.assertArrayEquals(ints1,ints2);
    }


    @Test
    public void test4(){
        ArrayList<String> strings = new ArrayList<>();
        strings.add("李明月");
        strings.add("刘明月");
        strings.add("张如月");

        //Test will fail 断言预期集合中是否包含某个值
        Assertions.assertTrue(strings.contains("张如月"));
    }
}
六、参数化测试
6.1.引入参数化所需依赖
实现参数化需要将下面的依赖引入到pom.xml,注意版本要和之前引入的Junit版本保持一致
dependency>
            <groupId>org.junit.jupiter</groupId>
            <artifactId>junit-jupiter-params</artifactId>
            <version>5.7.0</version>
            <scope>compile</scope>
        </dependency>
6.2.使用注解ParameterizedTest
使用@ParameterizedTest注解来代替@Test注解,单参数化注解使用@ValueSource ,多参数注解 @CsvSource,如果这两个注解@ParameterizedTest@Test同时使用则会多执行一次
- 单个参数如下:
public class ParamsTest {
    //@ParameterizedTest注解来代替@Test注解,单参数化注解使用@ValueSource
    @ParameterizedTest
    @ValueSource(strings = {"张三", "小明", "小红"})//几个参数,就执行几次
    void testParamString(String name){
        System.out.println(name);
    }


    @ParameterizedTest
    @ValueSource(ints = {10,20,30})
    void testParamInt(int num){
        Assertions.assertTrue(num < 100);
        System.out.println(num);
    }
}
- 多参数时,默认参数之间用英文逗号隔开
public class ParamsTest {
    //@ParameterizedTest注解来代替@Test注解,单参数化注解使用@ValueSource
    @ParameterizedTest
    @ValueSource(strings = {"张三", "小明", "小红"})//几个参数,就执行几次
    void testParamString(String name){
        System.out.println(name);
    }


    @ParameterizedTest
    @ValueSource(ints = {10,20,30})
    void testParamInt(int num){
        Assertions.assertTrue(num < 100);
        System.out.println(num);
    }

    //多参数
    @ParameterizedTest
    @CsvSource({"小明,10,一班","小李,11,二班"})//多参数使用@CsvSource注解实现,这里传入了两组数据,分别传入中间使用逗号隔开
    public void MultParams(String name,int age,String className ){
        System.out.println("name:"+name+" age:"+age+" classname:"+className);
    }

}
- 参数文件:参数可以从指定csv文件中读取,在resources目录下创建csv文件,参数之间用相同分隔符分割,例如 “,”,"|"等。此时使用的注解为 @CsvFileSource
下面例如创建一个csv文件如data.csv,需要注意如果csv文件中有中文,需要通过记事本打开csv文件修改编码方式为utf-8,否则读取进来后中文会乱码,数据创建多列直接使用逗号隔开,存放在resource目录下:

在代码中读取csv文件中的数据作为参数化的信息如下:
public class ParamsTest {
    //@ParameterizedTest注解来代替@Test注解,单参数化注解使用@ValueSource
    @ParameterizedTest
    @ValueSource(strings = {"张三", "小明", "小红"})//几个参数,就执行几次
    void testParamString(String name){
        System.out.println(name);
    }


    @ParameterizedTest
    @ValueSource(ints = {10,20,30})
    void testParamInt(int num){
        Assertions.assertTrue(num < 100);
        System.out.println(num);
    }

    //多参数
    @ParameterizedTest
    @CsvSource({"小明,10,一班","小李,11,二班"})//多参数使用@CsvSource注解实现,这里传入了两组数据,分别传入中间使用逗号隔开
    public void MultParams(String name,int age,String className ){
        System.out.println("name:"+name+" age:"+age+" classname:"+className);
    }

    @ParameterizedTest
    @CsvFileSource(resources = "/data.csv")//读取csv文件中的信息
    public void ParamByFile(String name, String password) {
        System.out.println("name:" + name + " password:" + password);
    }
}
执行后效果如下:

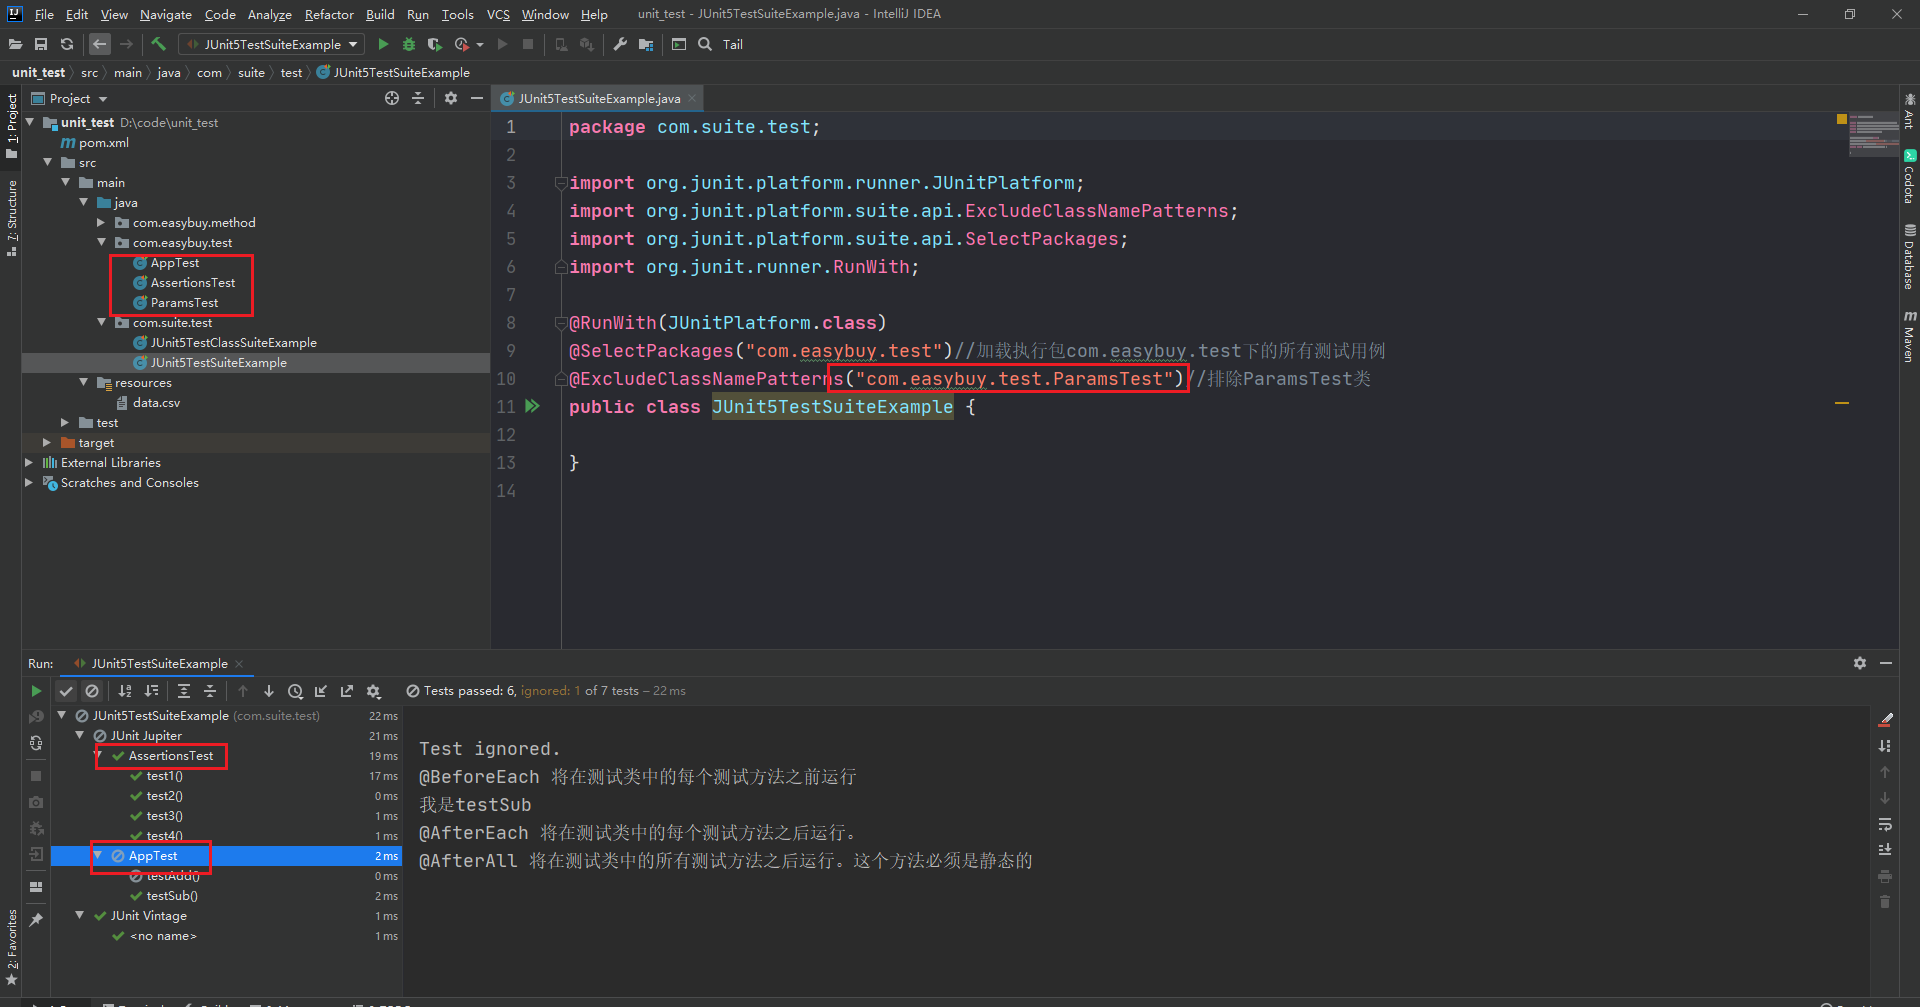
七、测试套件
使用 JUnit 5 测试套件,我们可以运行分布到多个测试类和不同包中的测试。JUnit 5 提供了两个注解:@SelectPackages 和@SelectClasses 来创建测试套件。要执行该套件,我们将使用 @RunWith(JUnitPlatform.class)。需要引入依赖如下:
<!--创建测试套件-->
        <dependency>
            <groupId>org.junit.platform</groupId>
            <artifactId>junit-platform-suite-api</artifactId>
            <version>1.6.3</version>
        </dependency>
        <!--执行测试套件-->
        <dependency>
            <groupId>org.junit.platform</groupId>
            <artifactId>junit-platform-runner</artifactId>
            <version>1.6.3</version>
        </dependency>
- 执行某个包下面的所有测试用例如下:
@RunWith(JUnitPlatform.class)
@SelectPackages("com.easybuy.test")//加载执行包com.easybuy.test下的所有测试用例
public class JUnit5TestSuiteExample {

}
- 指定执行某个类下的用例
@RunWith(JUnitPlatform.class)
@SelectClasses({
        com.easybuy.test.ParamsTest.class,
        com.easybuy.test.AppTest.class
})//在测试套件中加载执行ParamsTest和AppTest类
public class JUnit5TestClassSuiteExample {
}
此外,我们可以使用以下注释来过滤测试包、类甚至测试方法。
@IncludePackages和@ExcludePackages过滤包@IncludeClassNamePatterns和@ExcludeClassNamePatterns来过滤测试类@IncludeTags和@ExcludeTags来过滤测试方法
@RunWith(JUnitPlatform.class)
@SelectPackages("com.easybuy.test")//加载执行包com.easybuy.test下的所有测试用例
@ExcludeClassNamePatterns("com.easybuy.test.ParamsTest")//排除ParamsTest类
public class JUnit5TestSuiteExample {

}
执行结果如下图:
八、Junit5结合allure生成测试报告
8.1.下载和安装allrue
由于Junit的测试结果展示过于简陋,可以借助于allure生成可视化的测试报告更加的美观同时易用性也不错,allure是一个通用的测试报告框架,
GitHub下载地址:https://github.com/allure-framework/allure2/releases,进入后选择版本下载即可:

需要java8+,JDK 1.8+环境,所以提前配置好java环境,将安装包解压后配置allure环境变量,在系统变量path中添加到bin,例如:
D:\allure-2.21.0\bin
配置成功后在命令窗口输入allure或者allure --version,可以看到我的allure版本是2.21.0

8.2.allure集成Junit5依赖导入
在pom.xml中添加依赖,然后进行配置:
<properties>
        <aspectj.version>1.9.5</aspectj.version>
        <allure.version>2.13.2</allure.version>
    </properties>

    <dependencies>
        <!--配置和加载测试计划的公共API – 典型的使用场景是IDE和构建工具-->
        <dependency>
            <groupId>org.junit.platform</groupId>
            <artifactId>junit-platform-launcher</artifactId>
            <version>1.7.0</version>
            <scope>test</scope>
        </dependency>

        <!--JUnit Jupiter测试引擎的实现,仅仅在运行时需要。-->
        <dependency>
            <groupId>org.junit.jupiter</groupId>
            <artifactId>junit-jupiter-engine</artifactId>
            <version>5.7.0</version>
            <scope>test</scope>
        </dependency>

        <!--JUnit Vintage测试引擎实现,允许在新的JUnit Platform上运行低版本的JUnit测试,即那些以JUnit 3或JUnit 4风格编写的测试。
        非必须
        -->
        <dependency>
            <groupId>org.junit.vintage</groupId>
            <artifactId>junit-vintage-engine</artifactId>
            <version>5.7.0</version>
            <scope>test</scope>
        </dependency>
        <!--编写测试 和 扩展 的JUnit Jupiter API。-->
        <dependency>
            <groupId>org.junit.jupiter</groupId>
            <artifactId>junit-jupiter-api</artifactId>
            <version>5.7.0</version>
        </dependency>

        <!--参数化-->
        <dependency>
            <groupId>org.junit.jupiter</groupId>
            <artifactId>junit-jupiter-params</artifactId>
            <version>5.7.0</version>
            <scope>compile</scope>
        </dependency>

        <!--创建测试套件-->
        <dependency>
            <groupId>org.junit.platform</groupId>
            <artifactId>junit-platform-suite-api</artifactId>
            <version>1.6.3</version>
        </dependency>
        <!--执行测试套件-->
        <dependency>
            <groupId>org.junit.platform</groupId>
            <artifactId>junit-platform-runner</artifactId>
            <version>1.6.3</version>
        </dependency>

        <!--SL4J 主要是为了给Java日志访问提供一个标准、规范的API框架,其主要意义在于提供接口,具体的实现可以交由其他日志框架
        我的用例执行的时候console中一直提示缺少,故而添加
        -->
        <dependency>
            <groupId>org.slf4j</groupId>
            <artifactId>slf4j-nop</artifactId>
            <version>1.7.2</version>
        </dependency>

        <!--Junit5集成allure-->
        <dependency>
            <groupId>io.qameta.allure</groupId>
            <artifactId>allure-junit5</artifactId>
            <version>2.13.2</version>
        </dependency>

    </dependencies>

    <!--junit allure maven运行测试用例jar包-->
    <build>
        <plugins>
            <!--junit allure maven运行测试用例jar包-->
            <plugin>
                <groupId>org.apache.maven.plugins</groupId>
                <artifactId>maven-surefire-plugin</artifactId>
                <version>2.22.2</version>
                <configuration>
                    <argLine>
                        -javaagent:"${settings.localRepository}/org/aspectj/aspectjweaver/${aspectj.version}/aspectjweaver-${aspectj.version}.jar"
                    </argLine>
                </configuration>
                <dependencies>
                    <dependency>
                        <groupId>org.aspectj</groupId>
                        <artifactId>aspectjweaver</artifactId>
                        <version>${aspectj.version}</version>
                    </dependency>
                </dependencies>
            </plugin>
            <plugin>
                <groupId>io.qameta.allure</groupId>
                <artifactId>allure-maven</artifactId>
                <version>2.10.0</version>
                <configuration>
                    <reportVersion>${allure.version}</reportVersion>
                    <allureDownloadUrl>/maven2/io/qameta/allure/allure-commandline/${allure.version}/allure-commandline-${allure.version}.zip</allureDownloadUrl>
                </configuration>
            </plugin>
        </plugins>
    </build>
上面会设置后。执行用例(可以根据测试套件执行,也可以执行某个模块还是跟之前一样)生成的结果以josn格式存放在allure-results在根目录下:

8.3.生成allure测试报告
8.3.1.生成在线的测试报告
生成在线版本的测试报告,在命令行打开执行即可
allure serve allure-results
如下图:

8.3.1.生成文件持久型测试报告
先使用 allure generate 生成htl格式的测试结果报告
allure generate ./allure-results -o ./fileresult --clean
注意:上面的命令将 ./allure-results 目录下的测试数据生成html测试报告到 ./fileresult 路径下。–clean 先清空测试报告目录,再生成新的测试报告。
打开测试报告:
allure open -h 127.0.0.1 -p 8885 ./fileresult
启动一个web服务,将已经生成的html测试报告在默认的浏览器中打开,地址为:http://localhost:8885/

在浏览器打开测试报告如下:


 浙公网安备 33010602011771号