


0. Installation
SystemConfiguration:
# 启动时选择第二项boot(non-free),Manjaro自带的驱动精灵会帮你安装好所需驱动,笔记本双显卡则会帮你安装bumblebee
driver boot(non-free)
#查看系统信息: inxi -Fx
#排列源:
sudo pacman-mirrors -i -c China -m rank #只留下清华源能令带宽跑满
sudo pacman-optimize && sync #同步并优化(类似磁盘整理,固态硬盘无需操作)
#增加archlinuxcn库和antergos库: vi /etc/pacman.conf
[archlinuxcn]
SigLevel = TrustAll
Server = https://mirrors.tuna.tsinghua.edu.cn/archlinuxcn/$arch
[antergos]
SigLevel = TrustAll
Server = https://mirrors.tuna.tsinghua.edu.cn/antergos/$repo/$arch
#升级系统:
sudo pacman -Syyu
#安装archlinuxcn签名钥匙&antergos签名钥匙
sudo pacman -S --noconfirm archlinuxcn-keyring antergos-keyring
MacBook Air WiFi:
lspci -vnn | grep 0280
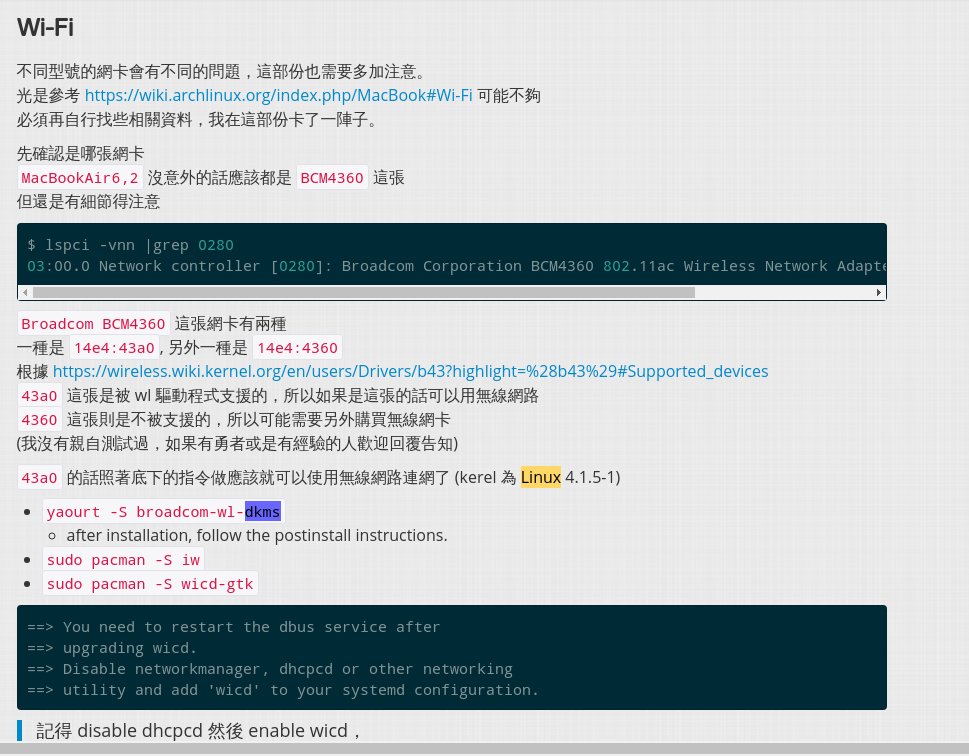
sudo pacman -S yaourt linux414-headers
yaourt -S broadcom-wl-dkms && reboot (optional)
#安装搜狗输入法#xfce桌面
sudo pacman -S --noconfirm fcitx-im fcitx-configtool fcitx-sogoupinyin #安装搜狗输入法#kde桌面
sudo pacman -S --noconfirm fcitx-im kcm-fcitx fcitx-sogoupinyin #配置fcitx
sudo echo -e "export GTK_IM_MODULE=fcitx\nexport QT_IM_MODULE=fcitx\nexport XMODIFIERS=@im=fcitx">>~/.xprofile#AUR助手yaourt:
sudo pacman -S --noconfirm yaourt
#common software:
sudo yaourt -S --noconfirm google-chrome masterpdfeditor screenfetch cmatrix goldendict xmind virtualbox linux414-virtualbox-host-modules virtualbox-ext-oracle tmux vim
Download---> http://chromecj.com/downloadstart.html#899
https://www.switchyomega.com/download.html
Editors:
tmux:
$ cd
$ git clone https://github.com/askDing/.tmux_conf.git
$ ln -s -f .tmux/tmux.conf
vim-spf13:
chsh -s /bin/zsh
sh -c "$(wget https://raw.github.com/robbyrussell/oh-my-zsh/master/tools/install.sh -O -)" # oh -my-zsh
sh <(curl https://j.mp/spf13-vim3 -L)
emacs-spacemacs:
sudo pacman -S adobe-source-code-pro-fonts
git clone https://github.com/syl20bnr/spacemacs ~/.emacs.d
Shadowsocksr:
<optjion 1>
git clone -b manyuser https://github.com/qcgzxw/ssr.git
sudo vi /etc/shadowsocks.json:
{
    "server":"12.34.56.78",
    "server_ipv6":"::",
    "server_port":8388,
    "local_address":"127.0.0.1",
    "local_port":1080,
    "password":"www.qcgzxw.cn",
    "timeout":300,
    "udp_timeout":60,
    "method": "chacha20",
    "protocol": "auth_sha1_v4",
    "protocol_param":"",
    "obfs":"tls1.2_ticket_auth",
    "obfs_param":"https://www.qcgzxw.cn/",
    "fast_open":false,
    "workers":1
}
cd shadowsocksr/shadowsocks
sudo python local.py -c /etc/shadowsocks.json -d start
<option 2>
git clone https://github.com/the0demiurge/CharlesScripts/blob/master/charles/bin/ssr
#sudo mv ssr /usr/local/bin
#sudo chmod 766 /usr/local/bin/ssr
#ssr install (安装)
#ssr config (配置文件)
#ssr start
启动!
**************************************************************
说明:
$ ssr help
ShadowSocksR python client tool
if you have not install ssr, please run "ssr install"
Usage:
  ssr help
  ssr config : edit config.json
  ssr install : install shadowsocksr client
  ssr uninstall : uninstall shadowsocksr client
  ssr start : start the shadowsocks service
  ssr stop : stop the shadowsocks service
  ssr log : cat the log of shadowsocks
**************************************************************
开机自启动:
debian:
$ sudo nano /etc/rc.local
添加
sudo ssr start

debian9+:
$nano /etc/rc.local
****************************************
#!/bin/bash
sudo ssr start
exit 0
****************************************
# chmod +x /etc/rc.local
# systemctl start rc-local

arch-linux:
$ sudo nano /usr/lib/systemd/system/rc-local.service
****************************************
[Unit]
Description=/etc/rc.local Compatibility
ConditionPathExists=/etc/rc.local
[Service]
Type=forking
ExecStart=/etc/rc.local
TimeoutSec=0
StandardOutput=tty
RemainAfterExit=yes
SysVStartPriority=99
[Install]
WantedBy=multi-user.target
****************************************
$ sudo systemctl enable rc-local.service
$ sudo nano /etc/rc.local
****************************************
#!/bin/bash
sudo ssr start
****************************************
$ sudo chmod +x /etc/rc.local
Swap CTRL and Caps_Lock:
<optional 1> setxkbmap -option ctrl:swapcaps
<optional 2>
查看默认键盘布局为美式 : /etc/default/keyboard
修改键盘映射文件:/usr/share/kbd/keymaps/i386/qwerty/us.map.gz
sudo gunzip us.map.gz
sudo vi us.map /Caps_Lock keycode = 58
sudo gzip us.map.gz us.map
Offices:
sudo pacman -S wps-office ttf-wps-fonts
备份/还原系统:
<optional 1>sudo dd if =/dev/sda1 of=/dev/sdb1
sudo dd if=/deb/sdb1 of=/dev/sda1
<optional 2>cd / && sudo tar cvzpf backup.tgz --exclude=/proc --exclude=/mnt --exclude=/sys --exclude=/backup.tgz /
tar xvzpf backup.tgz -C /
<optional 3>rsync -Pa
references: https://my.oschina.net/langxSpirit/blog/1647000
https://www.jianshu.com/p/47f315a408b6
https://www.qcgzxw.cn/301.html
https://www.likeu.info/2018/01/ssr-for-linux.html

 浙公网安备 33010602011771号