
Spark集群安装和WordCount编写
一、Spark概述
    官网:http://spark.apache.org/
    Apache Spark™是用于大规模数据处理的统一分析引擎。
    为大数据处理而设计的快速通用的计算引擎。

    Spark加州大学伯克利分校AMP实验室。不同于mapreduce的是一个Spark任务的中间结果保存到内存中。
    空间换时间。
    Spark启用的是内存分布式数据集。
    用scala语言实现,与spark紧密继承。用scala可以轻松的处理分布式数据集。
    Spark并不是为了替代hadoop,而为了补充hadoop。
    Spark并没有存储。可以集成HDFS。
二、Spark特点
    1)速度快
    与mr对比,磁盘运行的话10倍以上。
    内存运行的话,100倍以上。

    2)便于使用
    支持java/scala/python/R

    3)通用
    不仅支持批处理(SparkSQL)
    而且支持流处理(SparkStreaming)

    4)兼容
    兼容其它组件
    Spark实现了Standalone作为内置的资源管理和调度框架。hdfs/yarn。
三、Spark安装部署
    主节点:Master (192.168.146.150)
    从节点:Worker (192.168.146.151、192.168.146.152)

    1、准备工作
    (1)关闭防火墙
        firewall-cmd --state 查看防火墙状态
        systemctl stop firewalld.service 关闭防火墙
        systemctl disable firewalld.service 禁止开机启动

    (2)远程连接(CRT)

    (3)永久设置主机名
        vi /etc/hostname
        三台机器hostname分别为spark-01、spark-02、spark-03
        注意:要reboot重启生效

    (4)配置映射文件
        vi /etc/hosts

        #127.0.0.1   localhost localhost.localdomain localhost4 localhost4.localdomain4
        #::1         localhost localhost.localdomain localhost6 localhost6.localdomain6
        192.168.146.150 spark-01
        192.168.146.151 spark-02
        192.168.146.152 spark-03

    (5)配置ssh免密码登录
        ssh-keygen  生成密钥对
        ssh-copy-id spark-01
        ssh-copy-id spark-02
        ssh-copy-id spark-03

    2、安装jdk(scala依赖jvm)
    (1)创建spark安装的目录
        cd /root
        上传tar包到/root目录下

    (2)解压tar包
        cd /root
        mkdir sk
        tar -zxvf jdk-8u144-linux-x64.tar.gz -C /root/sk

    (3)配置环境变量
        vi /etc/profile

        export JAVA_HOME=/root/sk/jdk1.8.0_144
        export PATH=$PATH:$JAVA_HOME/bin

        source /etc/profile  加载环境变量

    (4)发送到其它机器(其他机器的/root下要先创建sk目录)
        cd /root/sk
        scp -r jdk1.8.0_144/ root@spark-02:$PWD
        scp -r jdk1.8.0_144/ root@spark-03:$PWD

        scp -r /etc/profile spark-02:/etc
        scp -r /etc/profile spark-03:/etc

        注意:加载环境变量 source /etc/profile

    3、安装Spark集群
    (1)上传tar包到/root目录下

    (2)解压
        cd /root
        tar -zxvf spark-2.2.0-bin-hadoop2.7.tgz -C sk/

    (3)修改配置文件
        cd /root/sk/spark-2.2.0-bin-hadoop2.7/conf
        mv spark-env.sh.template spark-env.sh
        vi spark-env.sh

        export JAVA_HOME=/root/sk/jdk1.8.0_144
        export SPARK_MASTER_HOST=spark-01
        export SPARK_MASTER_PORT=7077

    (4)slaves 加入从节点
        cd /root/sk/spark-2.2.0-bin-hadoop2.7/conf
        mv slaves.template slaves
        vi slaves

        spark-02
        spark-03

    (5)分发到其他机器
        cd /root/sk
        scp -r spark-2.2.0-bin-hadoop2.7/ root@spark-02:$PWD
        scp -r spark-2.2.0-bin-hadoop2.7/ root@spark-03:$PWD

    (6)启动集群
        cd /root/sk/spark-2.2.0-bin-hadoop2.7
        sbin/start-all.sh

        浏览器访问http://spark-01:8080/即可看到UI界面

    (7)启动命令行模式
        cd /root/sk/spark-2.2.0-bin-hadoop2.7/bin
        ./spark-shell

        sc.textFile("/root/words.txt").flatMap(_.split(" ")).map((_,1)).reduceByKey(_+_).sortBy((_,1)).collect
四、启动sparkshell
    cd /root/sk/spark-2.2.0-bin-hadoop2.7/
    本地模式:bin/spark-shell

    集群启动:bin/spark-shell --master spark://spark-01:7077 --total-executor-cores 2 --executor-memory 512mb

    提交运行jar:bin/spark-submit --master spark://spark-01:7077 --class SparkWordCount /root/SparkWC-1.0-SNAPSHOT.jar
 hdfs://192.168.146.111:9000/words.txt hdfs://192.168.146.111:9000/sparkwc/out
五、spark集群角色
    Yarn                         Spark           作用
    ResourceManager              Master          管理子节点
    NodeManager                  Worker          管理当前节点
    YarnChild                    Executor        处理计算任务
    Client+ApplicationMaster     SparkSubmit     提交计算任务
六、Shell编写WordCount
1、本地模式:bin/spark-shell
scala> sc.textFile("/root/words.txt").flatMap(_.split(" ")).map((_,1)).reduceByKey(_+_).collect
res5: Array[(String, Int)] = Array((is,1), (love,2), (capital,1), (Beijing,2), (China,2), (I,2), (of,1), (the,1))

scala>
其中words.txt文件内容如下
I love Beijing
I love China
2、集群启动:bin/spark-shell --master spark://spark-01:7077 --total-executor-cores 2 --executor-memory 512mb
scala> sc.textFile("/root/words.txt").flatMap(_.split(" ")).map((_,1)).reduceByKey(_+_).collect
res5: Array[(String, Int)] = Array((is,1), (love,2), (capital,1), (Beijing,2), (China,2), (I,2), (of,1), (the,1))

scala>
注意:如果集群启动使用的是本地文件words.txt,那么需要每个节点对应的路径都有该文件!!!
如果使用的是HDFS文件则不需要考虑这个。
scala> sc.textFile("hdfs://192.168.146.111:9000/words.txt").flatMap(_.split("\t")).map((_,1)).reduceByKey(_+_).collect
res6: Array[(String, Int)] = Array((haha,1), (heihei,1), (hello,3), (Beijing,1), (world,1), (China,1))

scala>
HDFS中的words.txt文件内容如下:
hello    world
hello    China
hello    Beijing
haha    heihei
3、IDEA开发WordCount
(1)SparkWordCount类
import org.apache.spark.{SparkConf, SparkContext}

//spark-WordCount本地模式测试
object SparkWordCount {
  def main(args: Array[String]): Unit = {
    //2.设置参数 setAppName设置程序名 setMaster本地测试设置线程数 *多个
    val conf: SparkConf = new SparkConf().setAppName("SparkWordCount").setMaster("local[*]")
    //1.创建spark执行程序的入口
    val sc:SparkContext = new SparkContext(conf)

    //3.加载数据 并且处理
    sc.textFile(args(0)).flatMap(_.split("\t")).map((_,1))
      .reduceByKey(_+_)
      .sortBy(_._2,false)
    //保存文件
      .saveAsTextFile(args(1))

    //4.关闭资源
    sc.stop()
  }
}
(2)pom.xml文件
<?xml version="1.0" encoding="UTF-8"?>
<project xmlns="http://maven.apache.org/POM/4.0.0"
         xmlns:xsi="http://www.w3.org/2001/XMLSchema-instance"
         xsi:schemaLocation="http://maven.apache.org/POM/4.0.0 http://maven.apache.org/xsd/maven-4.0.0.xsd">
    <modelVersion>4.0.0</modelVersion>

    <groupId>com.demo.spark</groupId>
    <artifactId>SparkWC</artifactId>
    <version>1.0-SNAPSHOT</version>

    <properties>
        <maven.compiler.source>1.8</maven.compiler.source>
        <maven.compiler.target>1.8</maven.compiler.target>
        <scala.version>2.11.8</scala.version>
        <spark.version>2.2.0</spark.version>
        <hadoop.version>2.8.4</hadoop.version>
        <encoding>UTF-8</encoding>
    </properties>

    <dependencies>
        <!-- scala的依赖导入 -->
        <dependency>
            <groupId>org.scala-lang</groupId>
            <artifactId>scala-library</artifactId>
            <version>${scala.version}</version>
        </dependency>

        <!-- spark的依赖导入 -->
        <dependency>
            <groupId>org.apache.spark</groupId>
            <artifactId>spark-core_2.11</artifactId>
            <version>${spark.version}</version>
        </dependency>

        <!-- hadoop-client API的导入 -->
        <dependency>
            <groupId>org.apache.hadoop</groupId>
            <artifactId>hadoop-client</artifactId>
            <version>${hadoop.version}</version>
        </dependency>

    </dependencies>

    <build>
        <pluginManagement>
            <plugins>
                <!-- scala的编译插件 -->
                <plugin>
                    <groupId>net.alchim31.maven</groupId>
                    <artifactId>scala-maven-plugin</artifactId>
                    <version>3.2.2</version>
                </plugin>
                <!-- ava的编译插件 -->
                <plugin>
                    <groupId>org.apache.maven.plugins</groupId>
                    <artifactId>maven-compiler-plugin</artifactId>
                    <version>3.5.1</version>
                </plugin>
            </plugins>
        </pluginManagement>
        <plugins>
            <plugin>
                <groupId>net.alchim31.maven</groupId>
                <artifactId>scala-maven-plugin</artifactId>
                <executions>
                    <execution>
                        <id>scala-compile-first</id>
                        <phase>process-resources</phase>
                        <goals>
                            <goal>add-source</goal>
                            <goal>compile</goal>
                        </goals>
                    </execution>
                    <execution>
                        <id>scala-test-compile</id>
                        <phase>process-test-resources</phase>
                        <goals>
                            <goal>testCompile</goal>
                        </goals>
                    </execution>
                </executions>
            </plugin>

            <plugin>
                <groupId>org.apache.maven.plugins</groupId>
                <artifactId>maven-compiler-plugin</artifactId>
                <executions>
                    <execution>
                        <phase>compile</phase>
                        <goals>
                            <goal>compile</goal>
                        </goals>
                    </execution>
                </executions>
            </plugin>


            <!-- 打jar包插件 -->
            <plugin>
                <groupId>org.apache.maven.plugins</groupId>
                <artifactId>maven-shade-plugin</artifactId>
                <version>2.4.3</version>
                <executions>
                    <execution>
                        <phase>package</phase>
                        <goals>
                            <goal>shade</goal>
                        </goals>
                        <configuration>
                            <filters>
                                <filter>
                                    <artifact>*:*</artifact>
                                    <excludes>
                                        <exclude>META-INF/*.SF</exclude>
                                        <exclude>META-INF/*.DSA</exclude>
                                        <exclude>META-INF/*.RSA</exclude>
                                    </excludes>
                                </filter>
                            </filters>
                        </configuration>
                    </execution>
                </executions>
            </plugin>
        </plugins>
    </build>

</project>
(3)配置类的运行参数
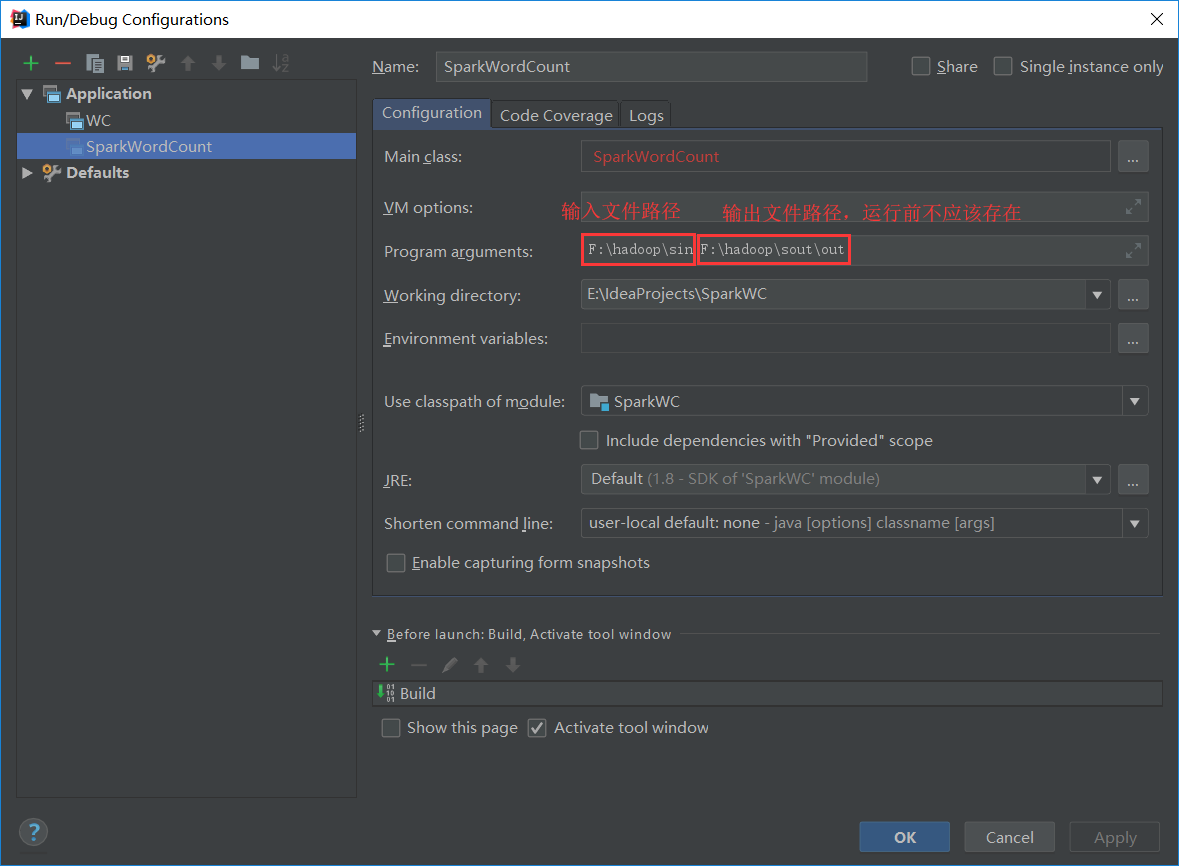
(4)输入的文件words.txt
hello    world
hello    spark
hello    China
hello    Beijing
hello    world
(5)输出文件part-00000
(hello,5)
(world,2)
(6)输出文件part-00001
(Beijing,1)
(spark,1)
(China,1)
4、SparkSubmit提交任务
(1)将上一步的工程打成jar包
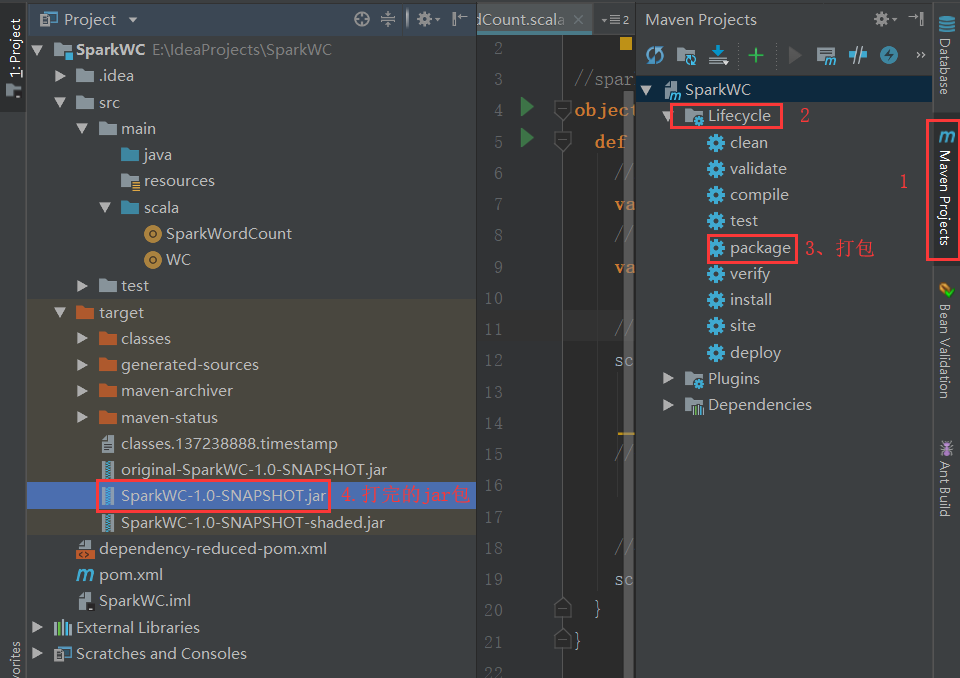
(2)把SparkWC-1.0-SNAPSHOT.jar放在spark-01机器的/root下
(3)执行以下命令
    cd /root/sk/spark-2.2.0-bin-hadoop2.7/

    bin/spark-submit --master spark://spark-01:7077 --class SparkWordCount /root/SparkWC-1.0-SNAPSHOT.jar
 hdfs://192.168.146.111:9000/words.txt hdfs://192.168.146.111:9000/sparkwc/out
(4)hdfs中words.txt文件内容如下:
hello    world
hello    China
hello    Beijing
haha    heihei
(5)输出结果
[root@bigdata111 ~]# hdfs dfs -ls /sparkwc/out
Found 3 items
-rw-r--r--   3 root supergroup          0 2019-01-10 21:43 /sparkwc/out/_SUCCESS
-rw-r--r--   3 root supergroup         10 2019-01-10 21:43 /sparkwc/out/part-00000
-rw-r--r--   3 root supergroup         52 2019-01-10 21:43 /sparkwc/out/part-00001
[root@bigdata111 ~]# hdfs dfs -cat /sparkwc/out/part-00000
(hello,3)
[root@bigdata111 ~]# hdfs dfs -cat /sparkwc/out/part-00001
(haha,1)
(heihei,1)
(Beijing,1)
(world,1)
(China,1)

 浙公网安备 33010602011771号