android: activity给fragment发送消息
一,代码:
activity xml
<?xml version="1.0" encoding="utf-8"?>
<androidx.constraintlayout.widget.ConstraintLayout xmlns:android="http://schemas.android.com/apk/res/android"
    xmlns:app="http://schemas.android.com/apk/res-auto"
    xmlns:tools="http://schemas.android.com/tools"
    android:id="@+id/main"
    android:layout_width="match_parent"
    android:layout_height="match_parent"
    tools:context=".activity.Message1Activity">

    <LinearLayout
        android:orientation="vertical"
        android:layout_width="match_parent"
        android:layout_height="match_parent">
        <Button
            android:id="@+id/button"
            android:layout_gravity="center"
            android:layout_marginTop="30dp"
            android:text="点击发送消息"
            android:textSize="20sp"
            android:layout_width="wrap_content"
            android:layout_height="wrap_content" />

        <TextView
            android:id="@+id/text"
            android:layout_gravity="center"
            android:layout_width="wrap_content"
            android:layout_height="wrap_content"
            android:textSize="20sp"
            android:text="我是Activity" />

        <FrameLayout
            android:id="@+id/fragment_container"
            android:layout_width="match_parent"
            android:layout_height="500dp"/>
    </LinearLayout>

</androidx.constraintlayout.widget.ConstraintLayout>
activity java
package com.example.okdemo1.activity;

import androidx.fragment.app.FragmentManager;
import androidx.fragment.app.FragmentTransaction;
import android.content.Intent;
import android.os.Bundle;
import android.view.View;
import android.widget.Button;

import androidx.activity.EdgeToEdge;
import androidx.appcompat.app.AppCompatActivity;
import androidx.core.graphics.Insets;
import androidx.core.view.ViewCompat;
import androidx.core.view.WindowInsetsCompat;

import com.example.okdemo1.MainActivity;
import com.example.okdemo1.R;
import com.example.okdemo1.fragment.MsgFragment;

public class Message1Activity extends AppCompatActivity {

    @Override
    protected void onCreate(Bundle savedInstanceState) {
        super.onCreate(savedInstanceState);
        EdgeToEdge.enable(this);
        setContentView(R.layout.activity_message1);

        //给按钮增加点击事件
        Button button2 = findViewById(R.id.button);
        button2.setOnClickListener(new View.OnClickListener() {
            @Override
            public void onClick(View v) {
                // 步骤1:获取FragmentManager
               // FragmentManager fragmentManager = getFragmentManager();
                FragmentManager fragmentManager = getSupportFragmentManager();
                // 步骤2:获取FragmentTransaction
                FragmentTransaction fragmentTransaction = fragmentManager.beginTransaction();

                // 步骤3:创建需要添加的Fragment
                final MsgFragment fragment = new MsgFragment();

                // 步骤4:创建Bundle对象
                // 作用:存储数据,并传递到Fragment中
                Bundle bundle = new Bundle();

                // 步骤5:往bundle中添加数据
                bundle.putString("message", "夜凉疑有雨,院静似无僧");

                // 步骤6:把数据设置到Fragment中
                fragment.setArguments(bundle);

                // 步骤7:动态添加fragment
                // 即将创建的fragment添加到Activity布局文件中定义的占位符中(FrameLayout)
                fragmentTransaction.add(R.id.fragment_container, fragment);
                fragmentTransaction.commitNow();
            }
        });
    }
}
fragment xml
<?xml version="1.0" encoding="utf-8"?>
<FrameLayout xmlns:android="http://schemas.android.com/apk/res/android"
    xmlns:tools="http://schemas.android.com/tools"
    android:layout_width="match_parent"
    android:layout_height="match_parent"
    tools:context=".fragment.MsgFragment">

    <LinearLayout
        android:orientation="vertical"
        android:layout_width="match_parent"
        android:layout_height="match_parent"
        android:background="#ffff00"
        >

        <TextView
            android:id="@+id/fragment"
            android:text="我是fragment"
            android:layout_gravity="center"
            android:textSize="30dp"
            android:layout_width="wrap_content"
            android:layout_height="wrap_content"
            />

        <TextView
            android:id="@+id/text"
            android:layout_gravity="center"
            android:layout_width="wrap_content"
            android:layout_height="wrap_content"
            android:textSize="20dp"
            android:text="等待Activity发送消息" />

    </LinearLayout>

</FrameLayout>
fragment java
package com.example.okdemo1.fragment;
import android.os.Bundle;
import androidx.fragment.app.Fragment;
import android.view.LayoutInflater;
import android.view.View;
import android.view.ViewGroup;
import android.widget.TextView;
import com.example.okdemo1.R;
/**
* A simple {@link Fragment} subclass.
* Use the {@link MsgFragment#newInstance} factory method to
* create an instance of this fragment.
*/
public class MsgFragment extends Fragment {
// TODO: Rename parameter arguments, choose names that match
// the fragment initialization parameters, e.g. ARG_ITEM_NUMBER
private static final String ARG_PARAM1 = "param1";
private static final String ARG_PARAM2 = "param2";
// TODO: Rename and change types of parameters
private String mParam1;
private String mParam2;
TextView text;
Bundle bundle;
String message;
public MsgFragment() {
// Required empty public constructor
}
/**
* Use this factory method to create a new instance of
* this fragment using the provided parameters.
*
* @param param1 Parameter 1.
* @param param2 Parameter 2.
* @return A new instance of fragment MsgFragment.
*/
// TODO: Rename and change types and number of parameters
public static MsgFragment newInstance(String param1, String param2) {
MsgFragment fragment = new MsgFragment();
Bundle args = new Bundle();
args.putString(ARG_PARAM1, param1);
args.putString(ARG_PARAM2, param2);
fragment.setArguments(args);
return fragment;
}
@Override
public void onCreate(Bundle savedInstanceState) {
super.onCreate(savedInstanceState);
if (getArguments() != null) {
mParam1 = getArguments().getString(ARG_PARAM1);
mParam2 = getArguments().getString(ARG_PARAM2);
}
}
@Override
public View onCreateView(LayoutInflater inflater, ViewGroup container,
Bundle savedInstanceState) {
View contentView = inflater.inflate(R.layout.fragment_msg, container, false);
text = (TextView) contentView.findViewById(R.id.text);
// 步骤1:通过getArgments()获取从Activity传过来的全部值
bundle = this.getArguments();
// 步骤2:获取某一值
message = bundle.getString("message");
// 步骤3:显示接收到的传递过来的值
text.setText(message);
// Inflate the layout for this fragment
//return inflater.inflate(R.layout.fragment_msg, container, false);
return contentView;
}
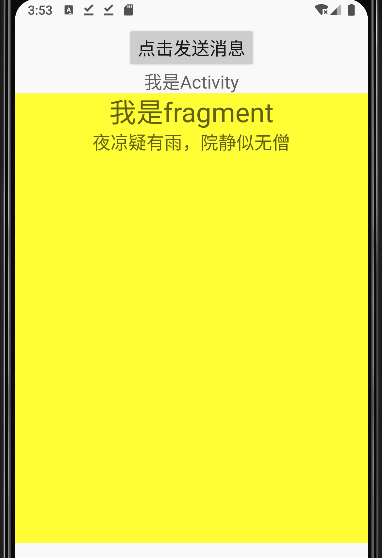
}二,测试效果

 浙公网安备 33010602011771号