

protobuf cmake 编译安装 (全命令行)
protobuf cmake Visual Studio 编译安装
中间踩了挺多的坑的, 这篇文章记录一下.
重要前言: 所有在引用框中的命令都不要输入!!
cmake --install . # 在引用框中的不要输入到命令行
cmake --install . --config Debug # 命令没有被引用框包裹, 需要输入到命令行中
下面开始正式安装过程
0x00 环境配置
vs2022, git, cmake
0x01 源代码下载
注意: 建议使用git clone的方式下载, 如果是通过github的Release下载的, 你得手动的配置protobuf的三方依赖.
git clone -b v28.0 https://github.com/protocolbuffers/protobuf protobuf-28.0.git # 可以不用输入
这里v28.0是版本号(本质是一个tag)
通过git submodule下载protobuf第三方依赖.
git submodule update --init --recursive # 可以不用输入
当然你也可以在clone的过程中就使用--recursive或者--recurse-submodules, 这条命令和上面的一堆作用相同.
(请使用本命令代替上面不要输入的内容)
git clone https://github.com/protocolbuffers/protobuf.git protobuf-28.3 -b v28.3 --depth 1 --recurse-submodules --shallow-submodules
cd protobuf-28.3
0x02 cmake编译前的配置
在项目中建立一个临时编译目录, (我这里使用的是powershell可使用mkdir, 如果你没有mkdir命令, windows创建文件夹的cmd命令是md)
mkdir cmake_build
cd cmake_build
cmake指定源码位置和编译位置(我这里优先使用命令的方式, 如果需要图形化的方式(cmake-gui)也有说明)
cmake -S .. -B . -L
-S指定source目录,-B执行build目录,-L查看项目的一些编译选项
如果你不是和我一样在Windows环境下, 或者你想使用别的编译器(比如mingw-w64), 你可以使用-G参数指定构建编译器, 在cmake --help中可以看到cmake默认使用的编译器.Generators The following generators are available on this platform (* marks default): * Visual Studio 17 2022 = Generates Visual Studio 2022 project files. Use -A option to specify architecture. Visual Studio 16 2019 = Generates Visual Studio 2019 project files. Use -A option to specify architecture. ....................... MinGW Makefiles = Generates a make file for use with mingw32-make. Unix Makefiles = Generates standard UNIX makefiles. Ninja = Generates build.ninja files. Ninja Multi-Config = Generates build-<Config>.ninja files.
PS C:\code_dependencies\protobuf-28.0\cmake_build> git submodule update --init --recursive
....................
Submodule path '../third_party/abseil-cpp': checked out '4a2c63365eff8823a5221db86ef490e828306f9d'
Submodule path '../third_party/googletest': checked out '4c9a3bb62bf3ba1f1010bf96f9c8ed767b363774'
Submodule path '../third_party/jsoncpp': checked out '9059f5cad030ba11d37818847443a53918c327b1'


PS C:\code_dependencies\protobuf-28.0\cmake_build> cmake -S .. -B . -L
-- Selecting Windows SDK version 10.0.26100.0 to target Windows 10.0.19045.
--
-- 28.0.0
-- Could NOT find ZLIB (missing: ZLIB_LIBRARY ZLIB_INCLUDE_DIR)
CMake Warning at third_party/abseil-cpp/CMakeLists.txt:82 (message):
  A future Abseil release will default ABSL_PROPAGATE_CXX_STD to ON for CMake
  3.8 and up.  We recommend enabling this option to ensure your project still
  builds correctly.


-- Performing Test ABSL_INTERNAL_AT_LEAST_CXX17
-- Performing Test ABSL_INTERNAL_AT_LEAST_CXX17 - Failed
-- Performing Test ABSL_INTERNAL_AT_LEAST_CXX20
-- Performing Test ABSL_INTERNAL_AT_LEAST_CXX20 - Failed
-- Configuring done (1.5s)
CMake Error at third_party/abseil-cpp/CMake/AbseilHelpers.cmake:317 (target_link_libraries):
  The link interface of target "random_mocking_bit_gen" contains:

    absl::random_internal_mock_overload_set

  but the target was not found.  Possible reasons include:

    * There is a typo in the target name.
    * A find_package call is missing for an IMPORTED target.
    * An ALIAS target is missing.

Call Stack (most recent call first):
  third_party/abseil-cpp/absl/random/CMakeLists.txt:100 (absl_cc_library)


-- Generating done (2.3s)
CMake Generate step failed.  Build files cannot be regenerated correctly.
-- Cache values
ABSL_BUILD_TESTING:BOOL=OFF
ABSL_FIND_GOOGLETEST:BOOL=OFF
ABSL_GOOGLETEST_DOWNLOAD_URL:STRING=
ABSL_LOCAL_GOOGLETEST_DIR:PATH=/usr/src/googletest
ABSL_PROPAGATE_CXX_STD:BOOL=OFF
ABSL_USE_GOOGLETEST_HEAD:BOOL=OFF
ABSL_USE_SYSTEM_INCLUDES:BOOL=OFF
BUILD_TESTING:BOOL=ON
CMAKE_CONFIGURATION_TYPES:STRING=Debug;Release;MinSizeRel;RelWithDebInfo
CMAKE_INSTALL_PREFIX:PATH=C:/Program Files (x86)/protobuf
EXECINFO_LIBRARY:FILEPATH=EXECINFO_LIBRARY-NOTFOUND
LIBRT:FILEPATH=LIBRT-NOTFOUND
protobuf_ABSL_PROVIDER:STRING=module
protobuf_ALLOW_CCACHE:BOOL=OFF
protobuf_BUILD_CONFORMANCE:BOOL=OFF
protobuf_BUILD_EXAMPLES:BOOL=OFF
..........
如果你想调整编译选项的开关, 请使用-D选项指定Key=Value, 命令执行过后, 可以不用重复执行.
例如下面的命令指定(不要输入到命令行)
cmake -S .. -B . -Dprotobuf_BUILD_SHARED_LIBS=ON -Dprotobuf_USE_EXTERNAL_GTEST=OFF -Dprotobuf_WITH_ZLIB=OFF # 不要输入到命令行
我的配置是这样的, 你可以按需修改. (后面的`符号是powershell的换行输入字符, 如果你是linux, 请替换成\)
cmake -S .. -B .    `
-DABSL_PROPAGATE_CXX_STD=ON   `
-DCMAKE_INSTALL_PREFIX="C:\code_dependencies\protobuf"   `
-Dprotobuf_BUILD_EXAMPLES=ON   `
-Dprotobuf_BUILD_LIBPROTOC=ON   `
-Dprotobuf_BUILD_LIBUPB=OFF   `
-Dprotobuf_BUILD_PROTOBUF_BINARIES=ON   `
-Dprotobuf_BUILD_PROTOC_BINARIES=ON   `
-Dprotobuf_BUILD_SHARED_LIBS=ON   `
-Dprotobuf_BUILD_TESTS=ON   `
-Dprotobuf_INSTALL=ON   `
-Dprotobuf_INSTALL_EXAMPLES=ON   `
-Dprotobuf_MSVC_STATIC_RUNTIME=ON   `
-Dprotobuf_WITH_ZLIB=OFF   `
-Dutf8_range_ENABLE_INSTALL=ON   `
-L     `
执行结果如下
PS C:\code_dependencies\protobuf-28.0\cmake_build> cmake -S .. -B .    `
>> -DABSL_PROPAGATE_CXX_STD=ON   `
>> -DCMAKE_INSTALL_PREFIX="C:\code_dependencies\protobuf"   `
>> -Dprotobuf_BUILD_EXAMPLES=ON   `
>> -Dprotobuf_BUILD_LIBPROTOC=ON   `
>> -Dprotobuf_BUILD_LIBUPB=OFF   `
>> -Dprotobuf_BUILD_PROTOBUF_BINARIES=ON   `
>> -Dprotobuf_BUILD_PROTOC_BINARIES=ON   `
>> -Dprotobuf_BUILD_SHARED_LIBS=ON   `
>> -Dprotobuf_BUILD_TESTS=ON   `
>> -Dprotobuf_INSTALL=ON   `
>> -Dprotobuf_INSTALL_EXAMPLES=ON   `
>> -Dprotobuf_MSVC_STATIC_RUNTIME=ON   `
>> -Dprotobuf_WITH_ZLIB=OFF   `
>> -Dutf8_range_ENABLE_INSTALL=ON   `
>> -L     `
>>
-- Selecting Windows SDK version 10.0.26100.0 to target Windows 10.0.19045.
--
-- 28.0.0
-- Configuring done (0.5s)
-- Generating done (1.1s)
-- Build files have been written to: C:/code_dependencies/protobuf-28.0/cmake_build
-- Cache values
ABSL_BUILD_TESTING:BOOL=OFF
ABSL_FIND_GOOGLETEST:BOOL=OFF
ABSL_GOOGLETEST_DOWNLOAD_URL:STRING=
ABSL_LOCAL_GOOGLETEST_DIR:PATH=/usr/src/googletest
ABSL_PROPAGATE_CXX_STD:BOOL=ON
ABSL_USE_GOOGLETEST_HEAD:BOOL=OFF
ABSL_USE_SYSTEM_INCLUDES:BOOL=OFF
BUILD_TESTING:BOOL=ON
CMAKE_CONFIGURATION_TYPES:STRING=Debug;Release;MinSizeRel;RelWithDebInfo
CMAKE_INSTALL_PREFIX:PATH=C:/code_dependencies/protobuf
EXECINFO_LIBRARY:FILEPATH=EXECINFO_LIBRARY-NOTFOUND
GTest_DIR:PATH=GTest_DIR-NOTFOUND
LIBRT:FILEPATH=LIBRT-NOTFOUND
protobuf_ABSL_PROVIDER:STRING=module
protobuf_ALLOW_CCACHE:BOOL=OFF
protobuf_BUILD_CONFORMANCE:BOOL=OFF
protobuf_BUILD_EXAMPLES:BOOL=ON
protobuf_BUILD_LIBPROTOC:BOOL=ON
protobuf_BUILD_LIBUPB:BOOL=OFF
protobuf_BUILD_PROTOBUF_BINARIES:BOOL=ON
protobuf_BUILD_PROTOC_BINARIES:BOOL=ON
protobuf_BUILD_SHARED_LIBS:BOOL=ON
protobuf_BUILD_TESTS:BOOL=ON
protobuf_DISABLE_RTTI:BOOL=OFF
protobuf_INSTALL:BOOL=ON
protobuf_INSTALL_EXAMPLES:BOOL=ON
protobuf_JSONCPP_PROVIDER:STRING=module
protobuf_REMOVE_INSTALLED_HEADERS:BOOL=OFF
protobuf_TEST_XML_OUTDIR:BOOL=OFF
protobuf_USE_EXTERNAL_GTEST:BOOL=OFF
protobuf_USE_UNITY_BUILD:BOOL=OFF
protobuf_WITH_ZLIB:BOOL=OFF
utf8_range_ENABLE_INSTALL:BOOL=ON
utf8_range_ENABLE_TESTS:BOOL=OFF
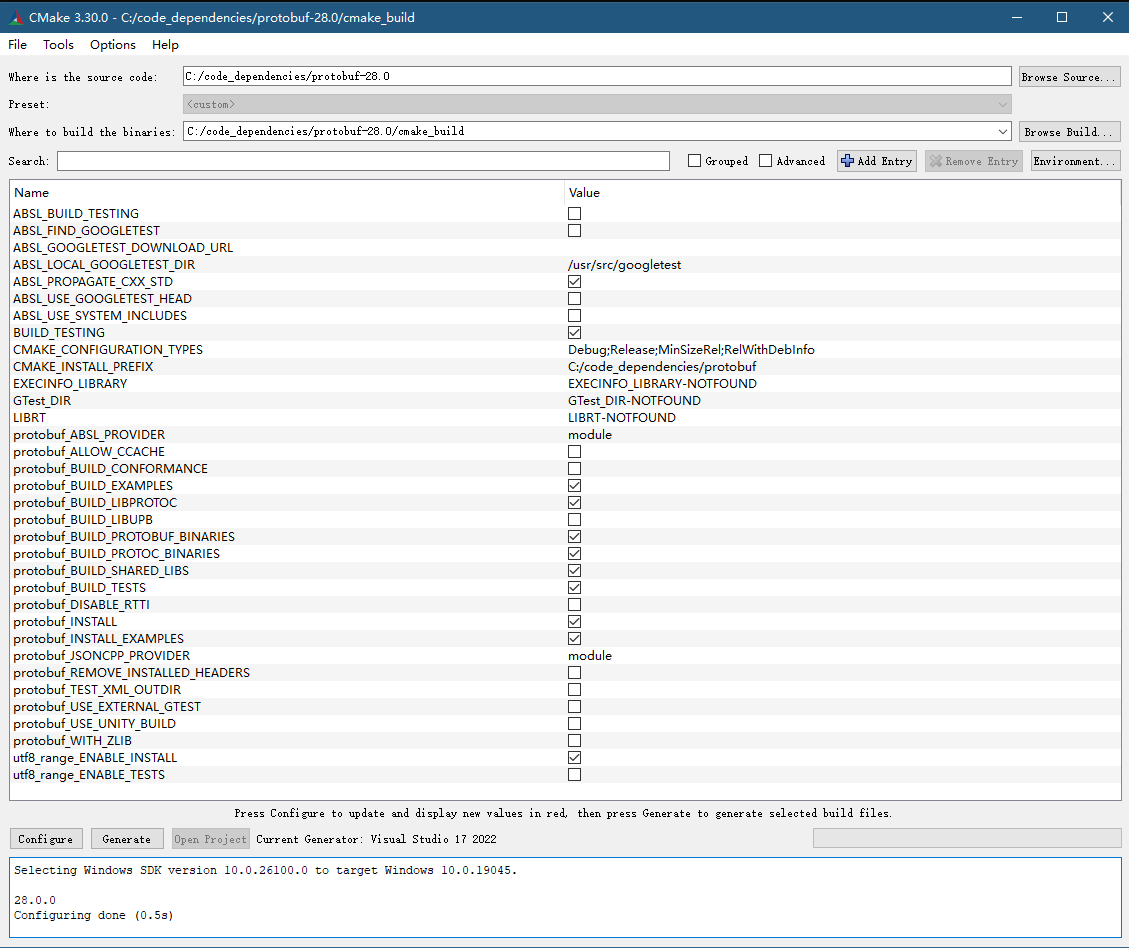
当然你也可以使用
cmake-gui图形化的方式(我个人觉得没有命令行装逼), 这里简单提一嘴
先点击
Configure, 然后选中你需要的组件, 最后点击Generate.
0x03 开始编译
cmake --build . --config Debug --target ALL_BUILD # 你可以选择Release或者Debug
注意: 这里似乎不能加
-j指定编译的线程数量, 会报文件重复征用的错误.这里优先使用命令行, 如果你觉得不适应, 在cmake_build(也就是当前目录), 有.sln项目文件, 通过VS打开它, 编译ALL_BUILD解决方案.
经过一段时间的编译, 将他安装在你在前面指定的安装路径中 (CMAKE_INSTALL_PREFIX="C:\code_dependencies\protobuf")
cmake --install . --config Debug # 需要和上面的Release或者Debug相同,
cmake --install . # 这里有坑, 在引用框中的不要输入到命令行默认是的config是Release, 如果你编译的是Debug, 但是没有指定
--config Debug会出现问题(编译后文件找不到)CMake Error at third_party/abseil-cpp/absl/cmake_install.cmake:55 (file): file INSTALL cannot find "C:/code_dependencies/protobuf-28.0/cmake_build/bin/Release/abseil_dll.dll": File exists. Call Stack (most recent call first): third_party/abseil-cpp/cmake_install.cmake:85 (include) cmake_install.cmake:37 (include)
cmake --install . --config Debuginstall过程PS C:\code_dependencies\protobuf-28.0\cmake_build> cmake --install . --config Debug -- Installing: C:/code_dependencies/protobuf/lib/cmake/absl/abslTargets.cmake -- Installing: C:/code_dependencies/protobuf/lib/cmake/absl/abslTargets-debug.cmake -- Installing: C:/code_dependencies/protobuf/lib/cmake/absl/abslConfig.cmake -- Installing: C:/code_dependencies/protobuf/lib/cmake/absl/abslConfigVersion.cmake -- Installing: C:/code_dependencies/protobuf/include/absl -- Installing: C:/code_dependencies/protobuf/include/absl/algorithm ............ ............ ............ -- Installing: C:/code_dependencies/protobuf/share/protobuf/examples/MODULE.bazel -- Installing: C:/code_dependencies/protobuf/share/protobuf/examples/pubspec.yaml -- Installing: C:/code_dependencies/protobuf/share/protobuf/examples/README.md -- Installing: C:/code_dependencies/protobuf/share/protobuf/examples/WORKSPACE -- Installing: C:/code_dependencies/protobuf/share/protobuf/examples/WORKSPACE.bzlmod -- Installing: C:/code_dependencies/protobuf/lib/gmock.lib
到这里就安装结束了, 请你到你设定的cmake选项中CMAKE_INSTALL_PREFIX(也就是安装位置)去找编译好的protobuf库文件.

 浙公网安备 33010602011771号