【转载】Intellij IDEA的Hibernate简单应用
转载自:
https://www.cnblogs.com/yangyquin/p/5438248.html
1、创建数据库及其表
create database demo;
use demo;
CREATE TABLE `user` (
`id` int(10) unsigned NOT NULL AUTO_INCREMENT,
`username` varchar(50) DEFAULT NULL,
`password` varchar(50) DEFAULT NULL,
`email` varchar(50) DEFAULT NULL,
PRIMARY KEY (`id`),
UNIQUE KEY `ID` (`id`),
KEY `ID_2` (`id`)
) ENGINE=InnoDB AUTO_INCREMENT=11 DEFAULT CHARSET=utf8
2、Intellij IDEA连接数据库


1)点击IDEA主界面右边的Database,点击“+”号,选择Data Source -> 选择对应的数据库,我这里选择的是MySQL。
2)输入需要用到的数据库的名称,比如demo,输入用户名和密码,点击“Test Connection‘,测试连接数据库是否成功。
3)数据库连接成功,点击”OK“,最后点击”Apply“和”OK“即可。
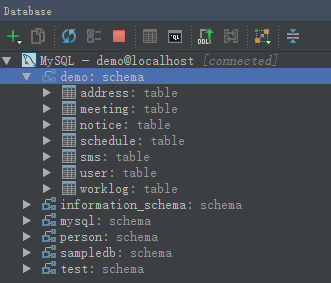
4)连接成功后,显示所有数据库及其表格。
5)随意点击一个表中的某个字段,即可查看到表格内容,比如user表。Data为表格内容,Text为生成表格的SQL语句。
3、使用Intellij IDEA13创建Hibernate
1)创建一个空白Project,名为:HibernateProject。
2)创建一个Module,名为:HibernateModule,选择“Web Application”和“Hibernate”。选择“create default hibernate configuration in project configuration”和“Download”,点击“Configure”,由于后面需要用到struts2,如果使用最新的Hibernate版本的话,貌似有些不兼容,所以这里选择Hibernate 3.6.10-3.6.10。确定即可。IDEA会自动下载相关的Jar包,并自动生成一个hibernate.cfg.xml配置文件。
3)调整一个项目的结构,将lib文件夹移动到web/WEB-INF路径下,在web/WEB-INF路径下生成一个文件夹classes。快捷键:Ctrl + Alt + Shift + S ,弹出Project Module。配置Paths和Dependencies。
4)将额外需要的JAR包复制到lib文件夹中,比如MySQL驱动包mysql-connector-java-5.1.22-bin.jar,测试包junit-4.10.jar。
5)根据数据库demo中的user表,生成UserEntity类。有两种生成方式,一种是生成UserEntity类并生成相应的配置文件UserEntity.hbm.xml 文件。另外一种是利用标注的方式进行数据库表与实体类的属性的匹配。这里选择第二种方式。
选择左边的Persistence,选择对应的Module的hibernate.cfg.xml,注意选择的是图标是数据库样式的,右键 -> Generate Persistence Mapping -> By Database Schema。
选择数据库源,就是刚刚测试连接的数据库;输入包名,它会自动创建包的;由于这里只是简单的演示如何利用Hibernate操作数据库,所以只是简单的选择其中一个表来做实验,比如选择demo.user。并且将右下方的“Generate Column Properties”勾上。如果选择的是第一种操作方式,则将右下方的“Generate Separate XML per Entity”勾选上,即为每一个表所对应的实体类生成一个配置文件。确定即可。
6)自动生成的实体类UserEntity。
package com.yyq.dao;
import javax.persistence.*;
@Entity
@Table(name = "user", schema = "", catalog = "demo")
public class UserEntity {
    private int id;
    private String username;
    private String password;
    private String email;
    @Id
    @Column(name = "id", nullable = false, insertable = true, updatable = true, length = 10, precision = 0)
    public int getId() {
        return id;
    }
    public void setId(int id) {
        this.id = id;
    }
    @Basic
    @Column(name = "username", nullable = true, insertable = true, updatable = true, length = 50, precision = 0)
    public String getUsername() {
        return username;
    }
    public void setUsername(String username) {
        this.username = username;
    }
    @Basic
    @Column(name = "password", nullable = true, insertable = true, updatable = true, length = 50, precision = 0)
    public String getPassword() {
        return password;
    }
    public void setPassword(String password) {
        this.password = password;
    }
    @Basic
    @Column(name = "email", nullable = true, insertable = true, updatable = true, length = 50, precision = 0)
    public String getEmail() {
        return email;
    }
    public void setEmail(String email) {
        this.email = email;
    }
    @Override
    public boolean equals(Object o) {
        if (this == o) return true;
        if (o == null || getClass() != o.getClass()) return false;
        UserEntity that = (UserEntity) o;
        if (id != that.id) return false;
        if (email != null ? !email.equals(that.email) : that.email != null) return false;
        if (password != null ? !password.equals(that.password) : that.password != null) return false;
        if (username != null ? !username.equals(that.username) : that.username != null) return false;
        return true;
    }
    @Override
    public int hashCode() {
        int result = id;
        result = 31 * result + (username != null ? username.hashCode() : 0);
        result = 31 * result + (password != null ? password.hashCode() : 0);
        result = 31 * result + (email != null ? email.hashCode() : 0);
        return result;
    }
}
7)配置hibernate.cfg.xml 如下。
<?xml version='1.0' encoding='utf-8'?>
<!DOCTYPE hibernate-configuration PUBLIC
        "-//Hibernate/Hibernate Configuration DTD//EN"
        "http://www.hibernate.org/dtd/hibernate-configuration-3.0.dtd">
<hibernate-configuration>
    <session-factory>
        <property name="connection.url">jdbc:mysql://localhost:3306/demo</property>
        <property name="connection.driver_class">com.mysql.jdbc.Driver</property>
        <property name="connection.username">root</property>
        <property name="connection.password">123456</property>
        <property name="current_session_context_class">thread</property>
        <property name="show_sql">true</property>
        <property name="hbm2ddl.auto">update</property>
        <!-- DB schema will be updated if needed -->
        <!-- <property name="hbm2ddl.auto">update</property> -->
        <property name="dialect">org.hibernate.dialect.MySQLDialect</property>
        <mapping class="com.yyq.dao.UserEntity"/>
    </session-factory>
</hibernate-configuration>
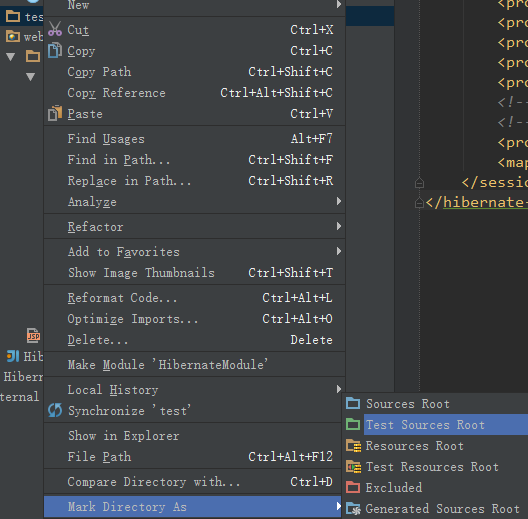
8)生成测试路径。在Module路径下生成一个文件夹,与src同级,名为test,点击文件夹test,右键,选择Mark Directory As - > Test Sources Root。
9)生成测试类。
package com.yyq;
import com.yyq.dao.UserEntity;
import org.hibernate.Session;
import org.hibernate.SessionFactory;
import org.hibernate.Transaction;
import org.hibernate.cfg.Configuration;
import org.junit.Before;
import org.junit.Test;

public class DAOTest {
    Configuration config = null;
    SessionFactory sessionFactory = null;
    Session session = null;
    Transaction tx = null;
    @Before
    public void init() {
        config = new Configuration().configure("/hibernate.cfg.xml");
        sessionFactory = config.buildSessionFactory();
        session = sessionFactory.openSession();
        tx = session.beginTransaction();
    }
    //增加
    @Test
    public void insert() {
        UserEntity ue = new UserEntity();
        ue.setUsername("Anny");
        ue.setPassword("123");
        ue.setEmail("Anny@163.com");
        session.save(ue);
        tx.commit();
    }
    //修改
    @Test
    public void update() {
        UserEntity user = (UserEntity) session.get(UserEntity.class, new Integer(2));
        user.setUsername("Penny");
        session.update(user);
        tx.commit();
        session.close();
    }
    //查找
    @Test
    public void getById() {
        UserEntity user = (UserEntity) session.get(UserEntity.class, new Integer(8));
        tx.commit();
        session.close();
        System.out.println("ID号:" + user.getId() + ";用户名:" + user.getUsername() +
                ";密码:" + user.getPassword() + ";邮件:" + user.getEmail());
    }
    //删除
    @Test
    public void delete() {
        UserEntity user = (UserEntity) session.get(UserEntity.class, new Integer(6));
        session.delete(user);
        tx.commit();
        session.close();
    }
}
10)运行测试类,可以一个一个方法的进行运行,也可以在类名处将所有的测试方法都一起运行。全部运行成功!

11)项目结构图。
4、Hibernate与Struts2整合
1)配置web.xml,这与普通的Struts2程序一样。
<?xml version="1.0" encoding="UTF-8"?>
<web-app xmlns="http://java.sun.com/xml/ns/javaee"
           xmlns:xsi="http://www.w3.org/2001/XMLSchema-instance"
           xsi:schemaLocation="http://java.sun.com/xml/ns/javaee
          http://java.sun.com/xml/ns/javaee/web-app_3_0.xsd"
           version="3.0">
    <display-name>Struts2AndHibernate</display-name>
    <filter>
        <filter-name>struts2</filter-name>
        <filter-class>org.apache.struts2.dispatcher.ng.filter.StrutsPrepareAndExecuteFilter</filter-class>
    </filter>
    <filter-mapping>
        <filter-name>struts2</filter-name>
        <url-pattern>/*</url-pattern>
    </filter-mapping>
    <welcome-file-list>
        <welcome-file>index.jsp</welcome-file>
    </welcome-file-list>
</web-app>
2)将相关的Jar包复制到lib文件夹下。

3)创建一个名为ListAllAction.java文件。
package com.yyq.action;
import com.googlecode.s2hibernate.struts2.plugin.annotations.SessionTarget;
import com.googlecode.s2hibernate.struts2.plugin.annotations.TransactionTarget;
import com.opensymphony.xwork2.ActionSupport;
import com.yyq.dao.UserEntity;
import org.hibernate.Session;
import org.hibernate.Transaction;
import java.util.List;
public class ListAllAction extends ActionSupport {
    //使用@SessionTarget标注得到Hibernate Session
    @SessionTarget
    private Session session = null;
    //使用@TransactionTarget标注得到Hibernate Transaction
    @TransactionTarget
    private Transaction transaction = null;
    private List<UserEntity> users;
    public String list(){
        try{
            //得到user表中的所有记录
            users = session.createCriteria(UserEntity.class).list();
            transaction.commit();
            session.close();
            return SUCCESS;
        }catch (Exception e){
            e.printStackTrace();
            return ERROR;
        }
    }
    public List<UserEntity> getUsers(){
        return users;
    }
    public void setUsers(List<UserEntity> users){
        this.users = users;
    }
}
4)修改index.jsp文件以显示后台数据库的数据获取情况。
<%@ taglib prefix="s" uri="/struts-tags" %>
<%@ page contentType="text/html;charset=UTF-8" language="java" %>
<html>
<head>
    <title>显示数据</title>
</head>
<body>
<table>
    <tr>
        <th>ID</th>
        <th>用户名</th>
        <th>密码</th>
        <th>邮箱</th>
    </tr>
    <s:iterator value="users" var="obj">
        <tr>
            <td><s:property value="id"/></td>
            <td><s:property value="username"/></td>
            <td><s:property value="password"/></td>
            <td><s:property value="email"/></td>
        </tr>
    </s:iterator>
</table>
</body>
</html>
5)配置struts.xml文件。
<?xml version="1.0" encoding="UTF-8"?>
<!DOCTYPE struts PUBLIC
        "-//Apache Software Foundation//DTD Struts Configuration 2.1.7//EN"
        "http://struts.apache.org/dtds/struts-2.1.7.dtd">
<struts>
    <!--s2hibernate插件里面有一个叫hibernate-default的package,
    它里面的拦截器用于实现struts2+hibernate整合-->
    <package name="default" extends="hibernate-default">
        <!--defaultStackHibernate里面的拦截器会识别出@SessionTarget,@TransactionTarget等标注,
        然后将hibernate注入进去-->
        <default-interceptor-ref name="defaultStackHibernate"/>
        <default-class-ref class="com.yyq.action.ListAllAction"/>
        <action name="listAll" method="list">
            <result>index.jsp</result>
        </action>
    </package>
</struts>
6)启动Tomcat,输入:http://localhost:8080/listAll.action

7)项目结构图。


 浙公网安备 33010602011771号