【Zabbix】5.0版本钉钉告警Python脚本及配置
Zabbix 钉钉群机器人发送信息
这里利用的是钉钉群机器人,将zabbix告警恢复信息发送至钉钉群,并@相应的管理人员。
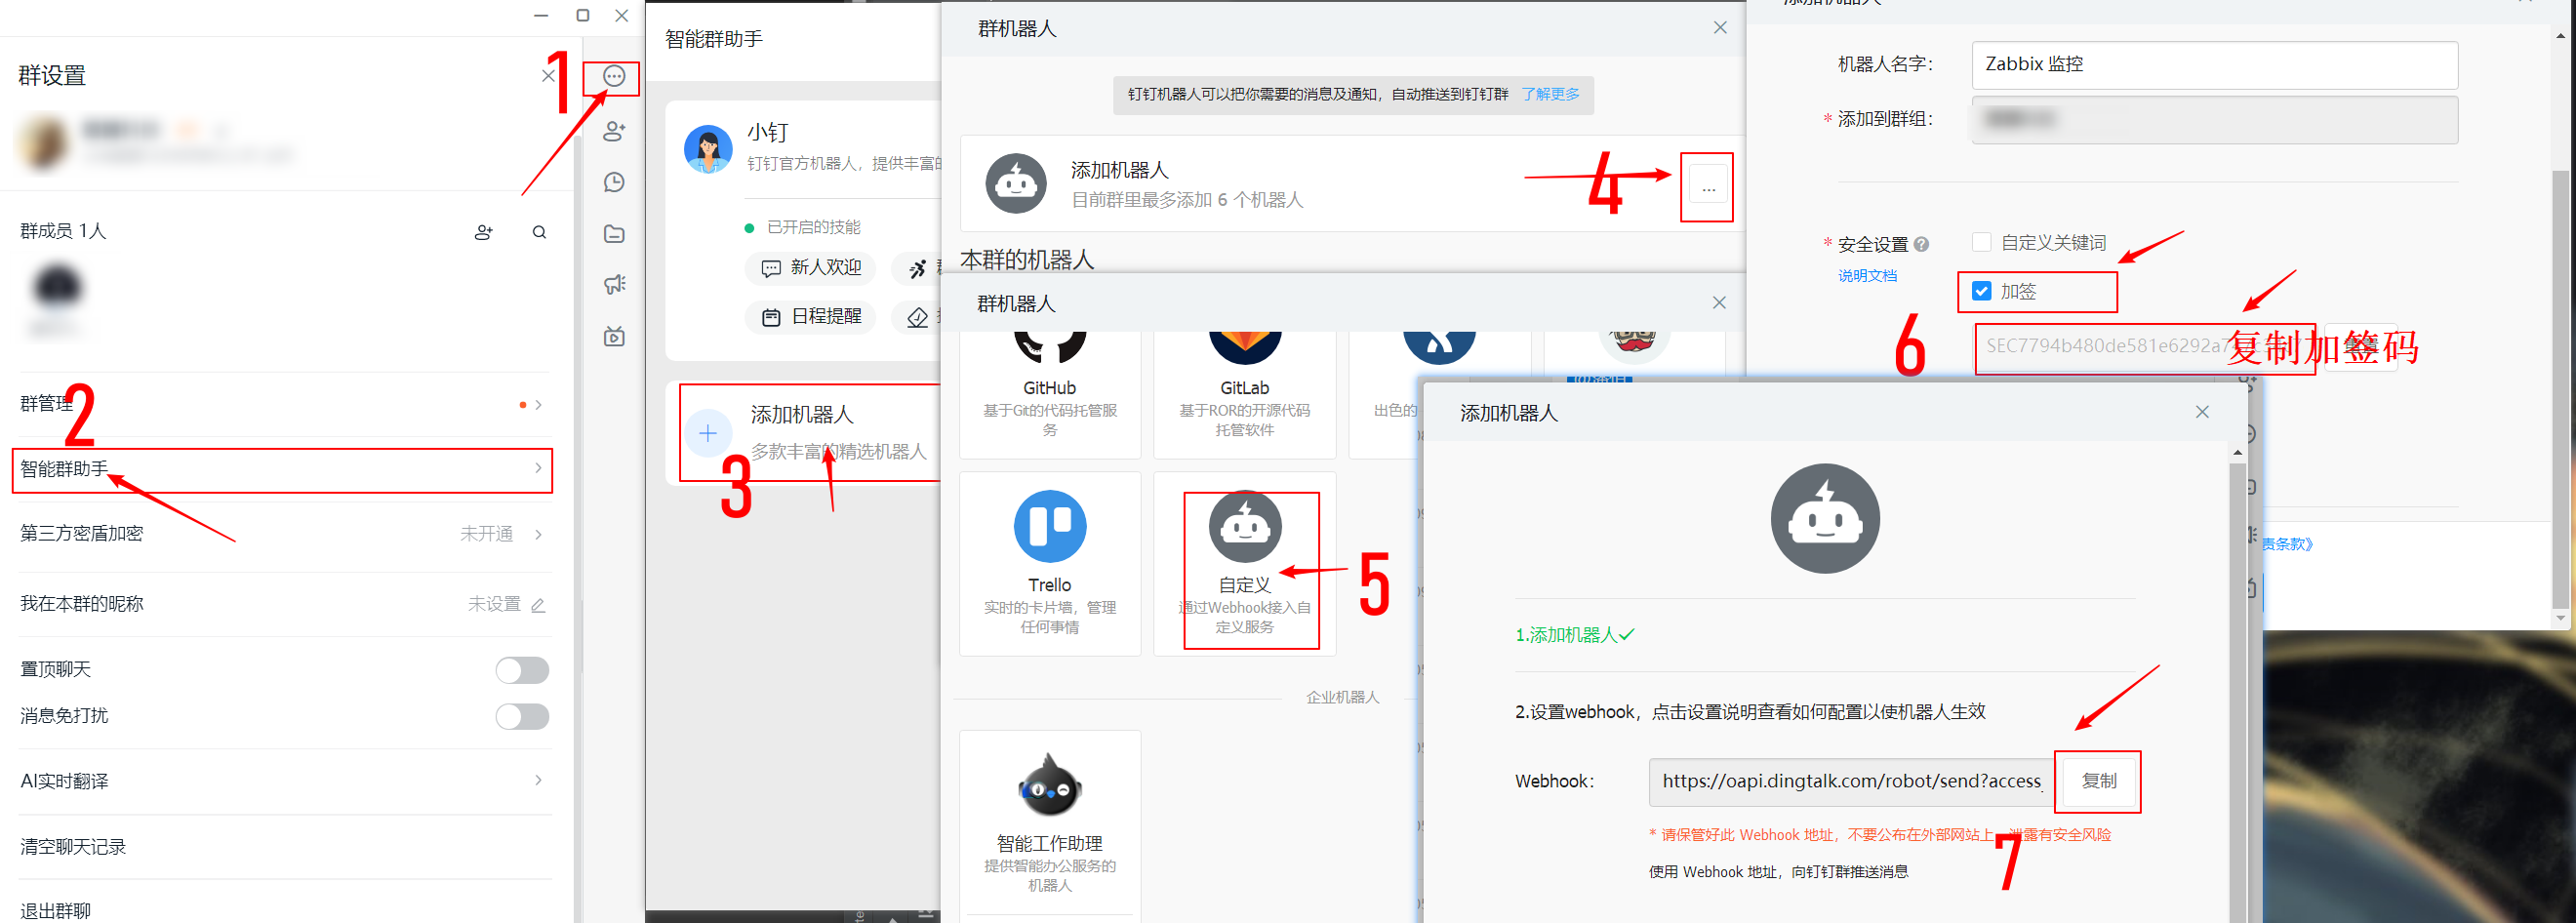
1. 在钉钉群中创建机器人
- 安全模式选择加签,并复制一个 67位字符串
- 记录webhook地址
获取到的这两串字符配置到后面的zabbix_ding.conf文件中
2. Zabbix 服务器端配置
2.1 安装Python3、相关包以及创建钉钉发送消息日志文件
# 安装python3,脚本是基于Python3写的
yum install -y python3

# 安装pip,pip是python的包管理器
# 下载pip安装脚本
curl https://bootstrap.pypa.io/get-pip.py -o get-pip.py
# 运行安装脚本
sudo python3 get-pip.py
# 安装puthon包
pip3 install configparser
pip3 install requests
# 创建钉钉发送日志文件路径
touch /var/log/zabbix/zabbix_ding.log
chown zabbix.zabbix /var/log/zabbix/zabbix_ding.log
2.2 将脚本及配置文件上传至服务器zabbix脚本目录
- 修改以下配置文件zabbix_ding.conf,并将文件上传至
/etc/zabbix/下
[config]
# 日志文件
log_path=/var/log/zabbix/zabbix_ding.log
#钉钉机器人 webhook 值
webhook=https://oapi.dingtalk.com/robot/send?access_token=b3e6fa0f410e7ced04c81680f036xxxx
# 安全设置 -- 加签
secret=SEC64d20b4e9d2e2677f7aa01d2a7c2f9xxxx
- 自定义修改,并复制脚本内容,上传至
AlertScriptsPath路径下
# 查看zabbix的脚本默认路径,请注意使用您自己的zabbix_server.conf
cat /etc/zabbix/zabbix_server.conf |grep AlertScriptsPath
### Option: AlertScriptsPath
# AlertScriptsPath=${datadir}/zabbix/alertscripts
AlertScriptsPath=/usr/lib/zabbix/alertscripts
#!/usr/bin/env python3
# coding:utf8
#
import configparser
import os
import time
import hmac
import hashlib
import base64
import urllib.parse
import requests
import json
import sys
config = configparser.ConfigParser()
config.read('/etc/zabbix/zabbix_ding.conf', encoding='utf-8')
log_path = config.get('config', 'log_path')
api_url = config.get('config', 'webhook')
api_secret = config.get('config', 'secret')
log_time = time.strftime("%Y-%m-%d %H:%M:%S", time.localtime())
# 钉钉机器人文档说明
# https://ding-doc.dingtalk.com/doc#/serverapi2/qf2nxq
def get_timestamp_sign():
timestamp = str(round(time.time() * 1000))
secret = api_secret
secret_enc = secret.encode('utf-8')
string_to_sign = '{}\n{}'.format(timestamp, secret)
string_to_sign_enc = string_to_sign.encode('utf-8')
hmac_code = hmac.new(secret_enc, string_to_sign_enc, digestmod=hashlib.sha256).digest()
sign = urllib.parse.quote_plus(base64.b64encode(hmac_code))
return timestamp, sign
# 获取加签后的链接
def get_signed_url():
timestamp, sign = get_timestamp_sign()
webhook = api_url + "×tamp=" + timestamp + "&sign=" + sign
return webhook
# 定义消息模式
def get_webhook(mode):
if mode == 0: # only 关键字
webhook = api_url
elif mode == 1 or mode == 2: # 关键字和加签 或 # 关键字+加签+ip
webhook = get_signed_url()
else:
webhook = ""
print("error! mode: ", mode, " webhook : ", webhook)
return webhook
def get_message(text, user_info):
# 和类型相对应,具体可以看文档 :https://ding-doc.dingtalk.com/doc#/serverapi2/qf2nxq
# 可以设置某个人的手机号,指定对象发送
message = {
"msgtype": "text", # 有text, "markdown"、link、整体跳转ActionCard 、独立跳转ActionCard、FeedCard类型等
"text": {
"content": text # 消息内容
},
"at": {
"atMobiles": [
user_info,
],
"isAtAll": False # 是否是发送群中全体成员
}
}
return message
# 消息发送日志
def log(info):
if os.path.exists(log_path):
log_file = open(log_path, "a+")
else:
log_file = open(log_path, "w+")
log_file.write(info)
def send_ding_message(text, user_info):
# 请求的URL,WebHook地址
# 主要模式有 0 : 关键字 1:# 关键字 +加签 3:关键字+加签+IP
webhook = get_webhook(1)
# 构建请求头部
header = {
"Content-Type": "application/json",
"Charset": "UTF-8"
}
# 构建请求数据
message = get_message(text, user_info)
# 对请求的数据进行json封装
message_json = json.dumps(message)
# 发送请求
info = requests.post(url=webhook, data=message_json, headers=header).json()
code = info["errcode"]
errmsg = info["errmsg"]
if code == 0:
log(log_time + ":消息已发送成功 返回信息:%s %s\n" % (code, errmsg))
else:
log(log_time + ":消息发送失败 返回信息:%s %s\n" % (code, errmsg))
print(log_time + ":消息发送失败 返回信息:%s %s\n" % (code, errmsg))
exit(3)
if __name__ == "__main__":
text = sys.argv[3]
user_info = sys.argv[1]
send_ding_message(text, user_info)
# 修改脚本权限
chown zabbix.zabbix /lib/zabbix/alertscripts/zabbix_ding.py
chmod u+x /lib/zabbix/alertscripts/zabbix_ding.py
# 测试脚本内容
python3 zabbix_ding.py  user subject mesages

3. Web端配置
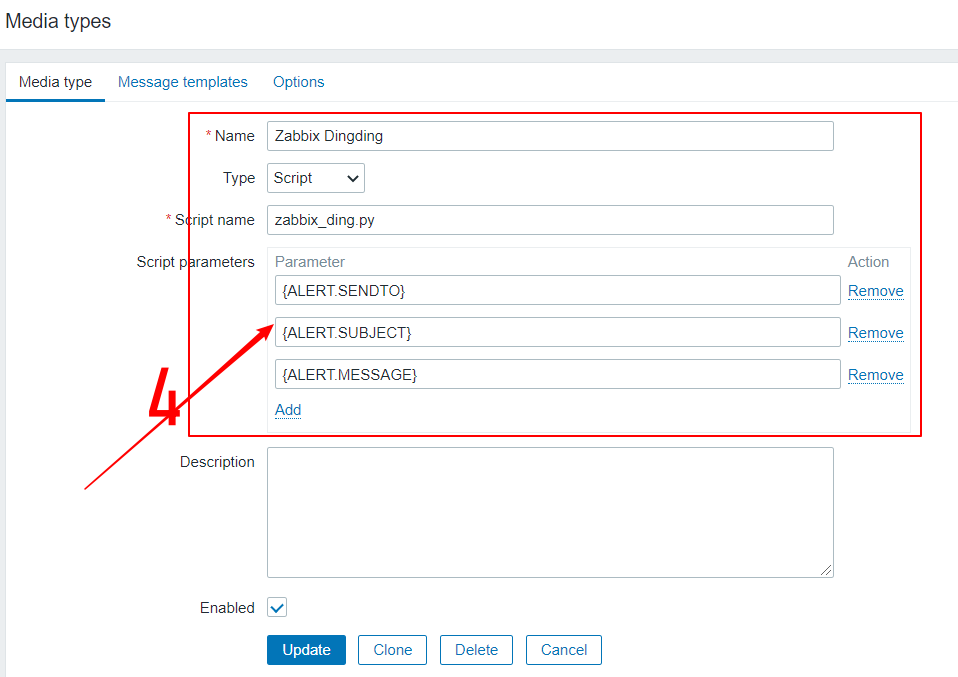
3.1 添加 报警媒体类型
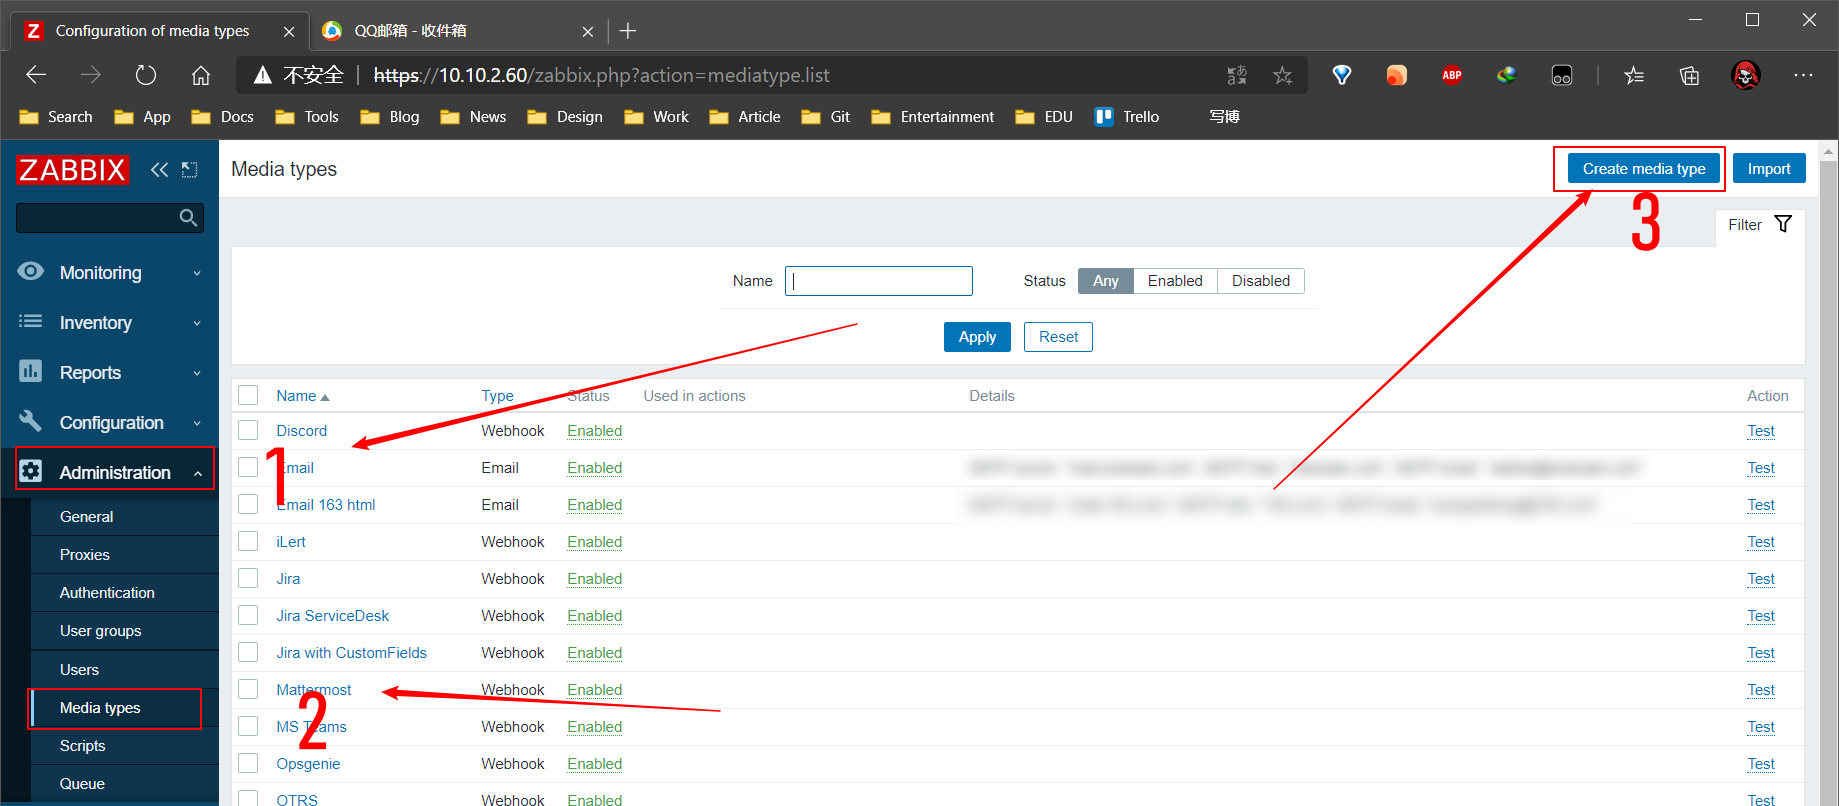
按如下图中信息填写
{ALERT.SENDTO}

{ALERT.SUBJECT}

{ALERT.MESSAGE}

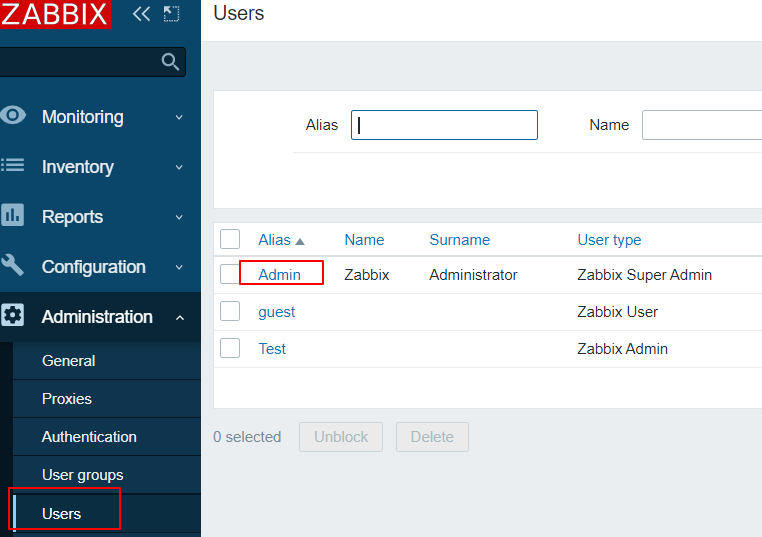
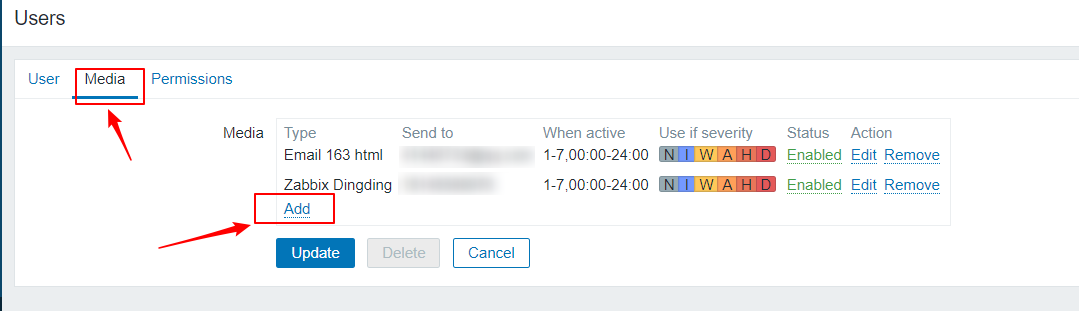
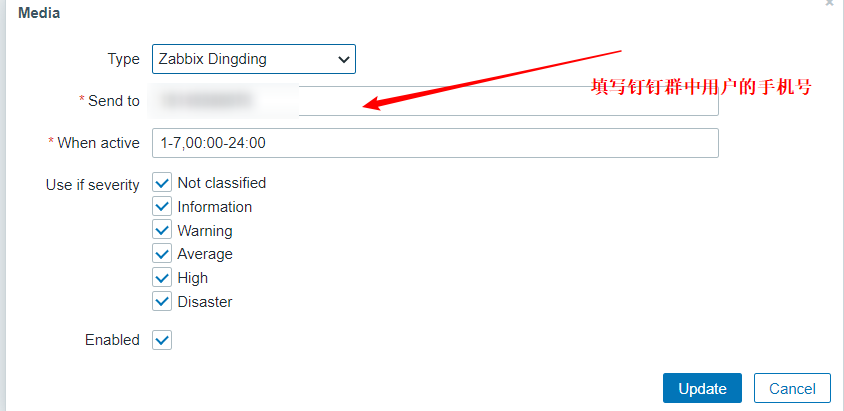
3.2 在用户中配置报警媒介
这里以管理员用户为例
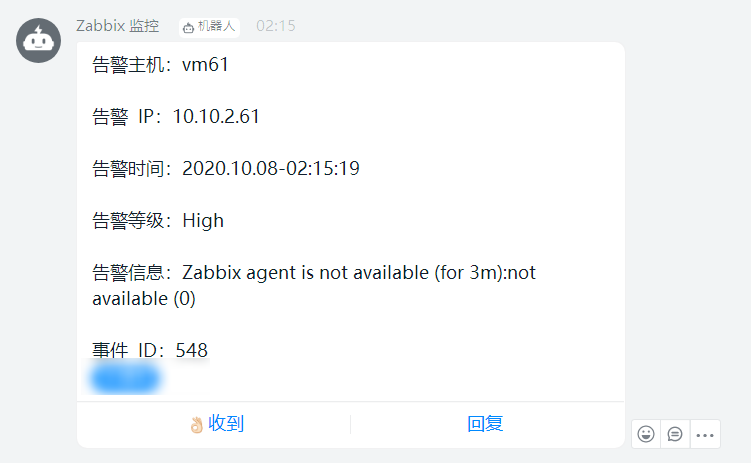
3.3 配置动作


告警主机:{HOST.NAME}
告警  IP:{HOST.IP}
告警时间:{EVENT.DATE}-{EVENT.TIME}
告警等级:{TRIGGER.SEVERITY}
告警信息:{TRIGGER.NAME}:{ITEM.VALUE}
事件  ID:{EVENT.ID}
3.4 测试
我这里关闭一台主机

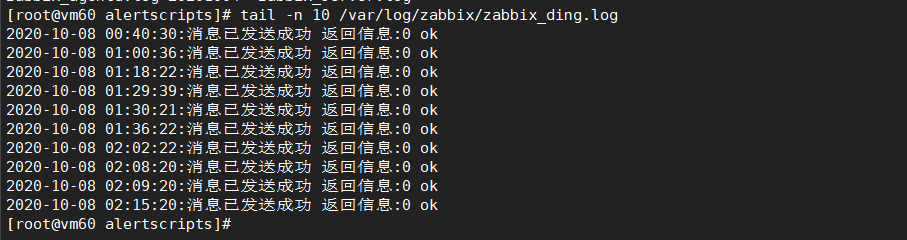
查看钉钉消息日志
我的一点点工作

 浙公网安备 33010602011771号