
汇编语言教程(二) 汇编器 NASM(Intel语法)& as(AT&T语法) 样例
编译器种类
汇编语言取决于处理器的指令集和体系结构。
有很多好的汇编器,例如 -
- 微软汇编器采用Intel语法(MASM)
- Borland Turbo 汇编编译器 (TASM)
- AT&T 语法的汇编编译器 - GNU gas(as) //as是作为gcc的后端来使用的
- Yet Another Assembler - YASM
- NASM是采用Intel风格语法的汇编编译器
两种语法和运行平台决定了,你可能会采用一种编译器
以下主要针对NASM和GNU的as
实验环境:
//nasm 汇编器
[root@ht6 huibian]# nasm -v  //centos平台,yum install nasm安装即可
NASM version 2.10.07 compiled on Jun  9 2014

//gnu as 汇编器
[root@ht6 huibian]# as -v
GNU assembler version 2.27 (x86_64-redhat-linux) using BFD version version 2.27-44.base.el7_9.1

[root@ht6 huibian]# cat /etc/redhat-release
CentOS Linux release 7.9.2009 (Core)

[root@ht6 huibian]# uname -a
Linux ht6.node 3.10.0-1160.62.1.el7.x86_64 #1 SMP Tue Apr 5 16:57:59 UTC 2022 x86_64 x86_64 x86_64 GNU/Linux
一、编译器采用 NASM
1) nasm采用intel语法
2) nasm汇编文件后缀为 .asm
3) 段采用 section .text / section .data / section .bbs
4)注解采用 ; 形式
例子1: 寄存器采用IA-32位架构汇编代码
;Copyright (c) 1999 Konstantin Boldyshev <konst@linuxassembly.org>
;
;"hello, world" in assembly language for Linux
;
;   to build an executable:
;       nasm -f elf test.asm
;       ld -s -o test test.o

section .text
; Export the entry point to the ELF linker or loader.  The conventional
; entry point is "_start". Use "ld -e foo" to override the default.
    global _start

section .data
msg db  'Hello, world!',0xa ;our dear string
len equ $ - msg         ;length of our dear string

section .text

; linker puts the entry point here:
_start:

; Write the string to stdout:

    mov edx,len ;message length
    mov ecx,msg ;message to write
    mov ebx,1   ;file descriptor (stdout)
    mov eax,4   ;system call number (sys_write)
    int 0x80    ;call kernel

; Exit via the kernel:

    mov ebx,0   ;process' exit code
    mov eax,1   ;system call number (sys_exit)
    int 0x80    ;call kernel - this interrupt won't return
验证、编译test.asm
[root@ht6 huibian]# vim test.asm
[root@ht6 huibian]# nasm -f elf test.asm
[root@ht6 huibian]# ll
total 8
-rw-r--r-- 1 root root 932 Mar  5 18:18 test.asm
-rw-r--r-- 1 root root 640 Mar  5 18:18 test.o
[root@ht6 huibian]# ld -s -o test test.o
ld: i386 architecture of input file `test.o' is incompatible with i386:x86-64 output
这个程序编译是没有问题,因为符合语法,但是ld就会报错, 因为是x86-64平台
ld: i386 architecture of input file `test.o' is incompatible with i386:x86-64 output
例子2: 寄存器采用x86-64位架构汇编代码
; -----------------------------------------------------------------------------
; A 64-bit Linux application that writes the first 90 Fibonacci numbers. To
; assemble and run:
;
;     nasm -felf64 test1.asm && gcc test1.o && ./a.out
; -----------------------------------------------------------------------------

        global  main
        extern  printf

        section .text
main:
        push    rbx                     ; we have to save this since we use it

        mov     ecx, 90                 ; ecx will countdown to 0
        xor     rax, rax                ; rax will hold the current number
        xor     rbx, rbx                ; rbx will hold the next number
        inc     rbx                     ; rbx is originally 1
print:
        ; We need to call printf, but we are using rax, rbx, and rcx.  printf
        ; may destroy rax and rcx so we will save these before the call and
        ; restore them afterwards.

        push    rax                     ; caller-save register
        push    rcx                     ; caller-save register

        mov     rdi, format             ; set 1st parameter (format)
        mov     rsi, rax                ; set 2nd parameter (current_number)
        xor     rax, rax                ; because printf is varargs

        ; Stack is already aligned because we pushed three 8 byte registers
        call    printf                  ; printf(format, current_number)

        pop     rcx                     ; restore caller-save register
        pop     rax                     ; restore caller-save register

        mov     rdx, rax                ; save the current number
        mov     rax, rbx                ; next number is now current
        add     rbx, rdx                ; get the new next number
        dec     ecx                     ; count down
        jnz     print                   ; if not done counting, do some more

        pop     rbx                     ; restore rbx before returning
        ret
format:
        db  "%20ld", 10, 0
验证、编译 test1.asm
[root@ht6 huibian]# nasm -felf64 test1.asm
[root@ht6 huibian]# ll
total 12
-rw-r--r-- 1 root root 0 Mar 5 18:21 a.out
-rw-r--r-- 1 root root 2021 Mar 5 18:56 test1.asm
-rw-r--r-- 1 root root 832 Mar 5 18:56 test1.o
-rw-r--r-- 1 root root 932 Mar 5 18:18 test.asm

  [root@ht6 huibian]# gcc test1.o && ./a.out
编译通过....
test1.asm 输出的结果 分析一下:
[root@ht6 huibian]# size a.out
text    data    bss    dec    hex    filename
1208    548    4    1760    6e0    a.out
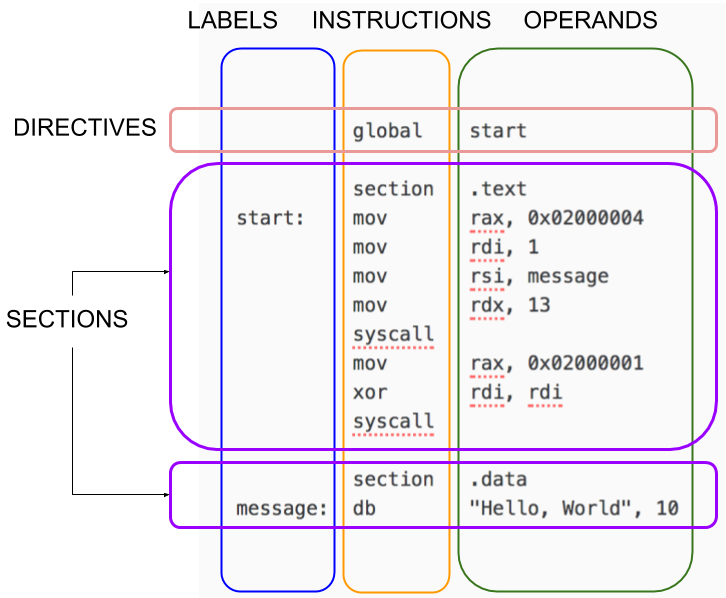
我们看下 NASM程序的结构大概是下面的样子, 图片来自: https://cs.lmu.edu/~ray/notes/nasmtutorial/
二、汇编语法采用AT&T语法,采用GNU Gas(as) 编译器
1) gnu as采用AT&T语法
2) 段使用 .text .data .bbs
3)注解采用#形式
4) 文件后缀为.s
# ----------------------------------------------------------------------------------------
# Writes "Hello, World" to the console using only system calls. Runs on 64-bit Linux only.
# To assemble and run:
#
#     gcc -c aozhejin.s && ld aozhejin.o && ./a.out
#
# or
#
#     gcc -nostdlib aozhejin.s && ./a.out
# ----------------------------------------------------------------------------------------

        .global _start

        .text
_start:
        # write(1, message, 13)
        mov     $1, %rax                # system call 1 is write
        mov     $1, %rdi                # file handle 1 is stdout
        mov     $message, %rsi          # address of string to output
        mov     $13, %rdx               # number of bytes
        syscall                         # invoke operating system to do the write

        # exit(0)
        mov     $60, %rax               # system call 60 is exit
        xor     %rdi, %rdi              # we want return code 0
        syscall                         # invoke operating system to exit
message:
        .ascii  "this is test\n"
[root@ht5 s]# gcc -c aozhejin.s && ld aozhejin.o && ./a.out //编译通过
三、NASM 和 as 使用小结:
1、Intel和AT&T 语法是不同的
2、as是从左到右赋值,而nasm是从右到左
3、注解as是 #, 而 nasm采用;
4、标签也不同等。
所以他们之间差异还是比较大的。

 浙公网安备 33010602011771号