
在 WPF 中集成 ASP.NET Core 和 WebView2 用于集成 SPA 应用
背景
我们有些工具在 Web 版中已经有了很好的实践,而在 WPF 中重新开发也是一种费时费力的操作,那么直接集成则是最省事省力的方法了。
思路解释
- 为什么要使用 WPF?莫问为什么,老 C# 开发的坚持,另外因为 Windows 上已经装了 Webview2/edge 整体打包比 electron 小很多,release 后的体积主要是 ASP.NET Core 的文件。
- 为什么要使用 ASP.NET Core 进行代理呢?很简单,因为很多操作要求使用 HTTP Context,在类似
file:///的链接下是不能使用的,如果做成联网的有些资源进行跨域请求也是不能的。举个很简单的例子,vite 打包后的 SPA 如果直接点开那么里面打包的 ES Module 的文件全部不允许请求。 - 那你这个项目不联网能用吗?看你的需求了,不联网当然能用,这里集成的 SPA 不一定全部都得是完整的 SPA,整套集成如果客户在有网的环境下可以直接引用网页的 URL 就好了。比如我们要用 monaco-editor 或者其他的文字编辑器又或者是 3D 编辑器,在 C# 上找不到或不好找到类似的库,那么集成 npm 上现成的库就是最佳选择。
修改项目文件
我们首先修改项目文件,让 WPF 项目可以包含 ASP.NET Core 的库,以及引用 WebView2 控件。
<Project Sdk="Microsoft.NET.Sdk">

  <PropertyGroup>
	<OutputType>WinExe</OutputType>
	<TargetFramework>net8.0-windows</TargetFramework>
	<Nullable>enable</Nullable>
	<ImplicitUsings>enable</ImplicitUsings>
	<UseWPF>true</UseWPF>
  </PropertyGroup>

  <ItemGroup>
    <!-- 这里插入 WebView2 的包,用于显示网页 -->
	<PackageReference Include="Microsoft.Web.WebView2" Version="1.0.2478.35" />
    <!-- 这里插入 ASP.NET Core 的框架引用,用于代理资源文件 -->
	<FrameworkReference Include="Microsoft.AspNetCore.App" />
  </ItemGroup>

  <ItemGroup>
    <!-- 这里模仿 ASP.NET Core,将 SPA 资源文件存于 wwwroot 文件夹下 -->
	<None Update="wwwroot\**">
	  <CopyToOutputDirectory>Always</CopyToOutputDirectory>
	</None>
  </ItemGroup>

</Project>
修改 App.xaml 和 App.xaml.cs 以使用 ASP.NET Core 的 WebApplication.CreateBuilder()
这里为了全局使用依赖注入,我们将 WebApplication.CreateBuilder() 放在 App.xaml.cs 中全局使用。为了使用依赖注入应注释掉默认启动窗口,并接管 Startup 事件。
<Application x:Class="WpfAircraftViewer.App"
             xmlns="http://schemas.microsoft.com/winfx/2006/xaml/presentation"
             xmlns:x="http://schemas.microsoft.com/winfx/2006/xaml"
             xmlns:local="clr-namespace:WpfAircraftViewer"
             Startup="ApplicationStartup">
    <!-- 这里将 StartupUri 属性删除,然后注册 Startup 事件 -->
    <Application.Resources>

    </Application.Resources>
</Application>
然后通过修改 Startup 事件的代码来实现相应的加载动作。
using Microsoft.AspNetCore.Builder;
using Microsoft.AspNetCore.StaticFiles;
using Microsoft.Extensions.DependencyInjection;
using System.Windows;

namespace WpfAircraftViewer
{
    /// <summary>
    /// Interaction logic for App.xaml
    /// </summary>
    public partial class App : Application, IAsyncDisposable
    {
        public WebApplication? WebApplication { get; private set; }

        public async ValueTask DisposeAsync()
        {
            if (WebApplication is not null)
            {
                await WebApplication.DisposeAsync();
            }
            GC.SuppressFinalize(this);
        }

        private async void ApplicationStartup(object sender, StartupEventArgs e)
        {
            // 这里是创建 ASP.NET 版通用主机的代码
            var builder = WebApplication.CreateBuilder(Environment.GetCommandLineArgs());
            // 注册主窗口和其他服务
            builder.Services.AddSingleton<MainWindow>();
            builder.Services.AddSingleton(this);
            var app = builder.Build();
            // 这里是文件类型映射,如果你的静态文件在浏览器中加载报 404,那么需要在这里注册,这里我加载一个 3D 场景文件的类型
            var contentTypeProvider = new FileExtensionContentTypeProvider();
            contentTypeProvider.Mappings[".glb"] = "model/gltf-binary";
            app.UseStaticFiles(new StaticFileOptions
            {
                ContentTypeProvider = contentTypeProvider,
            });
            // 你如果使用了 Vue Router 或者其他前端路由了,需要在这里添加这句话让路由返回前端,而不是 ASP.NET Core 处理
            app.MapFallbackToFile("/index.html");
            WebApplication = app;
            // 处理退出事件,退出 App 时关闭 ASP.NET Core
            Exit += async (s, e) => await WebApplication.StopAsync();
            // 显示主窗口
            MainWindow = app.Services.GetRequiredService<MainWindow>();
            MainWindow.Show();
            await app.RunAsync().ConfigureAwait(false);
        }
    }
}
此时,我们已经可以正常开启一个默认界面的 MainWindow 了。
使用 WebView2 控件
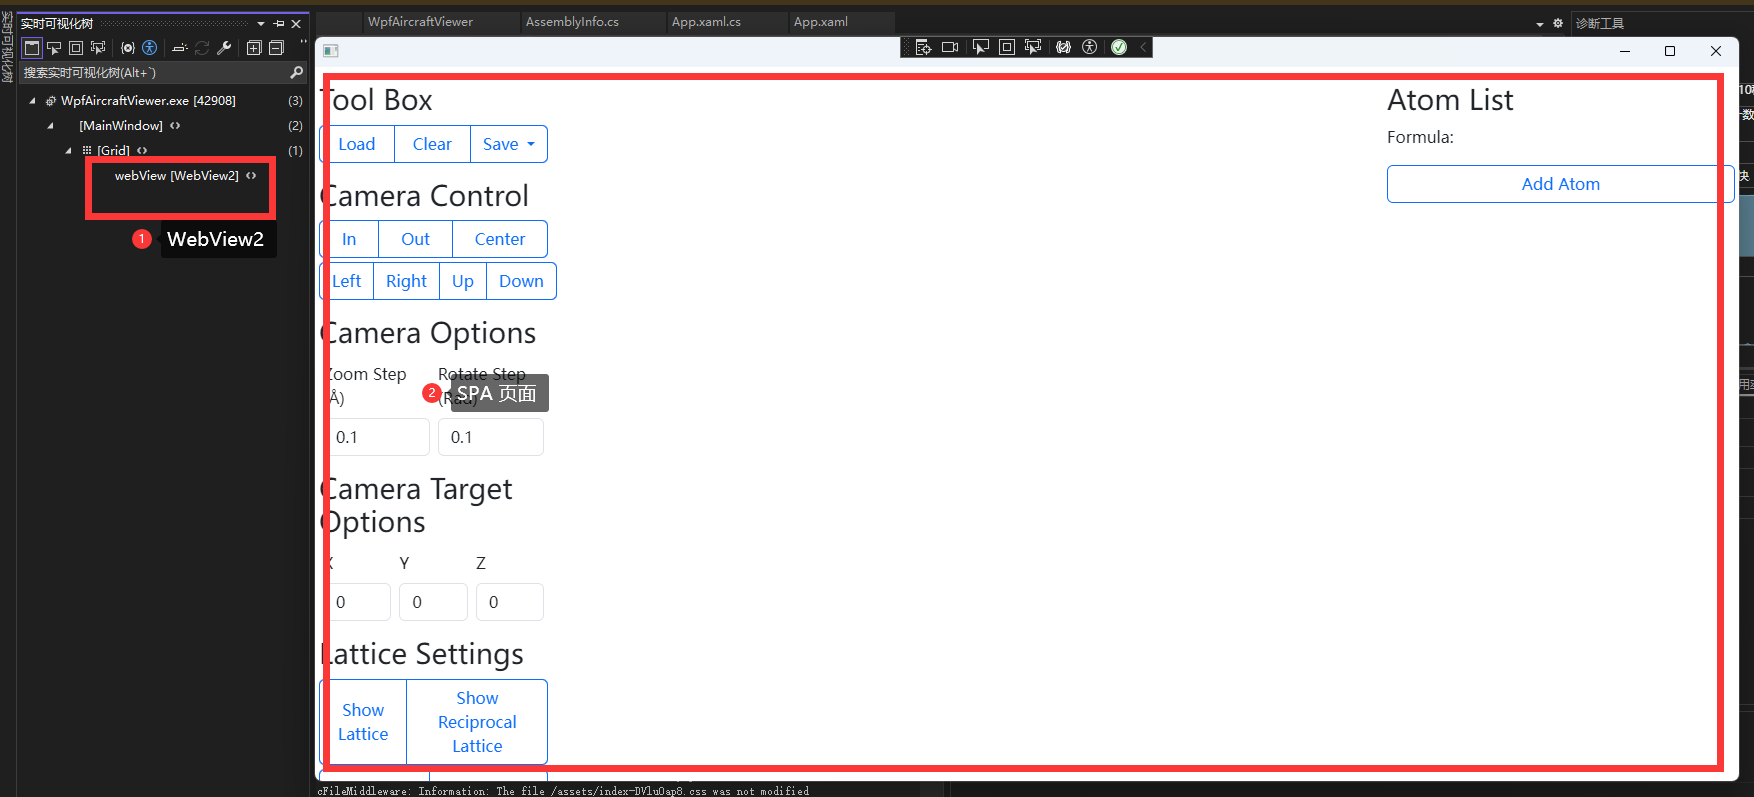
这时我们就可以先将 SPA 文件从 npm 项目的 dist 复制到 wwwroot 了,在编辑 MainWindow 加入 WebView2 控件后就可以查看了。
<Window x:Class="WpfAircraftViewer.MainWindow"
        xmlns="http://schemas.microsoft.com/winfx/2006/xaml/presentation"
        xmlns:x="http://schemas.microsoft.com/winfx/2006/xaml"
        xmlns:d="http://schemas.microsoft.com/expression/blend/2008"
        xmlns:mc="http://schemas.openxmlformats.org/markup-compatibility/2006"
        xmlns:local="clr-namespace:WpfAircraftViewer"
        xmlns:wv2="clr-namespace:Microsoft.Web.WebView2.Wpf;assembly=Microsoft.Web.WebView2.Wpf"
        mc:Ignorable="d" MinHeight="450" MinWidth="800" SnapsToDevicePixels="True">
        <!-- 在上面加入 xmlns:wv2 属性用于引用 WebView2 控件 -->
    <Grid>
        <!-- 这里插入 WebView2 控件,我们默认可以让 Source 是 http://localhost:5000,这是 ASP.NET Core 的默认监听地址 -->
        <wv2:WebView2 Name="webView"
                  Source="{Binding SourceUrl, FallbackValue='http://localhost:5000'}" AllowDrop="True" SnapsToDevicePixels="True"/>
    </Grid>
</Window>
我们可以继续编辑窗口的信息,让他可以关联 ASP.NET Core 的监听地址。
using Microsoft.AspNetCore.Hosting.Server;
using Microsoft.AspNetCore.Hosting.Server.Features;
using System.Windows;

namespace WpfAircraftViewer
{
    /// <summary>
    /// Interaction logic for MainWindow.xaml
    /// </summary>
    public partial class MainWindow : Window
    {
        public string SourceUrl { get; set; }
        public MainWindow(IServer server)
        {
            InitializeComponent();
            // 这里通过注入的 IServer 对象来获取监听的 Url
            var addresses = server.Features.Get<IServerAddressesFeature>()?.Addresses;
            SourceUrl = addresses is not null ? (addresses.FirstOrDefault() ?? "http://localhost:5000") : "http://localhost:5000";
            // 无 VM,用自身当 VM
            DataContext = this;
        }
    }
}
这时我们就可以看到窗口打开了我们的 SPA 页面了。

 浙公网安备 33010602011771号