DDD AutoMapper、Filter、性能测试
从零开始用 .NET Core 写一个领域模型的框架
每篇文章都会打一个对应的 tag
这一版代码中做了那些东西
引入 AutoMapper 并把 AutoMapper 融入 Autofac 中
登陆生成 Token 写入 Cookie。Filter 从 Cookie 中获取到 Token 信息,并写入到当前线程中确保当前线程中任意一个地方都可以获取到登陆信息
性能测试,做到心里有谱,遇到问题就解决问题。
AutoMapper
引入 AutoMapper 包
Core2022.Framework.Commons -- AutoMapper 融入到 Autofac 中 (会读取 DTO 中的所有配置)
Core2022.Application.Services.DTO -- 存放领域对象和Dto对象转换的配置,每一个需要转换的Dto对象都要有一个配置
// DTO 配置
public class UserResponseProfile : Profile
{
    public UserResponseProfile()
    {
        CreateMap<UserDomain, UserResponseDto>();
    }
}

// UserDomain -- 领域对象
// UserResponseDto -- DTO 数据传输对象
// UserDomain -> UserResponseDto -- 映射关系
把 AutoMapper 注册到 Autofac 中
// AutoMapperInjectionServicesExtension.cs
// 一个扩展方法,方便在 Startup 中注册
using Autofac;
using AutoMapper;
using System;
using System.Collections.Generic;
using System.Linq;
using System.Reflection;

namespace Core2022.Framework.Commons.AutoMapper
{
    public static class AutoMapperInjectionServicesExtension
    {
        private static readonly Action<IMapperConfigurationExpression> FallBackExpression =
            config => { };

        public static ContainerBuilder AutofacInjectionAutoMapper(this ContainerBuilder builder)
        {
            var assembly = Assembly.LoadFrom(AppDomain.CurrentDomain.BaseDirectory + "Core2022.Application.Services.DTO.dll");
            return RegisterAutoMapperInternal(builder, new[] { assembly });
        }


        private static ContainerBuilder RegisterAutoMapperInternal(ContainerBuilder builder,
       IEnumerable<Assembly> assemblies, Action<IMapperConfigurationExpression>? configExpression = null, bool propertiesAutowired = false)
        {
            var usedAssemblies = assemblies as Assembly[] ?? assemblies.ToArray();

            var usedConfigExpression = configExpression ?? FallBackExpression;

            builder.RegisterModule(new AutoMapperModule(usedAssemblies, usedConfigExpression, propertiesAutowired));

            return builder;
        }
    }
}
// AutoMapperModule.cs
// 这个代码是我直接在AutoMapper官网找的
using System;
using System.Collections.Generic;
using System.Linq;
using System.Reflection;
using Autofac;
using AutoMapper;
using Module = Autofac.Module;

namespace Core2022.Framework.Commons.AutoMapper
{

    internal class AutoMapperModule : Module
    {
        private readonly Assembly[] assembliesToScan;
        private readonly Action<IMapperConfigurationExpression> mappingConfigurationAction;
        private readonly bool propertiesAutowired;

        public AutoMapperModule(Assembly[] assembliesToScan,
            Action<IMapperConfigurationExpression> mappingConfigurationAction,
            bool propertiesAutowired)
        {
            this.assembliesToScan = assembliesToScan ?? throw new ArgumentNullException(nameof(assembliesToScan));
            this.mappingConfigurationAction = mappingConfigurationAction ??
                                              throw new ArgumentNullException(nameof(mappingConfigurationAction));
            this.propertiesAutowired = propertiesAutowired;
        }

        protected override void Load(ContainerBuilder builder)
        {
            var distinctAssemblies = this.assembliesToScan
                .Where(a => !a.IsDynamic && a.GetName().Name != nameof(AutoMapper))
                .Distinct()
                .ToArray();

            var profiles = builder.RegisterAssemblyTypes(distinctAssemblies)
                .AssignableTo(typeof(Profile))
                .As<Profile>()
                .SingleInstance();

            if (propertiesAutowired)
                profiles.PropertiesAutowired();

            builder
                .Register(componentContext => new MapperConfiguration(config => this.ConfigurationAction(config, componentContext)))
                .As<IConfigurationProvider>()
                .AsSelf()
                .SingleInstance();

            var openTypes = new[]
            {
                typeof(IValueResolver<,,>),
                typeof(IValueConverter<,>),
                typeof(IMemberValueResolver<,,,>),
                typeof(ITypeConverter<,>),
                typeof(IMappingAction<,>)
            };

            foreach (var openType in openTypes)
            {
                var openTypeBuilder = builder.RegisterAssemblyTypes(distinctAssemblies)
                    .AsClosedTypesOf(openType)
                    .AsImplementedInterfaces()
                    .InstancePerDependency();

                if (propertiesAutowired)
                    openTypeBuilder.PropertiesAutowired();
            }

            builder
                .Register(componentContext => componentContext
                    .Resolve<MapperConfiguration>()
                    .CreateMapper(componentContext.Resolve<IComponentContext>().Resolve))
                .As<IMapper>()
                .InstancePerLifetimeScope();
        }

        private void ConfigurationAction(IMapperConfigurationExpression cfg, IComponentContext componentContext)
        {
            this.mappingConfigurationAction.Invoke(cfg);

            var profiles = componentContext.Resolve<IEnumerable<Profile>>();

            foreach (var profile in profiles)
                cfg.AddProfile(profile);
        }
    }
}
把领域对象转成Dto的时候需要大量赋值相关的代码,AutoMapper可以帮忙解决这个问题
AutoMapper 能实现
属性 → 属性之间的映射,
方法 → 属性之间的映射
领域对象接口.方法 → DTO对象.属性 (当前项目的应用)
不需要太多的配置,为每个需要映射的Dto创建一个配套的映射类型。
映射规则直接使用默认的就可以,默认规则就可以把 GetUserName() → UserName,方法映射到属性上面,并且方法名是可以带 Get 的 如果需要特殊的映射规则也可以在配置类型中手动配置。
Filter
// AuthorizeFilterAttribute.cs  BaseController.cs

using Core2022.Framework;
using Core2022.Framework.Authorizations;
using Microsoft.AspNetCore.Mvc.Filters;

namespace Core2022.API.Filters
{
    public class AuthorizeFilterAttribute : ActionFilterAttribute
    {
        public override void OnActionExecuting(ActionExecutingContext context)
        {
            string token = "";
            context.HttpContext.Request.Cookies.TryGetValue(Global.CurrentLoginUserKey, out token);
            if (string.IsNullOrEmpty(token))
            {
                // 未登录
            }
            else
            {
                string json = CodingUtils.AesDecrypt(token);
                Token tokenObj = Newtonsoft.Json.JsonConvert.DeserializeObject<Token>(json);
                ((BaseController)context.Controller).SetUserLoginInfo(tokenObj.UserKeyId, tokenObj.UserName);
            }
            base.OnActionExecuting(context);
        }
    }
}


using Microsoft.AspNetCore.Mvc;
using System;
using System.Security.Principal;
using System.Threading;

namespace Core2022.API
{
    public class BaseController : ControllerBase
    {
        /// <summary>
        /// 设置用户登陆信息
        /// </summary>
        /// <param name="userKeyId"></param>
        /// <param name="userName"></param>
        public void SetUserLoginInfo(Guid userKeyId,string userName)
        {
            Thread.CurrentPrincipal = new GenericPrincipal(
               new GenericIdentity($"{ Guid.NewGuid() }|{ userKeyId }|{ userName }|"), null);
        }
    }
}
使用 MVCFilter
随便定义一个 Token 对象
随便找一个 AES加密解密的代码,用来对Token对象进行加密和解密
把登陆人的信息写入到当前线程中
为什么要用 MVCFilter
保存登陆人信息的这个操作,最好放到 Action 执行前完成
整个Http请求流程中可以做这个操作的有
中间件 (太早了,没必要)
BaseController构造函数 (Controller初始化后可能还会执行多个Filter)
OnActionExecuting (最合适,前面该执行的操作都完成了,不能比他再晚了)
性能测试
保证项目足够的健壮
目前只对单表进行测试,一共是三个接口
登陆→新增→查询
登陆返回Token,账号密码是写死的
新增用户返回UserKeyId,UserName 和 PassWord 都是写死的
查询用户返回用户信息
--SQL Server User 表

CREATE NONCLUSTERED INDEX User_Name ON [User](UserName)
CREATE NONCLUSTERED INDEX User_KeyId ON [User](KeyId)

User 这种表是一个堆表,没有聚集索引,只有两个非聚集索引(都只有一个Key)

--三个接口对应的 SQL
SELECT 全部列 FROM [User] WHERE UserName = 'XXX' AND PassWord = 'XXX'  -- 登陆
SELECT 全部列 FROM [User] WHERE KeyId = 'XXX'    -- 查询用户
INSERT INTO 全部列 VALUE(对应的数据)   -- 新增用户
非聚集索引 User_KeyId
因为 KeyId 是 Guid 类型的,所以 KeyId 这列不能设置聚集索引
只能设置非聚集索引或者非聚集索引的主键
所以就在KeyId这列设置非聚集索引
非聚集索引 User_Name
登陆会用到 UserName 和 PassWord 两个字段
性能测试的时候新增的 UserName 和 PassWord 都是一样的
虽然新增的数据 UserName 和 PassWord 都是一样的,但是不加索引肯定是要进行全表扫描的,因此这里必须要加索引
创建 User_Name 索引的时候指定一个Key就行了,没必要加上 PassWord
说明:Guid为什么不能创建聚集索引?
当前项目生成的Guid都是无序的,而索引都必须是有序的,因此执行新增操作的时候就要把Guid插入到指定的位置,当数据页已经满时就会触发页分裂,极大的降低性能
因此把表设计成一个堆表,主表新增的数据都是放到最后一张数据页中,主表新增的效率会非常高
User_KeyId 这个索引对应的索引表中只有 KeyId 这一个字段(创建的时候指定的是一个,但是实际上不是一个是三个,另外两个一个是唯一标识,一个是指向主表的地址),新增数据的时候虽然也会有页分裂但是一个字段进行页分裂的效率是远远小于主表十几个字段进行分裂
索引 User_Name 为什么只设置 UserName 字段不设置 PassWord 字段
没必要
因为 Select 全部列 所以这里一定要回表,有一个 UserName 就够了
-- 测试脚本
import http from 'k6/http';

/*
    登陆获取 Token
        创建用户信息 返回 UserKeyId
            查询用户信息
 */


export default function () {

    const Params = {
        headers: {
            'Content-Type': 'application/json',
        },
    };

    const UserName = 'Test123'
    const PassWord = '123'

    //  Login Start
    const LoginURL = 'https://localhost:44316/api/User/Login';
    // 请求参数
    const LoginReq = JSON.stringify({
        "userName":"8888881",
        "password":"9999991"
    });
    // 发送 POST 请求
    const LoginRes = http.post(LoginURL, LoginReq, Params);
    // 验证请求是否成功
    check(LoginRes, {
        'Login.status': (r) => r.status === 200
    });

    if (LoginRes.status === 200) {
        // 获取到 返回的数据
        var LoginJson = JSON.parse(LoginRes.body);
        // 验证接口返回的参数是否符合预期
        check(LoginJson, {
            'Login.body.status': (r) => r.status === 1,
            'Login.body.info': (r) => r.info === '操作成功',
            'Login.body.data': (r) => r.data == '6OhENiMRXic4IUEbhlNtW4EjhpDTBoRauJWRv9NKruUG+QamIghVoUyjYtkwjL3ubUWaW5BqqlCBubpuY7lH81K/U816WGdU0pXA2uwiGMY=',
            'Login.body.data not \'\'': (r) => r.data != '',
            'Login.body.data not null': (r) => r.data != null,
        });

        //  Login End

        //Params.headers['Cookie'] = LoginRes.Data

        const CreateUserUrl = 'https://localhost:44316/api/User/CreateUser';

        const CreateUserReq = JSON.stringify({
            "userName": UserName,
            "password": PassWord
        });

        const CreateUserRes = http.post(CreateUserUrl, CreateUserReq, Params);

        check(CreateUserRes, {
            'Login.status': (r) => r.status === 200
        });
        if (CreateUserRes.status === 200) {

            var CreateUserJson = JSON.parse(CreateUserRes.body);

            check(CreateUserJson, {
                'CreateUser.body.status': (r) => r.status === 1,
                'CreateUser.body.info': (r) => r.info === '操作成功',
                'CreateUser.body.data not \'\'': (r) => r.data != '00000000-0000-0000-0000-000000000000',
                'CreateUser.body.data not null': (r) => r.data != null,
            });

            const UserKeyId = CreateUserJson.data;
            //console.log('CreateUserKeyId = ' + UserKeyId);

            // CreateUser END
            const FindUserUrl = 'https://localhost:44316/api/user/FindUser'

            const FindUserReq = JSON.stringify({
                "KeyId": UserKeyId
            });

            const FindUserRes = http.post(FindUserUrl, FindUserReq, Params);

            check(FindUserRes, {
                'FindUser.status': (r) => r.status === 200
            });

            //console.log(JSON.stringify(FindUserRes))

            if (FindUserRes.status === 200) {

                var FindUserJson = JSON.parse(FindUserRes.body);
                //console.log(FindUserRes.body)

                check(FindUserJson, {
                    'FindUser.body.status': (r) => r.status === 1,
                    'FindUser.body.info': (r) => r.info === '操作成功',
                    'FindUser.body.data not null': (r) => r.data != null,
                });

                if (FindUserJson.data != null) {
                    const FindUserDataJson = JSON.stringify(FindUserJson.data)
                    //console.log(FindUserJson.data)
                    check(FindUserJson, {
                        'FindUser.body.data.keyId': (r) => r.data.keyId === UserKeyId,
                        'FindUser.body.data.userName': (r) => r.data.userName === UserName,
                        'FindUser.body.data.passWord': (r) => r.data.passWord === PassWord,
                    });
                }
            } else {
                //console.log(JSON.stringify(FindUserRes))
            }

            // FindUser END
        };// CreateUserRes.status === 200 END
    }; // LoginRes.status === 200 END
}
进行五次测试

五次测试数据库 User 表分别新增了 12724、13851、13492、13824、14246 条数据
从测试结果中可以得出,出问题的地方都是查询方法
一次不严谨的性能测试,结果还行
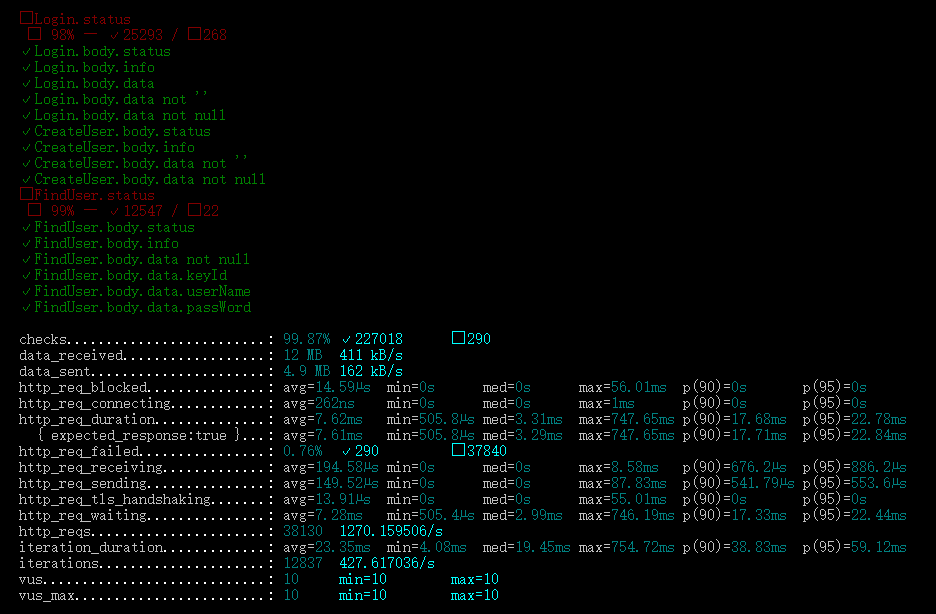
五次测试,每次都是 10 个虚拟用户,连续执行 30秒
checks.........................: 99.87% ✓ 227018 ✗ 290 检查的成功率
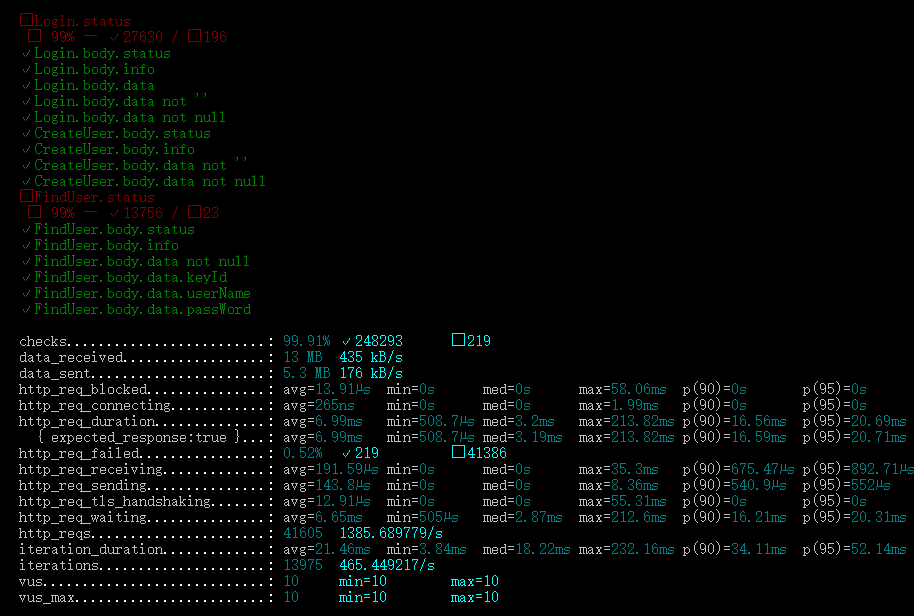
checks.........................: 99.91% ✓ 248293 ✗ 219
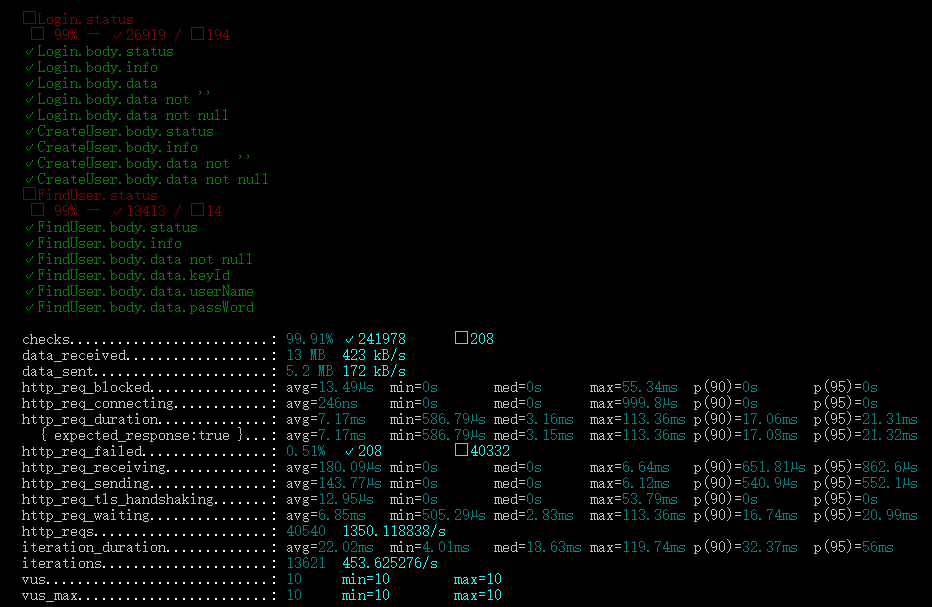
checks.........................: 99.91% ✓ 241978 ✗ 208
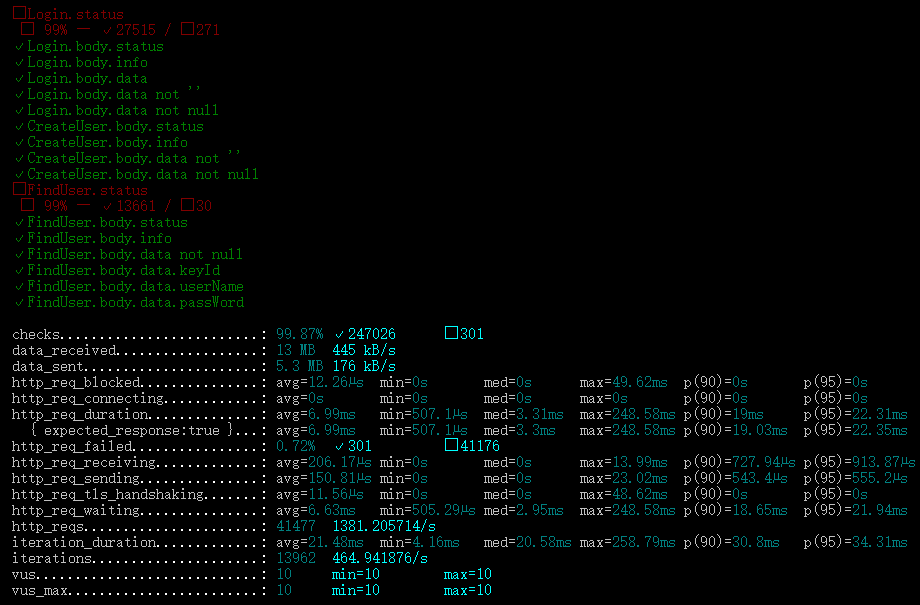
checks.........................: 99.87% ✓ 247026 ✗ 301
checks.........................: 99.90% ✓ 255180 ✗ 249
iterations.....................: 12837 427.617036/s 执行脚本的总次数 平均每秒执行 427.617036 次
iterations.....................: 13975 465.449217/s
iterations.....................: 13621 453.625276/s
iterations.....................: 13962 464.941876/s
iterations.....................: 14386 478.882618/s
目前遗留的问题,一点点的改。

 浙公网安备 33010602011771号