
vue使用vue-qr生成二维码
vue-qr基础使用:
第一步,先安装 vue-qr 插件
npm install vue-qr --save
第二步,在想要生成vueQr 的Vue页面引入组件
import vueQr from 'vue-qr'
第三步,在components中引入VueQr组件
components: { VueQr }
如下:
<script>
import VueQr from 'vue-qr';

export default {
    components: {
    VueQr,
    },
}
</script>
data() {
  return {
          logo:require("@/assets/images/1.jpg"),//默认二维码中间图片,图片需要使用require
          textUrl: "https://baidu.com" //二维码内容,我这里是扫码后要跳转的链接

}

},
// <template>
 //  <vue-qr :text="config.text" :logoScale="40" :size="300" :logoSrc="config.logo">
 //  </vue-qr>
// </template>

我这里二维码不需要中间logo

<vue-qr :text="qrUrl" :margin="0"></vue-qr>
参数说明:
1、:text 用于绑定生成二维码内容
2、:logoScale 中间logo标志大小,单位px
3、:logoSrc 用于绑定二维码中间logo图片的地址
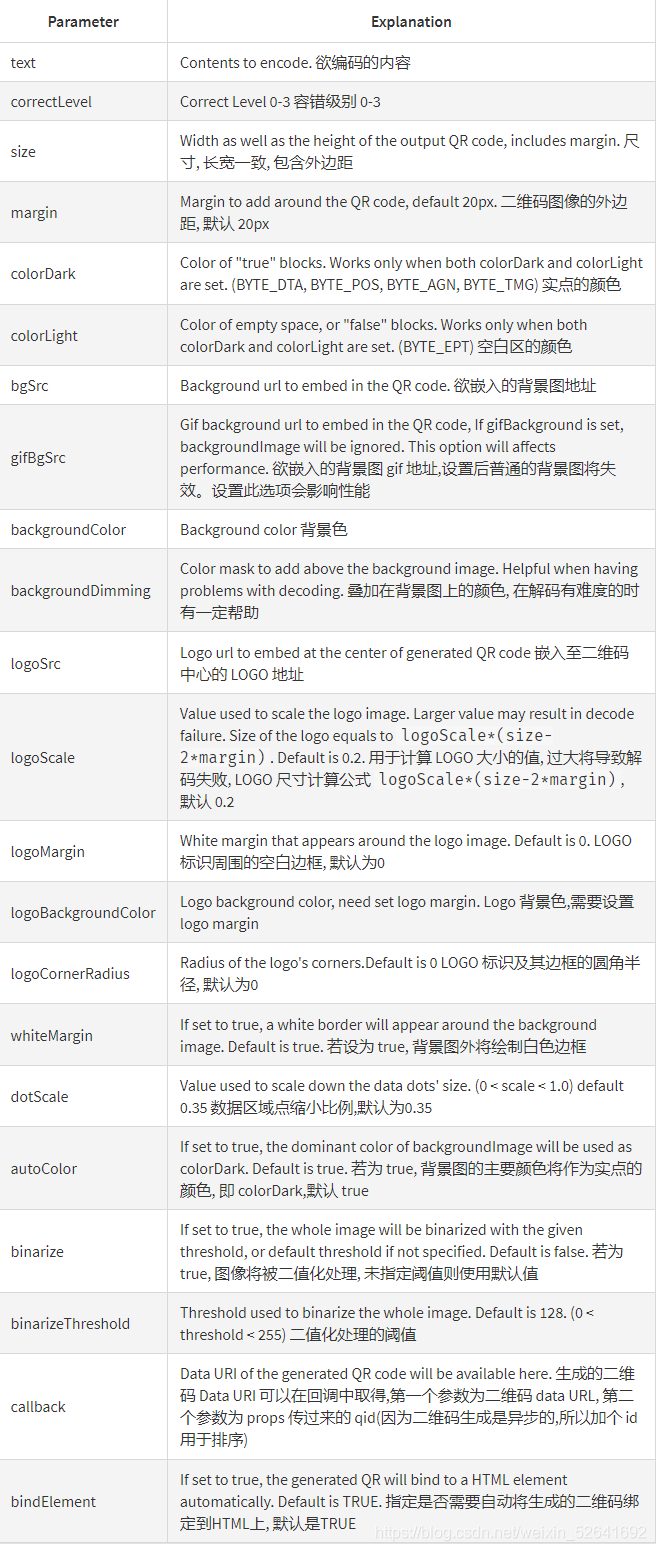
vue-qr组件中的属性如下图:
我这里的业务场景是:在PC端扫描二维码跳转下载app
实现逻辑:
1.安装使用vueqr生成二维码插件,生成二维码, 扫二维码跳转到h5中转页面(先开发一个h5页面做为中转页面)
2.在pc端获取配置项得到安卓手机 苹果手机的下载地址 携带参数到中转页面
3.在中转页面判断是安卓手机还是ios打开 使用window.location.href分别跳转到不同的下载
PC端:
<template>
 <div class="item-qrcode"">
    <vue-qr :text="qrUrl" :margin="0"></vue-qr>
     <div class="title">下载APP</div>
  </div>
</template>
<script>
import VueQr from "vue-qr";
export default {
name: "header-comp",
components: {
VueQr
},
},
data() {
return {
// 扫海南e登记二维码要跳转的链接
qrUrl: "",
// 下载APP中转页面传递的参数
jumpLink: {
androidUrl: "https://baidu.com",
iosUrl: "https://www.jianshu.com/"
},
};
},
created() {
this.qrUrl = `${window.envConfig.custom.qrcodePage}pages/template/download-app/pages/page?formItem=${JSON.stringify(this.jumpLink)}`;
},
};
</script>
<style lang="scss" scoped>
.qrcode {
display: flex;
justify-content: space-evenly;
.item-qrcode {
text-align: center;
.title {
width: 85px;
flex-wrap: warp;
font-size: 14px;
color: #333333;
margin: 5px 0;
}
img {
display: inline-block;
width: 85px;
height: 85px;
margin: 0 auto;
}
}
}
</style>
<template>
  <!-- PC端下载APP-h5中转页面 -->
  <view class="topnet-container">
  </view>
</template>
<script>
  export default {
    data() {
      return {
        jumplink: {},
      };
    },
    created() {
      this.getjumplink();
    },
    methods: {
      getjumplink() {
        const user = navigator.userAgent;
        // android端
        const isAndroid = user.indexOf('Android') > -1 || user.indexOf('Adr') > -1;
        // ios端
        const isiOS = !!user.match(/\(i[^;]+;( U;)? CPU.+Mac OS X/);
        // 接收参数
        const parameters = window.location.hash;
        if (parameters.indexOf('?') == -1) return null;
        const strs = parameters.substring(1).split('&');
        for (let i = 0; i < strs.length; i++) {
          const str = strs[i].split('=');
          this.jumplink = JSON.parse(decodeURIComponent(str[1]));
        }
        // 去掉链接两边双引号
        this.jumplink.androidUrl = this.jumplink.androidUrl.replace(/\"/g, '');
        this.jumplink.iosUrl = this.jumplink.iosUrl.replace(/\"/g, '');
        // 判断跳转
        if (isAndroid) {
          window.location.href = this.jumplink.androidUrl + '?time=' + new Date().getTime();
        } else if (isiOS) {
          window.location.href = this.jumplink.iosUrl + '?time=' + new Date().getTime();
        }
      },
    },
  };
</script>

<style lang="scss" scoped>
  .topnet-container-content {
    display: flex;
    flex-direction: column;
    align-items: center;
  }
</style>
require
你是什么样的人,便会遇到什么样的人;你想遇到什么样的人,就得先让自己成为那样的人。

 浙公网安备 33010602011771号