Spring、SpringBoot知识梳理及项目实践
github链接: https://github.com/Jackson-zhanganbing/spring-test
1、spring-context测试spring生命周期
测试方式包含:xml和注解方式
bean的生命周期
bean生命周期总览图
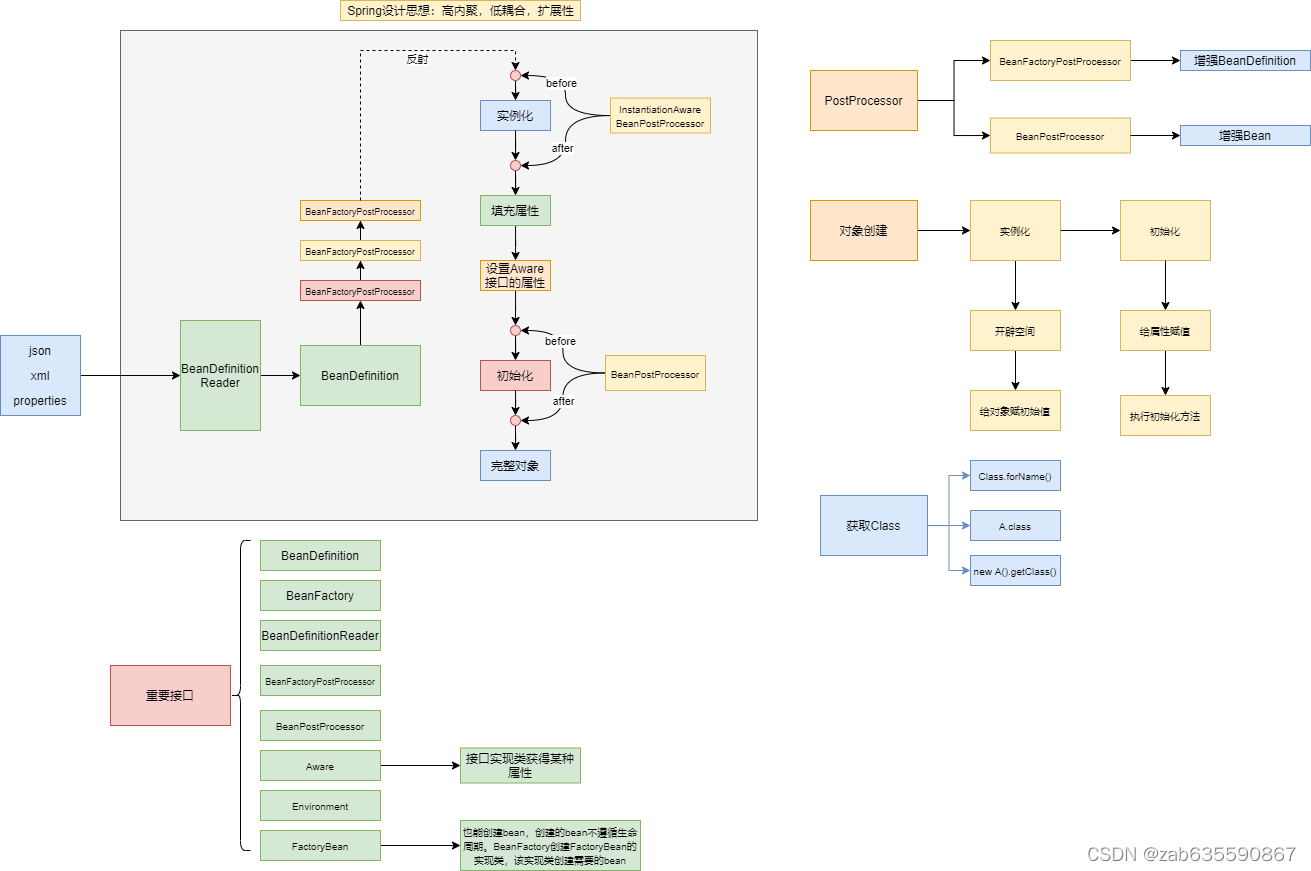
要理解spring bean的生命周期,首先要了解spring 的一些常用接口。
BeanDefinition:xml或其他外部配置文件中定义的bean会最终转换为BeanDefinition
BeanDefinitionReader:用于读取配置文件
BeanFactoryPostProcessor:用于bean定义(BeanDefinition)的增强
BeanPostProcessor:用于bean的增强,主要是初始化前后
InstantiationAwareBeanPostProcessor:是BeanPostProcessor的子接口,用于bean的增强,主要是实例化前后
Aware:感知接口,xxxAware接口,一般表示关注、关心xxx属性,实现xxxAware接口,就可以得到相关属性,比如BeanNameAware,可以获取bean名称
总体流程如上图所示。
AOP(实现放到springboot模块)
只是属于spring,所以介绍放到这里
Spring AOP两种实现,jdk动态代理和cglib动态代理。理论上cglib(Code Generation Library)只是一个动态生成代码的框架,更为底层是诸如asm、javassist生成字节码代码的框架。
静态代理需要在每个需要代理的类添加代理逻辑,aspectJ提供了一种编程方式,可以解决这个问题,在编译成class字节码的时候在方法周围加上代理逻辑
aspectJ专业术语:
| 术语 | 含义 | 说明 |
| Aspect | A modularization of a concern that cuts across multiple classes | 跨多个类的关注点的模块,Spring中有:before、after returning、after throwing、after、around这几种切面 |
| Join point | A point during the execution of a program, such as the execution of a method or the handling of an exception | 普通的一个方法执行,异常处理。通俗的讲,哪些方法或哪个方法在执行的时候会被拦截,被拦截的方法就叫join point |
| Advice | Action taken by an aspect at a particular join point | 切面在特定连接点的操作 |
| Pointcut | Pointcuts determine join points of interest and thus enable us to control when advice runs | 在spring aop里面,切点定义由两部分组成,常规方法和切点表达式,方法返回类型必须是void |
Pointcut可以定义哪些pointcut designators?
| execution | 匹配方法执行 | 备注 |
| within | 拦截within括号后面的包下所有类或某个类的所有方法 | 可以写包或者具体类 |
| this | 匹配某个类的所有方法 | 写*会报错 |
| target | 拦截target括号后面的接口或类的子类(实现类)所有方法 | |
| args | 报错 | |
| @target | 报错 | |
| @args | 报错 | |
| @within | 定义类注解,被注解标记的类的所有方法都被拦截 | |
| @annotation | 定义方法注解,限制到使用该注解的方法 |
扩展了解:The AspectJTM Programming Guide
所以Spring AOP实际上是对jdk代理和cglib代理做了一层封装,并且引入了AOP概念:Aspect、Advice、Joinpoint等,同时引入了AspectJ中的一些注解@PointCut、@After、@Before等。Spring AOP严格的来说都是动态代理。
总结:SpringAOP底层都是动态代理,只是引入了AspectJ的编程方式和注解。
2、手动实现spring mvc注解路由http请求
目的:克服对注解的恐惧,看清自动注入的真面目
实现步骤和原理:
- 加载指定目录下的所有文件
- 反射实例化所有有注解标记的类,放到容器中
- 路由和相关方法的映射,放到容器中
- 注入Autowire注解标记的对象
- 匹配路由,执行相关方法
3、spring mvc项目基本配置
目的:记录mvc项目的配置文件,主要是和springboot做对比,清楚的看到springboot的简洁性。
springmvc的处理流程:
(1)把WebApplicationContext作为属性绑定到request,以便控制器或者其他类在处理mvc流程中使用
(2)Locale resolver(本地化信息解析器)绑定到request,以便处理mvc流程时其他类使用
(3)Theme resolver(主题解析器)绑定到request,以便视图决定用哪个主题,如果需要的话。
(4)如果是一个文件类型的请求,则会包装成MultipartHttpServletRequest,以便mvc流程中其他类处理文件
(5)搜索适当的处理器(handler),如果找到一个handler(preprocessors, postprocessors, and controllers),执行链关联的handler就会为渲染model而执行
(6)Model返回,视图就返回。没返回视图的情况,可能是由于拦截器拦截了请求或者安全原因。
4、springboot项目
项目实战内容包含:
- 集成mybatis、mybatis-plus(相关插件使用)
- 集成redis
- 自定义注解实现aop切面
- filter和interceptor
- 动态代理demo
- 通用返回类
- 读取配置文件方式
- 全局异常处理
- 常用web配置(跨域、消息转换、日期转换)
- starter封装案例
- 启动项目初始化操作
- log4j2集成(颜色配置,存储配置)
核心特性
----启动类----
定制启动类
//默认初始springboot的启动代码
SpringApplication.run(Application.class, args);
//定制化代码,关闭banner
SpringApplication springApplication = new SpringApplication(Application.class); springApplication.setBannerMode(Banner.Mode.OFF);
//关闭命令行参数
springApplication.setAddCommandLineProperties(false);
 springApplication.run(args);
//流式启动springboot
new SpringApplicationBuilder()
     .bannerMode(Banner.Mode.OFF)
     .run(args);
Banner介绍
In addition to a text file, you can also add a banner.gif, banner.jpg, or banner.png image file to your classpath or set the spring.banner.image.location property. Images are converted into an ASCII art representation and printed above any text banner.
CommandLineRunner&ApplicationRunner
If you need to run some specific code once the SpringApplication has started, you can implement the ApplicationRunner or CommandLineRunner interfaces.
Tasks expected to run during startup should be executed by CommandLineRunner and ApplicationRunner components instead of using Spring component lifecycle callbacks such as @PostConstruct.
启动项目就要执行的逻辑,最好用ApplicationRunner,而不是用@PostConstruct
如果有多个类都实现了以上两个接口,那么可以用@Order(1)控制顺序
监听器
正确创建姿势
1、SpringApplication.addListeners(...)或者SpringApplicationBuilder.listeners(...)
2、添加文件META-INF/spring.factories,添加配置
org.springframework.context.ApplicationListener=com.project.MyListener
ApplicationRunner
优雅关闭SpringBoot
public static void main(String[] args) {
     System.exit(SpringApplication.exit(
          SpringApplication.run(MyApplication.class,args)));
}
----外部配置----
SpringBoot配置文件读取方式
Property values can be injected directly into your beans by using the @Value annotation, accessed through Spring’s Environment abstraction, or be bound to structured objects through @ConfigurationProperties.
方式一:@Value,直接注入
方式二:Environment
方式三:结构化对象用@ConfigurationProperties
宽松的binding
意思就是,几种常见的格式都兼容
test5:
    relaxedBinding: binding1
    relaxed-binding: binding2
    relaxed_binding: binding3
    RELAXEDBINDING: binding4
这几种情况都可以解析,如果配重复了,那么结果是第二个binding2.
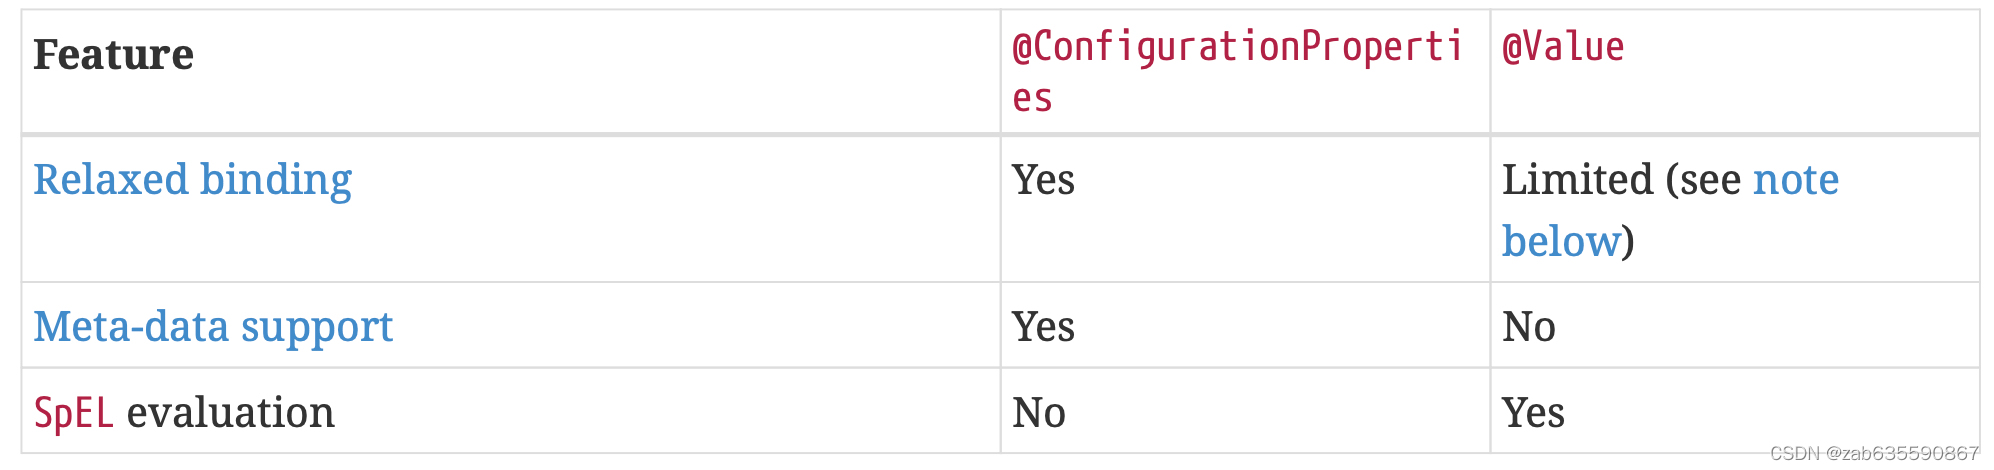
@ConfigurationProperties vs. @Value
属性验证
@ConfigurationProperties(prefix = "test5")
@Validated
public class PropertiesTest5 {
    @NonNull
    public String relaxedBinding;

    public String getRelaxedBinding() {
        return relaxedBinding;
    }
    public void setRelaxedBinding(String relaxedBinding) {
        this.relaxedBinding = relaxedBinding;
    }
}
如果是嵌套类型,需要验证嵌套类中的字段,那么则需要给嵌套类加@Valid,才能校验嵌套类中的字段。
访问命令行参数
--开头的参数可以被访问到,例如:--server.port=8080。并且优先于配置文件。命令行参数可以被关闭
SpringApplication.setAddCommandLineProperties(false)JSON配置
配置json到系统变量中,有以下三种方式:
SPRING_APPLICATION_JSON='{"my":{"name":"test"}}' java -jar myapp.jar
java -Dspring.application.json='{"my":{"name":"test"}}' -jar myapp.jar
java -jar myapp.jar --spring.application.json='{"my":{"name":"test"}}'
外部配置属性文件
官方顺序:
1. Default properties (specified by setting SpringApplication.setDefaultProperties).
2. @PropertySource annotations on your @Configuration classes. Please note that such property sources are not added to the Environment until the application context is being refreshed. This is too late to configure certain properties such as logging.* and spring.main.* which are read before refresh begins.
3. Config data (such as application.properties files).
4. A RandomValuePropertySource that has properties only in random.*.
5. OS environment variables.
6. Java System properties (System.getProperties()).
7. JNDI attributes from java:comp/env.
8. ServletContext init parameters.
9. ServletConfig init parameters.
10. Properties from SPRING_APPLICATION_JSON (inline JSON embedded in an environment variable or system property).
11. Command line arguments.
12. properties attribute on your tests. Available on @SpringBootTest and the test annotations for
testing a particular slice of your application.
13. @TestPropertySource annotations on your tests.
14. Devtools global settings properties in the $HOME/.config/spring-boot directory when devtools is active.
测试顺序:
如果一个项目打了jar包,项目本身有配置文件application.yml,项目启动后,在项目启动目录添加额外配置文件application.properties,那么application.properties的相同配置会覆application.yml。但是生效需要项目重新启动。
1、jar包外的配置application.properties 优于 jar包内部的配置文件。
2、命令行参数配置(java -jar app.jar --name="Spring")优于 jar包外的配置application.properties
导入另外的配置文件
spring.config.import=optional:file:./dev.properties
引入的配置文件的值会覆盖原文件的相同key的值。
导入的配置文件顺序不重要。声明多次,也只导入一次。
导入无扩展名的文件
spring.config.import=file:/etc/config/myconfig[.yaml]
属性占位符
app.name=MyApp
app.description=${app.name} is a Spring Boot application
配置文件tip
1、jar包外的配置文件,可以放到jar同级目录,也可以方法jar同级config目录下
2、springboot建议使用一种格式的配置文件,如果yml和properties都有,后者优先!
3、指定其他的配置文件
单一配置
java -jar myproject.jar --spring.config.name=myproject
多个地址配置
$ java -jar myproject.jar --spring.config.location= optional:classpath:/default.properties, optional:classpath:/override.properties
多文档文件
springboot可以把一个物理文件,切割为多个逻辑文件。文档从上往下加载,后面的覆盖前面的相同key的值
spring:
    application:
        name: MyApp
---
  spring:
    application:
      name: MyCloudApp
    config:
       activate:
         on-cloud-platform: kubernetes
For application.properties files a special #--- comment is used to mark the document splits
配置随机值
my.secret=${random.value}
my.number=${random.int}
my.bignumber=${random.long}
my.uuid=${random.uuid}
my.number-less-than-ten=${random.int(10)}
my.number-in-range=${random.int[1024,65536]}虽然是随机值,但是项目一启动,不管访问多少次,都是固定的值。只是项目一启动分配了一个固定值。
----日志----
<?xml version="1.0" encoding="UTF-8"?>
<!--Configuration后面的status,这个用于设置log4j2自身内部的信息输出,可以不设置,当设置成trace时,你会看到log4j2内部各种详细输出-->
<!--monitorInterval:Log4j能够自动检测修改配置 文件和重新配置本身,设置间隔秒数-->
<configuration monitorInterval="5">
    <!--日志级别以及优先级排序: OFF > FATAL > ERROR > WARN > INFO > DEBUG > TRACE > ALL -->

    <!--变量配置-->
    <Properties>
        <!-- 格式化输出:%date表示日期,%thread表示线程名,%-5level:级别从左显示5个字符宽度 %msg:日志消息,%n是换行符-->
        <!-- %logger{36} 表示 Logger 名字最长36个字符 -->
        <!--<property name="LOG_PATTERN" value="%date{HH:mm:ss.SSS} [%thread] %-5level %logger{36} - %msg%n" />-->
        <property name="LOG_PATTERN" value="%clr{%d{yyyy-MM-dd HH:mm:ss.SSS}}{faint} [%clr{%5p} ] %clr{${sys:PID}}{magenta} %clr{---}{faint} %clr{[%15.15t ]}{faint} %clr{%-40.40c{1.}}{cyan} %clr{:}{faint} %m%n%xwEx" />
        <!-- 定义日志存储的路径 -->
        <property name="FILE_PATH" value="/Users/xxx/work/logs/" />
        <property name="FILE_NAME" value="springboot-test" />
    </Properties>

    <appenders>

        <console name="Console" target="SYSTEM_OUT">
            <!--输出日志的格式-->
            <PatternLayout pattern="${LOG_PATTERN}"/>
            <!--控制台只输出level及其以上级别的信息(onMatch),其他的直接拒绝(onMismatch)-->
            <ThresholdFilter level="info" onMatch="ACCEPT" onMismatch="DENY"/>
        </console>

        <!--文件会打印出所有信息,这个log每次运行程序会自动清空,由append属性决定,适合临时测试用-->
        <File name="Filelog" fileName="${FILE_PATH}/test.log" append="false">
            <PatternLayout pattern="${LOG_PATTERN}"/>
        </File>

        <!-- 这个会打印出所有的info及以下级别的信息,每次大小超过size,则这size大小的日志会自动存入按年份-月份建立的文件夹下面并进行压缩,作为存档-->
        <RollingFile name="RollingFileInfo" fileName="${FILE_PATH}/info.log" filePattern="${FILE_PATH}/${FILE_NAME}-INFO-%d{yyyy-MM-dd}_%i.log.gz">
            <!--控制台只输出level及以上级别的信息(onMatch),其他的直接拒绝(onMismatch)-->
            <ThresholdFilter level="info" onMatch="ACCEPT" onMismatch="DENY"/>
            <PatternLayout pattern="${LOG_PATTERN}"/>
            <Policies>
                <!--interval属性用来指定多久滚动一次,默认是1 hour-->
                <TimeBasedTriggeringPolicy interval="1"/>
                <SizeBasedTriggeringPolicy size="10MB"/>
            </Policies>
            <!-- DefaultRolloverStrategy属性如不设置,则默认为最多同一文件夹下7个文件开始覆盖-->
            <DefaultRolloverStrategy max="15"/>
        </RollingFile>

        <!-- 这个会打印出所有的warn及以下级别的信息,每次大小超过size,则这size大小的日志会自动存入按年份-月份建立的文件夹下面并进行压缩,作为存档-->
        <RollingFile name="RollingFileWarn" fileName="${FILE_PATH}/warn.log" filePattern="${FILE_PATH}/${FILE_NAME}-WARN-%d{yyyy-MM-dd}_%i.log.gz">
            <!--控制台只输出level及以上级别的信息(onMatch),其他的直接拒绝(onMismatch)-->
            <ThresholdFilter level="warn" onMatch="ACCEPT" onMismatch="DENY"/>
            <PatternLayout pattern="${LOG_PATTERN}"/>
            <Policies>
                <!--interval属性用来指定多久滚动一次,默认是1 hour-->
                <TimeBasedTriggeringPolicy interval="1"/>
                <SizeBasedTriggeringPolicy size="10MB"/>
            </Policies>
            <!-- DefaultRolloverStrategy属性如不设置,则默认为最多同一文件夹下7个文件开始覆盖-->
            <DefaultRolloverStrategy max="15"/>
        </RollingFile>

        <!-- 这个会打印出所有的error及以下级别的信息,每次大小超过size,则这size大小的日志会自动存入按年份-月份建立的文件夹下面并进行压缩,作为存档-->
        <RollingFile name="RollingFileError" fileName="${FILE_PATH}/error.log" filePattern="${FILE_PATH}/${FILE_NAME}-ERROR-%d{yyyy-MM-dd}_%i.log.gz">
            <!--控制台只输出level及以上级别的信息(onMatch),其他的直接拒绝(onMismatch)-->
            <ThresholdFilter level="error" onMatch="ACCEPT" onMismatch="DENY"/>
            <PatternLayout pattern="${LOG_PATTERN}"/>
            <Policies>
                <!--interval属性用来指定多久滚动一次,默认是1 hour-->
                <TimeBasedTriggeringPolicy interval="1"/>
                <SizeBasedTriggeringPolicy size="10MB"/>
            </Policies>
            <!-- DefaultRolloverStrategy属性如不设置,则默认为最多同一文件夹下7个文件开始覆盖-->
            <DefaultRolloverStrategy max="15"/>
        </RollingFile>

    </appenders>

    <!--Logger节点用来单独指定日志的形式,比如要为指定包下的class指定不同的日志级别等。-->
    <!--然后定义loggers,只有定义了logger并引入的appender,appender才会生效-->
    <loggers>

        <!--过滤掉spring和mybatis的一些无用的DEBUG信息-->
        <logger name="org.mybatis" level="info" additivity="false">
            <AppenderRef ref="Console"/>
        </logger>
        <!--监控系统信息-->
        <!--若是additivity设为false,则 子Logger 只会在自己的appender里输出,而不会在 父Logger 的appender里输出。-->
        <Logger name="org.springframework" level="info" additivity="false">
            <AppenderRef ref="Console"/>
        </Logger>

        <root level="info">
            <appender-ref ref="Console"/>
            <appender-ref ref="Filelog"/>
            <appender-ref ref="RollingFileInfo"/>
            <appender-ref ref="RollingFileWarn"/>
            <appender-ref ref="RollingFileError"/>
        </root>
    </loggers>

</configuration>
----JSON----
Springboot官方集成了Jackson、Gson、JSON-B。
Jackson是首选默认的。
----测试----
@SpringBootTest(webEnvironment = SpringBootTest.WebEnvironment.RANDOM_PORT)
@AutoConfigureMockMvc
class ApplicationTests {

    @Autowired
    MockMvc mvc;
    @Test
    void testWithMockMvc() throws Exception {
        AspectParam zhangsan = AspectParam.builder().code("007").name("zhangsan").build();
        mvc.perform(
                 post("/api/adviceTest")
                .contentType(MediaType.APPLICATION_JSON)
                .content(JSONUtil.toJsonStr(zhangsan))
                 )
                .andExpect(status().isOk())
                .andExpect(content().string("zhangsan"));
    }
}
----构建starter----
构建一个自定义的starter,需要做两件事:
1、自动配置代码的自动配置模块
2、starter模块,包含所有依赖,自身的依赖和自动配置模块的依赖
命名,根据经验,只能命名为:xxx-spring-boot-starter
需要在META-INFO里配置spring.factories,主要是把配置类注入到spring
org.springframework.boot.autoconfigure.EnableAutoConfiguration=com.sms.starter.config.SmsAutoConfiguration如果starter里加了配置文件,那么以下依赖是必要的:
<dependency>
    <groupId>org.springframework.boot</groupId>
    <artifactId>spring-boot-configuration-processor</artifactId>
</dependency>
集成mybatis、mybatis-plus
现在做项目,大多数orm框架都是用的mybatis,而国内大多数又会采用plus来简化单表增删改查。
SpringBoot引入外部技术的三部曲,第一:添加starter;第二:添加配置;第三:撸码!
引入依赖
        <dependency>
            <groupId>mysql</groupId>
            <artifactId>mysql-connector-java</artifactId>
            <version>5.1.49</version>
        </dependency>

        <dependency>
            <groupId>org.mybatis.spring.boot</groupId>
            <artifactId>mybatis-spring-boot-starter</artifactId>
            <version>2.2.0</version>
        </dependency>

        <dependency>
            <groupId>com.baomidou</groupId>
            <artifactId>mybatis-plus-boot-starter</artifactId>
            <version>3.4.3.4</version>
        </dependency>
添加配置
博主本机安装的mysql5.7,添加配置到application配置文件中
spring:
  datasource:
    url: jdbc:mysql://localhost:3306/zab?characterEncoding=utf8&characterSetResults=utf8&autoReconnect=true&failOverReadOnly=false
    username: root
    password: root
    driver-class-name: com.mysql.jdbc.Driver
撸码
博主用的idea插件生成的代码,MyBatisX。自动生成代码的工具有很多,大家可以自行选择自己喜欢的。
只是为了集成mysql,做了张很简单的表
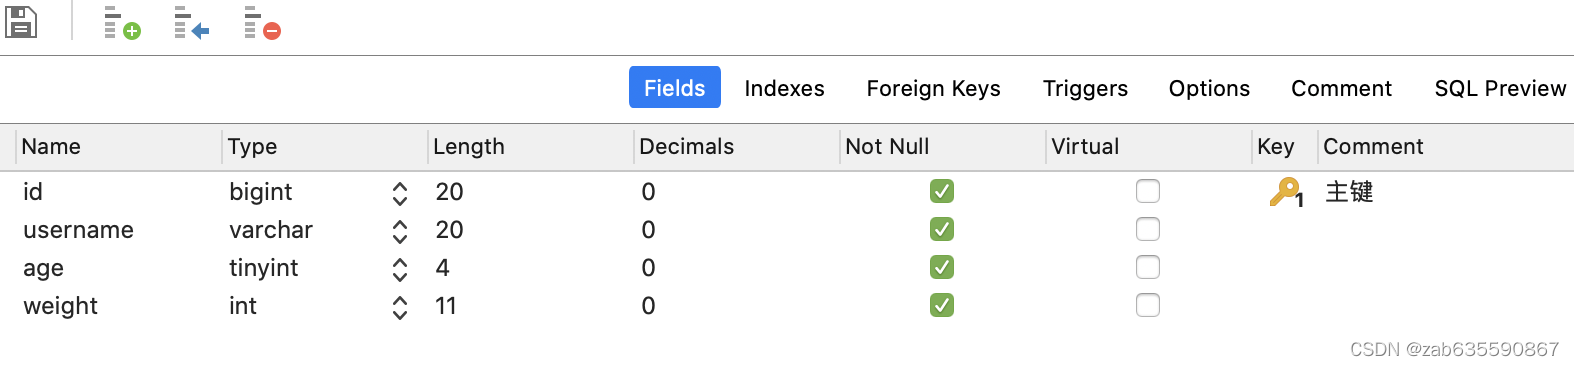
插件安装好后,用idea连接数据库后,直接右键需要生成代码的表,选择MyBatisX就行,像下图所示
 配置好基础的包,像下图所示

注意,base package是用点分割的包名
然后,配置好目录,点finish,代码就生成到对应目录里了
 最后,配置一下mapper接口的包名到Application启动类就好了。
@SpringBootApplication
@MapperScan(basePackages = "com.zab.springboot.project.mapper")
public class Application {
    xxx
}具体代码,详见项目:https://github.com/Jackson-zhanganbing/spring-test
集成redis
与集成mybatis一样,SpringBoot集成redis也非常简单,三部曲通用:第一:添加starter;第二:添加配置;第三:撸码!
添加starter
        <dependency>
            <groupId>org.springframework.boot</groupId>
            <artifactId>spring-boot-starter-data-redis</artifactId>
        </dependency>
添加配置
spring:
  redis:
    host: localhost
    port: 6379
博主本机搭建了一个单节点的redis
撸码
import com.zab.springboot.common.ResponseVo;
import org.springframework.beans.factory.annotation.Autowired;
import org.springframework.data.redis.core.RedisTemplate;
import org.springframework.web.bind.annotation.RequestMapping;
import org.springframework.web.bind.annotation.RestController;

/**
 * redis
 *
 * @author zab
 * @date 2021/12/13 11:01 PM
 */
@RestController
@RequestMapping("/api")
public class RedisController {

    @Autowired
    private RedisTemplate<String,String> redisTemplate;

    @RequestMapping("/redis/set")
    public ResponseVo<Boolean> set(String key, String value){
        redisTemplate.opsForValue().set(key, value);
        return ResponseVo.<Boolean>success(true);
    }
    @RequestMapping("/redis/get")
    public ResponseVo<String> get(String key){
        String s = redisTemplate.opsForValue().get(key);
        return ResponseVo.<String>success(s);
    }
}
代码中只是集成了redis的字符串操作。作为小白演示项目。
5、springboot starter项目
构建一个自定义的starter,需要做两件事:
1、自动配置代码的自动配置模块
2、starter模块,包含所有依赖,自身的依赖和自动配置模块的依赖
命名,根据经验,只能命名为:xxx-spring-boot-starter
需要在META-INFO里配置spring.factories,主要是把配置类注入到spring
org.springframework.boot.autoconfigure.EnableAutoConfiguration=com.sms.starter.config.SmsAutoConfiguration
如果starter里加了配置文件,那么以下依赖是必要的:
<dependency>
    <groupId>org.springframework.boot</groupId>
    <artifactId>spring-boot-configuration-processor</artifactId>
</dependency>
 浙公网安备 33010602011771号