
SpringBoot整合缓存笔记
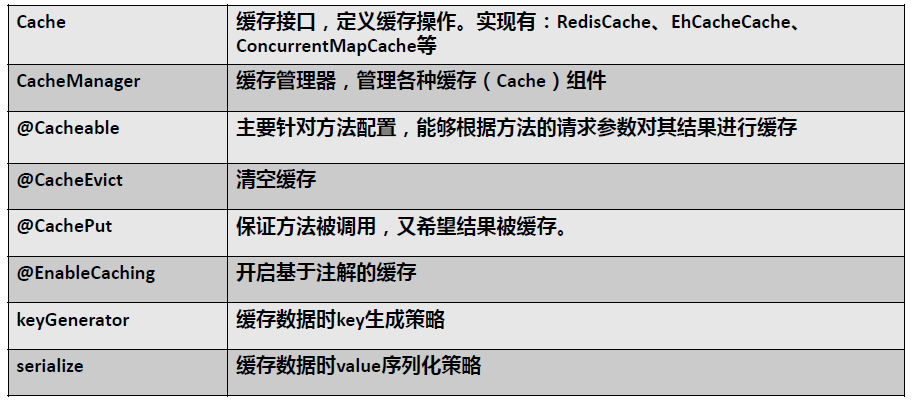
一、几个重要概念&缓存注解
二、快速体验缓存
1.工程构建:POM文件
 1 <dependency>
 2             <groupId>org.springframework.boot</groupId>
 3             <artifactId>spring-boot-starter-web</artifactId>
 4         </dependency>
 5
 6         <dependency>
 7             <groupId>org.springframework.boot</groupId>
 8             <artifactId>spring-boot-starter-cache</artifactId>
 9         </dependency>
10
11         <dependency>
12             <groupId>org.mybatis.spring.boot</groupId>
13             <artifactId>mybatis-spring-boot-starter</artifactId>
14             <version>2.1.0</version>
15         </dependency>
16
17         <dependency>
18             <groupId>mysql</groupId>
19             <artifactId>mysql-connector-java</artifactId>
20         </dependency>
21
22         <dependency>
23             <groupId>com.alibaba</groupId>
24             <artifactId>druid</artifactId>
25             <version>1.1.20</version>
26         </dependency>
39     </dependencies>
2.整合MyBatis
 1 spring:
 2   datasource:
 3     driverClassName: com.mysql.cj.jdbc.Driver
 4     username: root
 5     password: root
 6     url: jdbc:mysql://129.211.77.216:3307/jdbc
 7     type:  com.alibaba.druid.pool.DruidDataSource
 8     #  数据源其他配置
 9     initialSize: 5
10     minIdle: 5
11     maxActive: 20
12     maxWait: 60000
13     timeBetweenEvictionRunsMillis: 60000
14     minEvictableIdleTimeMillis: 300000
15     validationQuery: SELECT 1 FROM DUAL
16     testWhileIdle: true
17     testOnBorrow: false
18     testOnReturn: false
19     poolPreparedStatements: true
20 mybatis:
21   configuration:
22     map-underscore-to-camel-case: true
3.整合Druid连接池
 1 @Configuration
 2 public class DruidConfig {
 3
 4     @ConfigurationProperties(prefix = "spring.datasource")
 5     @Bean
 6     public DataSource druid(){
 7         return new DruidDataSource();
 8     }
 9
10     //配置Druid的监控
11     //1.配置一个管理后台的Servlet
12     @Bean
13     public ServletRegistrationBean statViewServlet(){
14         ServletRegistrationBean bean = new ServletRegistrationBean(new StatViewServlet(),
15                 "/druid/*");
16         Map<String,String> initParams = new HashMap<>();
17         initParams.put("loginUsername","admin");
18         initParams.put("loginPassword","admin");
19         initParams.put("allow","");
20
21         bean.setInitParameters(initParams);
22         return bean;
23     }
24
25     //2、配置一个web监控的filter
26     @Bean
27     public FilterRegistrationBean webStatFilter(){
28         FilterRegistrationBean bean = new FilterRegistrationBean();
29         bean.setFilter(new WebStatFilter());
30
31         Map<String,String> initParams = new HashMap<>();
32         initParams.put("exclusions","*.js,*.css,/druid/*");
33
34         bean.setInitParameters(initParams);
35         bean.setUrlPatterns(Arrays.asList("/*"));
36         return bean;
37     }
38 }
4.SpringBootApplication
/**
 * 一、搭建基本环境
 * 1、导入数据库文件 创建出department和employee表
 * 2、创建javaBean封装数据
 * 3、整合MyBatis操作数据库
 *        1.配置数据源信息
 *        2.使用注解版的MyBatis;
 *           1)、@MapperScan指定需要扫描的mapper接口所在的包
 * 二、快速体验缓存
 *        步骤:
 *           1、开启基于注解的缓存 @EnableCaching
 *           2、标注缓存注解即可
 *              @Cacheable
 *              @CacheEvict
 *              @CachePut
 * 默认使用的是ConcurrentMapCacheManager==ConcurrentMapCache;将数据保存在  ConcurrentMap<Object, Object>中
 * 开发中使用缓存中间件;redis、memcached、ehcache;
 * 三、整合redis作为缓存
 * Redis 是一个开源(BSD许可)的,内存中的数据结构存储系统,它可以用作数据库、缓存和消息中间件。
 *     1、安装redis:使用docker;
 *     2、引入redis的starter
 *     3、配置redis
 *     4、测试缓存
 *        原理:CacheManager===Cache 缓存组件来实际给缓存中存取数据
 *    1)、引入redis的starter,容器中保存的是 RedisCacheManager;
 *    2)、RedisCacheManager 帮我们创建 RedisCache 来作为缓存组件;RedisCache通过操作redis缓存数据的
 *    3)、默认保存数据 k-v 都是Object;利用序列化保存;如何保存为json
 *           1、引入了redis的starter,cacheManager变为 RedisCacheManager;
 *           2、默认创建的 RedisCacheManager 操作redis的时候使用的是 RedisTemplate<Object, Object>
 *           3、RedisTemplate<Object, Object> 是 默认使用jdk的序列化机制
 *      4)、自定义CacheManager;
 *
 */
@MapperScan("com.amao.springboot.mapper")
@SpringBootApplication
@EnableCaching
public class SpringbootCacheApplication {
    public static void main(String[] args) {
        SpringApplication.run(SpringbootCacheApplication.class, args);
    }
}
5.Service
  1 package com.amao.springboot.service;
  2
  3
  4 import com.amao.springboot.domain.Employee;
  5 import com.amao.springboot.mapper.EmployeeMapper;
  6 import org.springframework.beans.factory.annotation.Autowired;
  7 import org.springframework.cache.annotation.*;
  8 import org.springframework.stereotype.Service;
  9
 10 @Service
 11 @CacheConfig(cacheNames="emp"/*,cacheManager = "employeeCacheManager"*/) //抽取缓存的公共配置
 12 public class EmployeeService {
 13
 14     @Autowired
 15     EmployeeMapper employeeMapper;
 16
 17     /**
 18      * 将方法的运行结果进行缓存;以后再要相同的数据,直接从缓存中获取,不用调用方法;
 19      * CacheManager管理多个Cache组件的,对缓存的真正CRUD操作在Cache组件中,每一个缓存组件有自己唯一一个名字;
 20      *
 21
 22      *
 23      * 原理:
 24      *   1、自动配置类;CacheAutoConfiguration
 25      *   2、缓存的配置类
 26      *   org.springframework.boot.autoconfigure.cache.GenericCacheConfiguration
 27      *   org.springframework.boot.autoconfigure.cache.JCacheCacheConfiguration
 28      *   org.springframework.boot.autoconfigure.cache.EhCacheCacheConfiguration
 29      *   org.springframework.boot.autoconfigure.cache.HazelcastCacheConfiguration
 30      *   org.springframework.boot.autoconfigure.cache.InfinispanCacheConfiguration
 31      *   org.springframework.boot.autoconfigure.cache.CouchbaseCacheConfiguration
 32      *   org.springframework.boot.autoconfigure.cache.RedisCacheConfiguration
 33      *   org.springframework.boot.autoconfigure.cache.CaffeineCacheConfiguration
 34      *   org.springframework.boot.autoconfigure.cache.GuavaCacheConfiguration
 35      *   org.springframework.boot.autoconfigure.cache.SimpleCacheConfiguration【默认】
 36      *   org.springframework.boot.autoconfigure.cache.NoOpCacheConfiguration
 37      *   3、哪个配置类默认生效:SimpleCacheConfiguration;
 38      *
 39      *   4、给容器中注册了一个CacheManager:ConcurrentMapCacheManager
 40      *   5、可以获取和创建ConcurrentMapCache类型的缓存组件;他的作用将数据保存在ConcurrentMap中;
 41      *
 42      *   运行流程:
 43      *   @Cacheable:
 44      *   1、方法运行之前,先去查询Cache(缓存组件),按照cacheNames指定的名字获取;
 45      *      (CacheManager先获取相应的缓存),第一次获取缓存如果没有Cache组件会自动创建。
 46      *   2、去Cache中查找缓存的内容,使用一个key,默认就是方法的参数;
 47      *      key是按照某种策略生成的;默认是使用keyGenerator生成的,默认使用SimpleKeyGenerator生成key;
 48      *          SimpleKeyGenerator生成key的默认策略;
 49      *                  如果没有参数;key=new SimpleKey();
 50      *                  如果有一个参数:key=参数的值
 51      *                  如果有多个参数:key=new SimpleKey(params);
 52      *   3、没有查到缓存就调用目标方法;
 53      *   4、将目标方法返回的结果,放进缓存中
 54      *
 55      *   @Cacheable标注的方法执行之前先来检查缓存中有没有这个数据,默认按照参数的值作为key去查询缓存,
 56      *   如果没有就运行方法并将结果放入缓存;以后再来调用就可以直接使用缓存中的数据;
 57      *
 58      *   核心:
 59      *      1)、使用CacheManager【ConcurrentMapCacheManager】按照名字得到Cache【ConcurrentMapCache】组件
 60      *      2)、key使用keyGenerator生成的,默认是SimpleKeyGenerator
 61      *
 62      *
 63      *   几个属性:
 64      *      cacheNames/value:指定缓存组件的名字;将方法的返回结果放在哪个缓存中,是数组的方式,可以指定多个缓存;
 65      *
 66      *      key:缓存数据使用的key;可以用它来指定。默认是使用方法参数的值  1-方法的返回值
 67      *              编写SpEL; #i d;参数id的值   #a0  #p0  #root.args[0]
 68      *              getEmp[2]
 69      *
 70      *      keyGenerator:key的生成器;可以自己指定key的生成器的组件id
 71      *              key/keyGenerator:二选一使用;
 72      *
 73      *
 74      *      cacheManager:指定缓存管理器;或者cacheResolver指定获取解析器
 75      *
 76      *      condition:指定符合条件的情况下才缓存;
 77      *              ,condition = "#id>0"
 78      *          condition = "#a0>1":第一个参数的值》1的时候才进行缓存
 79      *
 80      *      unless:否定缓存;当unless指定的条件为true,方法的返回值就不会被缓存;可以获取到结果进行判断
 81      *              unless = "#result == null"
 82      *              unless = "#a0==2":如果第一个参数的值是2,结果不缓存;
 83      *      sync:是否使用异步模式
 84      * @param id
 85      * @return
 86      *
 87      */
 88
 89     @Cacheable(value = {"emp"}/*,keyGenerator = "myKeyGenerator",unless="#a0==1",condition = "#p0==2"*/)
 90     public Employee getEmp(Integer id){
 91         System.out.println("查询"+id+"号员工");
 92         Employee emp = employeeMapper.getEmpById(id);
 93         return emp;
 94     }
 95
 96     /**
 97      * @CachePut:既调用方法,又更新缓存数据;同步更新缓存
 98      * 修改了数据库的某个数据,同时更新缓存;
 99      * 运行时机:
100      *  1、先调用目标方法
101      *  2、将目标方法的结果缓存起来
102      *
103      * 测试步骤:
104      *  1、查询1号员工;查到的结果会放在缓存中;
105      *          key:1  value:lastName:张三
106      *  2、以后查询还是之前的结果
107      *  3、更新1号员工;【lastName:zhangsan;gender:0】
108      *          将方法的返回值也放进缓存了;
109      *          key:传入的employee对象  值:返回的employee对象;
110      *  4、查询1号员工?
111      *      应该是更新后的员工;
112      *          key = "#employee.id":使用传入的参数的员工id;
113      *          key = "#result.id":使用返回后的id
114      *             @Cacheable的key是不能用#result
115      *      为什么是没更新前的?【1号员工没有在缓存中更新】
116      *
117      */
118     @CachePut(value = "emp",key = "#result.id")
119     public Employee updateEmp(Employee employee){
120         System.out.println("updateEmp:"+employee);
121         employeeMapper.updateEmp(employee);
122         return employee;
123     }
124
125
126     /**
127      * @CacheEvict:缓存清除
128      *  key:指定要清除的数据
129      *  allEntries = true:指定清除这个缓存中所有的数据
130      *  beforeInvocation = false:缓存的清除是否在方法之前执行
131      *      默认代表缓存清除操作是在方法执行之后执行;如果出现异常缓存就不会清除
132      *
133      *  beforeInvocation = true:
134      *      代表清除缓存操作是在方法运行之前执行,无论方法是否出现异常,缓存都清除
135      *
136      *
137      */
138     @CacheEvict(value="emp",beforeInvocation = true/*,key = "#id",*/)
139     public void deleteEmp(Integer id){
140         System.out.println("deleteEmp:"+id);
141         //employeeMapper.deleteEmpById(id);
142         int i = 10/0;
143     }
144
145     // @Caching 定义复杂的缓存规则
146     @Caching(
147             cacheable = {
148                     @Cacheable(/*value="emp",*/key = "#lastName")
149             },
150             put = {
151                     @CachePut(/*value="emp",*/key = "#result.id"),
152                     @CachePut(/*value="emp",*/key = "#result.email")
153             }
154     )
155     public Employee getEmpByLastName(String lastName){
156         return employeeMapper.getEmpByLastName(lastName);
157     }
159 }
6、配置缓存key自动生成器 :KeyGenerator
 1 @Configuration
 2 public class MyCacheConfig {
 3
 4     @Bean("myKeyGenerator")
 5     public KeyGenerator keyGenerator(){
 6         return new KeyGenerator(){
 8             @Override
 9             public Object generate(Object target, Method method, Object... params) {
10                 return method.getName()+"["+ Arrays.asList(params).toString()+"]";
11             }
12         };
13     }
14 }
三、整合redis
1、pom加入坐标
1 <dependency>
2             <groupId>org.springframework.boot</groupId>
3             <artifactId>spring-boot-starter-data-redis</artifactId>
4         </dependency>
ymal配置redis

redis:
host: 129.211.77.216
2、MyRedisConfig配置类
 1 @Configuration
 2 public class MyRedisConfig extends CachingConfigurerSupport {
 3
 4     @Bean
 5     public RedisTemplate<Object, Department> deptRedisTemplate(
 6             RedisConnectionFactory redisConnectionFactory)
 7             throws UnknownHostException {
 8         RedisTemplate<Object, Department> template = new RedisTemplate<Object, Department>();
 9         template.setConnectionFactory(redisConnectionFactory);
10         Jackson2JsonRedisSerializer<Department> ser = new Jackson2JsonRedisSerializer<Department>(Department.class);
11         template.setDefaultSerializer(ser);
12         return template;
13     }
14
15     @Bean
16     public RedisTemplate<Object,Object> redisTemplate(RedisConnectionFactory redisConnectionFactory){
17         RedisTemplate<Object, Object> objectObjectRedisTemplate = new RedisTemplate<>();
18         objectObjectRedisTemplate.setConnectionFactory(redisConnectionFactory);
19         Jackson2JsonRedisSerializer<Object> redisSerializer = new Jackson2JsonRedisSerializer<>(Object.class);
20         objectObjectRedisTemplate.setDefaultSerializer(redisSerializer);
21         return objectObjectRedisTemplate;
22     }
23
24     @Bean
25     public StringRedisTemplate stringRedisTemplate(RedisConnectionFactory redisConnectionFactory) throws UnknownHostException {
26         StringRedisTemplate template = new StringRedisTemplate();
27         Jackson2JsonRedisSerializer<Object> redisSerializer = new Jackson2JsonRedisSerializer<>(Object.class);
28         template.setConnectionFactory(redisConnectionFactory);
29         template.setDefaultSerializer(redisSerializer);
30         return template;
31     }
32
33     //CacheManagerCustomizers可以来定制缓存的一些规则
34     @Bean
35     public RedisCacheManager myRedisCacheManager(RedisConnectionFactory factory) {
36
37         RedisCacheConfiguration cacheConfiguration =
38                 RedisCacheConfiguration.defaultCacheConfig()
39                         .entryTtl(Duration.ofDays(1))
40                         .disableCachingNullValues()
41                         .serializeValuesWith(RedisSerializationContext.SerializationPair.fromSerializer(valueSerializer()));
42         return RedisCacheManager.builder(factory).cacheDefaults(cacheConfiguration).build();
43     }
44
45     private RedisSerializer<Object> valueSerializer() {
46         return new GenericJackson2JsonRedisSerializer();
47     }
48 }
3.Redis测试类
 1 @RunWith(SpringRunner.class)
 2 @SpringBootTest
 3 class SpringbootCacheApplicationTests {
 4
 5     @Autowired
 6     EmployeeMapper employeeMapper;
 7
 8     @Autowired
 9     DepartmentMapper departmentMapper;
10
11     @Autowired
12     StringRedisTemplate stringRedisTemplate;  //操作k-v都是字符串的
13
14     @Autowired
15     RedisTemplate redisTemplate; //k-v都是对象的
16
17     @Autowired
18     RedisTemplate myRedisTemplate;
19
20     @Autowired
21     RedisTemplate deptRedisTemplate;
22
23 //    @Autowired
24 //    RedisTemplate<Object, Employee> employeeRedisTemplate;
25
26     /**
27      * Redis常见的五大数据类型
28      *  String(字符串)、List(列表)、Set(集合)、Hash(散列)、ZSet(有序集合)
29      *  stringRedisTemplate.opsForValue()[String(字符串)]
30      *  stringRedisTemplate.opsForList()[List(列表)]
31      *  stringRedisTemplate.opsForSet()[Set(集合)]
32      *  stringRedisTemplate.opsForHash()[Hash(散列)]
33      *  stringRedisTemplate.opsForZSet()[ZSet(有序集合)]
34      */
35     @Test
36     void contextLoads1() {
37         //给redis中保存数据
38         //stringRedisTemplate.opsForValue().append("msg","helloo");
39 //        String msg = stringRedisTemplate.opsForValue().get("msg");
40 //        System.out.println(msg);
41 //        stringRedisTemplate.opsForList().leftPush("mylist","你好");
42 //        stringRedisTemplate.opsForList().leftPush("mylist","张三");
43         List<String> list = stringRedisTemplate.opsForList().range("mylist", 0, 7);
44         for (String s : list) {
45             System.out.println(s);
46         }
47     }
48
49     @Test
50     void contextLoads2() {
51         Employee employee = employeeMapper.getEmpById(1);
52         //默认如果保存对象,使用jdk序列化机制,序列化后的数据保存到redis中
53         //redisTemplate.opsForValue().set("emp",employee);
54         //1、将数据以json的方式保存
55         //(1)自己将对象转为json
56         //(2)redisTemplate默认的序列化规则;改变默认的序列化规则;
57         //System.out.println(redisTemplate.opsForValue().get("emp"));
58 //        myRedisTemplate.opsForValue().set("emp",employee);
59         Object emp = myRedisTemplate.opsForValue().get("emp");
60         System.out.println(emp);
61     }
62
63     @Test
64     void contextLoads3() {
65         Department deptartment = departmentMapper.getDeptById(1);
66
67         //myRedisTemplate.opsForValue().set("dept",deptartment);
68
69         Object dept = myRedisTemplate.opsForValue().get("dept");
70         System.out.println(dept);
71     }
72
73     @Test
74     void contextLoads4() {
75         Department deptartment = departmentMapper.getDeptById(1);
76
77        // deptRedisTemplate.opsForValue().set("dept",deptartment);
78
79         Department dept = (Department) deptRedisTemplate.opsForValue().get("dept");
80         System.out.println(dept);
81     }
82
83 }
4、RedisCache应用
 1 @Service
 2 public class DeptService {
 3
 4     @Autowired
 5     DepartmentMapper departmentMapper;
 6
 7     @Autowired
 8     RedisCacheManager myRedisCacheManager;
 9
10     /**
11      *  缓存的数据能存入redis;
12      *  第二次从缓存中查询就不能反序列化回来;
13      *  存的是dept的json数据;CacheManager默认使用RedisTemplate<Object, Employee>操作Redis
14      * @param id
15      * @return
16      */
17 //    @Cacheable(cacheNames = "dept",cacheManager = "myRedisCacheManager")
18 //    public Department getDeptById(Integer id){
19 //        System.out.println("查询部门"+id);
20 //        Department department = departmentMapper.getDeptById(id);
21 //        return department;
22 //    }
23
24     // 使用缓存管理器得到缓存,进行api调用
25     public Department getDeptById(Integer id){
26         System.out.println("查询部门"+id);
27         Department department = departmentMapper.getDeptById(id);
28
29         //获取某个缓存
30         Cache deptcache = myRedisCacheManager.getCache("dept");
31         deptcache.put("1",department);
32         return department;
33     }
34 }

 浙公网安备 33010602011771号