

一、概述
本文首先描述了一个可以实际测试运行的简单驱动实例,然后由此去讨论Linux下驱动模板的要素,以及Linux上应用程序到驱动的执行过程。这个简单的驱动实例运行直接运行在开发板Linux系统上。
测试环境: TQ2440开发板+Linux2.6.30.4。
二、驱动程序实例
1、编写驱动文件EmbedSky_hello.c
#include <linux/miscdevice.h>
#include <linux/delay.h>
#include <asm/irq.h>
#include <mach/regs-gpio.h>
#include <mach/hardware.h>
#include <linux/kernel.h>
#include <linux/module.h>
#include <linux/init.h>
#include <linux/mm.h>
#include <linux/fs.h>
#include <linux/types.h>
#include <linux/delay.h>
#include <linux/moduleparam.h>
#include <linux/slab.h>
#include <linux/errno.h>
#include <linux/ioctl.h>
#include <linux/cdev.h>
#include <linux/string.h>
#include <linux/list.h>
#include <linux/pci.h>
#include <asm/uaccess.h>
#include <asm/atomic.h>
#include <asm/unistd.h>

#define    HELLO_MAJOR     231
#define    DEVICE_NAME     "HelloModule"

static int hello_open(struct inode *inode, struct file *file)
{
    printk("<1>hello open.\n");
    return 0;
}

static int hello_write(struct file *file, const char __user * buf, size_t count, loff_t *ppos){
    printk("<1>hello write.\n");
    return 0;
}

static struct file_operations hello_flops = {
    .owner  =   THIS_MODULE,
    .open   =   hello_open,
    .write  =   hello_write,
};

static int __init EmbedSky_hello_init(void)
{
    int ret;

    ret = register_chrdev(HELLO_MAJOR, DEVICE_NAME, &hello_flops);
    if (ret < 0)
    {
      printk("<1>"DEVICE_NAME " can't register major number.\n");
      return ret;
    }
    printk("<1>"DEVICE_NAME " initialized.\n");

    return 0;
}

static void __exit EmbedSky_hello_exit(void)
{
    unregister_chrdev(HELLO_MAJOR, DEVICE_NAME);
    printk("<1>"DEVICE_NAME " removed.\n");
}

module_init(EmbedSky_hello_init);
module_exit(EmbedSky_hello_exit);

MODULE_LICENSE("GPL");
MODULE_AUTHOR("www.embedsky.net");
MODULE_DESCRIPTION("SKY2440/TQ2440 Board First module test");
2、编写驱动Makefile文件
KERN_DIR = /opt/EmbedSky/linux-2.6.30.4

all:
    make -C $(KERN_DIR) M=`pwd` modules

clean:
    make -C $(KERN_DIR) M=`pwd` modules clean
    rm -rf modules.order

obj-m    += EmbedSky_hello.o
3、编写测试驱动的应用代码hellotest.c
#include <fcntl.h>
#include <stdio.h>

int main(void)
{
    int fd;
    int val = 1;
    fd = open("/dev/hellodev", O_RDWR);
    if(fd < 0){
        printf("can't open!\n");
    }
    write(fd, &val, 4);
    return 0;
}
三、驱动实例测试
1、编译驱动前说明
驱动文件所在的目录不是Linux内核源码的子目录。
驱动文件所在目录为“opt/EmbedSky/work/EmbedSky_hello”。
Linux内核源码所在目录为“/opt/EmbedSky/linux-2.6.30.4”。
2、在Ubuntu下编译驱动
注意在编译驱动之前要先编译Linux内核镜像,否则驱动编译不通过。
#cd /opt/EmbedSky/work/EmbedSky_hello
#make
3、在Ubuntu下拷贝驱动到开发板库
#cd /opt/EmbedSky/root_nfs/lib
#cp /opt/EmbedSky/work/EmbedSky_hello/EmbedSky_hello.ko ./
说明:开发板使用nfs网络系统启动,使用Ubuntu共享的根文件系统所在目录为“/opt/EmbedSky/root_nfs“。
4、在开发板安装驱动
#insmode EmbedSky_hello.ko
结果截图:
![]()
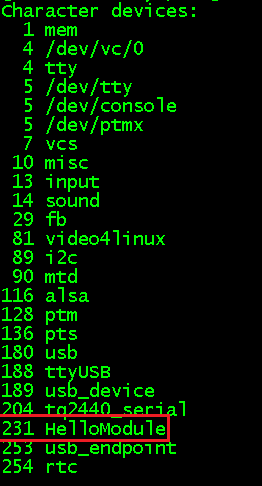
5、查看驱动注册信息
#cat /proc/devices
结果截图:
6、在Ubuntu下编译上层应用测试程序
#arm-linux-gcc hellotest.c -o hellotest
通过这条命令,就能编译出一个上层应用hellotest。
7、在Ubuntu下拷贝上层应用测试程序到开发板
#cd /opt/EmbedSky/root_nfs/usr/bin
#cp /opt/EmbedSky/work/EmbedSky_hello/hellotest ./
8、在开发板Linux系统上创建设备节点
#mknod /dev/hellodev c 231 0
9、执行测试代码
#cd /usr/bin
#./hellotest
结果如下:
![]()
四、驱动模板
从宏观上把握了驱动程序的框架,然后再从细节上完善驱动的功能,这是开发驱动程序的一般步骤。驱动模板必备要素有头文件、初始化函数、退出函数、版权信息,常用的扩展要素是增加一些功能函数完善底层驱动的功能。
1、头文件
#include <linux/module.h>
#include <linux/kernel.h>
#include <linux/fs.h>
#include <linux/init.h>
#include <linux/delay.h>
init.h 定义了驱动的初始化和退出相关的函数
kernel.h 定义了经常用到的函数原型及宏定义
module.h 定义了内核模块相关的函数、变量及宏
2、初始化函数
static int __init hello_init(void){
    int ret;
    ret = register_chrdev(HELLO_MAJOR,DEVICE_NAME,&hello_flops);
    if (ret < 0) {
          printk(KERN_EMERG DEVICE_NAME " can't register major number.\n");
          return ret;
    }
    printk(KERN_EMERG DEVICE_NAME " initialized.\n");
    return 0;
}
module_init(hello_init);
当加载驱动到内核的时候,这个初始化函数就会被自动执行。
初始化函数顾名思义是用来初始化模块的,常用的功能是通过register_chrdev来注册函数。内核分配了一块内存(数组)专门用来存放字符设备的函数集,register_chrdev函数会在这个数组的HELLO_MAJOR位置将hello_flops中的内容进行填充,也就是将HelloModule的功能函数地址注册到设备管理内存集中。
形象的比喻好像是操作系统提供了很多的衣服架,注册设备就好像是把一个衣服挂到某一个衣服架上。衣服上有许多口袋,就好像每一个模块有许多功能程序接口。显然,如果想使用设备的某个功能,就可以先找到对应的衣服架,然后找到相应的口袋,去调用对应的函数,执行动作。

3、退出函数
static void __exit hello_exit(void){
    unregister_chrdev(HELLO_MAJOR, DEVICE_NAME);
    printk(KERN_EMERG DEVICE_NAME " removed.\n");
}
module_exit(hello_exit);
当卸载驱动的时候,退出函数便会自动执行,完成一些列清楚工作。
在加载驱动的时候,我们向设备管理内存集中注册了该模块的相关功能函数。当卸载驱动的时候,就有必要将这个模块占用的内存空间清空。这样当其他的设备注册的时候便有更多的空间可以选择。
形象的比喻是, 当卸载驱动的时候,就是把衣服从衣服架上取下来,这样衣服架就腾空了。
4、版权信息
MODULE_LICENSE("GPL");
Linux内核是按照GPL发布的,同样Linux的驱动程序也要提供版权信息,否则当加载到内核中系统会给出警告信息。
5、功能函数
static int hello_open(struct inode *inode, struct file *file){
    printk(KERN_EMERG "hello open.\n");
    return 0;
}

static int hello_write(struct file *file, const char __user * buf, size_t count, loff_t *ppos){
    printk(KERN_EMERG "hello write.\n");
    return 0;
}

static struct file_operations hello_flops = {
    .owner  =   THIS_MODULE,
    .open   =   hello_open,
    .write  =   hello_write,
};
  功能函数虽然不是一个驱动模板所必须的,但是一个有实际意义的驱动程序一定包含功能函数。功能函数实际上定义了这个驱动程序为用户提供了哪些功能,也就是用户可以对一个硬件设备可以进行哪些操作。
  常见的功能函数有xxx_open()、xxx_write()、xxx_read()、xxx_ioctl()、xxx_llseek()等。当上层应用调用open()、write()、read()、ioctl()、llseek()等这些函数的时候,经过层层调用最后到达底层,调用相应的功能函数。结构体file_operations中的成员定义了很多函数,实际应用可以只对其部分成员赋值,其定义如下。
struct file_operations {
    struct module *owner;
    loff_t (*llseek) (struct file *, loff_t, int);
    ssize_t (*read) (struct file *, char __user *, size_t, loff_t *);
    ssize_t (*write) (struct file *, const char __user *, size_t, loff_t *);
    ssize_t (*aio_read) (struct kiocb *, const struct iovec *, unsigned long, loff_t);
    ssize_t (*aio_write) (struct kiocb *, const struct iovec *, unsigned long, loff_t);
    int (*readdir) (struct file *, void *, filldir_t);
    unsigned int (*poll) (struct file *, struct poll_table_struct *);
    int (*ioctl) (struct inode *, struct file *, unsigned int, unsigned long);
    long (*unlocked_ioctl) (struct file *, unsigned int, unsigned long);
    long (*compat_ioctl) (struct file *, unsigned int, unsigned long);
    int (*mmap) (struct file *, struct vm_area_struct *);
    int (*open) (struct inode *, struct file *);
    int (*flush) (struct file *, fl_owner_t id);
    int (*release) (struct inode *, struct file *);
    int (*fsync) (struct file *, struct dentry *, int datasync);
    int (*aio_fsync) (struct kiocb *, int datasync);
    int (*fasync) (int, struct file *, int);
    int (*lock) (struct file *, int, struct file_lock *);
    ssize_t (*sendpage) (struct file *, struct page *, int, size_t, loff_t *, int);
    unsigned long (*get_unmapped_area)(struct file *, unsigned long, unsigned long, unsigned long, unsigned long);
    int (*check_flags)(int);
    int (*flock) (struct file *, int, struct file_lock *);
    ssize_t (*splice_write)(struct pipe_inode_info *, struct file *, loff_t *, size_t, unsigned int);
    ssize_t (*splice_read)(struct file *, loff_t *, struct pipe_inode_info *, size_t, unsigned int);
    int (*setlease)(struct file *, long, struct file_lock **);
};
五、从上层应用到底层驱动的执行过程
1、Linux系统的分层结构

Linux系统的分层结构为:应用层 ----> 库 ----> 内核 ----> 驱动程序 ----> 硬件设备。
2、从上层应用到底层驱动的执行过程
以“open("/dev/hellodev", O_RDWR)”函数的执行过程为例来说明。
(1)应用程序使用库提供的open函数打开代表hellodev的设备文件。
(2)库根据open函数传入的参数执行swi指令,这条指令会引起CPU异常,从而进入内核。
(3)内核的异常处理函数根据这些参数找到相应的驱动程序。
(4)执行相应的驱动程序。
(5)返回一个文件句柄给库,进而返回给应用程序。
3、驱动程序的执行特点
与应用程序不同,驱动程序从不主动运行,它是被动的:根据应用程序的要求进行初始化,根据应用程序的要求进行读写。驱动程序加载进内核,只是告诉内核“我在这里,我能做这些工作”,至于这些工作何时开始,则取决于应用程序。
驱动程序运行于“内核空间”,它是系统“信任”的一部分,驱动程序的错误有可能导致整个系统的崩溃。
参考资料:
《嵌入式Linux应用开发完全手册》

 浙公网安备 33010602011771号