Python测试框架pytest(18)命令行参数
命令行参数执行是根据命令行选项将不同的值传递给测试函数的方式执行。
1、parser.addoption()添加参数
parser.addoption() 方法用来添加命令行参数
1.1、conftest配置参数
1、在conftest.py文件添加命令行选项,自定义命令行传入参数"--opt", 如果测试用例需要用到,从命令行传入参数,就调用opt函数。
脚本代码:
#!/usr/bin/env python
# -*- coding: utf-8 -*-
"""
微信公众号:AllTests软件测试
"""

import pytest

def pytest_addoption(parser):
    parser.addoption(
        "--opt", action="store", default="type1", help="选择类型: type1 或 type2"
    )

@pytest.fixture
def opt(request):
    return request.config.getoption("--opt")
2、创建测试用例test_command.py文件
脚本代码:
#!/usr/bin/env python
# -*- coding: utf-8 -*-
"""
微信公众号:AllTests软件测试
"""

import pytest

def test_case(opt):
    if opt == "type1":
        print("选择类型: type1")
    elif opt == "type2":
        print("选择类型: type2")
    assert 0

if __name__ == "__main__":
    pytest.main(["-s", "test_command.py"])
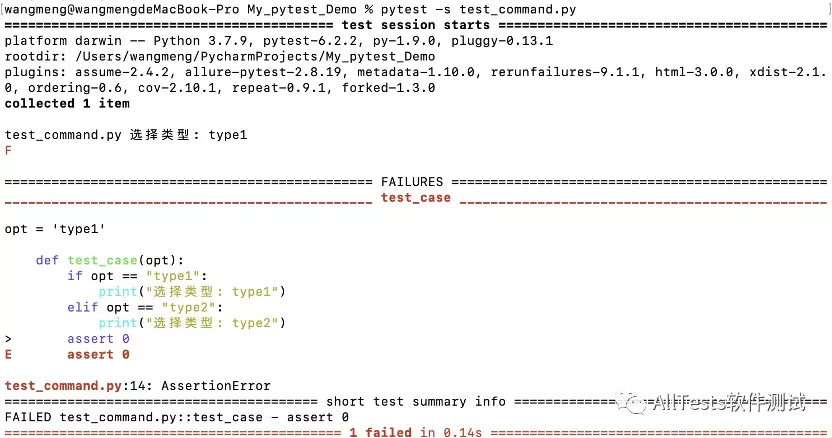
3、打开命令行,执行命令:
pytest -s test_command.py
4、运行结果:测试用例调用conftest配置参数
1.2、带参数启动
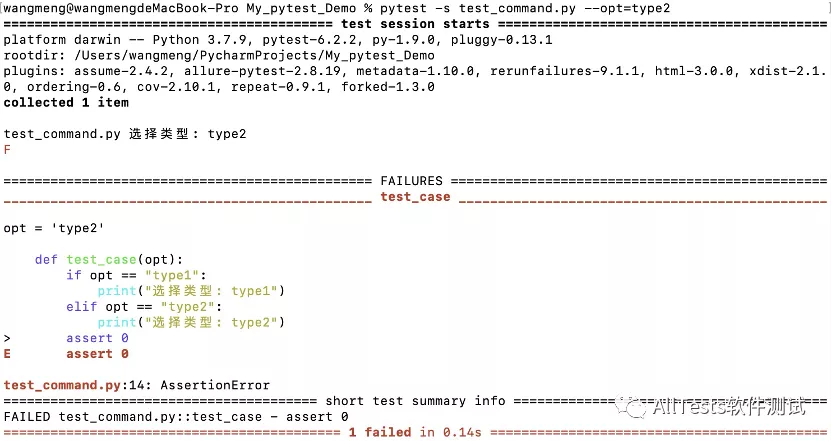
如果不带参数执行,那么传默认的default="type1",接下来在命令行带上参数"--opt=type2"去执行。
打开命令行,执行命令:
pytest -s test_command.py --opt=type2
或者:
pytest -s test_command.py --opt type2
运行结果:
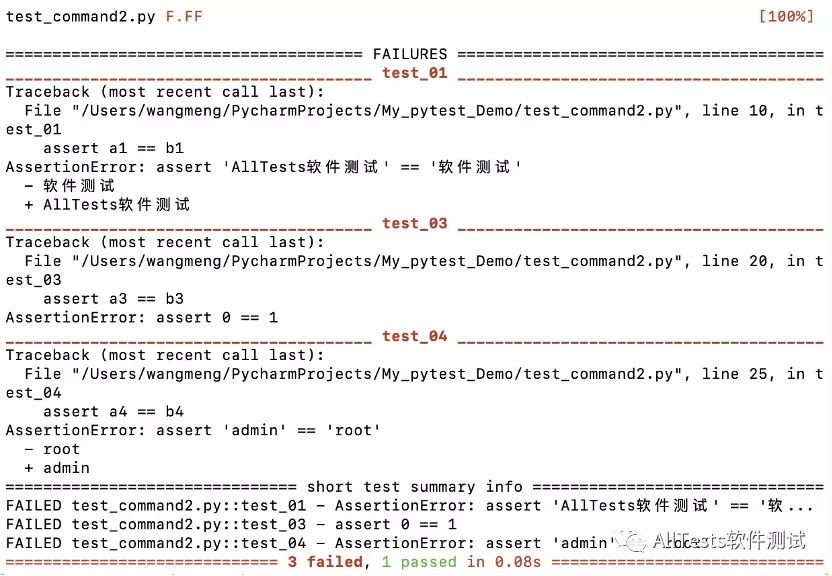
2、--tb
pytest 使用命令行执行用例时,如果用例失败,控制台会打印一堆的报错信息,不方便快速查看是哪些用例执行失败。
命令行参数 --tb=style,可以设置用例报错的时候回溯打印的内容。
style 的值可以设置的打印模式:auto、long、short、line、native、no
1、创建test_command2.py文件
脚本代码:
#!/usr/bin/env python
# -*- coding: utf-8 -*-
"""
微信公众号:AllTests软件测试
"""

def test_01():
    a1 = "AllTests软件测试"
    b1 = "软件测试"
    assert a1 == b1

def test_02():
    a2 = 1
    b2 = 1
    assert a2 == b2

def test_03():
    a3 = 0
    b3 = 1
    assert a3 == b3

def test_04():
    a4 = "admin"
    b4 = "root"
    assert a4 == b4
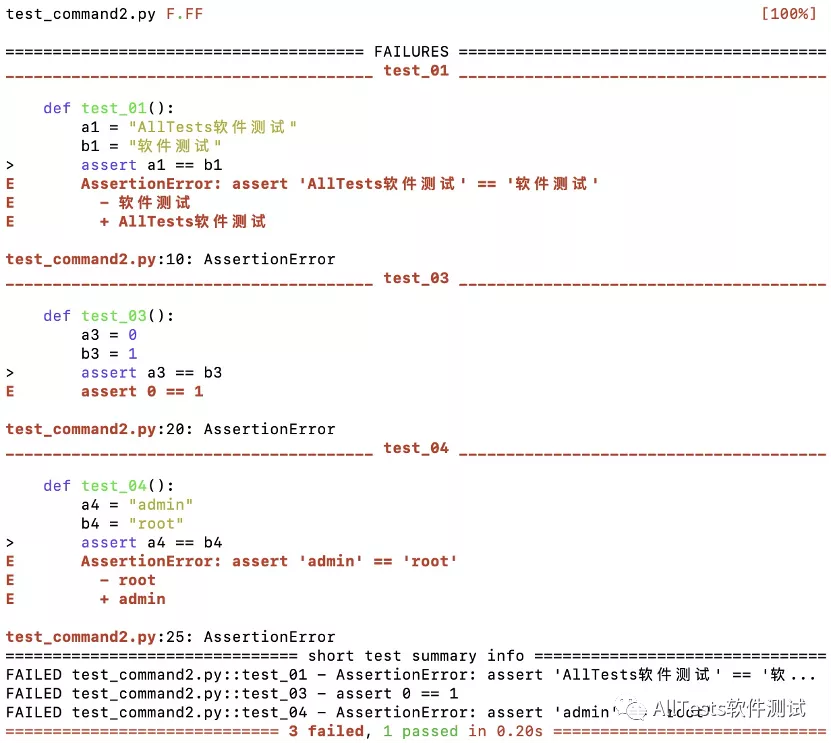
2、打开命令行,执行命令:
pytest test_command2.py
运行结果:
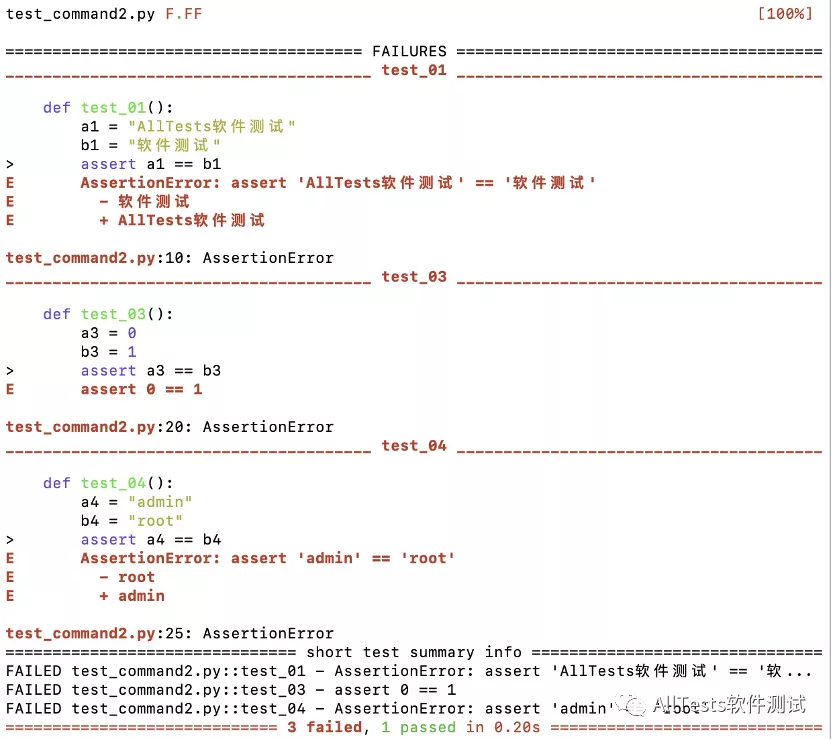
2.1、--tb=auto
auto 模式,打印所有失败用例的回溯信息。
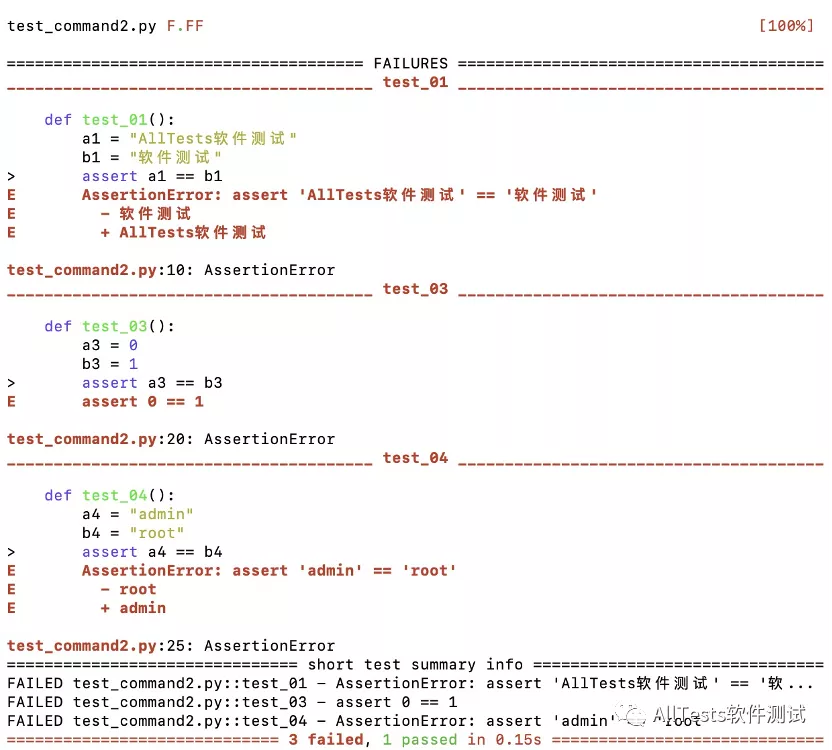
打开命令行,执行命令:
pytest test_command2.py --tb=auto
运行结果:
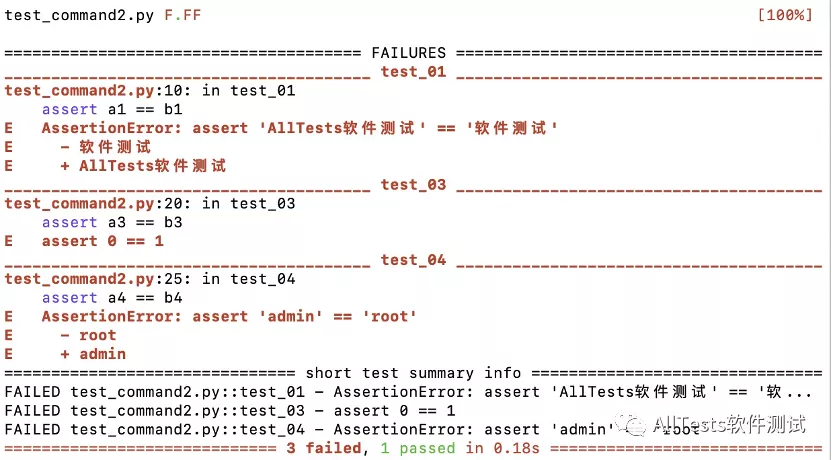
2.2、--tb=long
long 模式,打印所有失败用例最详细的回溯信息。
打开命令行,执行命令:
pytest test_command2.py --tb=long
运行结果:
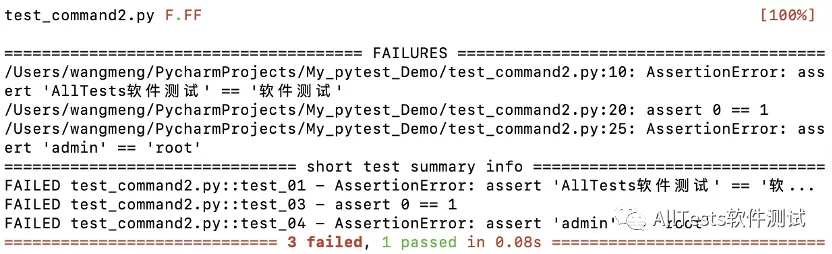
2.3、--tb=short
short 模式,打印失败用例的断言部分回溯信息。
打开命令行,执行命令:
pytest test_command2.py --tb=short
运行结果:
2.4、--tb=line
line 模式,失败用例显示一行失败信息。
打开命令行,执行命令:
pytest test_command2.py --tb=line
运行结果:
2.5、--tb=native
native 模式,介于 short 和 line 模式显示信息。
打开命令行,执行命令:
pytest test_command2.py --tb=native
运行结果:
2.6、--tb=no
no 模式,不打印回溯信息。
打开命令行,执行命令:
pytest test_command2.py --tb=no
运行结果:

3、--durations
当很多用例执行的时候,总有一些用例执行的很慢,要想找出哪些用例执行的慢,可以用命令行参数 --durations=N,显示N个最慢的设置/测试持续时间(N=0表示所有)。
创建test_command3.py文件
编写4个测试用例,每个用例里加不同的sleep等待时间。
脚本代码:
#!/usr/bin/env python
# -*- coding: utf-8 -*-
"""
微信公众号:AllTests软件测试
"""

import pytest
import time

@pytest.fixture()
def my_fixture():
    time.sleep(0.1)
    yield
    time.sleep(0.2)

def test_case01(my_fixture):
    print("执行用例1")
    time.sleep(1.0)

def test_case02(my_fixture):
    print("执行用例2")
    time.sleep(0.5)

def test_case03(my_fixture):
    print("执行用例3")
    time.sleep(1.1)

def test_case04(my_fixture):
    print("执行用例4")
    time.sleep(0.8)
1、命令行参数为 --durations=0
打开命令行,执行命令:
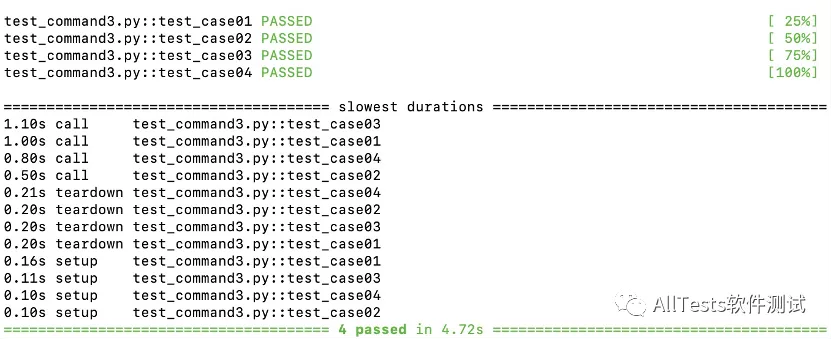
pytest -v test_command3.py --durations=0
运行结果:
当N=0表示显示所有测试用例的运行时间
用例运行的3个阶段:
setup(用例的fixture)->call(测试用例)->teardown(用例的fixture)
2、命令行参数为 --durations=2
打开命令行,执行命令:
pytest -v test_command3.py --durations=2
运行结果:
只筛选出最慢的2条测试用例

4、--setup-show
默认情况下,命令行执行 pytest 用例时,是看不到 fixture 的执行过程的。
如果想查看 fixture 的执行信息,可使用命令行参数 --setup-show,设置在执行测试时显示 fixture 的执行过程。
1、创建test_command4.py文件
脚本代码:
#!/usr/bin/env python
# -*- coding: utf-8 -*-
"""
微信公众号:AllTests软件测试
"""

import pytest

@pytest.fixture()
def my_fixture():
    print("前置操作")
    yield
    print("后置操作")

def test_case01(my_fixture):
    print("执行用例1")
    assert 1 == 1

def test_case02(my_fixture):
    print("执行用例2")
    assert 1 == 1
2、默认执行
打开命令行,执行命令:
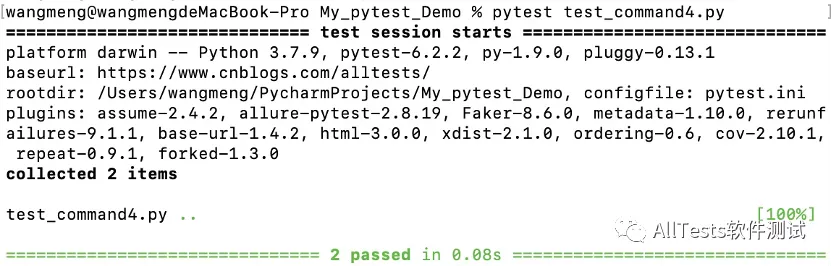
pytest test_command4.py
运行结果:
只显示执行用例的结果
3、使用命令行参数 --setup-show
打开命令行,执行命令:
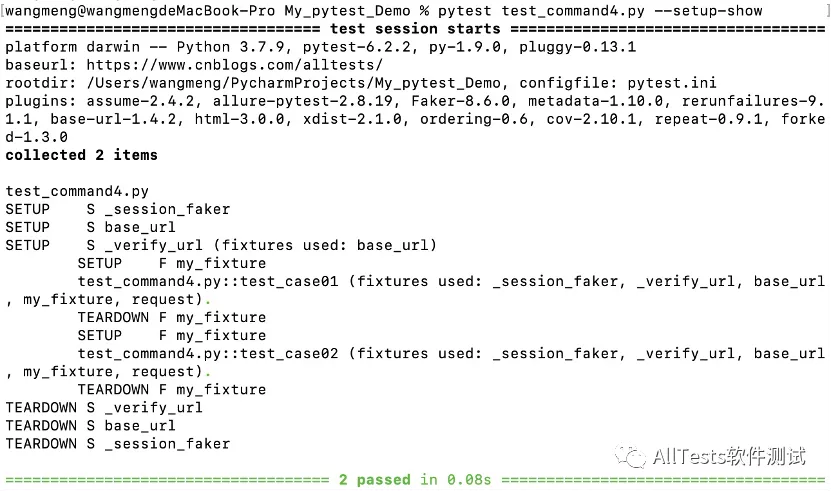
pytest test_command4.py --setup-show
运行结果:
可以清楚的看到除了执行的用例信息,还有所调用的 fixture(调用脚本里的my_fixture)。

本文来自博客园,作者:AllTests软件测试,转载请注明原文链接:https://www.cnblogs.com/alltests/p/15465584.html

 浙公网安备 33010602011771号