使用EasyExcel制作超复杂表格
项目上有个需求就是要制作特别复杂的表格,看了下肯定是不能用模板生成的,每一行每一列都得动态计算,耗时大半个月各种查资料终于完成,现在分享一下心得
对于这种表格的制作,我是分为三部分写的
我们先来看最终生成表单的代码
 writeSheet = EasyExcel.writerSheet(testStage).head(header).registerWriteHandler(new CustomCellStyleStrategy(cellRangeAddressList)).build();
   excelWriter.write(body, writeSheet);
在这个里面,我们生成的表单一共需要四个参数:
- 第一个是
testStage,这个是我的当前sheet的名称 - 第二个是
header这个是Excel的表头,这是个(List<List<String>>类型的数据,内层List是列,外层List就是把列组合在一起 - 第三个是
registerWriteHandler这个是对excel的样式处理的一个类,我定义了一个CustomCellStyleStrategy()的类并且传入了
一个cellRangeAddressList的集合,这个CustomCellStyleStrategy是单元格处理器,我们要对单元格样式的处理,包括单元格合
并的操作都写在这里。而cellRangeAddressList储存的是需要合并的单元格的List集合。
cellRangeAddressList中是的元素是CellRangeAddress,是单元格合并的类
if (flag&&lastCol<9){
     if (firstCol<lastCol-1){
          CellRangeAddress cellAddresses = new CellRangeAddress(firstRow, lastRow, firstCol, lastCol-1);
          CellRangeAddress cellAddresses1 = new CellRangeAddress(firstRow + 4, lastRow + 4, firstCol, lastCol-1);
          CellRangeAddress cellAddresses2 = new CellRangeAddress(firstRow + 5, lastRow + 5, firstCol, lastCol-1);
          cellRangeAddressList.addAll(Arrays.asList(cellAddresses, cellAddresses1, cellAddresses2));
      }
}
CellRangeAddress接收四个参数分别是int firstRow int lastRow int firstCol int lastCol分别含义是合并单元格的第一行,最后一行
第一列和最后一列
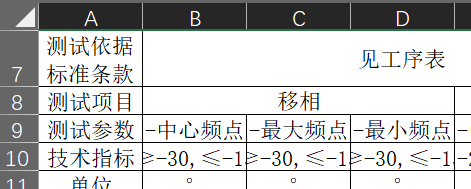
以上图为例”移相“这个单元格占了第8行和B,C,D列,那么就是
new CellRangeAddress(7,7,1,3)单元格下标是从0开始计位。
重点说一下registerWriteHandler,因为复杂单元格的表头和数据,都是自己拼凑的,直接放进去这个没有多说的。我们来看看registerWriteHandler的用法:
@Slf4j
public class CustomCellStyleStrategy extends AbstractVerticalCellStyleStrategy {

    private List<CellRangeAddress> cellRangeAddressList;
    public CustomCellStyleStrategy(List<CellRangeAddress> cellRangeAddressList) {
        this.cellRangeAddressList=cellRangeAddressList;
    }

    @Override
    protected WriteCellStyle headCellStyle(Head head) {

        // 获取样式实例
        WriteCellStyle headWriteCellStyle = new WriteCellStyle();
        // 获取字体实例
        WriteFont headWriteFont = new WriteFont();
        // 设置字体样式
        headWriteFont.setFontName("宋体");
        headWriteFont.setBold(false);
        // 设置字体大小
        headWriteFont.setFontHeightInPoints((short)11);
        headWriteCellStyle.setWriteFont(headWriteFont);
        headWriteCellStyle.setFillForegroundColor(IndexedColors.WHITE.getIndex());
        return headWriteCellStyle;
    }

    @Override
    protected void setContentCellStyle(CellWriteHandlerContext context) {
        Workbook workbook = context.getWriteSheetHolder().getSheet().getWorkbook();
        // 创建一个自定义的CellStyle
        CellStyle cellStyle = workbook.createCellStyle();
        Cell cell = context.getCell();
        String cellValue = cell.toString(); // 获取单元格文本内容
        // 设置字体
        Font font = workbook.createFont();
        font.setFontName("宋体");  // 设置字体为宋体
        font.setFontHeightInPoints((short) 11);// 设置字体大小为11
        if (cellValue.toLowerCase().contains("@red@")) {
            font.setColor(IndexedColors.RED.getIndex()); // 设置字体颜色为红色
            // 删除 "red"(忽略大小写)
            cellValue = cellValue.replaceAll("(?i)@red@", ""); // (?i) 表示忽略大小写
            cell.setCellValue(cellValue.trim());
        }
        cellStyle.setFont(font);
        //设置边框
        // 设置边框
        cellStyle.setBorderTop(BorderStyle.THIN);
        cellStyle.setBorderBottom(BorderStyle.THIN);
        cellStyle.setBorderLeft(BorderStyle.THIN);
        cellStyle.setBorderRight(BorderStyle.THIN);

        // 设置边框颜色
        cellStyle.setTopBorderColor(IndexedColors.BLACK.getIndex());
        cellStyle.setBottomBorderColor(IndexedColors.BLACK.getIndex());
        cellStyle.setLeftBorderColor(IndexedColors.BLACK.getIndex());
        cellStyle.setRightBorderColor(IndexedColors.BLACK.getIndex());

        // 设置背景颜色
        cellStyle.setFillForegroundColor(IndexedColors.WHITE.getIndex());
        cellStyle.setFillPattern(FillPatternType.SOLID_FOREGROUND);
        cellStyle.setAlignment(HorizontalAlignment.CENTER);  // 设置水平居中
        cellStyle.setVerticalAlignment(VerticalAlignment.CENTER);  // 设置垂直居中
        cell.setCellStyle(cellStyle);
        context.setCell(cell);
    }

    @Override
    public void afterCellCreate(WriteSheetHolder writeSheetHolder, WriteTableHolder writeTableHolder, Cell cell, Head head, Integer relativeRowIndex, Boolean isHead) {
        //单元格合并
        Sheet sheet = writeSheetHolder.getSheet();
        if (CollectionUtils.isNotEmpty(cellRangeAddressList)){
            for (CellRangeAddress cellRangeAddress : cellRangeAddressList) {
                if (cell.getRowIndex() == cellRangeAddress.getFirstRow() && cell.getColumnIndex() == cellRangeAddress.getFirstColumn()) {
                    // 合并单元格的示例:合并 A1 到 C2
                    sheet.addMergedRegion(cellRangeAddress);
                }
            }
        }
    }
}
我们定义的CustomCellStyleStrategy必须实现AbstractVerticalCellStyleStrategy这个抽象类,然后实现里面的三个方法,分别是:
headCellStyle这个是处理表头的样式setContentCellStyle这个是数据单元格样式的方法(如修改字体大小颜色位置,给单元格加边框等)afterCellCreate这个是在所有单元格创建之后,既单元格数据和样式填充完毕之后执行这个方法,一般用来实现单元格合并
样式可以根据自己的需求进行修改
注意:我们在合并单元格需要注意的问题:已经合并的单元格不能再次进行合并,否则会报错。单元格合并操作至少要横跨两行或者两列。
当sheet处理完成之后,就可以生成excel了excelWriter.finish();
最后:附上所有的Excel类的路径作为参考:
import com.alibaba.excel.EasyExcel;
import com.alibaba.excel.ExcelWriter;
import com.alibaba.excel.write.metadata.WriteSheet;
import com.alibaba.fastjson2.JSON;
import com.alibaba.fastjson2.JSONArray;
import com.alibaba.fastjson2.JSONObject;
import com.ruoyi.common.excel.CustomCellStyleStrategy;
import org.apache.poi.ss.util.CellRangeAddress;

 浙公网安备 33010602011771号